Introduction
In today’s digital age, where staying connected is a necessity, your IP address plays a crucial role in enabling your iPhone to access the internet. Every device connected to a network is assigned a unique IP address, which serves as its online identifier. While most users never have to worry about their IP address, there may be situations where you would want to change it on your iPhone.
Changing your IP address can offer several benefits, such as improving your online privacy and security, bypassing geographic restrictions, accessing blocked websites, or troubleshooting network-related issues. Whether you want to protect your online activities from prying eyes, access region-restricted content, or resolve connectivity problems, knowing how to change your IP address on your iPhone can be a valuable skill.
In this article, we will explore various methods to change your IP address on an iPhone. These methods are simple and can be easily implemented even by users with minimal technical knowledge. From restarting your iPhone to using a VPN (Virtual Private Network) app or contacting your internet service provider, we’ll cover a range of options to help you accomplish your goal. So, without further ado, let’s dive into the methods and learn how to change your IP address on your iPhone.
Why would you want to change your IP address?
There are several reasons why you might want to change your IP address on your iPhone. Let’s take a look at some common scenarios where changing your IP address can be beneficial.
-
Enhancing Privacy and Security: Changing your IP address can help protect your online privacy and increase your security. By using a different IP address, you can prevent websites, advertisers, or malicious entities from tracking your online activities and collecting your personal information. This can be particularly useful when accessing sensitive information or conducting confidential transactions.
-
Bypassing Geographic Restrictions: Some online services and websites may restrict access based on your geographical location. By changing your IP address to one from a different location, you can bypass these restrictions and access content that is otherwise unavailable in your region. It allows you to enjoy streaming services, such as Netflix or Hulu, that may have region-specific libraries.
-
Overcoming Network Connection Issues: In some cases, changing your IP address can help resolve network-related problems. If you’re experiencing slow internet speeds, frequent disconnections, or difficulty accessing certain websites, changing your IP address may provide a fresh connection and resolve any conflicts or issues with your current IP.
-
Protecting Against DDoS Attacks: Distributed Denial of Service (DDoS) attacks are a common threat to online platforms and networks. These attacks overload a server or network with an overwhelming volume of traffic, rendering it inaccessible. By changing your IP address, you can route your internet traffic through a different server, making it more difficult for attackers to target your device directly.
-
By changing your IP address: you can gain a certain level of anonymity while browsing the internet. This can be useful for those who value their privacy and do not want their online activities to be traced back to their actual IP address. Whether you want to protect your identity or simply maintain a low profile while online, changing your IP address can help you achieve that.
By understanding the various reasons for changing your IP address, you can determine which method to use as you proceed to the next section. Whether you’re focused on privacy, accessing restricted content, or addressing network-related issues, knowing how to change your IP address on your iPhone puts you in control of your online experience.
How to change your IP address on iPhone
Now that you understand the importance of changing your IP address, let’s explore the different methods you can use to accomplish this on your iPhone. The following methods are easy to follow and require no technical expertise.
1. Restart your iPhone
One of the simplest ways to change your IP address on an iPhone is by restarting the device. This method is effective in many cases as it resets the network settings, including the IP address assignment. To restart your iPhone, press and hold the power button until you see the “slide to power off” option. Slide it to turn off the device, wait for a few seconds, and then press and hold the power button again until you see the Apple logo. Once your iPhone restarts, it will be assigned a new IP address.
2. Disconnect and reconnect from Wi-Fi
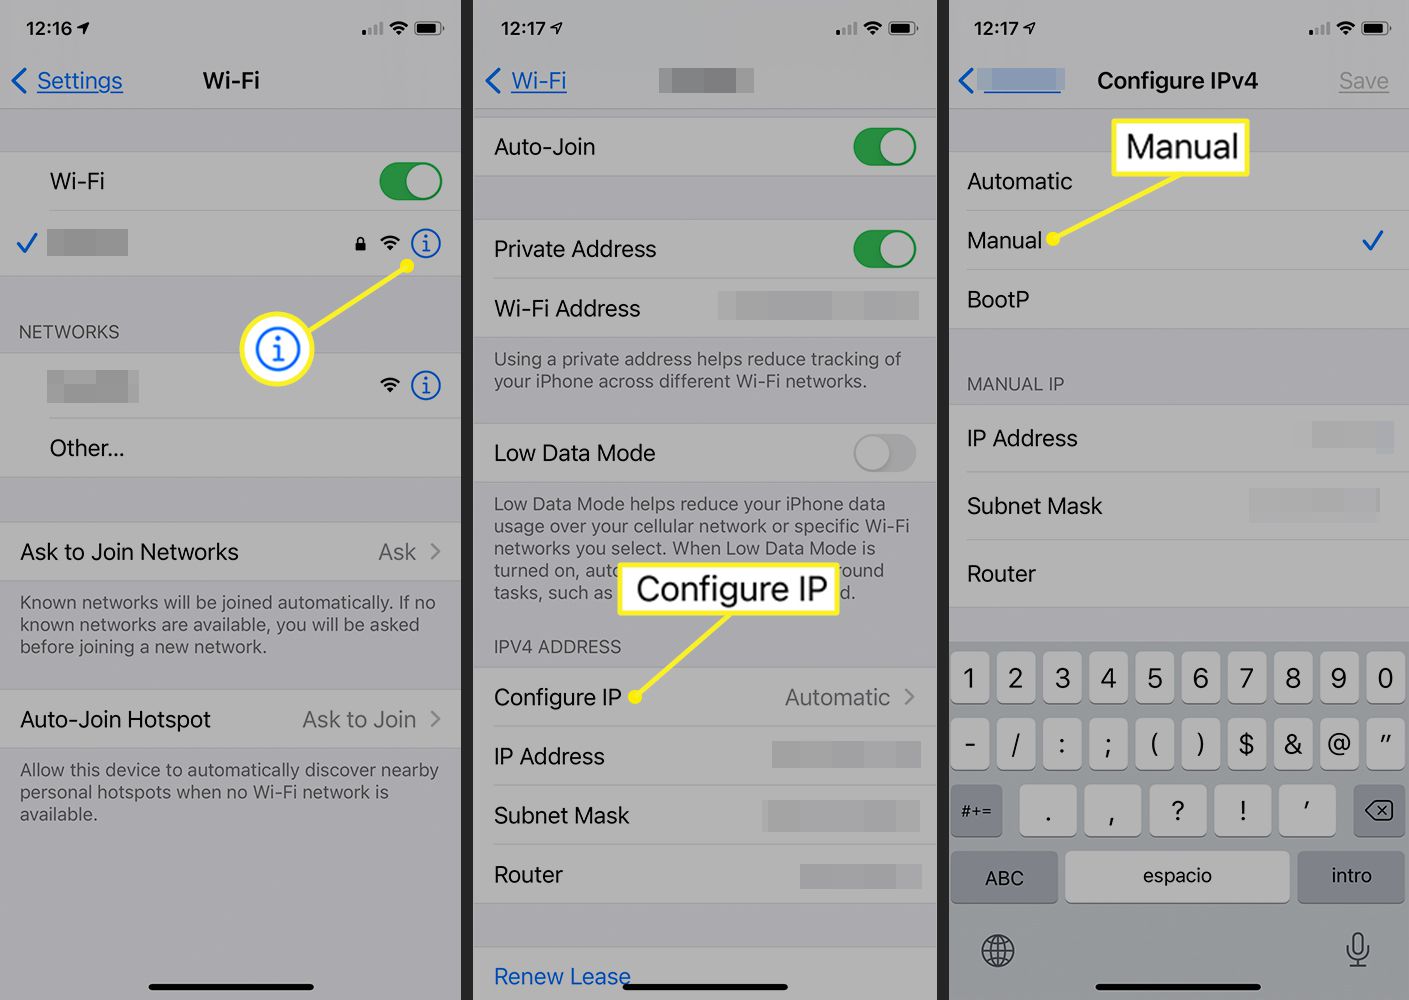
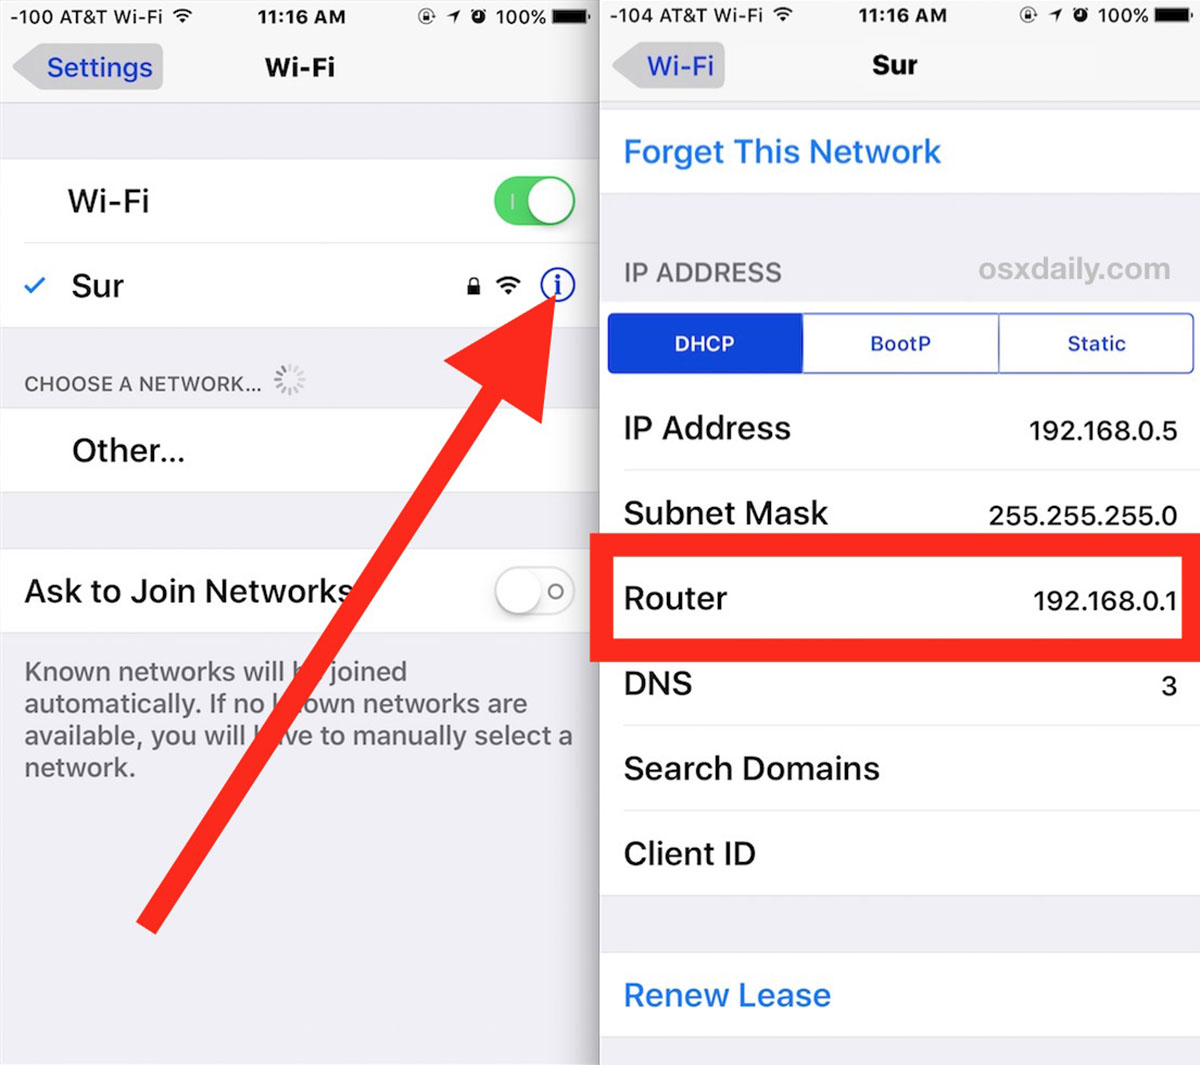
Another method to change your IP address is by disconnecting from the Wi-Fi network and reconnecting. To do this, go to the Settings app on your iPhone and tap on Wi-Fi. Find the Wi-Fi network you are connected to and tap on the (i) icon next to it. Then, tap on “Forget This Network” and confirm the action. After that, reconnect to the same Wi-Fi network by tapping on it again and entering the password if necessary. Your iPhone will obtain a new IP address from the router, effectively changing your IP.
3. Use a VPN app
Using a VPN (Virtual Private Network) app is another effective method to change your IP address on your iPhone. A VPN app creates a secure connection to a remote server and routes your internet traffic through it. This not only changes your IP address but also encrypts your data, enhancing your privacy and security. There are numerous VPN apps available for iOS, such as NordVPN, ExpressVPN, and CyberGhost. Simply download and install a trusted VPN app from the App Store, connect to a server location of your choice, and your IP address will be changed.
4. Reset network settings
If the previous methods did not work, you can try resetting the network settings on your iPhone. Keep in mind that this will reset all network-related settings, including Wi-Fi passwords, so make sure you have them handy before proceeding. To reset network settings, go to the Settings app, tap on General, then scroll down and tap on Reset. From the options available, select “Reset Network Settings” and confirm the action. After your iPhone restarts, your network settings will be restored to default, and your IP address will be changed.
5. Contact your internet service provider (ISP)
If none of the above methods work, or if you require a specific IP address, you can contact your internet service provider (ISP) directly. ISPs have the ability to assign IP addresses to their subscribers, and in some cases, they might be able to manually change your IP address upon request. Contact their customer support and explain your situation, and they should be able to assist you further.
By following these methods, you can easily change your IP address on your iPhone and enjoy the benefits that come with it. Whether you prefer a quick restart, reconnecting to Wi-Fi, using a VPN app, resetting network settings, or reaching out to your ISP, there’s a solution that fits your needs. Stay in control of your online experience and adapt your IP address as necessary.
Method 1: Restart your iPhone
One of the simplest and most straightforward methods to change your IP address on an iPhone is by restarting the device. This method is effective in many cases as it resets the network settings, including the IP address assignment.
To restart your iPhone, follow these steps:
- Press and hold the power button located on the side or top of your iPhone until you see the “slide to power off” option.
- Slide the power button from left to right to turn off your iPhone.
- Wait for a few seconds to ensure the device is completely turned off.
- Press and hold the power button again until the Apple logo appears on the screen.
- Release the power button and wait for your iPhone to restart. This may take a moment.
After your iPhone restarts, it will be assigned a new IP address from your network’s DHCP (Dynamic Host Configuration Protocol) server. This method is particularly useful when you want to quickly obtain a new IP address without making any manual changes to your device’s settings.
It’s important to note that restarting your iPhone may also resolve other network-related issues such as slow internet speeds or connectivity problems. Additionally, it can help refresh the device’s network connections and establish a new connection to your Wi-Fi network, which might improve overall network performance.
However, it’s important to keep in mind that restarting your iPhone will not guarantee a change in IP address if your network’s DHCP server has a long lease time or if your ISP (Internet Service Provider) assigns static IP addresses. In such cases, you may need to try alternative methods or contact your ISP for further assistance.
To conclude, restarting your iPhone is a quick and simple method to change your IP address. By following these steps, you can easily obtain a new IP address and potentially resolve network-related issues. Give it a try whenever you need a fresh connection or want to troubleshoot IP-related problems.
Method 2: Disconnect and reconnect from Wi-Fi
Another method to change your IP address on an iPhone is by disconnecting from the Wi-Fi network and reconnecting. This method is straightforward and can be effective in obtaining a new IP address.
To disconnect and reconnect from Wi-Fi, follow these steps:
- Open the Settings app on your iPhone.
- Tap on Wi-Fi, which is usually located near the top of the Settings menu.
- Find the Wi-Fi network you are currently connected to and tap on the (i) icon next to it. This icon provides more detailed information about the network.
- On the network details page, tap on the “Forget This Network” option. A confirmation pop-up will appear.
- Confirm the action by tapping on “Forget” to disconnect from the network. This will remove the network’s stored settings from your iPhone.
- After disconnecting, go back to the list of available Wi-Fi networks and tap on the same network you previously disconnected from.
- If prompted, enter the password to reconnect to the network.
By disconnecting and reconnecting to the Wi-Fi network, your iPhone will request a new IP address from the network’s DHCP server. In most cases, the server will assign a fresh IP address to your device, effectively changing your IP.
This method is particularly useful when you want to quickly change your IP address without restarting your iPhone or using any additional apps. It can be helpful for troubleshooting connectivity issues, improving network performance, or bypassing certain restrictions that may be associated with your previous IP address.
However, it’s important to note that this method may not always guarantee a change in IP address, especially if your network’s DHCP server has a long lease time. In such cases, you may need to wait for the lease to expire or try alternative methods.
In summary, disconnecting and reconnecting from Wi-Fi is a simple and effective method to change your IP address on an iPhone. By following these steps, you can obtain a new IP address and potentially overcome network-related limitations. Give it a try whenever you need a fresh IP or want to troubleshoot network connectivity issues.
Method 3: Use a VPN app
Using a VPN (Virtual Private Network) app is another effective method to change your IP address on your iPhone. A VPN app creates a secure connection to a remote server and routes your internet traffic through it, which can help you obtain a new IP address and enhance your online privacy and security.
To change your IP address using a VPN app, follow these steps:
- Browse the App Store on your iPhone and search for a reputable VPN app such as NordVPN, ExpressVPN, or CyberGhost.
- Download and install the VPN app of your choice by following the on-screen instructions.
- Once installed, open the VPN app and create an account if required. Most VPN apps offer a free trial or a range of subscription options.
- Follow the prompts within the app to connect to a VPN server. Usually, you can choose from various server locations across different countries.
- Once connected, the VPN app will encrypt your internet traffic and route it through the selected server. Your IP address will be replaced with the IP address of the server you are connected to.
By using a VPN app, you can change your IP address to one associated with the server location you have chosen. This allows you to bypass geographic restrictions and access content that might be blocked in your region. Moreover, a VPN encrypts your data, ensuring your online activities remain private and secure.
It is important to choose a reliable and trustworthy VPN app to ensure the safety of your personal information. Look for VPN providers with strong encryption protocols, a strict no-logs policy, and a wide range of server locations. Additionally, consider the speed and performance of the VPN service to ensure a seamless browsing experience.
Keep in mind that while a VPN app is an effective method to change your IP address, it may require a subscription fee for the full range of features and server options. However, the added benefits of increased privacy, security, and access to geo-restricted content often make it worthwhile.
In summary, using a VPN app is a popular and reliable method to change your IP address on an iPhone. By following these steps and connecting to a VPN server, you can obtain a new IP address, enhance your online privacy, and bypass geographic restrictions. Consider using a trusted VPN app for a seamless and secure browsing experience.
Method 4: Reset network settings
If the previous methods did not work or if you require a more drastic change in your IP address, you can try resetting the network settings on your iPhone. This method will restore all network-related settings on your device to their default configurations, effectively obtaining a new IP address.
To reset network settings on your iPhone, follow these steps:
- Open the Settings app on your iPhone.
- Scroll down and tap on “General.”
- Scroll further down and tap on “Reset.”
- From the options available, tap on “Reset Network Settings.”
- A confirmation pop-up will appear, allowing you to confirm the action. Keep in mind that this will also remove saved Wi-Fi passwords and other network-related settings, so ensure that you have the necessary information to reconnect to your Wi-Fi networks.
- Once confirmed, your iPhone will proceed to reset the network settings. It may take a few moments, and your device will restart.
After the reset, your iPhone’s network settings will be restored to their default state, including the IP address assignment. Your device will now obtain a new IP address when connecting to Wi-Fi networks.
Resetting network settings can be helpful in resolving persistent connectivity issues, such as slow internet speeds or difficulty connecting to certain networks. It is a more comprehensive method that can effectively reset any network-related configurations that might be causing conflicts or issues.
However, keep in mind that resetting network settings will remove any customizations or saved Wi-Fi passwords on your device. You will need to reenter the Wi-Fi passwords and go through the setup process again for any Bluetooth or VPN connections.
It is also worth noting that resetting network settings will not guarantee a change in your IP address if your internet service provider (ISP) assigns static IP addresses or if your network’s DHCP server has a long lease time. In these cases, you may need to contact your ISP for assistance or consider other methods to change your IP address.
To sum up, resetting network settings is a comprehensive method to change your IP address on an iPhone. By following these steps and allowing your device to restore its network settings to default, you can obtain a new IP address and potentially resolve persistent network issues. Use this method cautiously, ensuring you have the necessary information to reconnect to your Wi-Fi networks.
Method 5: Contact your internet service provider (ISP)
If none of the previous methods have successfully changed your IP address, or if you require a specific IP address for a particular purpose, you can consider contacting your internet service provider (ISP) directly. ISPs have the ability to assign IP addresses to their subscribers, and in some cases, they may be able to manually change your IP address upon request.
To change your IP address through your ISP, follow these steps:
- Gather your account information and contact details. This may include your account number, name, and any identification details your ISP may require for verification.
- Call your ISP’s customer support hotline or visit their support website.
- Explain your situation to the support representative or fill out any necessary forms on the website. Clearly state your request to change your IP address and provide a reason if required.
- Follow any instructions or guidelines provided by the support representative or on the website to proceed with the IP change request.
- Depending on your ISP’s policies and processes, they may require some time to process your request. You may be required to restart your modem/router or take other actions for the IP address change to take effect.
By contacting your ISP, you can potentially request a specific IP address or seek assistance in changing your IP address. This is particularly helpful if you need an IP address for a specific purpose, such as accessing specific services or resolving network-related issues.
Keep in mind that ISPs may have limitations and policies regarding IP address changes. They may assign IP addresses dynamically or have a limited pool of available addresses. Additionally, your ISP may charge a fee or have specific requirements for changing IP addresses.
It’s important to note that this method may not be available or viable for all users. Some ISPs do not allow customers to change their IP address manually, while others may charge additional fees for such requests. It is recommended to check with your ISP’s customer support to verify their capabilities and any associated costs before proceeding.
To summarize, contacting your internet service provider (ISP) is an option to explore if you want to change your IP address, especially if you require a specific IP address for a particular purpose. By following these steps and communicating with your ISP’s customer support, you can potentially request an IP address change. Be sure to check your ISP’s policies, any associated fees, and requirements before proceeding.
Conclusion
Changing your IP address on an iPhone can offer various benefits, including enhancing your online privacy and security, accessing region-restricted content, resolving network issues, and more. In this article, we explored five different methods to change your IP address on an iPhone.
Firstly, we discussed the simple method of restarting your iPhone to obtain a new IP address. This method can be effective for quick changes and resolving minor network issues. Next, we explored the option of disconnecting and reconnecting from a Wi-Fi network, which can also result in a new IP address assignment.
We then explored the use of VPN apps, which provide an added layer of security and privacy while allowing you to change your IP address to a different location. VPNs are particularly useful for accessing restricted content and protecting your online activities.
Resetting network settings is another option to consider when you need a more comprehensive change in your IP address and want to resolve persistent network issues. However, it’s important to be aware that this will restore all network-related settings to their default configurations.
Lastly, if the previous methods do not yield the desired results, contacting your internet service provider (ISP) allows you to request a specific IP address or seek their assistance in changing your IP address. Keep in mind that specific requirements and limitations may apply, and there may be associated costs or fees.
In conclusion, with the wide range of methods available, you have the flexibility to change your IP address on your iPhone as needed. Consider the specific reasons for changing your IP address and choose the method that best suits your needs. Whether it’s enhancing your online security, accessing geographically restricted content, or troubleshooting network issues, changing your IP address puts you in control of your online experience.