Introduction
Welcome to the world of server rack cable management. Whether you’re setting up a small home server or managing a large data center, properly organizing and securing your cables is crucial for optimal performance and easy maintenance.
The goal of server rack cable management is to create a clean and organized setup that minimizes cable clutter, reduces the risk of accidental disconnections, and enables efficient troubleshooting. By following a few simple steps, you can ensure that your server rack is not only aesthetically pleasing but also highly functional.
In this article, we will guide you through the process of cable management for your server rack. From planning and organizing cables to selecting the right connectors and securing them in place, we’ll cover everything you need to know to achieve a professionally managed setup.
Proper cable management offers several benefits. Firstly, it improves airflow within the rack, preventing heated air from getting trapped and causing equipment overheating. Secondly, it makes it easier to identify and trace cables, simplifying maintenance and troubleshooting tasks. Lastly, it reduces the risk of accidental cable disconnects, which can lead to data loss or service interruptions.
Whether you’re an experienced IT professional or a beginner venturing into server management for the first time, this guide will provide you with the knowledge and tips you need to cable a server rack effectively. So, let’s dive in and transform your messy cables into a neatly organized infrastructure!
Step 1: Planning Your Server Rack Cable Management
The first step in achieving effective server rack cable management is careful planning. Before diving into the physical installation of your cables, take the time to devise a solid plan that considers all your specific requirements.
Start by assessing the layout of your server rack and identifying the components that will be housed in it. This includes servers, switches, power distribution units (PDUs), and any other networking equipment. Understanding the overall setup will help you determine the optimal cable routing paths.
Next, consider the length of the cables you will need. Measure the distances between components and factor in some extra length to accommodate any future reconfigurations or cable replacements. It’s always better to have a slightly longer cable than a shorter one that leaves you struggling to reach the necessary connections.
An essential aspect of planning is designing cable management pathways within the rack. Take into account any built-in cable management features, such as cable management arms, clips, or hooks. Determine how the cables will be routed from the patch panels to the devices and plan for adequate clearance to avoid tangling or interference with other components.
In addition to the physical layout, consider the organization and labeling of your cables. Decide on a consistent and intuitive labeling system to make it easier to identify and trace cables in the future. Use color-coded labels or tags to differentiate between different types of cables, such as Ethernet, power, or fiber optic.
Another crucial aspect of planning is considering future scalability. Leave some room for additional cables and equipment that may be added later. This will help you avoid cramped spaces and allow for easier maintenance and future expansion.
By carefully planning your server rack cable management, you can ensure a well-organized and efficient setup. Take the time to consider the layout, cable lengths, management pathways, and labeling system. This initial planning stage will set the foundation for a successful cable management implementation in your server rack.
Step 2: Organizing and Labeling Cables
Once you have a solid plan in place for your server rack cable management, the next step is to organize and label your cables. This crucial step will make future maintenance and troubleshooting much easier, saving you time and minimizing the risk of errors.
Begin by grouping cables based on their purpose and destination. Separate power cables, Ethernet cables, fiber optic cables, and any other specific types of cables you may have. This will help minimize confusion and make it easier to trace specific cables when needed.
Consider using cable ties, Velcro straps, or cable management sleeves to bundle and secure cables together. This not only keeps them organized but also ensures they have a neat and tidy appearance within the rack. Be careful not to bundle too many cables tightly together, as this can cause interference or hinder proper airflow.
Labeling is a crucial aspect of cable management. Use labels or tags to identify each cable’s purpose, destination, and any relevant information. This can be as simple as labeling cables with their corresponding port numbers or as detailed as indicating the device or network they connect to. The important thing is to have a clear and consistent labeling system that is easy to understand and follow.
Consider using color-coded labels or tags to distinguish between different cables, such as power, data, or management cables. This can be particularly helpful when dealing with a large number of cables in a complex server environment. Make sure to document the meaning of each color for future reference.
When labeling cables, it’s best to attach the labels close to both ends of the cable. This way, if you need to trace a cable, you can easily identify and follow it from its source to its destination. Additionally, if you have cables connected to patch panels, label both the cable and the corresponding port it is plugged into for easy identification.
By organizing and labeling your cables in a clear and systematic way, you will be able to quickly identify and trace them when needed. This not only simplifies maintenance and troubleshooting but also reduces the risk of making errors or accidentally disconnecting the wrong cable.
Step 3: Selecting the Right Cables and Connectors
Choosing the right cables and connectors is crucial for ensuring reliable and efficient connectivity within your server rack. By selecting the appropriate cables and connectors for your specific needs, you can minimize potential issues and optimize performance.
First and foremost, consider the type of connections you need to make. Ethernet cables are commonly used for network connections, while power cables are essential for delivering power to devices. Fiber optic cables are utilized for high-speed data transmission over long distances. Understand the requirements of your setup and select cables accordingly.
Ensure that the cables you choose are of the proper category and meet the necessary standards. For Ethernet connections, Cat 5e, Cat 6, or Cat 6a cables are commonly used, depending on the required bandwidth and speed. For power cables, make sure they have the appropriate rating for the equipment you are connecting.
When it comes to connectors, ensure compatibility with the devices you will be connecting. For Ethernet cables, RJ-45 connectors are commonly used. Make sure they are properly crimped and provide a secure connection. For fiber optic cables, connectors such as LC, SC, or ST are commonly used. Consider the type of connector required by your devices and choose accordingly.
Pay attention to the length of cables you select. Measure the distance between devices accurately and choose cables that are long enough to comfortably reach the intended connections. It is better to have a slightly longer cable than one that is too short and strains the connection or limits flexibility.
Consider the quality of the cables and connectors you choose. Investing in high-quality cables and connectors can prevent signal loss, improve data transmission speeds, and increase overall reliability. Choose cables and connectors from reputable manufacturers for the best performance.
Lastly, consider future scalability and potential upgrades. Opt for cables and connectors that allow for future expansions or changes in your server rack setup. This will save you from having to replace cables or connectors in the future.
By selecting the right cables and connectors for your server rack, you ensure optimal connectivity and minimize compatibility issues. Consider the type of connections, choose cables of appropriate category and length, and ensure compatibility with the devices being connected. Investing in quality cables and connectors will contribute to the overall efficiency and reliability of your server rack setup.
Step 4: Routing and Bundling Cables
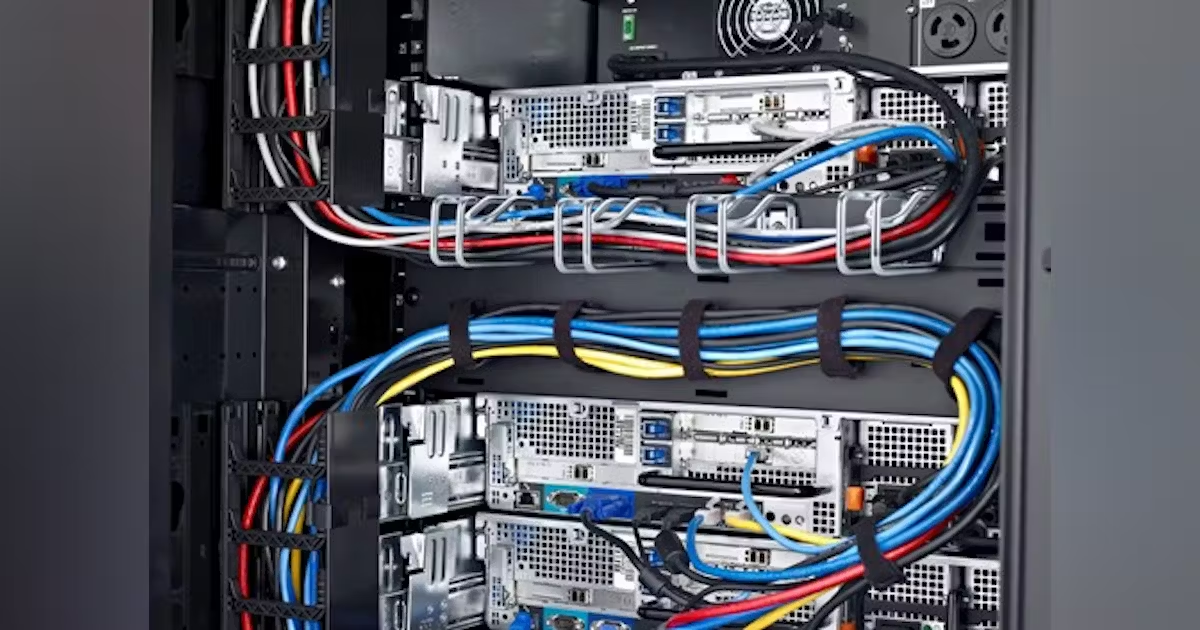
When it comes to server rack cable management, proper routing and bundling of cables is essential for maintaining an organized and efficient setup. By carefully routing and bundling your cables, you can minimize clutter, improve airflow, and make future maintenance much easier.
Start by identifying the optimal routing paths for your cables. Consider the locations of your devices within the rack and plan the most direct and efficient routes for each cable. Avoid crossing cables or creating unnecessary loops that can lead to interference or confusion.
Take advantage of any built-in cable management features within your server rack, such as cable management arms, clips, or hooks. Utilize these to guide and secure your cables along their designated routes. This helps prevent cables from hanging loose or getting tangled, ensuring a neat and organized appearance.
Ensure proper clearance between cables and other components to avoid any potential obstructions or interference. Leave enough space for maneuverability when connecting or disconnecting cables, as well as for future maintenance tasks.
Bundling cables together is an effective way to keep them organized and prevent them from becoming tangled or obstructing airflow. Use cable ties, Velcro straps, or cable management sleeves to secure cables into bundles. Be mindful not to bundle too many cables tightly together, as this can cause signal interference or obstruct airflow within the rack.
Separate different types of cables into distinct bundles, such as power cables, Ethernet cables, or fiber optic cables. This makes it easier to identify and trace specific cables when needed. Consider using color-coded cable ties or labels to further differentiate between different types of cables.
Carefully label each bundle of cables to indicate their purpose or destination. This ensures easy identification and simplifies troubleshooting in the future. Label both ends of the bundle to facilitate tracing from the source to the destination device.
Take the time to organize and arrange your cables neatly within the rack. Use cable management clips or hooks to secure them along the rack edges or vertical rails. This prevents cables from dangling or obstructing other components, such as exhaust fans or equipment ventilation.
By routing and bundling your cables effectively, you create a cleaner and more organized server rack setup. Proper cable routing reduces the chances of cable damage or accidental disconnections. Bundling cables together creates a neater appearance and improves airflow within the rack, preventing equipment overheating.
Step 5: Managing Power Cables
Managing power cables in your server rack is a critical aspect of cable management. Properly organizing and managing these cables ensures safe and reliable power delivery to your devices and minimizes the risk of power-related issues.
Start by identifying and separating the power cables from other types of cables in your server rack. Power cables have specific requirements and considerations that differ from data cables. By keeping them separate, you can focus on managing them effectively.
One important consideration is the length of the power cables. Ensure that they are long enough to reach the power outlets while allowing for some flexibility. Avoid excessive slack, as this can cause cable entanglement or interfere with cooling mechanisms within the rack.
Consider using power distribution units (PDUs) to manage power distribution in your server rack. PDUs provide multiple power outlets in a compact form factor and can be mounted within the rack. This avoids the need for individual power strips and helps streamline cable management.
Label your power cables to indicate the devices they are connected to or the specific power outlet they are plugged into. This makes it easier to identify and trace power connections, especially when troubleshooting or performing maintenance tasks.
Avoid overloading power outlets or PDUs by distributing the power load evenly. Check the power rating of your equipment and ensure that the total power draw is within the capacity of the power source. Overloading power outlets can lead to electrical hazards and equipment malfunctions.
Create separate power cable bundles or channels to keep power cables organized and distinguish them from other types of cables. Use cable ties or Velcro straps to secure the power cable bundles, ensuring they are neatly arranged and not obstructing airflow or other components.
Consider using power cable management accessories, such as cable arms or power cable organizers, to route and organize power cables within the rack. These accessories help keep cables tidy, prevent them from sagging or interfering with other components, and make it easier to manage power connections in the future.
Regularly inspect power cables for signs of damage or wear. Replace any damaged or frayed cables immediately to prevent electrical hazards. Avoid routing power cables near sources of heat or sharp edges that could potentially damage the insulation.
By effectively managing power cables in your server rack, you ensure reliable power delivery, prevent power-related issues, and promote a safe working environment. Taking the time to organize and label power cables properly will save you time and effort in the long run.
Step 6: Securing and Dressing Cables in the Rack
Securing and dressing the cables in your server rack is an important step in achieving a professional and organized setup. Proper cable dressing ensures that cables are safely secured, reduces the risk of accidental disconnections, and facilitates easy maintenance and troubleshooting.
Start by ensuring that the cables are properly seated in their respective ports or connectors. Check that each cable is securely plugged in and that the connections are tight. Loose or improperly connected cables can lead to signal loss or intermittent connectivity issues.
Use cable management solutions, such as cable management arms, cable troughs, or cable management rings to guide and route your cables within the rack. These accessories help prevent cables from hanging loosely and getting tangled, creating a cleaner and more organized appearance.
Consider using cable ties, Velcro straps, or cable management sleeves to bundle and secure cables together. Group cables with similar functions or destinations, such as power cables, Ethernet cables, or fiber optic cables. Avoid over-tightening the cable ties, as this can damage the cables or restrict airflow within the rack.
Organize and arrange the cables in a logical and systematic manner. Bundle longer cables in manageable loops to avoid excess slack. Ensure that the cables are not strained or twisted excessively, as this can cause signal degradation or damage to the cables themselves.
Secure the cables along the rack edges or vertical rails using cable clips, hooks, or cable management brackets. This prevents the cables from obstructing other components and ensures that they are neatly arranged. Be mindful of cable weight and balance, as an uneven distribution can put strain on the rack or cause cables to sag.
Label each cable at both ends to indicate its purpose or destination. Use clear and legible labels that can be easily read during maintenance or troubleshooting. This labeling system helps identify cables quickly and accurately, saving time and reducing the risk of errors.
Regularly inspect the cable dressing in your server rack. Check for any cables that have become loose or have shifted out of their designated routes. Re-secure and re-dress these cables as necessary to maintain a neat and organized appearance.
By properly securing and dressing the cables in your server rack, you create a professional and efficient setup. Secure connections minimize the risk of accidental disconnections, while systematic cable dressing improves airflow and allows for easy maintenance. Remember to regularly inspect and maintain the cable dressing to ensure a well-maintained and functional server rack.
Step 7: Testing and Troubleshooting Cable Connections
After completing the installation and organization of your server rack cables, the final step is to test and troubleshoot the cable connections. Thorough testing ensures proper functionality and helps identify any issues or errors that may have occurred during the setup process.
Start by physically inspecting all cable connections in the rack. Check that each cable is securely plugged in and that the connectors are properly seated in their respective ports. Look for any loose or partially unplugged cables and reseat them if necessary.
Once the physical connections have been verified, use appropriate testing tools to check the functionality of the cables. This can include network cable testers for Ethernet cables or visual fault locators for fiber optic cables. These tools can help identify any wiring faults, shorts, or continuity issues in the cables.
Test the data transmission capabilities of Ethernet cables using network testing equipment. Ensure that each cable is capable of achieving the desired speed and bandwidth without any significant packet loss or signal degradation. This step is crucial for verifying the reliability of your network connections.
Perform signal tests on fiber optic cables using optical power meters or optical time-domain reflectometers. These tests measure the signal strength and quality of the fiber optic connections. By conducting these tests, you can detect any anomalies or faults in the fiber optic cables that may affect the transmission performance.
In addition to testing, it’s important to troubleshoot any connectivity issues that may arise. If a cable connection is not functioning properly, start by double-checking the physical connections. Ensure that the cables are securely plugged in and that the connectors are properly aligned.
If the issue persists, check the labeling and documentation of the cables. Verify that the correct cable is being used for the intended connection. Sometimes, mistakenly using the wrong cable can result in connection problems.
If troubleshooting the physical connections does not resolve the issue, consider checking the network or device settings. Ensure that the devices connected to the cables are configured correctly and have proper IP addresses, subnet masks, and gateway settings.
Lastly, consult any available documentation or contact technical support if needed. They can provide further assistance and guidance in troubleshooting the cable connections within your server rack.
By thoroughly testing and troubleshooting cable connections, you can ensure the reliability and performance of your server rack setup. Identifying and resolving any issues early on saves time and prevents potential downtime or data loss.
Conclusion
Proper cable management in your server rack is crucial for maintaining an organized and efficient infrastructure. By following the steps outlined in this guide, you can achieve a well-organized setup that not only looks professional but also improves performance and simplifies maintenance.
From planning and organizing cables to selecting the right connectors and securing them in place, each step plays a vital role in achieving effective cable management. Planning ensures that you have a clear roadmap for routing cables and allows for scalability and future expansions. Organizing and labeling cables make it easier to identify and trace them during troubleshooting or maintenance tasks.
Choosing the right cables and connectors ensures reliable connectivity and minimizes compatibility issues. Properly routing and bundling cables reduces clutter and improves airflow within the rack, preventing equipment overheating. Managing power cables safely and effectively contributes to overall stability and avoids power-related issues.
Securing and dressing cables in a neat and systematic manner creates a professional and organized appearance in your server rack. Proper cable dressing improves airflow, prevents cable interference, and facilitates easier maintenance tasks. Finally, testing and troubleshooting cable connections ensure functionality and identify any issues that may have been overlooked during the setup.
By following these steps and implementing effective cable management practices, you can enjoy the benefits of a well-organized and efficient server rack. A clean and organized infrastructure minimizes downtime, simplifies cable tracing, and makes future maintenance tasks easier. Give your server rack the attention it deserves and enjoy a streamlined and reliable network infrastructure.