Introduction
Welcome to the world of 3D scanning! If you’ve ever wanted to explore the realm of 3D scanning but thought it was only limited to expensive commercial systems, think again. In this article, we’ll show you how to build your very own homemade 3D scanner using readily available tools and materials.
3D scanning allows you to capture the physical geometry of objects and convert them into digital models. Whether you’re a hobbyist, an artist, or an engineer, having a 3D scanner at your disposal can open up a world of possibilities.
Building a homemade 3D scanner may seem like a daunting task, but rest assured, we’ve got you covered. With a bit of time, effort, and some basic technical knowledge, you’ll be well on your way to creating your own scanner.
In this guide, we’ll take you through the step-by-step process of building and calibrating your homemade 3D scanner, as well as providing some troubleshooting tips along the way.
Ready to embark on this exciting DIY project? Let’s gather the necessary tools and materials.
Tools and Materials
Before we dive into the construction of our homemade 3D scanner, let’s take a moment to gather all the necessary tools and materials. Having everything ready from the beginning will make the assembly process much smoother. Here’s a list of what you’ll need:
Tools:
- Screwdriver set
- Wire cutters
- Soldering iron
- Hot glue gun
- Allen wrench set
- Scissors
- Tape measure
- Computer with internet access
Materials:
- Raspberry Pi single-board computer
- Webcam or Raspberry Pi Camera Module
- Laser line module
- Stepper motor and driver
- Arduino microcontroller
- Aluminum frame or 3D-printed parts
- Jumper wires
- USB cables
- Power supply
- Mirror or turntable
- Open-source 3D scanning software (such as ReconstructMe or Skanect)
It’s important to note that the specific tools and materials may vary depending on the design and specifications of your homemade 3D scanner. However, this list provides a general guideline to get you started.
While some of these items can be easily purchased online or from your local electronics store, others may require a bit more effort to procure. Take the time to research and compare options to ensure you choose the best components for your project.
Now that we have everything we need, let’s move on to the first step – gathering the required components.
Step 1: Gathering the Required Components
Before we can start building our homemade 3D scanner, we need to gather all the necessary components. Here’s a breakdown of what you’ll need:
Raspberry Pi:
The Raspberry Pi will serve as the brain of our 3D scanner. It’s a versatile single-board computer that’s affordable and easy to work with. Make sure to choose a model with enough computing power to handle the scanning process.
Webcam or Raspberry Pi Camera Module:
You’ll need a camera to capture the images for the 3D scanning process. You can either use a standard webcam or the Raspberry Pi Camera Module. Both options will work, but the Raspberry Pi Camera Module offers better image quality and control.
Laser Line Module:
A laser line module is used to create a reference line that helps with the scanning process. This creates a distinct line on the object being scanned, allowing the software to detect and calculate depth information accurately.
Stepper Motor and Driver:
The stepper motor will be responsible for rotating the object being scanned. Choose a motor with enough torque to handle the weight of your objects. A motor driver is required to control the stepper motor and ensure precise rotation.
Arduino Microcontroller:
An Arduino microcontroller will communicate with the Raspberry Pi and control the stepper motor’s movements. It serves as an intermediary between the software and the hardware components.
Aluminum Frame or 3D-Printed Parts:
You’ll need a sturdy frame to hold all the components together. An aluminum frame provides stability, or you can 3D print your own parts if you have access to a 3D printer. The frame should be designed to accommodate the camera, the laser module, and the rotating platform.
Jumper Wires and USB Cables:
Jumper wires are needed for connecting the various components together. USB cables will be used to connect the Raspberry Pi to the camera and the Arduino to the computer.
Power Supply:
A suitable power supply is required to provide power to the Raspberry Pi, Arduino, and other components. Make sure to choose a power supply that can deliver enough voltage and current to meet the requirements of all the components.
Mirror or Turntable:
A mirror or a turntable is used to reflect the laser line onto the object from different angles. This allows the scanner to capture multiple perspectives of the object, resulting in a more accurate 3D model.
Open-Source 3D Scanning Software:
Choose an open-source 3D scanning software, such as ReconstructMe or Skanect, to process and generate the 3D model from the captured images. These software options offer a range of features and compatibility with different hardware setups.
Now that you have a comprehensive list of the required components, you’re ready to move on to the next step – assembling the hardware.
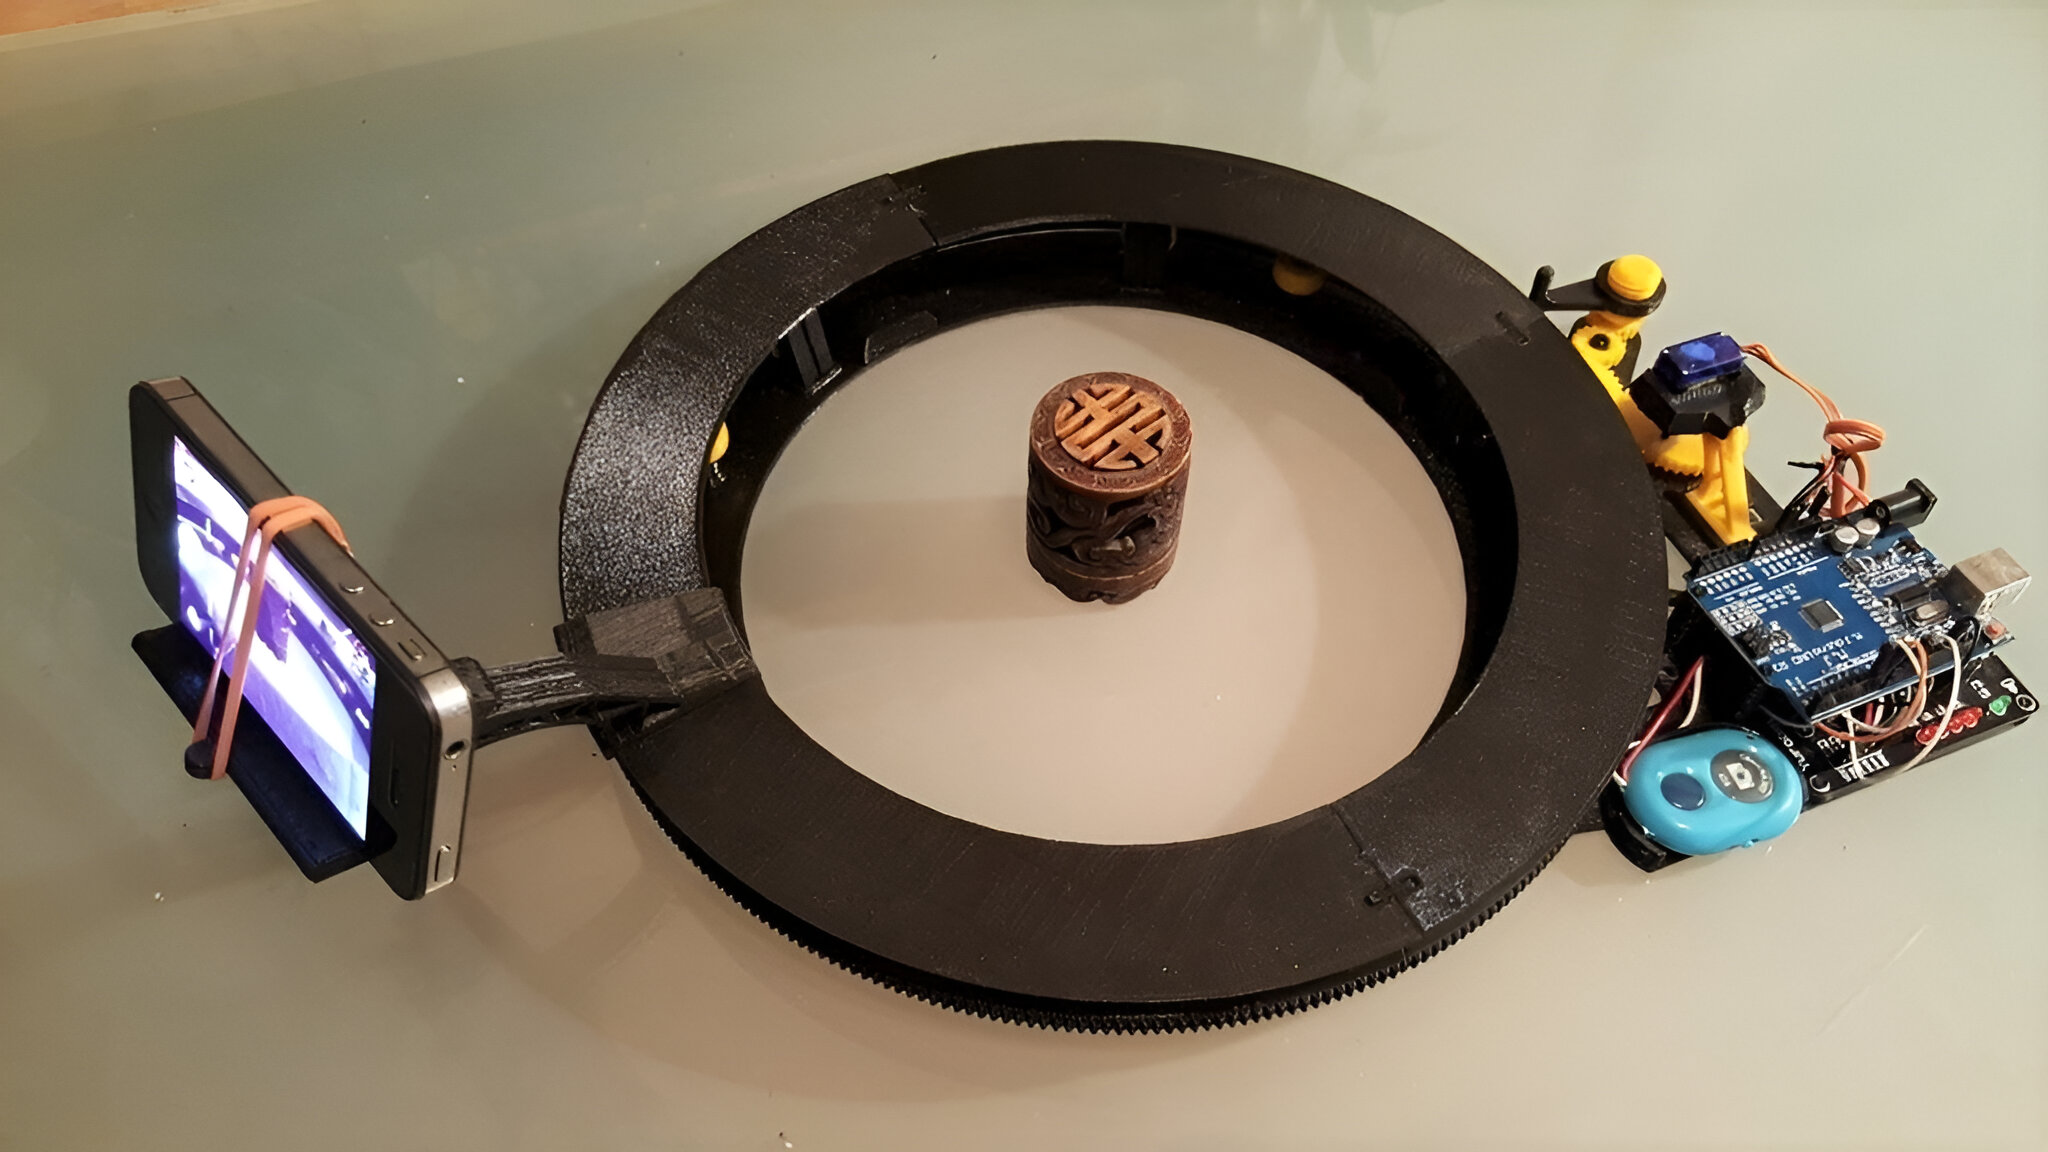
Step 2: Assembling the Hardware
With all the necessary components in hand, it’s time to start assembling the hardware for your homemade 3D scanner. Follow these steps to put everything together:
1. Prepare the Frame:
If you’re using an aluminum frame, make sure it’s clean and free from any sharp edges or rough surfaces. If you’re 3D printing your own parts, ensure they are printed accurately and securely fastened.
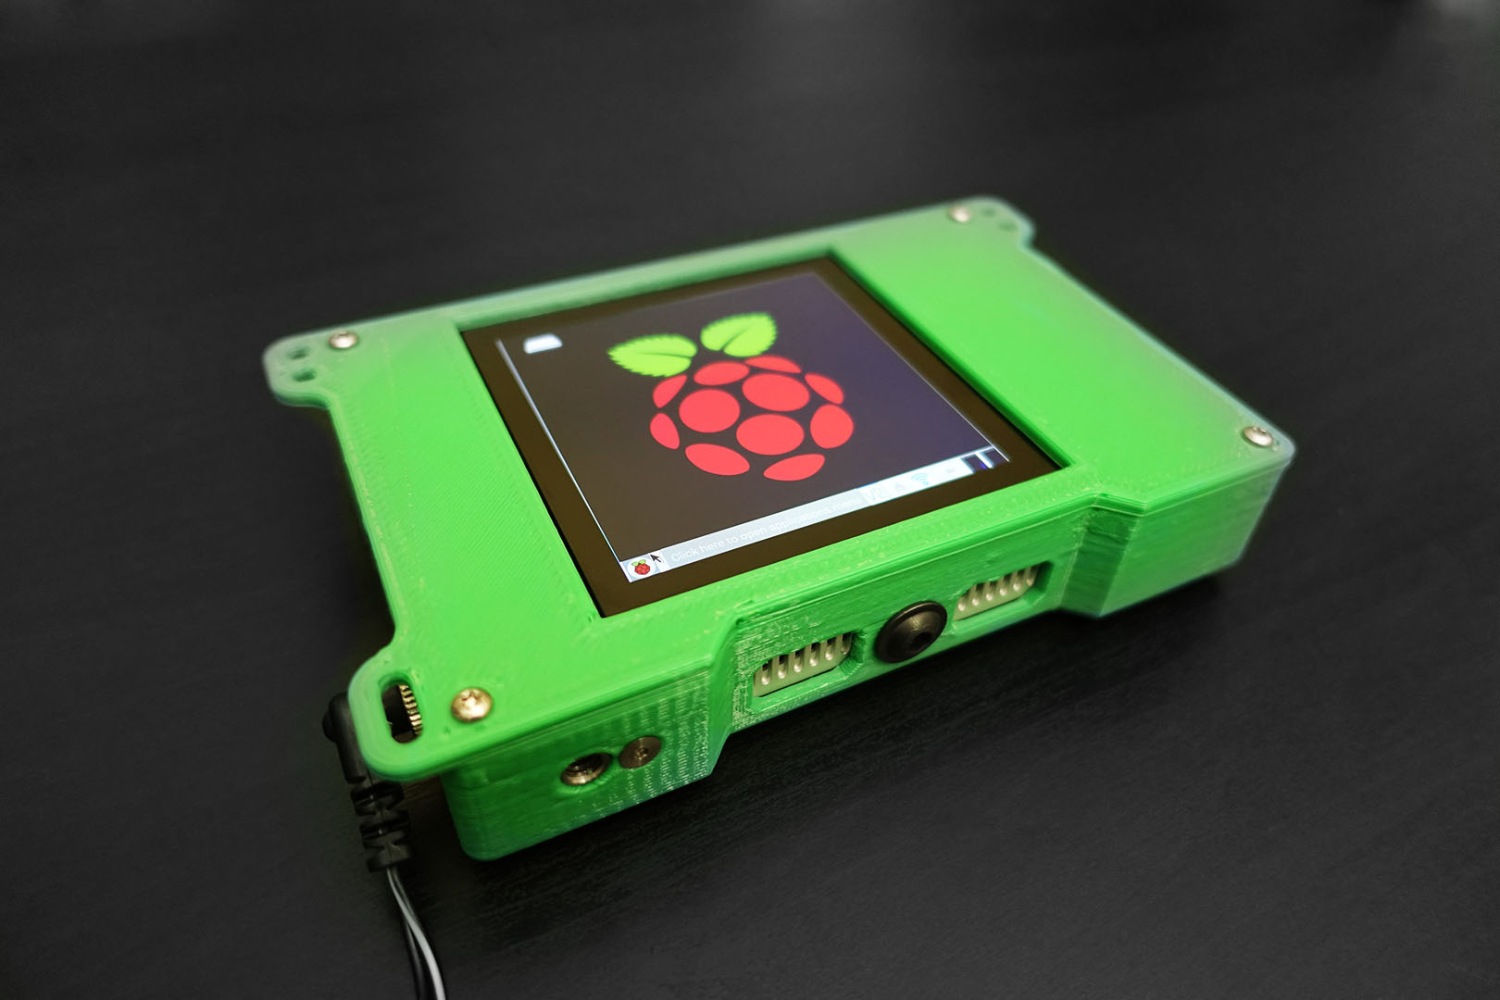
2. Mount the Raspberry Pi:
Attach the Raspberry Pi to the frame using screws or mounting brackets. Make sure it’s positioned securely and accessible for connecting cables later on.
3. Connect the Camera:
If you’re using a webcam, connect it to the USB port on the Raspberry Pi. If you’re using the Raspberry Pi Camera Module, follow the manufacturer’s instructions to attach it to the Raspberry Pi’s camera port.
4. Attach the Laser Line Module:
Mount the laser line module onto the frame, ensuring that it’s aligned with the camera’s field of view. Secure it in place using brackets or adhesive strips. Adjust the positioning and angle of the laser line to create a clear and visible reference line on the object being scanned.
5. Install the Stepper Motor:
Mount the stepper motor onto the frame, making sure it’s securely fastened. Attach the motor driver to the Raspberry Pi and connect the stepper motor to the driver using jumper wires. Consult the motor and driver documentation for wiring instructions.
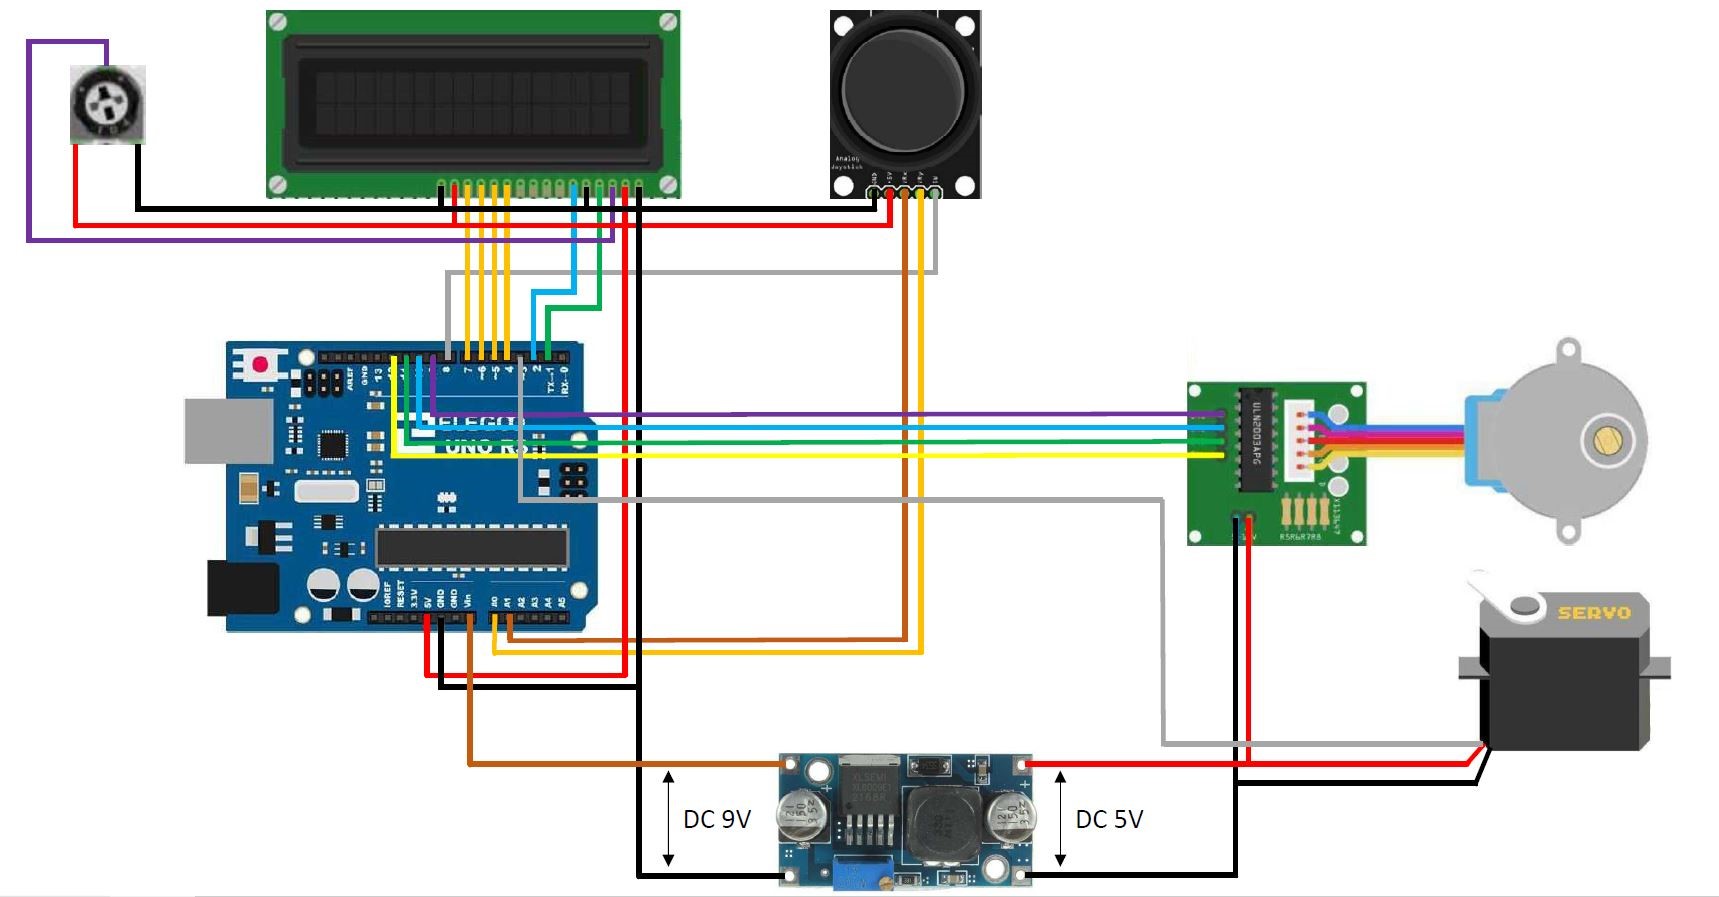
6. Connect the Arduino:
Using jumper wires, connect the Arduino to the Raspberry Pi. This connection will allow the Raspberry Pi to send commands to the Arduino to control the stepper motor’s movements. Follow the wiring diagram provided by the motor driver and ensure all connections are secure.
7. Set Up the Power Supply:
Connect the power supply to the appropriate ports on the Raspberry Pi, Arduino, and other components that require power. Make sure the voltage and current rating of the power supply match the requirements of the components.
8. Test the Hardware:
Before proceeding, double-check all connections and ensure that everything is properly wired. Power on the Raspberry Pi and Arduino, and verify that the camera, laser line module, and stepper motor are functioning correctly. Troubleshoot any issues that may arise before moving on to the next step.
With the hardware assembly complete, you’re now ready to move on to the next step – installing the software.
Step 3: Installing the Software
With the hardware assembled, it’s time to install the necessary software to control and operate your homemade 3D scanner. Follow these steps to get started:
1. Raspberry Pi Setup:
Begin by setting up your Raspberry Pi. Install the operating system of your choice, such as Raspbian, and make sure it’s up to date. You can find detailed guides on how to set up a Raspberry Pi online.
2. Camera and Laser Module Configuration:
Once your Raspberry Pi is ready, configure the camera and laser line module. Enable the camera module in the Raspberry Pi’s settings and adjust camera settings such as resolution and frame rate. For the laser line module, verify that it’s detected and functioning properly.
3. Install the 3D Scanning Software:
Choose an open-source 3D scanning software, such as ReconstructMe or Skanect, that is compatible with your hardware setup. Visit the software’s website and follow the installation instructions specific to your Raspberry Pi’s operating system.
4. Configure the Software:
Once the software is installed, launch it and configure the necessary settings. This typically includes selecting the camera input, setting up scanning parameters, and calibrating the laser line for accurate depth calculations. Refer to the software’s documentation for guidance on configuring these settings.
5. Test the Software:
With the software configured, it’s time to test it out. Place an object on the rotating platform, adjust the camera and laser line module if needed, and start the scanning process using the software’s interface. Monitor the progress and ensure that the software is capturing the required data accurately. Make any necessary adjustments to the settings to optimize the scanning process.
6. Save the 3D Model:
Once the scanning process is complete, the software will generate a 3D model based on the captured data. Save the model in a format that is compatible with your desired applications or 3D printers. It’s also a good practice to backup your models for future reference and modifications.
Congratulations! You have successfully installed the necessary software for your homemade 3D scanner. Now, it’s time to move on to the next step – calibrating the scanner for accurate scanning results.
Step 4: Calibrating the 3D Scanner
Before you can start scanning objects with your homemade 3D scanner, it’s crucial to calibrate the system to ensure accurate and high-quality results. Follow these steps to calibrate your 3D scanner:
1. Position the Calibration Pattern:
Prepare a calibration pattern, such as a checkerboard or a specific calibration board, and place it on the rotating platform. Ensure that the pattern is positioned at the center and within the field of view of the camera.
2. Capture Images:
Start the scanning software and capture multiple images of the calibration pattern from different angles as the platform rotates. The software will guide you through the process of capturing the images. Make sure to cover a wide range of perspectives to achieve accurate calibration.
3. Process the Calibration Images:
Once you have captured the calibration images, process them using the calibration software provided with your chosen 3D scanning software. This software will analyze the images and extract the necessary parameters to calibrate your 3D scanner.
4. Adjust Camera and Laser Settings:
Based on the calibration results, you may need to fine-tune the camera and laser line module settings. This includes adjusting parameters such as exposure, gain, laser line brightness, and laser line alignment. Refer to your scanning software’s documentation for guidance on making these adjustments.
5. Verify Calibration Accuracy:
After making the necessary adjustments, capture new test scans of the calibration pattern. Compare the resulting 3D model to the known dimensions and geometry of the calibration pattern to verify the accuracy of the calibration. Make additional adjustments if required.
6. Repeat the Calibration Process (If Needed):
If you’re not satisfied with the calibration results, you can repeat the calibration process to refine the accuracy. Adjust the settings, take new calibration images, and process them again until you achieve satisfactory results.
7. Store Calibration Parameters:
When you’re satisfied with the calibration, save the calibration parameters in your 3D scanning software. This ensures that the scanner remains calibrated for future scans and eliminates the need to repeat the calibration process each time you use the scanner.
By following these calibration steps, you’ll ensure that your homemade 3D scanner is accurately capturing the geometry of objects and producing high-quality 3D models.
Now that the scanner is calibrated, it’s time to move on to the final step – testing and troubleshooting your scanner to ensure optimal performance.
Step 5: Testing and Troubleshooting
Once you have built and calibrated your homemade 3D scanner, it’s essential to thoroughly test it before using it for any critical projects. Here are some steps to follow for testing and troubleshooting your scanner:
1. Test Scanning:
Begin by scanning a simple object to test the functionality of your scanner. Choose an object with clear geometry and well-defined features. This test will help you evaluate the accuracy, resolution, and overall quality of the 3D model produced by your scanner.
2. Adjust Scanning Parameters:
During the test scan, assess the output and make adjustments to the scanning parameters as necessary. Experiment with different settings such as resolution, scanning speed, and exposure to achieve optimal results. Fine-tuning these parameters will help enhance the accuracy and quality of your scans.
3. Troubleshoot Issues:
If you encounter any issues during the testing process, troubleshoot the problems systematically. Identify the specific problem, consult the documentation and user forums for your 3D scanning software or hardware, and follow the recommended troubleshooting steps. Common issues may include misalignment of the laser line, inconsistent rotation of the object, or poor image quality.
4. Improve Environmental Conditions:
Note that the scanning environment plays a crucial role in the performance of your 3D scanner. Ensure that the area is well-lit, free from external distractions, and that there are no reflective surfaces that may interfere with the laser line or camera. Also, consider using a controlled background or backdrop to improve the contrast between the object being scanned and the background.
5. Test Different Objects:
Once you’ve addressed any initial issues and have obtained satisfactory results with simple objects, try scanning more complex or challenging objects. Vary the size, shape, and material of the objects to assess your scanner’s performance in different scenarios. This will help you understand the limitations and capabilities of your homemade 3D scanner.
6. Document and Iterate:
Throughout the testing and troubleshooting process, document any adjustments, improvements, or modifications you make to your 3D scanner. This documentation will help you refine your scanning process and provide valuable insights for future projects.
By thoroughly testing and troubleshooting your homemade 3D scanner, you’ll be able to identify and resolve any issues that may arise. With each successful scan, you’ll gain confidence in the capabilities of your scanner and be ready to embark on exciting 3D scanning projects.
Now that you have tested and troubleshooting your scanner, you’re ready to utilize your homemade 3D scanner for a variety of applications!
Conclusion
Congratulations on successfully building your own homemade 3D scanner! By following the steps outlined in this guide, you’ve learned how to gather the necessary tools and materials, assemble the hardware, install the software, calibrate the scanner, and test and troubleshoot any issues that may arise. Now, you have a powerful tool at your disposal for capturing detailed 3D models of objects with remarkable accuracy.
With your homemade 3D scanner, the possibilities are endless. Whether you’re a hobbyist, an artist, a designer, or an engineer, you can now explore the world of 3D scanning and utilize it in various applications. You can scan and replicate objects for 3D printing, create digital models for animation, visualization, or virtual reality, or even use it for reverse engineering and prototyping.
Remember to continue experimenting and refining your scanning techniques to improve the quality of your scans. Take the time to understand the capabilities and limitations of your scanner, and don’t be afraid to try out different objects and settings to achieve the desired results.
Lastly, join online communities and forums dedicated to 3D scanning and share your experiences and learnings with others. These communities can provide valuable insights, tips, and solutions to further enhance your scanning skills and broaden your knowledge in this exciting field.
Now, it’s time to unleash your creativity and start scanning amazing objects with your homemade 3D scanner. Enjoy the journey and have fun exploring the world through the lens of 3D scanning!