Introduction
3D printing technology has revolutionized various industries, allowing individuals to bring their digital designs to life with the help of additive manufacturing. However, sometimes a model may be too large or complex to print as a single object. In such cases, breaking up the model into smaller, printable parts becomes necessary. This process ensures that each part is properly supported, oriented, and printed to achieve the desired quality.
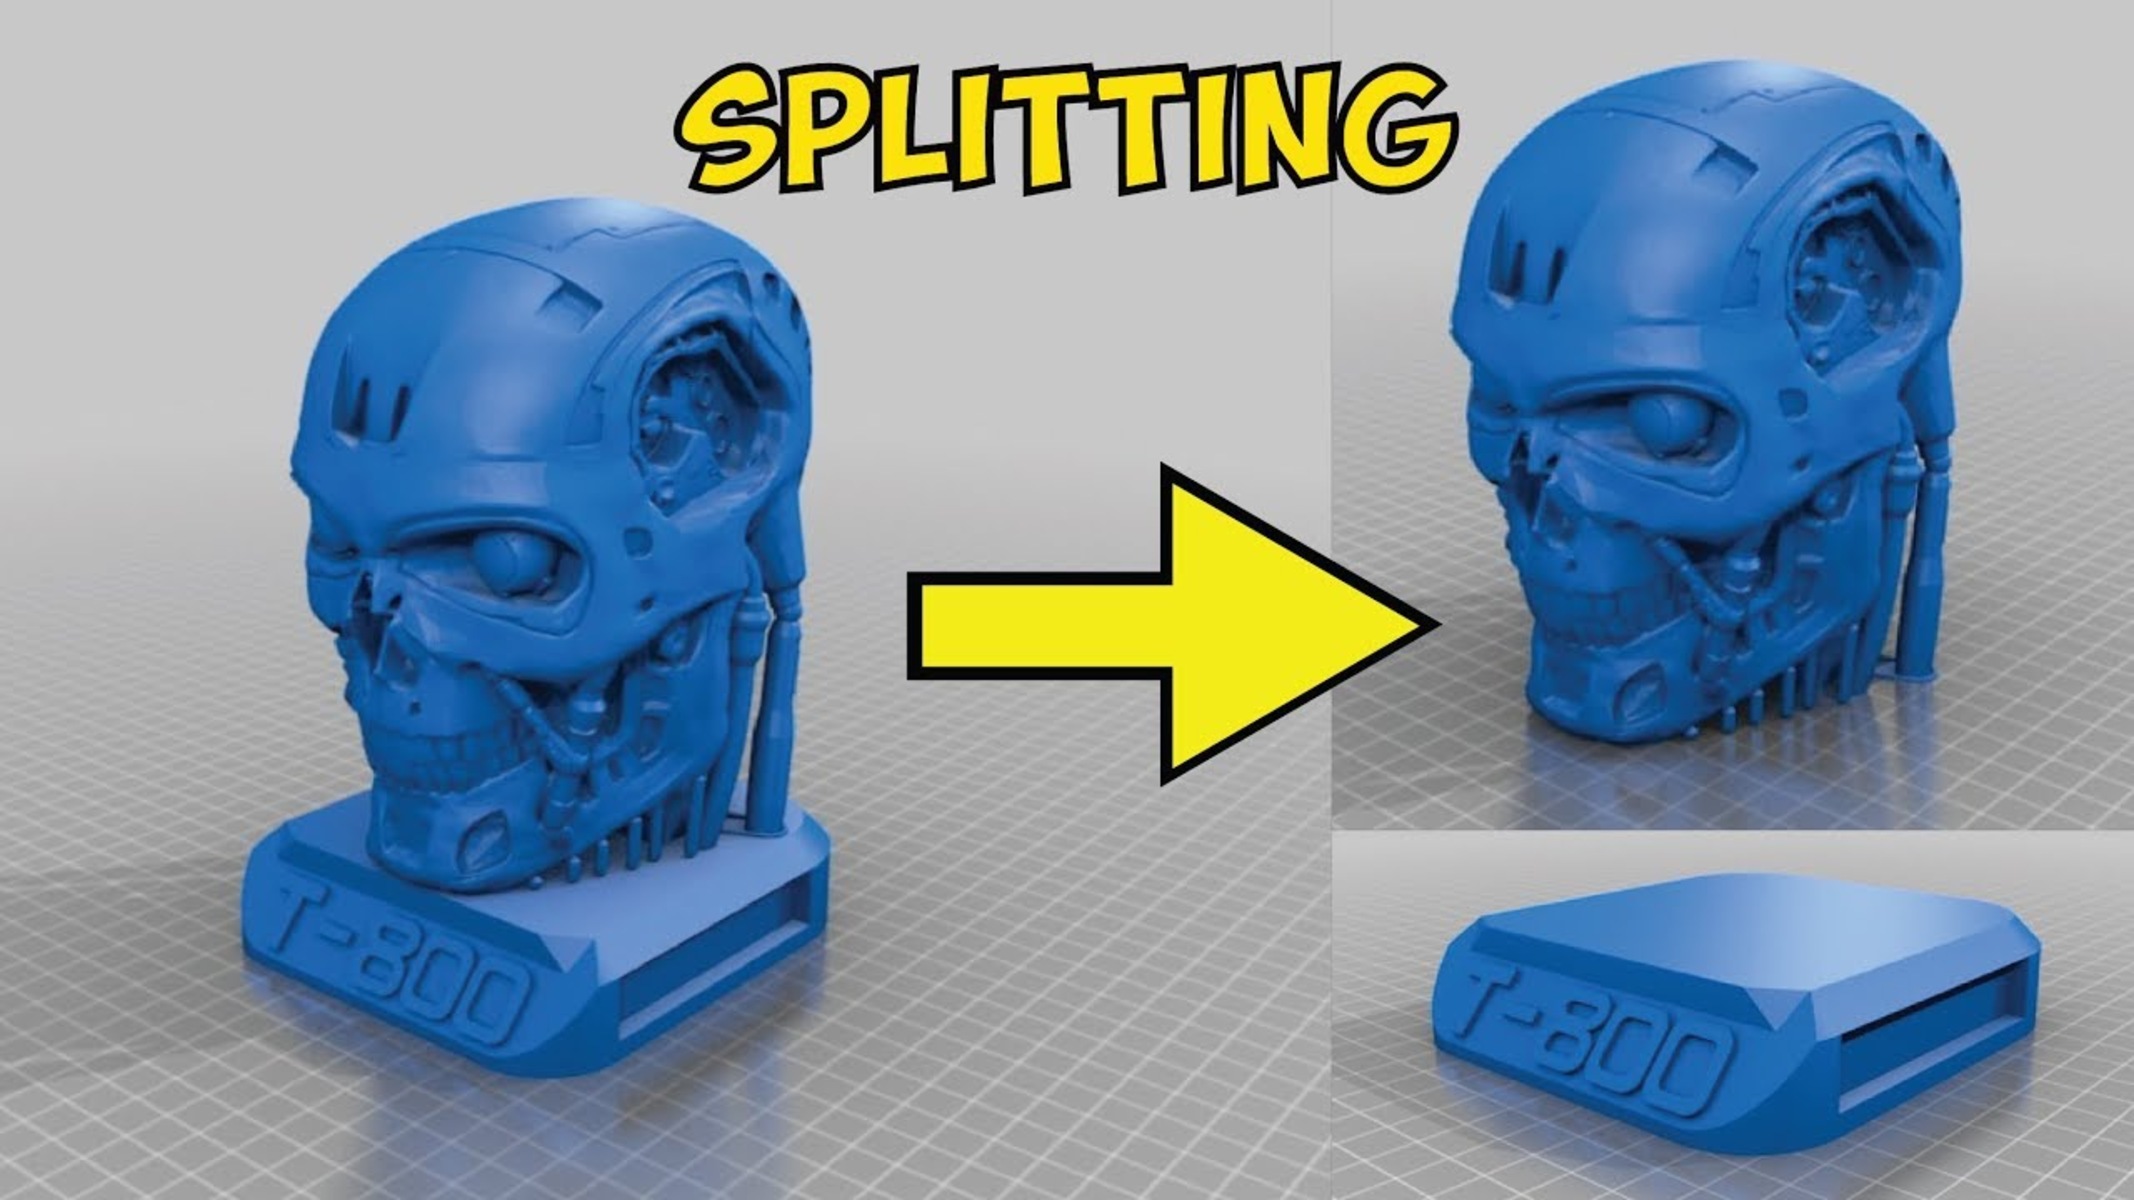
Breaking up a model for 3D printing involves dividing it into separate parts that can be printed individually and assembled later. By doing so, you can overcome the limitations posed by print bed size, material requirements, or intricate details that would otherwise be impractical to print as a single piece.
In this article, we will explore the process of breaking up a model for 3D printing and discuss the steps involved in preparing the individual parts for a successful print. We will cover techniques such as selecting and preparing the model, determining the best orientation for each part, adding support structures where necessary, and exporting the individual parts for printing.
Before we delve into the details, it’s important to note that breaking up a model is not suitable for every design. Simple objects or those with no intricate details may not require this process and can be printed as a whole. However, for larger, more complex models, breaking them up can optimize print quality and minimize potential printing issues.
Whether you’re a professional designer, hobbyist, or simply interested in 3D printing, understanding how to break up a model effectively is essential to ensure successful prints and bring your designs to life. So, let’s dive into the fascinating world of breaking up models for 3D printing and unlock the potential of additive manufacturing to its fullest.
Selecting and preparing the model
When preparing a model for 3D printing, it’s important to start by selecting the right design and ensuring it is properly prepared for the printing process. Here are some key considerations:
Design complexity: Evaluate the complexity of the model and determine if it needs to be broken up. Larger and intricate designs often require breaking up into smaller parts for successful printing.
Print bed size: Understand the limitations of your 3D printer’s print bed size. If the model exceeds the available space, breaking it up into smaller parts that fit within the bed dimensions is necessary.
Alignment and fit: Consider the assembly process and how the individual parts will fit together. Ensure that the model is broken up in a logical manner, allowing for easy alignment and assembly once printed.
File format: Ensure that the model is in a compatible file format for 3D printing. Common formats include STL (Standard Tessellation Language) and OBJ (Object File Format). Use modeling software to convert the model into the appropriate file format if necessary.
Model orientation: Before breaking up the model, consider the orientation of the design. It’s important to identify the optimal orientation that minimizes the need for support structures, ensures proper printing, and maintains the desired aesthetics of the final product.
Model analysis: Use 3D modeling software or online tools to analyze the model for potential printing issues. Check for overhangs, unsupported areas, or intricate details that could affect the print quality or require additional supports.
Model repair: If the model has any errors or issues, such as non-manifold geometry or intersections, use modeling software to repair it before proceeding with the breaking up process.
Scaling: Consider scaling the model if needed, ensuring that each part retains the desired size and proportions while fitting within the printer’s constraints.
Preparing the model for printing involves a combination of thoughtful considerations and technical optimizations. By selecting the right model and ensuring it is properly prepared, you set the foundation for a successful print job.
Breaking up the model into separate parts
Once you have selected and prepared the model, the next step is to break it up into separate parts that can be printed individually. This process involves slicing the model into manageable sections that fit within the print bed and allow for easy assembly later on. Here are the main steps to follow:
Identify breaking points: Analyze the model and identify natural breaking points where it can be divided without affecting the overall design or structural integrity. This could be based on visible seams, separate components of the model, or areas where it can be easily split.
Slicing software: Use slicing software, which is specialized software used to prepare models for 3D printing. Import your model and use the software’s tools to define the breaking points and create separate, printable parts.
Create connectors: Consider adding connectors or joints to the broken sections to ensure proper alignment and ease of assembly. These connectors can be designed as pegs, slots, or interlocking mechanisms that securely hold the parts together.
Check for printability: Before finalizing the broken parts, review each section individually for printability. Check if the parts fit within the printer’s dimensions, have sufficient base support, and are free from overhangs or intricate details that may require additional supports.
Export separate parts: Once you are satisfied with the broken sections, export each part as a separate file in the appropriate file format for 3D printing. Label each file accordingly, specifying the print settings if necessary.
Organize the assembly: Consider creating an assembly guide or documentation to assist in the assembly process. This can include labeled diagrams or instructions to ensure a seamless and efficient assembly of the printed parts.
Breaking up a model into separate parts requires careful consideration of the design, functionalities, and potential limitations of the 3D printer. By following these steps, you can effectively divide the model into printable sections that can be assembled to recreate the original design.
Determining the best orientation for each part
Once the model has been broken up into separate parts, the next crucial step is to determine the best orientation for printing each part. The orientation plays a vital role in achieving optimal print quality, minimizing the need for supports, and ensuring proper functionality. Here are some key factors to consider:
Surface quality: Assess the visible surfaces of each part and identify the desired quality. Depending on the design, you may want to prioritize smooth and detailed surfaces over less visible areas.
Support requirements: Examine each part for overhangs or unsupported sections. Orienting the part in a way that minimizes the need for supports can improve printability and reduce post-processing efforts.
Printing direction: Consider the direction in which the layers will be printed. Parts that require strength or flexibility may benefit from specific layer orientations to optimize their mechanical properties.
Assembly alignment: Ensure that the orientation of each part allows for easy alignment and assembly. Visualize how the parts will fit together and choose orientations that facilitate a seamless assembly process.
Printing time: Take into account the printing time for each part. Orientation can affect the print speed and efficiency. Balancing the desired print quality with the time constraints is crucial to optimize the printing process.
Material considerations: Different materials have unique printing characteristics. Consider the specific properties of the chosen material, such as shrinkage or warping tendencies, and orient the parts to minimize these effects.
Texture alignment: If the model has textures or surface details that need to align across multiple parts, pay attention to the orientation to ensure a consistent appearance throughout the assembled object.
Prototyping intent: If the intention is to create a prototype for functional testing, consider the orientation that best matches the intended use and testing scenarios. This can impact the success of the testing phase.
Printing limitations: Understand the limitations of your 3D printer, such as maximum build height, print bed shape, or specific features that may affect orientation choices. Adhere to these limitations to ensure successful printing.
By carefully considering these factors, you can determine the best orientation for each part, ultimately maximizing the print quality and functionality of the finished product.
Adding support structures
When printing certain parts of a model, it may be necessary to add support structures to ensure successful printing. Support structures are temporary elements that provide stability and prevent overhangs or unsupported sections from collapsing during the print process. Here are some important considerations when adding support structures:
Identify overhangs: Examine each part and identify areas with overhangs or unsupported sections. These are areas where support structures may be needed to ensure proper printability.
Automatic support generation: Most slicing software provides automatic support generation options. Activate this feature and let the software analyze the model to generate support structures where necessary. Adjust the settings, such as support density or distance, to achieve the desired results.
Manual support placement: In some cases, automatic support generation may not be sufficient or may result in excessive support structures. In such situations, use the manual support feature in the slicing software to selectively add or remove support structures where needed.
Orientation impact: Consider how the orientation of each part affects the need for supports. Orienting the part in a way that minimizes overhangs or reduces the angle of unsupported sections can help reduce the reliance on support structures.
Support removal: Keep in mind that supports are meant to be temporary and should be easy to remove after printing. Opt for support structures that are easily detachable and minimize damage to the printed part.
Printability considerations: Assess the impact of support structures on the overall printability of the model. Make sure that adding supports does not obstruct critical details or compromise the functionality of the printed part.
Optimize support placement: Strategically place support structures to minimize their impact on the visible surfaces of the final print. Avoid placing supports on highly visible or detailed areas to maintain the desired aesthetic appeal.
Test prints: It is advisable to conduct test prints with varying support settings or orientations to evaluate their impact on the print quality and ease of support removal. This can help fine-tune the support structure placement for optimal results.
By carefully adding support structures where necessary, you can ensure the successful printing of complex or overhanging parts while maintaining the integrity and quality of the overall design.
Exporting the individual parts for 3D printing
Once you have prepared and optimized each part of your 3D model, the next step is to export the individual parts in a format suitable for 3D printing. Proper exportation ensures that the parts are compatible with your chosen printing software and can be successfully printed. Here are the key steps to follow:
File format selection: Choose the appropriate file format for 3D printing. The most common file formats used in 3D printing are STL (Standard Tessellation Language) and OBJ (Object File Format). These formats contain the necessary information about the shape, surface textures, and other geometric data of the model.
Export settings: When exporting each part, pay attention to the settings available in your 3D modeling software. The export settings may include options such as resolution, accuracy, and level of detail. Adjust these settings to achieve the desired outcome for each individual part.
Orientation preservation: While exporting, ensure that the orientation of each part is preserved. Maintaining the orientation within the exported file helps when it comes to aligning and assembling the printed parts correctly.
File naming and labeling: Organize your exported files by appropriately naming and labeling each part. Include additional information, such as the print settings used or any specific considerations that need to be taken into account during printing or post-processing.
Check for errors: Before exporting, double-check each part for any potential errors or issues. Ensure that there are no missing surfaces, intersecting geometry, or non-manifold elements. Address any problems before exporting to prevent printing complications.
Conversion software: If your 3D printer requires a specific file format that is not supported by your modeling software, use a file conversion tool to convert the exported file into the required format without losing any critical information.
Scale and unit calibration: Verify that the scale and units of each exported part are accurate and aligned with your intended print specifications. Calibration is essential to ensure that the final printed parts match the desired dimensions and proportions.
Backup files: It is advisable to create backups of the exported files to prevent data loss or corruption. Store the files in a secure location and consider keeping multiple copies as a precaution.
By following these steps, you can export each individual part of your 3D model in the appropriate format, ready for the 3D printing process. Keep track of each exported file and the specific considerations for printing to ensure a smooth and successful printing experience.
Conclusion
Breaking up a model for 3D printing is a crucial step in achieving successful and high-quality prints. By carefully selecting and preparing the model, breaking it up into separate parts, determining the best orientation for each part, adding necessary support structures, and exporting the individual parts correctly, you can optimize the printing process and achieve the desired results.
Breaking up a model allows you to overcome the limitations of print bed size, material requirements, and intricate details that may be challenging to print as a single piece. It enables you to optimize print quality, minimize potential printing issues, and enhance the ease of assembly and functionality of the final product.
Throughout the process, it is important to consider the specific requirements of each part, such as surface quality, support structure placement, printability, and alignment for successful assembly. Additionally, paying attention to file formats, export settings, and file organization ensures seamless integration into the 3D printing workflow.
By employing the techniques and considerations discussed in this article, you can take full advantage of the capabilities of 3D printing technology to bring your designs to life. Whether you are a professional designer, hobbyist, or simply interested in 3D printing, understanding how to break up a model and prepare it for printing is an essential skill for achieving optimal results.
So, with this knowledge in hand, venture forth and explore the fascinating world of breaking up models for 3D printing. Unlock the potential of additive manufacturing and unleash your creativity to bring remarkable designs to life, one printable part at a time.


