Introduction
Welcome to this guide on how to authorize Apple TV on your Mac! Apple TV is a popular streaming device that allows you to enjoy a wide range of entertainment options on your television. By authorizing your Apple TV on your Mac, you can gain access to your iTunes library, including your purchased movies, TV shows, and music, as well as stream content from various streaming services.
Authorizing your Apple TV on your Mac is a straightforward process that requires a few simple steps. Whether you’re setting up your Apple TV for the first time or need to reauthorize it on your Mac after a system update, this guide will walk you through the process, ensuring a seamless and hassle-free experience.
It’s important to note that authorizing your Apple TV on your Mac is necessary to access your iTunes library and make use of certain features like Home Sharing. Without authorization, you may encounter restrictions and limitations in using your Apple TV to its full potential.
In this guide, we will cover the step-by-step process of authorizing your Apple TV on your Mac, as well as troubleshoot common issues that you may encounter along the way. So, let’s dive in and get started with the authorization process!
Prerequisites
Before you begin the process of authorizing your Apple TV on your Mac, there are a few prerequisites that you need to ensure for a smooth setup. Here’s what you’ll need:
- Mac running the latest version of macOS: Make sure that your Mac is up to date with the latest version of macOS. This ensures compatibility and access to the latest features and security enhancements.
- Apple TV: You’ll need an Apple TV device, whether it’s the Apple TV HD or Apple TV 4K. Ensure that your Apple TV is set up and connected to your television. You can follow the instructions provided by Apple to set up your Apple TV if you haven’t done so already.
- Wi-Fi network: Make sure that your Mac and Apple TV are connected to the same Wi-Fi network. This enables seamless communication between the two devices and ensures proper authorization.
- iTunes Apple ID: Ensure that you have an active iTunes Apple ID. This is the same Apple ID that you use to make purchases on the iTunes Store. If you don’t have an Apple ID, you can easily create one by visiting the Apple ID creation page.
With these prerequisites in place, you’re ready to proceed with the authorization process. Once you’ve confirmed that you meet all the requirements, you can continue with the step-by-step instructions to authorize your Apple TV on your Mac.
Step 1: Update your Mac to the latest version
Before authorizing your Apple TV on your Mac, it is essential to ensure that your Mac is running the latest version of macOS. Updating your Mac guarantees compatibility and access to the latest features and security patches.
Here’s how you can update your Mac to the latest version:
- Click on the Apple menu () in the top-left corner of your screen.
- Select “System Preferences” from the drop-down menu.
- In the System Preferences window, click on “Software Update.”
- If an update is available, you will see a message indicating the availability of the update. Click on the “Update Now” button to start the update process.
- Follow the on-screen instructions to complete the update. Your Mac may restart during the process.
It is recommended to have a stable internet connection during the update process to ensure uninterrupted downloading and installation of the updates.
Once your Mac has been updated to the latest version of macOS, you can proceed to the next step of authorizing your Apple TV on your Mac. Ensuring that your Mac is up to date will help prevent any compatibility issues and ensure a smooth authorization process.
Step 2: Set up your Apple TV
Once you have updated your Mac to the latest version of macOS, the next step is to set up your Apple TV. If you have already completed the initial setup process, you can skip to the next step.
Here’s how you can set up your Apple TV:
- Connect your Apple TV to your television using an HDMI cable.
- Plug the power cord into your Apple TV and connect it to a power outlet.
- Turn on your television and switch to the input/source channel that corresponds to the HDMI port you connected your Apple TV to.
- Follow the on-screen instructions on your television to complete the setup process.
- During setup, make sure to connect your Apple TV to your Wi-Fi network. Choose your network from the list of available networks and enter the password if prompted.
- Once the setup is complete, your Apple TV will be ready to use.
It is important to note that you need to set up your Apple TV using the same Wi-Fi network as your Mac. This ensures seamless communication between the two devices when it comes to authorizing your Apple TV on your Mac.
Once you have successfully set up your Apple TV, you can proceed to the next step of connecting your Apple TV to your Mac to begin the authorization process.
Step 3: Connect your Apple TV to your Mac
Now that you have set up your Apple TV, the next step is to connect it to your Mac. This connection is necessary for authorizing your Apple TV on your Mac and accessing your iTunes library.
Here’s how you can connect your Apple TV to your Mac:
- Ensure that your Apple TV and Mac are connected to the same Wi-Fi network.
- On your Mac, open the “System Preferences” by clicking on the Apple menu () in the top-left corner of your screen and selecting “System Preferences” from the drop-down menu.
- In the System Preferences window, click on the “Sharing” icon.
- In the Sharing settings, make sure that “Home Sharing” is enabled by checking the box next to it.
- Enter your iTunes Apple ID and password to enable Home Sharing on your Mac.
- Now, on your Apple TV, go to the main menu and select “Settings.”
- In the settings menu, select “Accounts” and then select “Home Sharing.”
- Enter the same iTunes Apple ID and password that you used to enable Home Sharing on your Mac.
- Wait for your Apple TV to verify and establish the connection with your Mac. Once connected, you will see a confirmation message.
By connecting your Apple TV to your Mac, you have established a link between the two devices, allowing them to communicate and share content seamlessly. This connection is crucial for the authorization process to grant access to your iTunes library on your Apple TV.
With your Apple TV now connected to your Mac, you can proceed to the next step of authorizing your Apple TV on your Mac.
Step 4: Authorize your Apple TV on your Mac
Now that you have connected your Apple TV to your Mac, it’s time to authorize it so that you can access your iTunes library and enjoy your purchased content. The authorization process ensures that only authorized devices can access and play your iTunes content.
Follow these steps to authorize your Apple TV on your Mac:
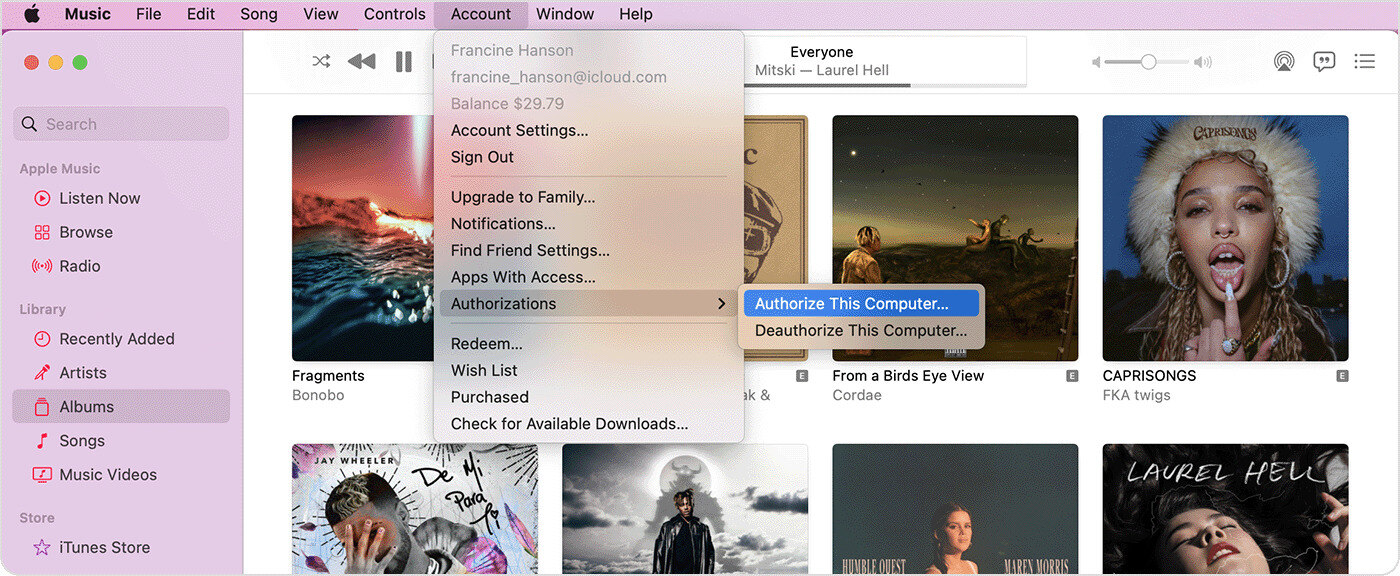
- On your Mac, open the iTunes app.
- In the menu bar at the top of the screen, click on “Account” and select “Authorizations” from the drop-down menu.
- From the Authorizations menu, choose “Authorize This Computer.”
- Enter your iTunes Apple ID and password when prompted.
- Once you have successfully entered your credentials, your Mac will be authorized to access your iTunes content.
- Now, go back to your Apple TV and navigate to the main menu.
- Choose “Settings,” then select “Accounts” and “iTunes and App Store.”
- Under iTunes and App Store, sign in with the same iTunes Apple ID and password that you used to authorize your Mac.
By authorizing your Apple TV on your Mac and signing in with your iTunes Apple ID, you have granted access to your iTunes library on your television. This means you can now enjoy your purchased movies, TV shows, music, and more directly on your Apple TV.
With the authorization process complete, you’re almost ready to start enjoying your iTunes content on your Apple TV. However, before you dive into your library, there is one more step to verify the authorization.
Step 5: Verify the authorization
After authorizing your Apple TV on your Mac, it is important to verify that the authorization is successful. This step ensures that your Apple TV can access and play your iTunes content without any issues.
- On your Apple TV, go to the main menu and select “Movies,” “TV Shows,” or “Music” to access your iTunes library.
- Choose any purchased content from your library and start playing it.
- If the content plays without any error messages or prompts for authorization, it means that your Apple TV is successfully authorized.
- If you encounter any issues or receive an authorization prompt, ensure that you have followed all the previous steps correctly, including enabling Home Sharing on your Mac and entering the correct iTunes Apple ID and password on your Apple TV.
If you do encounter any authorization issues, double-check the internet connection on both your Mac and Apple TV, and ensure that they are connected to the same Wi-Fi network. You may also need to sign out and sign in again with your iTunes Apple ID on both devices to refresh the authorization.
By verifying the authorization, you can ensure that your Apple TV is ready to stream and enjoy your iTunes content seamlessly. Now you can sit back, relax, and indulge in your favorite movies, TV shows, and music on the big screen.
Troubleshooting common issues
While authorizing your Apple TV on your Mac is usually a smooth process, there may be times when you encounter some common issues. Here are a few troubleshooting tips to help resolve these issues:
1. Wi-Fi connection: Ensure that both your Mac and Apple TV are connected to the same Wi-Fi network. If you’re experiencing connection issues, try restarting your Wi-Fi router and reconnecting both devices to the network.
2. Apple ID credentials: Double-check that you are entering the correct iTunes Apple ID and password on both your Mac and Apple TV. It’s essential to use the same credentials for successful authorization.
3. Home Sharing: Verify that Home Sharing is enabled on your Mac by going to “System Preferences” > “Sharing” > “Home Sharing.” If it is disabled, enable it and enter your iTunes Apple ID and password. On your Apple TV, ensure that Home Sharing is activated as well.
4. Update iTunes: Make sure you are running the latest version of iTunes on your Mac. Updating iTunes can often resolve compatibility issues and provide bug fixes that could improve the authorization process.
5. Restart devices: Try restarting both your Mac and Apple TV. This simple step can refresh the connection and resolve any temporary glitches that might be affecting the authorization process.
6. Firewall settings: Check your Mac’s firewall settings to ensure that iTunes and Home Sharing are allowed to communicate through the firewall. Adjust the settings if necessary to grant access to these applications.
If you have followed these troubleshooting steps and are still unable to authorize your Apple TV on your Mac, it may be helpful to visit the Apple Support website or contact their customer support for further assistance. They can provide more specific guidance based on your unique situation.
Remember, resolving authorization issues will ensure a seamless experience in accessing your iTunes library and enjoying your favorite content on your Apple TV.
Conclusion
Congratulations! You have successfully authorized your Apple TV on your Mac and can now access and enjoy your iTunes library on the big screen. By following the step-by-step process outlined in this guide, you have ensured that your Apple TV is connected and authorized to play your purchased movies, TV shows, and music.
Remember, authorizing your Apple TV on your Mac allows you to conveniently stream content from your iTunes library and make use of features like Home Sharing. This integration between your devices provides a seamless entertainment experience, bringing all your favorite content right to your living room.
In the event that you encounter any difficulties or face authorization issues, refer back to the troubleshooting tips to help resolve common issues. It’s essential to ensure that both your Mac and Apple TV are connected to the same Wi-Fi network, you have entered the correct iTunes Apple ID and password, and Home Sharing is enabled on both devices.
With your Apple TV now authorized on your Mac, sit back, relax, and enjoy your favorite movies, TV shows, and music on the big screen. Explore the vast collection of content available in your iTunes library and discover new entertainment options to enhance your viewing experience.
Now that you have mastered the process of authorizing Apple TV on your Mac, you can make the most of your streaming device and indulge in hours of entertainment right from the comfort of your home.