Introduction
Sending documents via email has become an integral part of our daily routines. Whether for work, school, or personal purposes, being able to attach files to our emails is essential for effective communication. Google Docs, a popular cloud-based document editing platform, offers a convenient way to create and collaborate on documents. If you’re wondering how to attach a Google Doc to an email, you’ve come to the right place.
In this guide, we’ll walk you through the step-by-step process of attaching a Google Doc to an email. Whether you use Gmail or another email service, the procedure is straightforward and will save you time and effort. So, let’s dive in and explore how to share your Google Docs seamlessly with others through email attachments.
Before we begin, it’s important to note that this guide assumes you already have a Google account and a Google Doc that you want to send as an attachment. If you haven’t created a Google Doc yet, head over to Google Drive and create a new document. Once you have the document ready, follow along with the steps below to learn how to attach it to your email.
Now, let’s get started with step one: opening Google Docs!
Step 1: Open Google Docs
The first step in attaching a Google Doc to an email is to open Google Docs itself. Google Docs is a web-based application, so there’s no need to download any additional software.
To open Google Docs, simply go to your preferred web browser and type in “docs.google.com” in the address bar. Press enter, and you’ll be directed to the Google Docs homepage.
If you’re signed in to your Google account, you’ll immediately see a list of your saved documents. If you’re not signed in, click on the “Sign In” button in the top-right corner of the page and enter your Google account credentials.
Once you’re signed in, you can access your Google Docs library, which contains all your saved documents, including the one you want to attach to your email. If you can’t find the document right away, you can search for it using the search bar at the top of the page or navigate through the folders in your Google Drive.
Once you’ve located the document, you’re ready to move on to the next step: selecting the document you want to attach.
Now that you have opened Google Docs, let’s proceed to the next step and select the document you want to attach to your email.
Step 2: Select the Document
Now that you have opened Google Docs, the next step is to select the document that you want to attach to your email.
In your Google Docs library, you will see a list of all your saved documents. Take a moment to browse through the list and locate the specific document you want to share as an attachment.
If you have a lot of documents and find it challenging to locate the document, you can use the search bar at the top of the page. Enter keywords or the title of the document to quickly narrow down the search results and find the desired document.
Once you have located the document, click on its title to open it. This action will take you to the document editor, where you can view and edit the content of the document.
Now, you are ready to proceed to the next step, which involves accessing the “File” menu in Google Docs. This menu will provide you with the option to email the document as an attachment.
With the document selected, you are one step closer to attaching it to your email. Let’s move on to the next step and learn how to access the “File” menu in Google Docs.
Step 3: Click on the “File” Menu
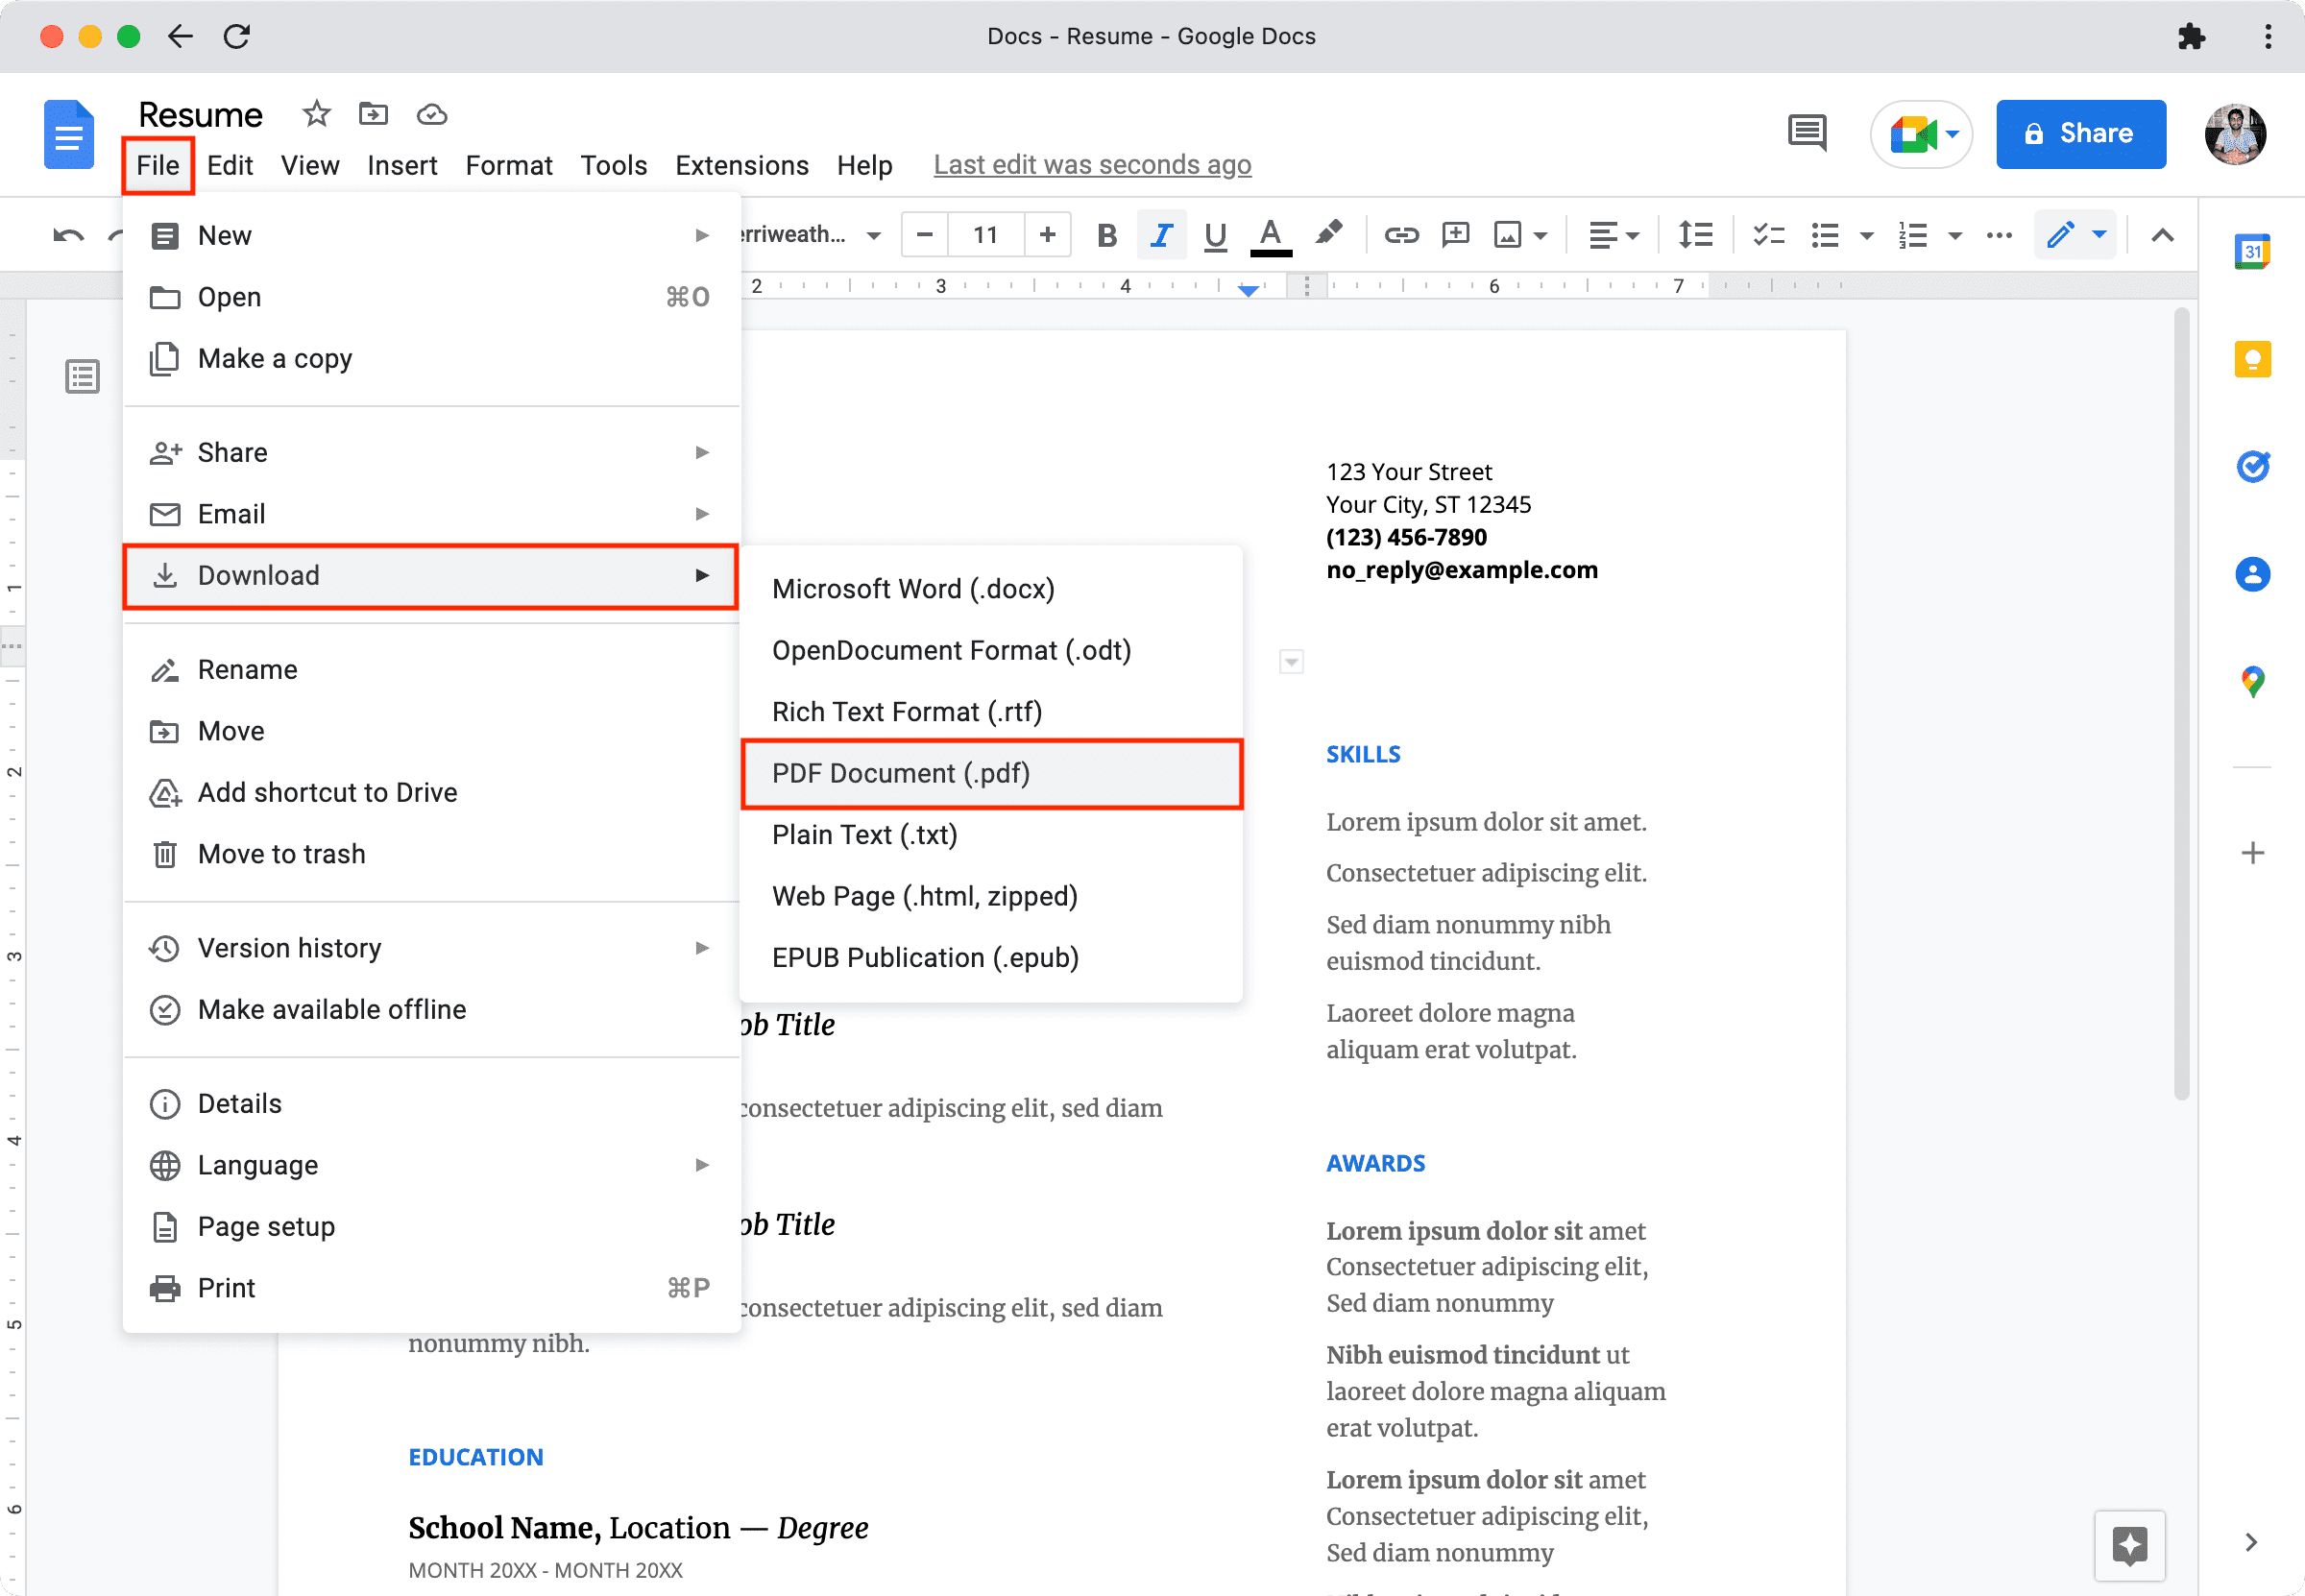
Once you have selected the document you want to attach in Google Docs, it’s time to access the “File” menu. This menu contains various options, including the option to email the document as an attachment.
In the top-left corner of the Google Docs editor, you will see a horizontal toolbar. This toolbar houses several icons and buttons. Look for the “File” option on the leftmost side of the toolbar.
To access the “File” menu, click on the word “File.” A dropdown menu will appear, displaying a list of options such as “New,” “Open,” “Save,” and more.
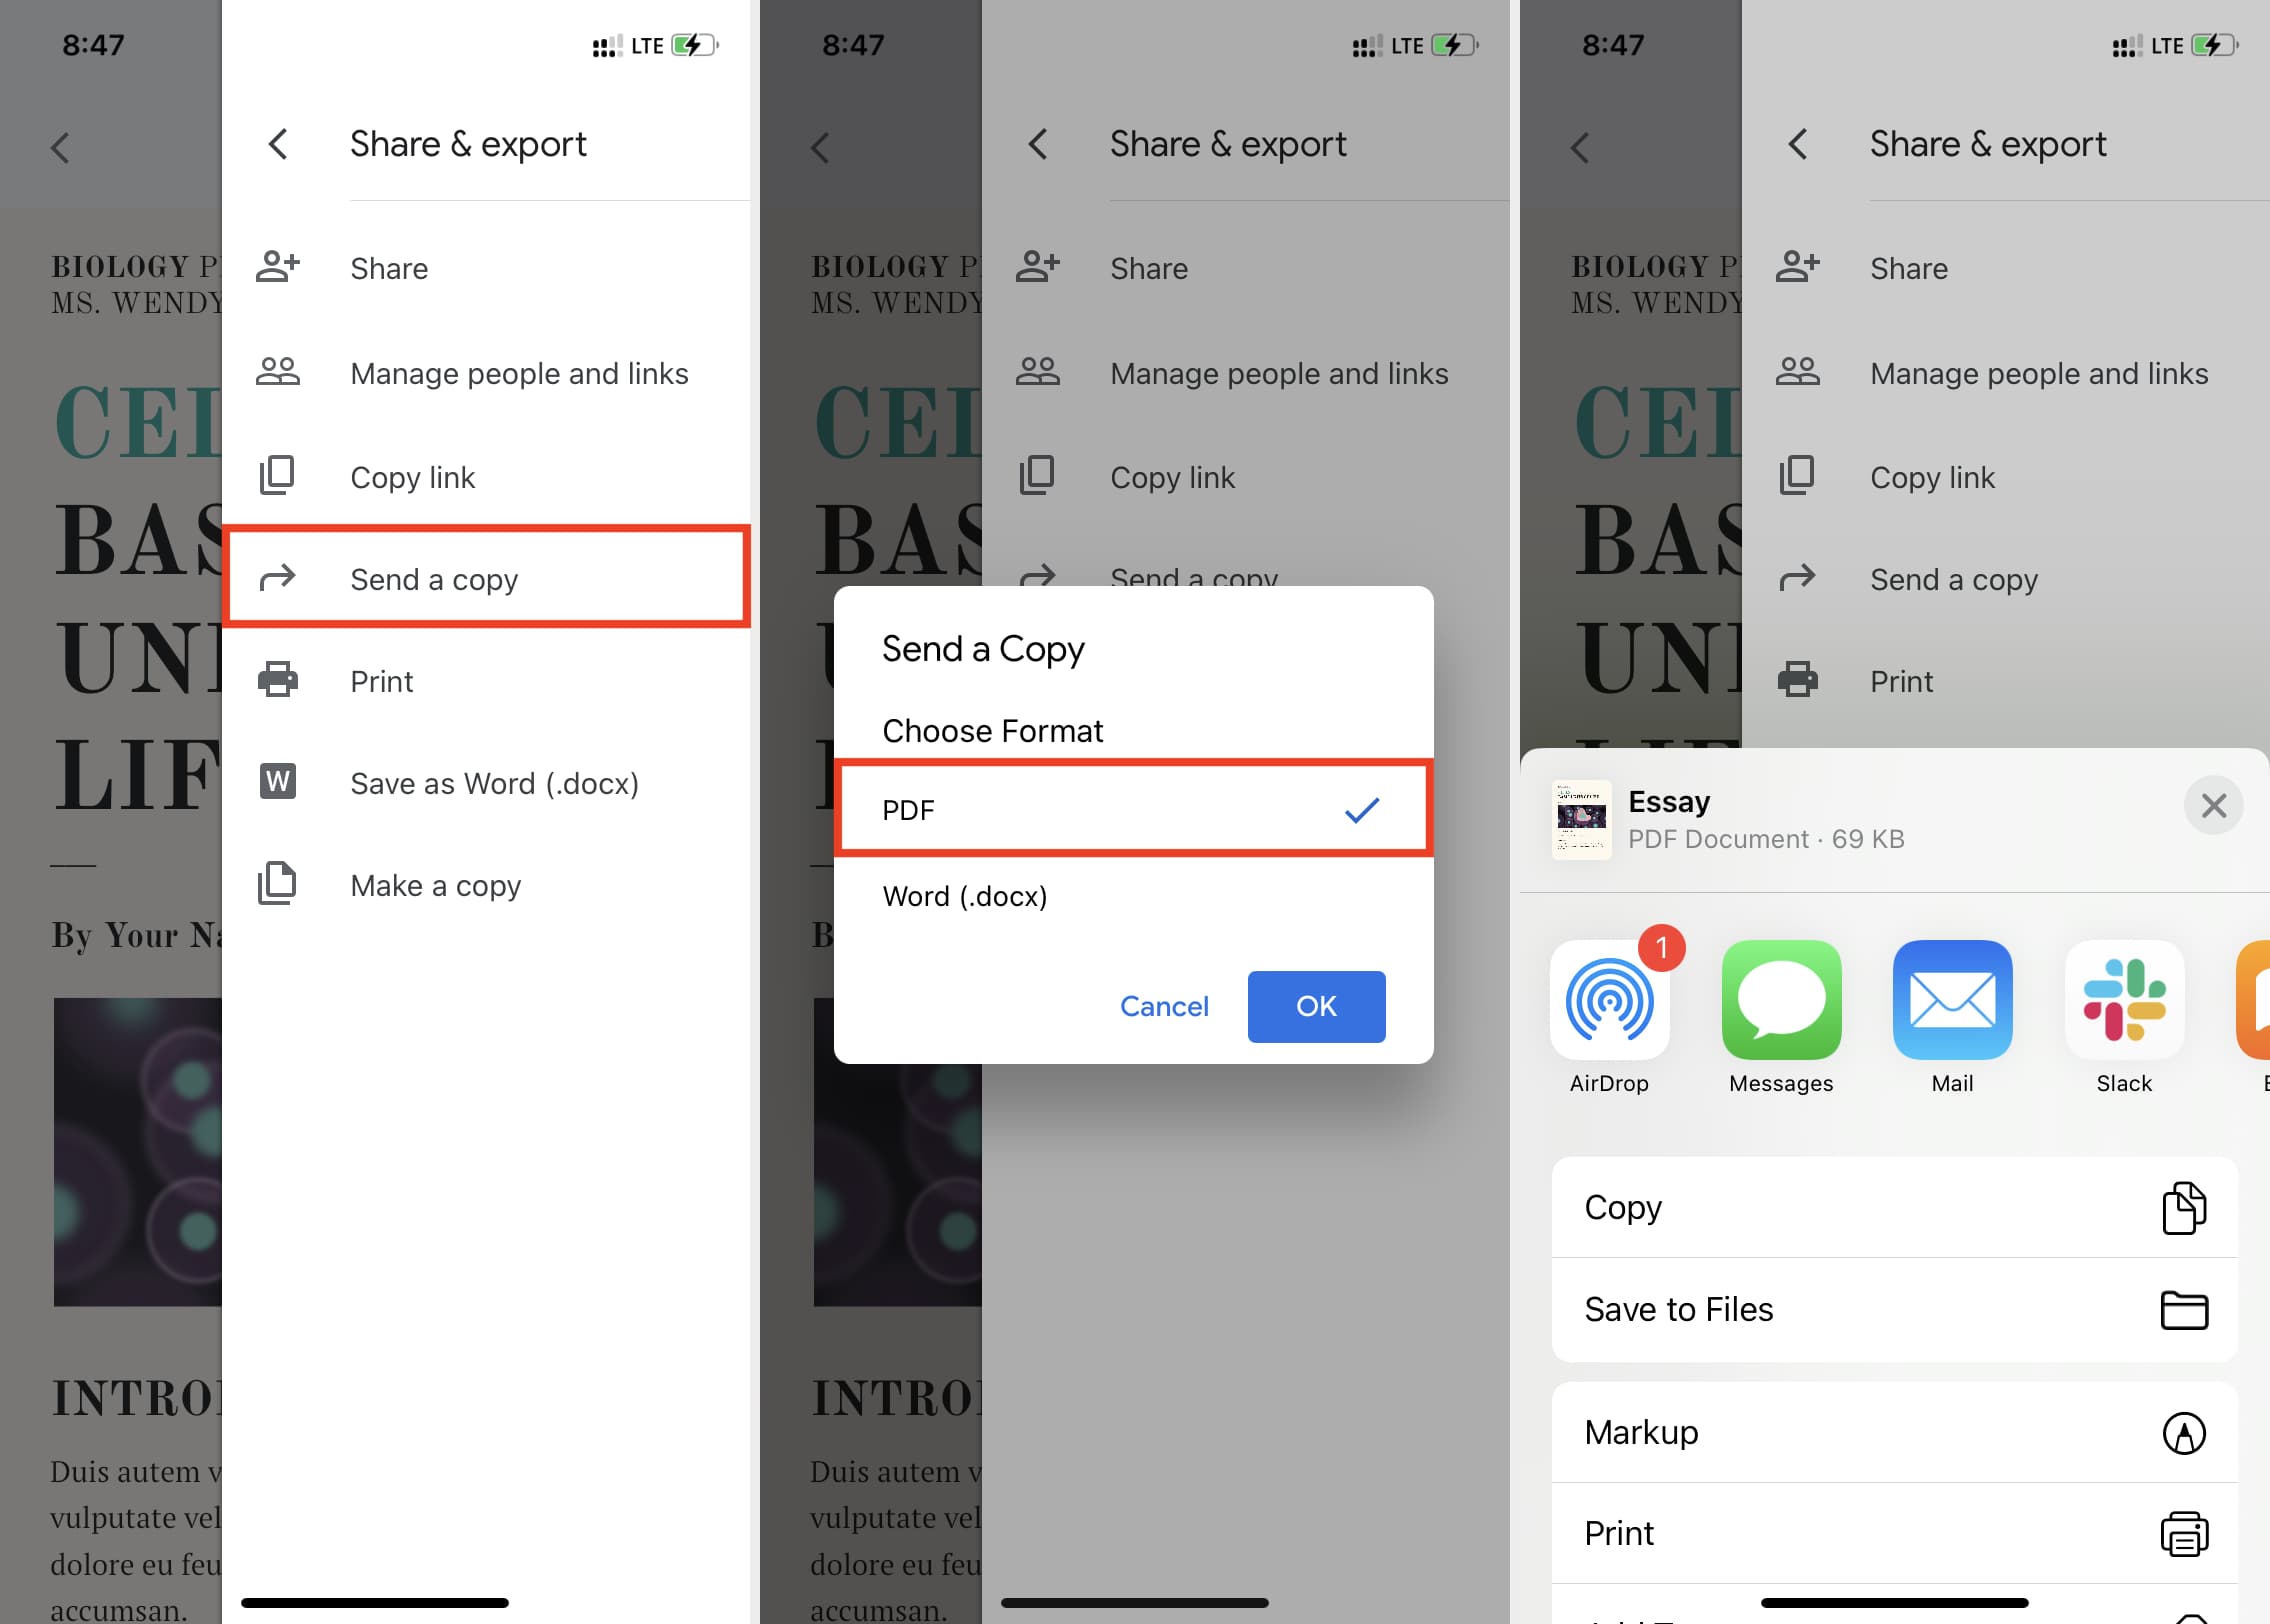
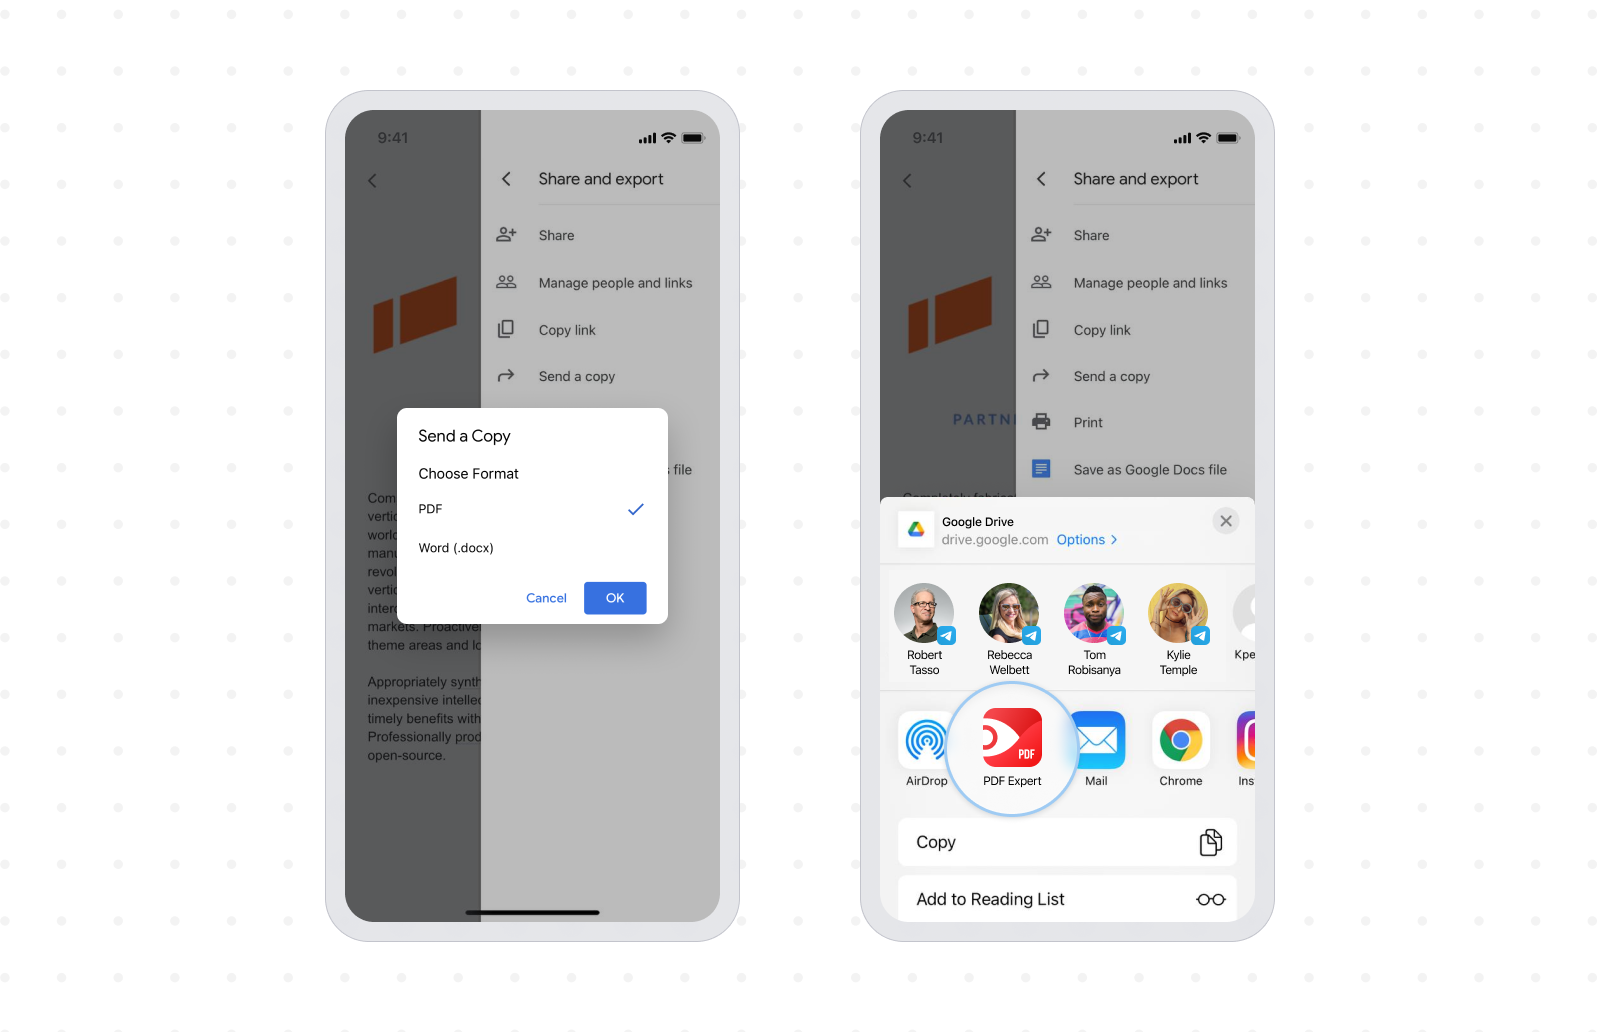
Scroll down this menu until you find the option that says “Email as Attachment.” This option is denoted by an envelope icon and the words “Email as Attachment” next to it.
Once you have located the “Email as Attachment” option in the “File” menu, you’re ready to proceed to the next step: selecting an email app to use for sending the document.
Clicking on the “File” menu and finding the “Email as Attachment” option is a crucial step in the process of attaching a Google Doc to an email. Let’s move on to the next step and choose an email app to use.
Step 4: Select “Email as Attachment”
After clicking on the “File” menu in Google Docs, you will see a dropdown menu with various options. Scroll down until you find the “Email as Attachment” option.
When you locate the “Email as Attachment” option, click on it. This action will initiate the process of attaching your Google Doc to an email.
Depending on your device and browser settings, you may be prompted to select an email app or client to use for sending the email. Google Docs will generate a new email with the attached document, ready for you to compose and send.
If you have multiple email apps installed on your device, you will be presented with a list of options to choose from. Select the email app or client that you prefer to use for sending emails.
Once you have selected the email app, you will be taken to a new email composition window with the attached document already included. This saves you the hassle of manually attaching the document to the email and ensures that it is sent as an attachment rather than just a shared link.
Now that you have successfully selected the “Email as Attachment” option and chosen your preferred email app, you’re ready to move on to the next step: writing your email message.
Selecting the “Email as Attachment” option is a crucial step in the process of attaching a Google Doc to an email. Let’s proceed to the next step and learn how to compose your email message.
Step 5: Choose an Email App
After selecting the “Email as Attachment” option in Google Docs, you will be prompted to choose an email app or client to use for sending the email. The available options will depend on the applications and settings installed on your device.
If you have only one email app installed, Google Docs will automatically select it as the default option and open a new email composition window. The attached document will be included in the email, ready for you to compose and send.
However, if you have multiple email apps installed on your device, you will be presented with a list of options. These may include commonly used email apps such as Gmail, Outlook, Yahoo Mail, or other installed email clients.
To choose an email app, simply click on the desired app from the list. This will open a new email composition window within the selected app, with the attached Google Doc already included.
Keep in mind that the user interface and features of each email app may vary. However, the general process of composing and sending the email will remain the same.
Now that you have selected the email app to use, you’re one step closer to sending your Google Doc as an attachment. The next step is to write your email, including any additional information or instructions you want to include.
Choosing the email app is an essential part of the process when attaching a Google Doc to an email. Let’s proceed to the next step and learn how to write your email message.
Step 6: Write your Email
Once you have selected the email app to use for sending your Google Doc as an attachment, you will be presented with a new email composition window. This is where you can craft your email message, including any necessary information, instructions, or additional context you want to provide along with the attached document.
Begin by addressing the recipient(s) of your email. Enter the email addresses in the “To” field of the composition window. If you are sending the email to multiple recipients, separate their email addresses with commas or use the appropriate field for Cc (Carbon Copy) or Bcc (Blind Carbon Copy) recipients.
Next, it’s time to write the body of your email. Start by greeting the recipient(s) with a polite and appropriate salutation. For instance, “Dear,” “Hello,” or “Hi” followed by their name or a neutral term like “Team” or “Colleagues.”
In the body of the email, you can provide any necessary context or additional information regarding the attached Google Doc. This could include instructions on how to review, edit, or provide feedback on the document. You could also mention the purpose of sharing the document and any specific deadlines or expectations.
Keep the email concise and clear. Use proper spelling, grammar, and punctuation to ensure your message is professional and easy to read. If necessary, use bullet points or numbered lists to organize information effectively.
If you want to add a personal touch to your email, consider using a friendly and personable tone. It’s always a good idea to establish a positive rapport with your recipients.
Before sending the email, don’t forget to include a polite closing. Common options include “Best regards,” “Thank you,” or “Sincerely,” followed by your name. You may also want to include any relevant contact information or a brief signature at the end of the email.
Now that you have written your email message, you are ready for the final step: sending the email with the attached Google Doc!
Writing your email effectively is a crucial part of the process when attaching a Google Doc. Let’s move on to the final step and learn how to send the email.
Step 7: Send the Email
After writing your email message and ensuring all the necessary details are included, it’s time to send the email with the attached Google Doc. This final step will complete the process of attaching and sharing your document.
In the email composition window, locate the “Send” button. Depending on the email app or client you are using, this button may be located at the top or bottom of the window.
Before clicking on the “Send” button, take a moment to review your email. Double-check the recipient(s), subject line, and the content of your message to ensure everything is accurate and error-free.
If you want to save a copy of the email for your records, some email apps provide an option to save the email as a draft or make a copy of the sent message in your email account.
Once you are confident that everything is in order, click on the “Send” button. Your email, with the attached Google Doc, will be sent to the recipients you specified.
After sending the email, some email apps may provide a confirmation message or notification to let you know that the email has been successfully sent. At this point, you can close the email composition window and proceed with your other tasks.
Congratulations! You have successfully attached and sent your Google Doc as an email attachment. The recipients will now be able to open, view, and work with the attached document based on the permissions you have set.
Remember to check your email for any responses or feedback regarding the attached Google Doc. This will ensure effective communication and collaboration with the recipients.
Now that you have completed the process of attaching and sending the email, take a moment to celebrate your accomplishment. You have successfully shared your Google Doc as an email attachment, making it easier for others to access and collaborate on the document.
By following these steps, you can efficiently attach Google Docs to your emails and streamline your document-sharing process. Happy emailing!
Conclusion
Attaching Google Docs to your emails provides a convenient way to share and collaborate on documents with others. Whether it’s for work, school, or personal use, being able to send a Google Doc as an attachment saves time and enables efficient communication.
In this guide, we have explained the step-by-step process of attaching a Google Doc to an email. From opening Google Docs to selecting the document, accessing the “File” menu, choosing an email app, writing your email message, and finally sending the email, each step has been outlined to help you navigate the process with ease.
Remember, the key is to follow the steps and instructions carefully, ensuring that you are selecting the correct document, email app, and composing a clear and concise message to accompany the attachment.
By utilizing these methods, you can share your Google Docs seamlessly with others, allowing for collaboration, feedback, and efficient document sharing.
Keep in mind that email apps and interfaces may vary slightly, but the general process remains the same. Take the time to explore the features and options within your chosen email app to make the most out of this functionality.
Now that you have learned how to attach Google Docs to your emails, you can streamline your document sharing and enhance productivity in your personal and professional endeavors.
So, go ahead and start sharing those Google Docs with ease. Happy emailing!