Introduction
Welcome to our guide on how to allocate more RAM to a Forge server. If you’re a Minecraft enthusiast or server administrator, you know the importance of having sufficient RAM to ensure a smooth and lag-free gaming experience. Fortunately, with Forge, you have the flexibility to allocate more RAM to your server, giving it the necessary resources to handle heavy server loads and mods.
In this article, we will walk you through the step-by-step process of allocating more RAM to your Forge server. Whether you’re running a small private server for friends or a large public server community, optimizing your allocated RAM can make a significant difference in the overall performance and stability of your server.
Before we dive into the steps, it’s important to note that allocating more RAM to your server requires a basic understanding of server administration and access to the server control panel. Additionally, make sure to familiarize yourself with the system requirements of the server and ensure that your hosting plan has enough available resources.
Now, without further ado, let’s get started on maximizing your server’s potential by increasing its RAM allocation!
Why allocate more RAM to a Forge server?
Allocating more RAM to your Forge server can have several significant benefits for both server administrators and players. Here are a few key reasons why increasing your server’s RAM allocation is crucial:
- Improved Performance: Minecraft servers, especially those running mods or plugins, require sufficient resources to handle the increasing demands of players and server activities. By allocating more RAM, you provide your server with additional memory to process and handle these tasks efficiently. This can lead to smoother gameplay, reduced lag, and faster response times.
- Support for Heavy Server Loads: If you’re running a popular server with a substantial player base or planning to host multiple worlds and game modes, allocating more RAM becomes even more critical. The additional memory allows your server to handle the increased load, simultaneous connections, and resource-intensive mods without becoming overwhelmed or experiencing frequent crashes.
- Smooth Mod Integration: Forge is a powerful modding platform that enhances the gameplay experience by adding new features, items, and mechanics to Minecraft. However, many mods require a significant amount of RAM to operate smoothly. By allocating more RAM, you ensure that your server has enough resources to run these mods without performance issues, crashes, or conflicts.
- Future-Proofing: As Minecraft evolves and new mods, plugins, and updates are released, the demand for system resources also increases. By allocating additional RAM, you future-proof your server, ensuring it can handle the requirements of upcoming updates and enhancements. This allows you to maintain a stable and enjoyable gaming experience for both current and future players.
Overall, allocating more RAM to your Forge server is a necessary step to ensure optimal performance, stability, and an enjoyable Minecraft experience for both administrators and players. Now that we understand why increasing your server’s RAM allocation is crucial, let’s proceed to the step-by-step process of how to allocate more RAM to your Forge server.
Step 1: Checking server requirements
Before adjusting the RAM allocation for your Forge server, it’s essential to check the server requirements and ensure that your hosting plan supports the desired RAM upgrade. Here’s how to get started:
- Review Hosting Plan: Check your hosting plan details or contact your hosting provider to determine the maximum amount of RAM you can allocate to your server. Different hosting plans have varying resource limits, so it’s crucial to stay within the allocated resources to avoid performance issues or breaches of your hosting agreement.
- Verify Minecraft Version: Ensure that your server is running the correct version of Minecraft that is compatible with the Forge modding platform. Different Minecraft versions have different RAM requirements, so it’s essential to match the server’s needs to avoid any compatibility issues.
- Consider Mod Requirements: If you plan to utilize mods or plugins on your Forge server, it’s important to check their specific RAM requirements. Some mods may require additional RAM allocation compared to vanilla Minecraft. Take note of these requirements and consider them when deciding how much RAM to allocate to your server.
- Monitor Server Performance: If you’re experiencing frequent lag, crashes, or poor server performance, it could be a sign that your server is struggling with its current RAM allocation. Keep an eye on server resource usage, such as CPU and RAM usage, to identify any potential bottlenecks that can be resolved by increasing the RAM allocation.
By thoroughly understanding the server requirements and current performance limitations, you can make informed decisions about the amount of RAM to allocate to your Forge server. Once you have verified these requirements, we can move on to the next step of accessing the server control panel.
Step 2: Accessing the server control panel
To allocate more RAM to your Forge server, you need to access the server’s control panel. The exact steps to access the control panel may vary depending on your hosting provider. Here are the general steps to follow:
- Login to Your Hosting Account: Visit your hosting provider’s website and log in to your account using the provided credentials. If you’re unsure of your login details, consult your hosting provider’s documentation or contact their support team for assistance.
- Locate the Server Management Area: Once logged in, navigate to the server management area or control panel. This is the hub where you can manage various aspects of your server, including its RAM allocation.
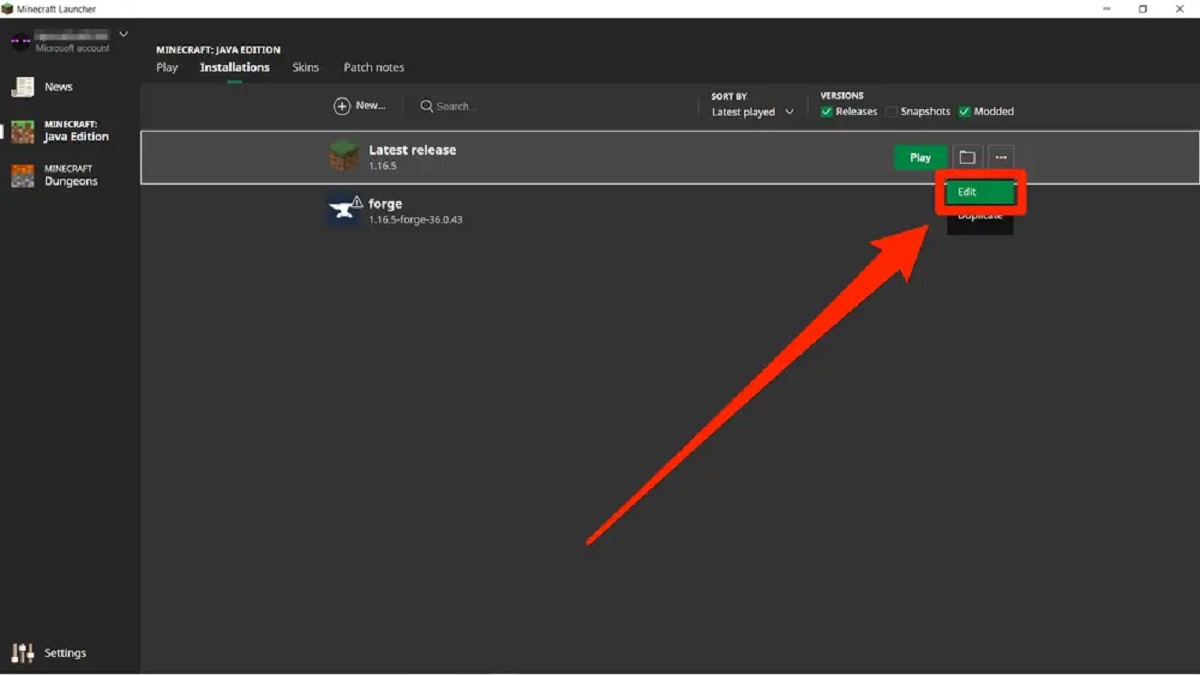
- Select Your Forge Server: Depending on your hosting setup, you may have multiple servers listed in your control panel. Locate the specific Forge server for which you want to adjust the RAM allocation and select it.
- Access Server Settings: Look for an option or tab labeled “Server Settings,” “Configuration,” or something similar. This is where you can modify various server settings, including the RAM allocation.
If you encounter any difficulties accessing the server control panel or cannot locate the necessary settings, don’t hesitate to reach out to your hosting provider’s support team for guidance. They will be able to assist you in finding the control panel and accessing the relevant server settings.
Once you have successfully accessed the server control panel, the next step is to locate the RAM allocation settings, which we’ll cover in the next section.
Step 3: Locating the RAM allocation settings
Now that you have accessed the server control panel, the next step is to locate the RAM allocation settings for your Forge server. Follow these general steps to find the RAM allocation settings:
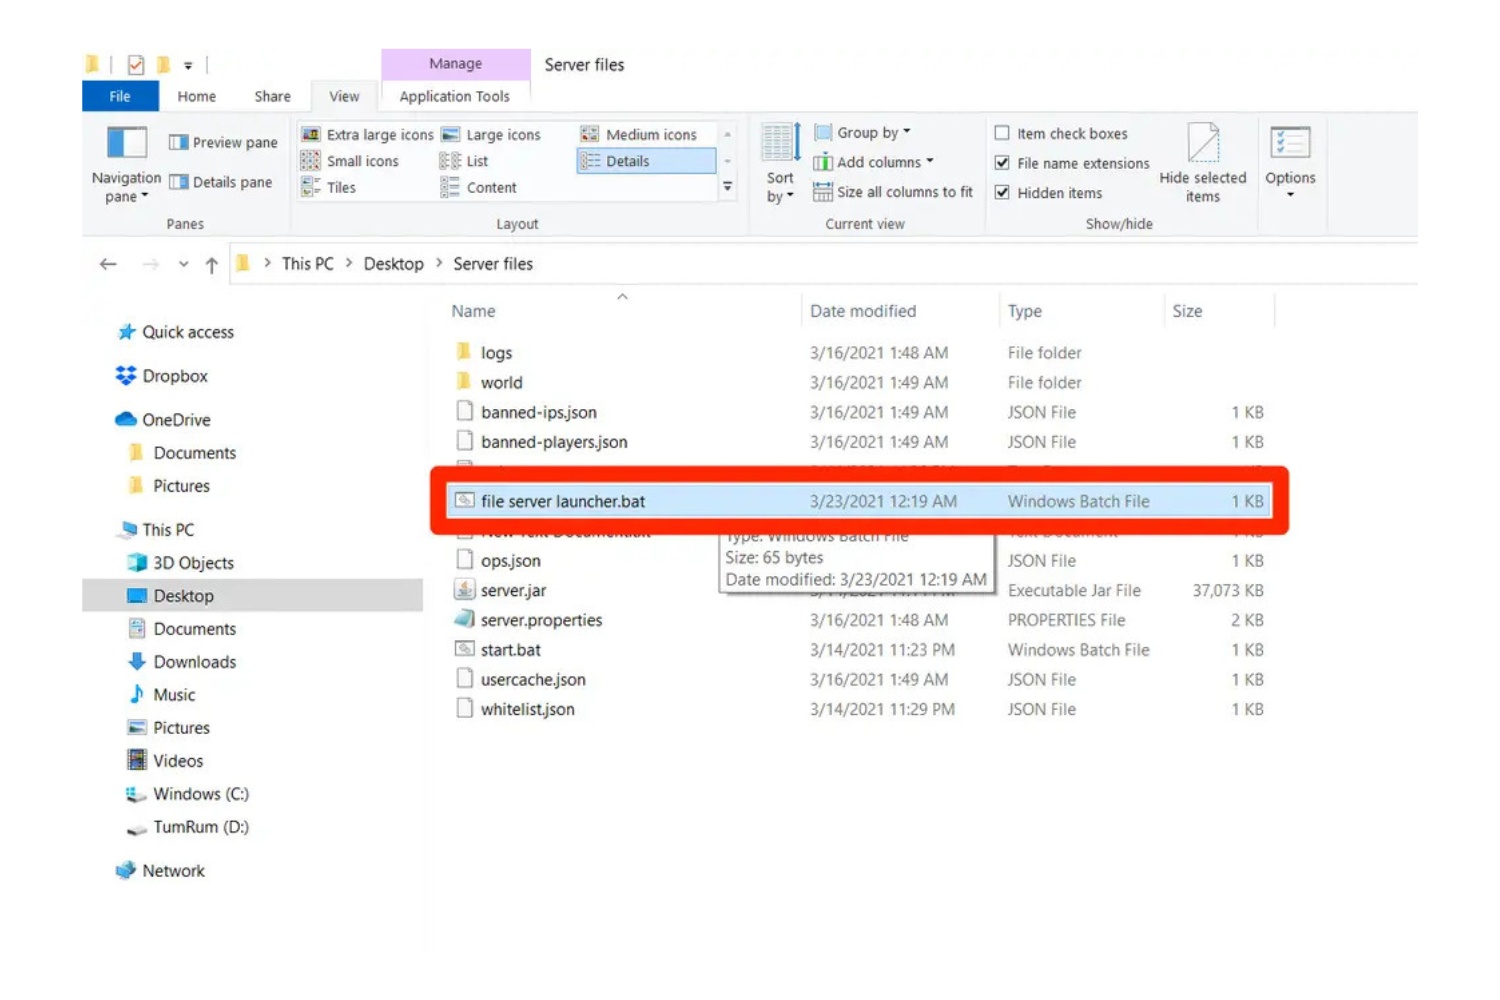
- Server Configuration: Look for a section or tab within the control panel labeled “Server Configuration,” “Server Settings,” or something similar. This is where you will find the different settings related to your server’s configuration.
- Memory or RAM Options: Within the server configuration section, there should be an option specifically related to memory or RAM. It might be labeled as “Memory Allocation,” “RAM Allocation,” or similar terms. Click on that option to access the RAM allocation settings.
- Available RAM Slider: In the RAM allocation settings, you will typically find a slider or input field that allows you to adjust the amount of RAM allocated to your Forge server. The available RAM options may be presented in megabytes (MB) or gigabytes (GB).
- Additional Settings: Depending on your server control panel, you may find other related settings in this section, such as CPU priority, garbage collection options, or performance optimization settings. Feel free to explore and adjust these settings if desired.
It’s essential to exercise caution when adjusting the RAM allocation settings. Allocating too little RAM can lead to poor server performance, while allocating too much RAM can result in wasted resources and potential conflicts with other processes running on the server.
Once you have located the RAM allocation settings and are ready to adjust the allocation, follow the next step for guidance on making the necessary adjustments.
Step 4: Adjusting RAM allocation
After locating the RAM allocation settings for your Forge server, it’s time to adjust the amount of RAM allocated. Here are the steps to follow:
- Assess Current Allocation: Take note of the current RAM allocation, if available. This will help you determine the desired amount of RAM to allocate and ensure that the adjustments are accurate.
- Drag the Slider or Enter Value: Depending on the server control panel, you may have a slider or an input field to adjust the RAM allocation. If using a slider, drag it to increase or decrease the allocated RAM. If using an input field, enter the desired value in megabytes (MB) or gigabytes (GB).
- Consider Available Resources: When adjusting the RAM allocation, consider the resources available on your hosting plan. Ensure that you don’t allocate more RAM than your plan allows, as this can lead to stability issues or breaches of your hosting agreement.
- Balance Performance and Stability: Aim to strike a balance between performance and stability when adjusting the RAM allocation. Allocating too little RAM may result in lag and poor server performance, while allocating too much can lead to wasted resources. Experiment with different allocations and monitor server performance to find the optimal setting for your specific server and player load.
It’s important to note that adjusting the RAM allocation will require the server to restart for the changes to take effect. Make sure to save the settings and proceed to the next step to restart the server.
Now that the RAM allocation has been adjusted, it’s time to save the changes and restart the server to apply the new allocation, which we’ll cover in the next step.
Step 5: Saving changes and restarting the server
Once you have adjusted the RAM allocation for your Forge server, it’s crucial to save the changes and restart the server for the new allocation to take effect. Here’s how to proceed:
- Save Configuration: Look for a “Save” or “Apply Changes” button in the RAM allocation settings section. Click on it to save the new RAM allocation configuration.
- Confirm Restart: After saving the changes, you will likely receive a prompt or confirmation message indicating that a server restart is required for the new RAM allocation to apply. Take note of this message and be prepared to proceed with the restart process.
- Restart the Server: Locate the option to restart the server within the control panel. This may be labeled as “Restart Server,” “Reboot,” or similar terms. Click on this option to initiate the server restart.
- Wait for Restart: The server restart process may take a few moments. During this time, the server will shut down and then start back up with the new RAM allocation applied. Be patient and allow the server sufficient time to complete the restart process.
- Verify Changes: Once the server has restarted, you can verify the new RAM allocation by accessing the server control panel’s RAM allocation settings. Ensure that the allocated RAM matches the desired amount you set earlier.
It’s worth noting that during the server restart, players may experience a temporary disconnect from the server. It’s advisable to inform your players in advance to avoid any confusion or frustration.
With the server successfully restarted and the new RAM allocation in place, your Forge server is now operating with the increased memory resources. In the next step, we will cover how to verify the new RAM allocation.
Step 6: Verifying the new RAM allocation
After adjusting the RAM allocation and restarting your Forge server, it’s important to verify that the new allocation is applied correctly. Here’s how you can verify the new RAM allocation:
- Access Server Control Panel: Log back into the server control panel using your hosting account credentials.
- Locate RAM Allocation Settings: Navigate to the RAM allocation settings again, as you did in Step 3.
- Check Allocated RAM: In the RAM allocation settings, verify that the allocated RAM matches the desired amount you set earlier. It should reflect the changes you made in Step 4.
- Monitor Server Performance: After verifying the RAM allocation, it’s a good idea to monitor your server’s performance over time. Check for any improvements in server responsiveness, reduced lag, or smoother gameplay. If you notice any issues, you may need to readjust the RAM allocation or consider other optimizations.
- Seek Feedback: Reach out to your players or server community and gather feedback on their gaming experience after the RAM allocation adjustment. Ask them to share any improvements they have noticed or if they are still experiencing any performance issues. Their feedback can help you fine-tune the server settings further.
It’s important to periodically review and reassess the RAM allocation as your server’s needs may change over time. As your player base grows or new mods are added, you may need to adjust the RAM allocation accordingly to maintain optimal performance.
Congratulations! You have successfully verified the new RAM allocation for your Forge server. By ensuring that the server has sufficient memory resources, you can provide a smoother and more enjoyable gaming experience for your players.
Conclusion
Allocating more RAM to your Forge server is a crucial step in optimizing its performance and providing a seamless gaming experience for players. By following the steps outlined in this guide, you can successfully adjust the RAM allocation and take full advantage of the resources available to you.
We began by emphasizing the importance of checking server requirements, understanding the Minecraft version, considering mod requirements, and monitoring server performance. These steps ensure that you make informed decisions about the amount of RAM to allocate and avoid any compatibility or resource limitations.
Next, we covered how to access the server control panel and locate the RAM allocation settings. Familiarizing yourself with the control panel’s layout and finding the specific settings is essential for making adjustments confidently.
We then discussed the process of adjusting the RAM allocation, highlighting the need to strike a balance between performance and stability. It’s crucial to consider the available resources and experiment with different allocations to find the optimal setting for your server and player load.
After saving the changes and restarting the server, we emphasized the importance of verifying the new RAM allocation. By accessing the server control panel and double-checking the allocated RAM, you can ensure that the adjustments are accurately applied.
Lastly, we mentioned the significance of monitoring server performance and seeking feedback from players. Regularly reviewing the RAM allocation and gathering input allows you to fine-tune the server’s settings and provide the best possible gameplay experience.
Allocating more RAM to your Forge server demonstrates your commitment to delivering a high-quality and lag-free environment for Minecraft players. By following the steps outlined in this guide, you are now equipped with the knowledge to optimize your server’s performance and provide an exceptional gaming experience.