Introduction
Welcome to this step-by-step guide on how to add subtitles using Windows Movie Maker. Subtitles are an essential component of any video production, as they provide valuable context and help viewers understand the content better. Whether you’re creating a movie, a tutorial, or a YouTube video, adding subtitles can significantly enhance the overall viewing experience.
Windows Movie Maker is a user-friendly video editing software available for Windows users. It offers a variety of features, including the ability to add subtitles to your videos. By following the simple steps outlined in this guide, you’ll be able to add impactful subtitles that will engage your audience and make your videos more accessible to a wider range of viewers.
In this tutorial, we will walk you through the process of adding subtitles to your videos using Windows Movie Maker. You’ll learn how to import your video file, add text to the video, customize the subtitle appearance, adjust the timing of the subtitles, and save your video with the subtitles included.
Adding subtitles not only benefits viewers who may be hearing impaired or non-native English speakers, but it also improves the overall search engine optimization (SEO) of your video. Search engines can index text embedded in videos, which can help increase your video’s visibility and attract a larger audience.
So, whether you’re looking to make your videos more accessible or want to improve your video’s SEO, let’s dive in and learn how to add subtitles using Windows Movie Maker.
Step 1: Open Windows Movie Maker
The first step in adding subtitles to your video using Windows Movie Maker is to open the software on your Windows computer. Here’s how:
- Click on the Windows “Start” button located at the bottom left corner of your screen.
- Scroll through the list of installed applications and locate “Windows Movie Maker.”
- Click on “Windows Movie Maker” to open the software.
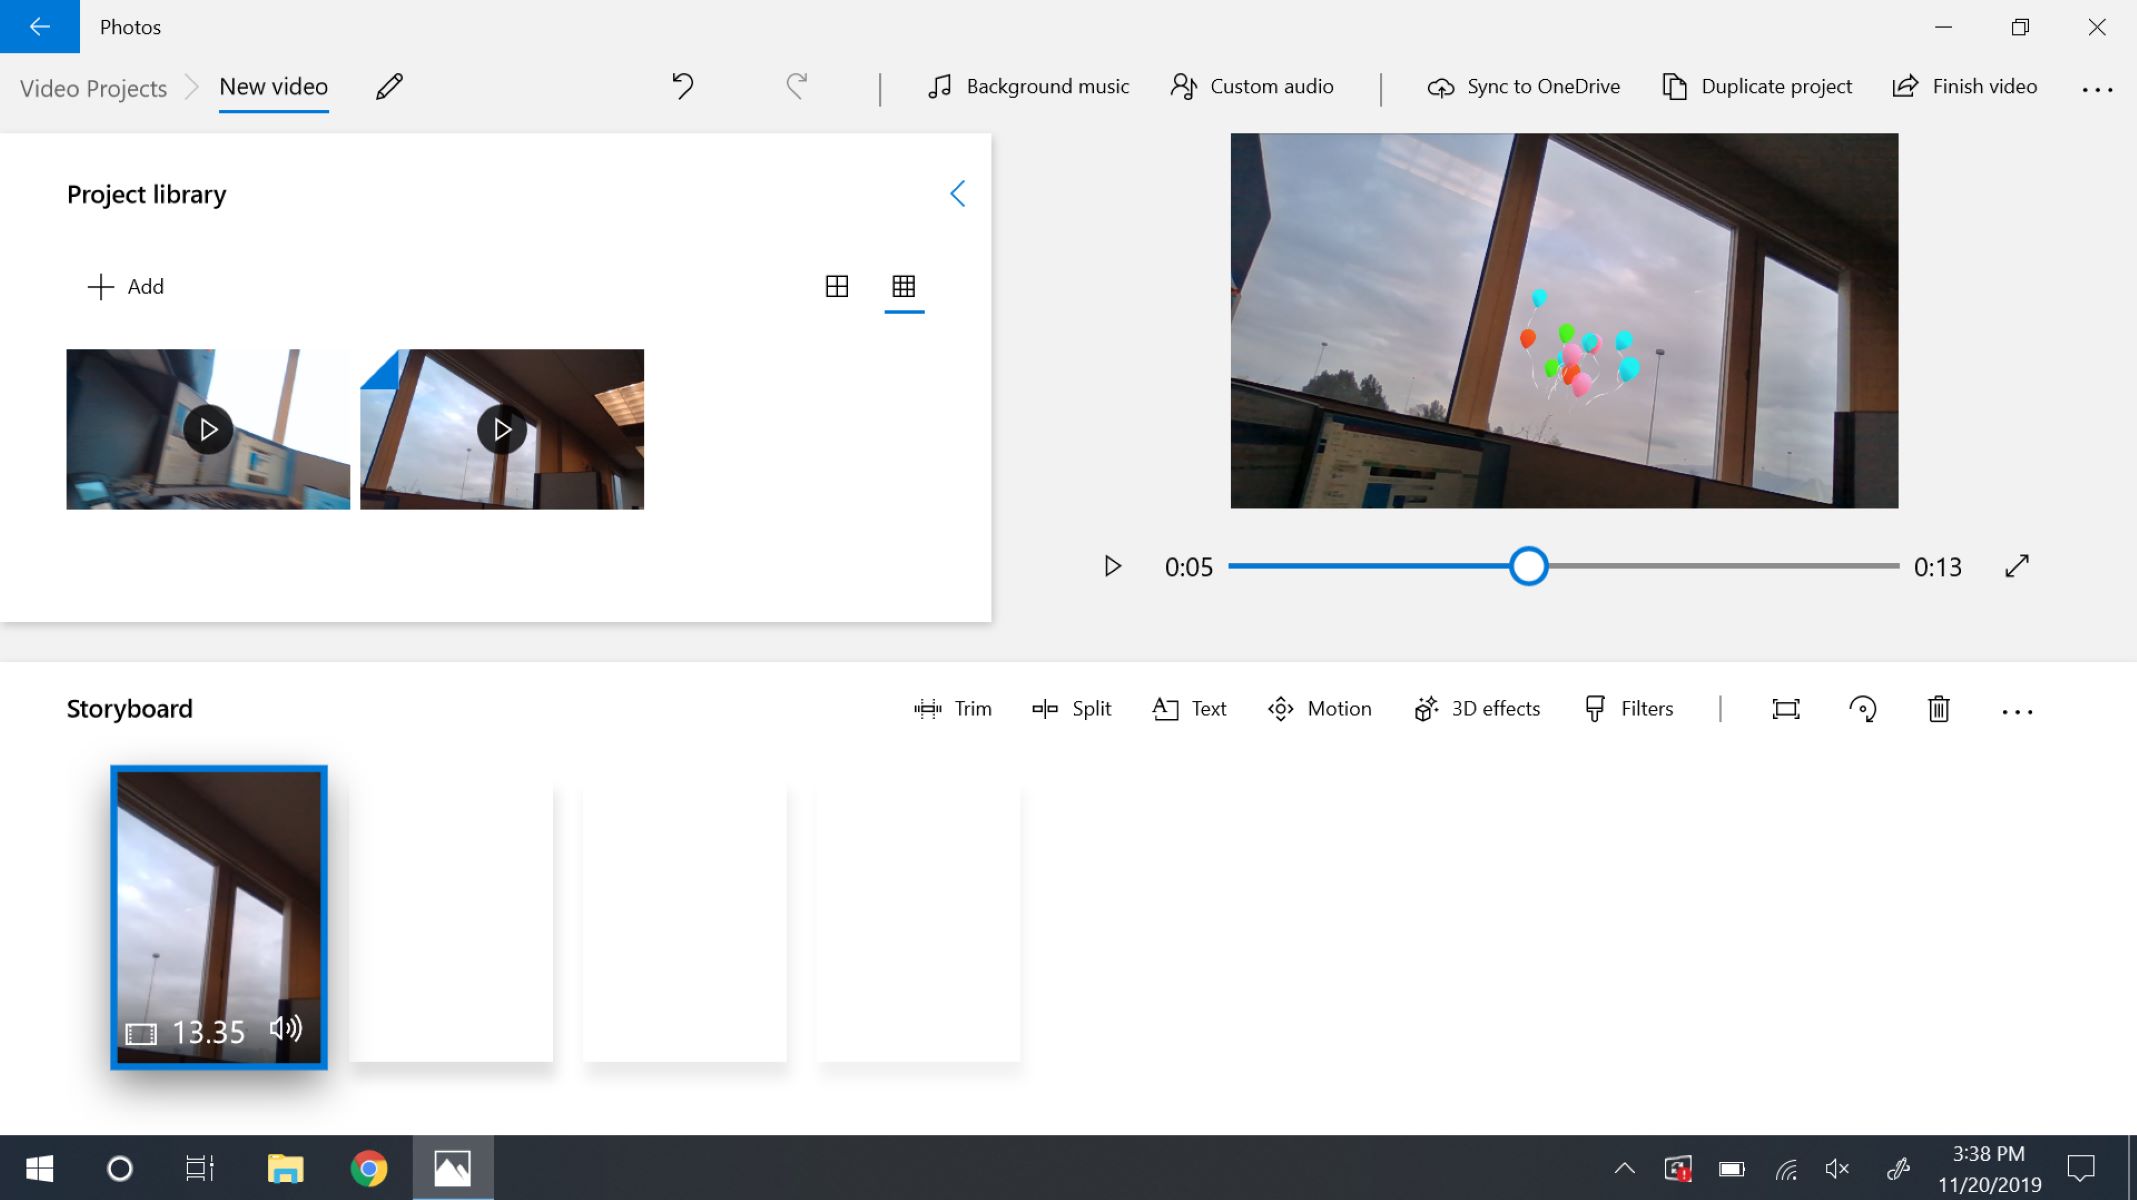
Once the software is open, you will be greeted with a clean and intuitive interface that provides easy access to all the necessary tools and features for editing your videos. The main window is divided into sections, such as “Preview,” “Storyboard,” and “Timeline,” which allow you to view and manipulate your video content.
By default, Windows Movie Maker might open a blank project, but if you have an existing project you want to add subtitles to, simply click on “File” in the top left corner and select “Open project” to navigate to your project file and open it.
Now that you have Windows Movie Maker open and your project loaded, you’re ready to move on to the next step: importing your video file.
Step 2: Import your video file
Once you have opened Windows Movie Maker and your project is loaded, the next step is to import the video file you want to add subtitles to. Follow these instructions to import your video:
- Click on the “Home” tab in the top menu of Windows Movie Maker.
- Within the “Add” group, click on the “Add Videos and Photos” button.
- A file browser window will appear. Navigate to the location where your video file is saved.
- Select the video file you want to import by clicking on it once.
- Click on the “Open” button to import the video into your project.
Windows Movie Maker supports a wide range of video file formats, including AVI, MP4, MPEG, WMV, and more. This allows you to work with various types of video files and ensures compatibility with different devices and platforms.
After importing your video file, it will appear in the “Storyboard” or “Timeline” section of the interface, depending on your preferred editing view. You can arrange and edit your clips, trim the video, add transitions and effects, and more within the software to create a professional-looking video.
Now that your video file is imported into Windows Movie Maker, you’re ready to proceed to the next step: adding text to the video to create subtitles.
Step 3: Add text to the video
Once you have imported your video file into Windows Movie Maker, the next step is to add text to create subtitles. Follow these simple instructions to add text to your video:
- Click on the “Home” tab in the top menu of Windows Movie Maker.
- Within the “Tools” group, click on the “Caption” button.
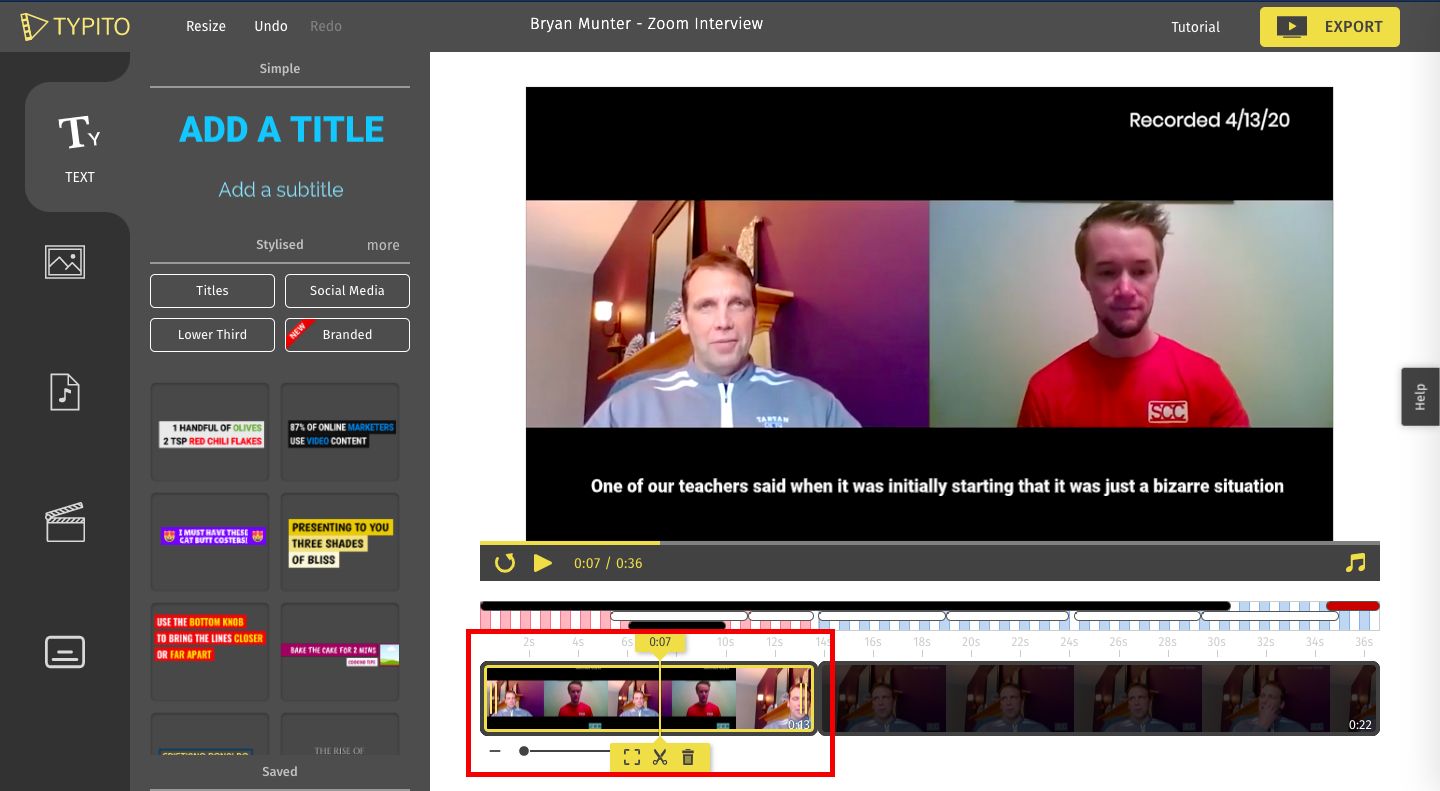
- A text box will appear on your video preview.
- Type in the desired subtitle text in the text box.
- Use the on-screen controls to position and resize the text box to the desired location on the video.
You can add multiple text boxes at different timestamps throughout the video to create subtitles for different sections or dialogue. Simply repeat the above steps for each subtitle you want to add. It is important to note that Windows Movie Maker does not provide advanced formatting options for the text, such as font styles or colors. However, you can customize the appearance of the subtitle text in the next step.
Furthermore, Windows Movie Maker allows you to add additional text effects or animations to make your subtitles visually appealing. To do this:
- Select the text box.
- Click on the “Format” tab that appears in the ribbon menu.
- Within the “Text Tools” group, you’ll find various options to apply effects like shadow, outline, or glow to the text.
- Experiment with these options to enhance the visual impact of your subtitles.
By adding text to your video and customizing its appearance, you’re one step closer to creating engaging and professional-looking subtitles. The next step is to adjust the timing of the subtitles to ensure they match the corresponding video segments perfectly.
Step 4: Customize the subtitle appearance
After adding text to your video and positioning it properly, the next step is to customize the appearance of the subtitles. Windows Movie Maker provides limited options for customizing the subtitle appearance, but you can still make adjustments to improve readability and match your video’s style. Follow these instructions to customize the appearance of your subtitles:
- Select the text box containing the subtitle you want to customize.
- Click on the “Format” tab that appears in the ribbon menu.
- Within the “Text Tools” group, you’ll find options to change the font, font size, and alignment of the subtitle text.
- Choose a font that is easy to read and complements the style of your video. Arial, Helvetica, or Calibri are good options.
- Adjust the font size to ensure the subtitle text is legible on various screen sizes.
- Align the subtitle text to your preference, such as center, left, or right alignment.
While Windows Movie Maker does not offer extensive formatting options, you can still enhance the appearance of your subtitles by making these adjustments. Keep in mind that it’s important to prioritize clarity and readability when choosing the font style, size, and alignment.
In addition to formatting the subtitle text, you can also adjust the transparency (opacity) of the text box to make it blend seamlessly into your video. This can be useful if you want the subtitles to appear as if they are embedded within the video itself. To adjust the transparency:
- Select the text box.
- Click on the “Format” tab in the ribbon menu.
- Within the “Text Tools” group, you’ll find the “Transparency” slider.
- Slide the transparency slider to your desired level.
- Preview the video to ensure the subtitles are clearly visible but not distracting.
By customizing the appearance of your subtitles, you can create a more cohesive and visually appealing video. Once you are satisfied with the subtitle appearance, you’re ready to move on to the next step: adjusting the timing of the subtitles to sync with the video.
Step 5: Adjust subtitle timing
After adding and customizing the appearance of your subtitles, the next step is to adjust their timing to ensure they appear on screen in sync with the corresponding video segments. Follow these instructions to adjust the timing of your subtitles using Windows Movie Maker:
- Select the text box containing the subtitle you want to adjust.
- Click on the “Duration” tab that appears in the ribbon menu.
- Enter the start and end times for the subtitle in the respective fields.
- Alternatively, you can click and drag the edges of the text box on the timeline to adjust the duration visually.
- Repeat these steps for each subtitle to ensure accurate timing for all the text boxes.
It’s essential to get the timing of your subtitles right so that they appear on screen exactly when the corresponding dialogues or content are being spoken or displayed in the video. This will ensure a seamless viewing experience for your audience.
To preview your subtitles and check their timing:
- Click on the “Play” button in the preview pane to start playing the video.
- Observe how the subtitles appear and adjust their timing if necessary.
- Pause, rewind, and play as needed to fine-tune the subtitle timing.
By carefully adjusting the subtitle timing, you can create a more immersive and synchronized viewing experience for your audience. Once you’re satisfied with the timing of your subtitles, you’re ready for the final step: saving your video with the subtitles included.
Step 6: Save your video with subtitles
After adding subtitles, customizing their appearance, and adjusting their timing, the final step is to save your video with the subtitles included. Windows Movie Maker offers various options to save and export your video in different formats and qualities. Follow these instructions to save your video with subtitles:
- Click on the “File” tab in the top left corner of Windows Movie Maker.
- From the dropdown menu, click on “Save Movie.”
- A submenu will appear with different options:
- Choose the option that suits your needs. For example, you can select “Recommended for this project” to save the video with the best quality settings based on your project settings.
- You can also choose other options, such as saving the video for playback on a computer, for sharing online, or for burning to a DVD.
- After selecting your desired option, choose a location on your computer to save the video file.
- Provide a name for the video file and click on the “Save” button.
Windows Movie Maker will now start the process of saving your video with the subtitles. The time it takes to save the video will vary depending on the length of the video and the settings you have chosen.
Once the saving process is complete, you can navigate to the location where you saved the video file and play it to see the subtitles in action. Congratulations! You have successfully added subtitles to your video using Windows Movie Maker.
Now you can share your video with the world, knowing that it is more accessible and engaging for a wider audience. Subtitles make your content more inclusive, allowing viewers who are deaf or hard of hearing, as well as non-native speakers to understand and enjoy your videos.
Experiment with different subtitle styles, colors, and positions to find the best look for your videos. Keep in mind that subtitles should be clear, legible, and in sync with the audio or visual content to provide the best viewing experience.
Remember, adding subtitles not only enhances the accessibility of your video but also contributes to better search engine optimization (SEO). Subtitles make your video more discoverable and can attract a larger audience to your content.
So go ahead, create engaging videos with subtitles using Windows Movie Maker and connect with your viewers on a deeper level.
Conclusion
Adding subtitles to your videos using Windows Movie Maker can greatly enhance their accessibility, audience engagement, and search engine optimization. With the step-by-step guide provided in this article, you have learned how to seamlessly integrate subtitles into your video projects.
We began by opening Windows Movie Maker and importing your video file. Then, we moved on to adding text and customizing the appearance of the subtitles to ensure readability and visual appeal. Next, we adjusted the timing of the subtitles to synchronize them with the corresponding video segments. Lastly, we saved the video with the subtitles included, ready to be shared with the world.
By incorporating subtitles into your videos, you make your content more accessible to individuals who are deaf or hard of hearing, as well as non-native English speakers. Subtitles also improve the overall viewing experience, ensuring that your audience can follow along with the dialogue and content of your videos.
Furthermore, adding subtitles can boost the search engine optimization of your videos. Search engines can index the text of your subtitles, making it easier for your videos to be discovered and ranked in relevant search results.
Remember to customize the appearance of your subtitles to match your video’s style and optimize the timing to ensure perfect synchronization. Play around with different text effects and experiment with subtitle positioning to make your videos more visually appealing and engaging.
Now that you have mastered the process of adding subtitles in Windows Movie Maker, you can create professional-looking videos that cater to a wider audience. Whether you’re creating tutorials, movies, or YouTube videos, subtitles will enhance the accessibility and impact of your content.
So, start implementing these steps in your video editing workflow and connect with your audience on a deeper level. Subtitles not only make your videos more inclusive, but they also contribute to a more engaging and immersive viewing experience. Happy video editing!