Introduction
Google Sheets is a powerful and versatile cloud-based spreadsheet tool that offers a wide range of features for data analysis, collaboration, and organization. When working with large datasets or constantly updating information, it is common to need to add new rows to a sheet. Whether you need to insert a row between existing data or add a row at the end of a sheet, Google Sheets provides multiple methods to accomplish this task quickly and efficiently.
In this article, we will explore five different methods for adding rows in Google Sheets. Whether you prefer using menu options, keyboard shortcuts, or mouse actions, you’ll find a method that suits your workflow. By understanding how to add rows in Google Sheets, you can effectively organize and manage your data while improving your overall productivity.
Throughout the article, we’ll provide step-by-step instructions and highlight essential tips and shortcuts. So, let’s jump in and learn how to add rows in Google Sheets!
Method 1: Using the Insert Menu
One of the easiest ways to add a row in Google Sheets is by using the insert menu. This method allows you to insert a new row above or below the selected row with just a few clicks.
To add a row using the insert menu, follow these steps:
- Select the row below or above which you want to insert a new row.
- Click on the “Insert” option in the top menu.
- From the dropdown menu, select “Row above” or “Row below” depending on your desired placement of the new row.
Once you’ve selected the appropriate option, Google Sheets will automatically insert a new row in the chosen position. The existing rows will shift down to make room for the new row.
It’s worth noting that this method is particularly useful when you need to insert a single row or have a specific row in mind for the new insertion. However, if you need to add multiple rows, it may be more efficient to explore other methods which we’ll discuss next.
Method 2: Right-Clicking on a Row
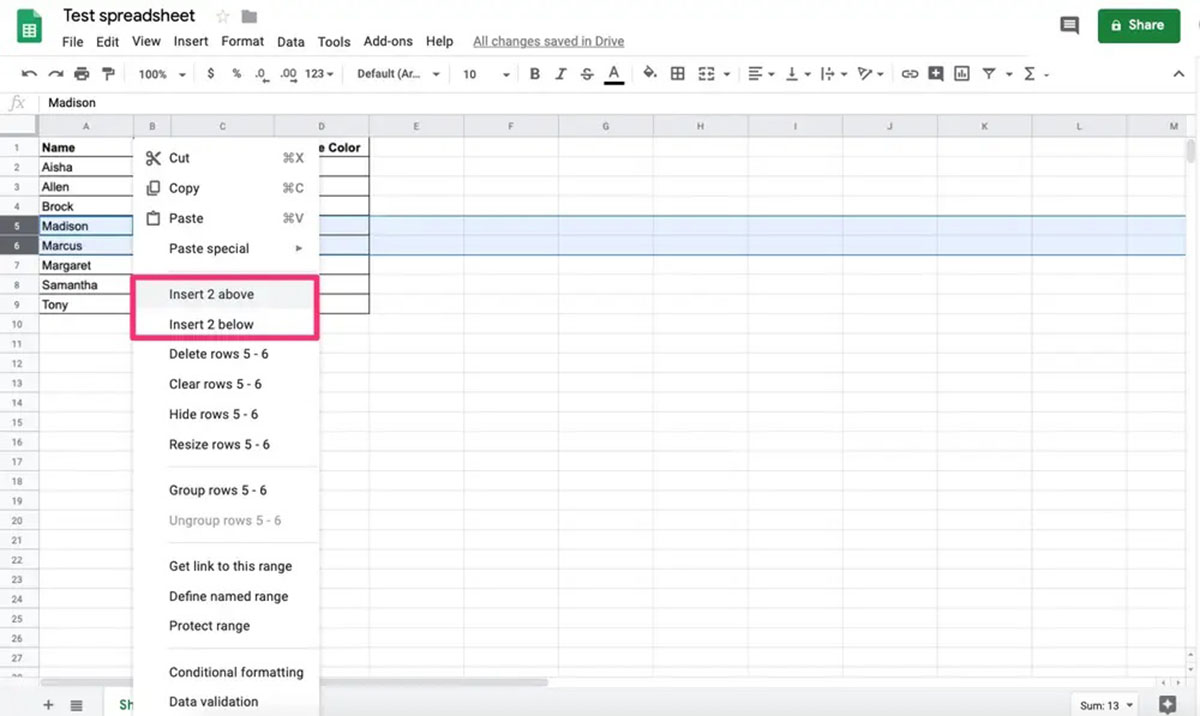
An alternative method for adding a row in Google Sheets is by right-clicking on a row. This method offers a quick and convenient way to insert a new row without navigating through the menu options.
To add a row using the right-click method, follow these steps:
- Right-click on the row below or above which you want to insert a new row.
- In the context menu that appears, select “Insert 1 above” or “Insert 1 below” to insert a single row.
- If you need to insert multiple rows, choose the “Insert X above” or “Insert X below” option and specify the number of rows you want to add.
Upon selecting the appropriate option, Google Sheets will instantly add the new row(s) in the chosen position, shifting the existing rows down accordingly.
This method is particularly useful when you prefer using the right-click context menu to access various options quickly. It eliminates the need to navigate through the top menu and offers a seamless way to insert rows on the go.
Now that we’ve covered two methods for adding rows in Google Sheets, let’s move on to exploring another time-saving approach.
Method 3: Using Shortcut Keys
If you’re someone who prefers keyboard shortcuts to streamline your workflow, Google Sheets provides a handy shortcut key combination for adding rows with ease. By utilizing this method, you can quickly insert new rows without the need for mouse clicks or navigation through menus.
To add a row using shortcut keys, follow these steps:
- Select the row below or above which you want to insert a new row.
- Press the Ctrl key (or the Command key on a Mac) along with the + key.
Using this shortcut key combination will instantly insert a new row above the selected row. The existing rows will automatically shift down to accommodate the newly added row.
One of the advantages of using shortcut keys is the speed and efficiency they offer. Once you become familiar with the shortcut, you can quickly insert rows without interrupting your workflow. This method is particularly ideal for power users who heavily rely on keyboard shortcuts to perform various tasks in Google Sheets.
Now that you’re acquainted with the shortcut key method, let’s move on to our next approach for adding rows in Google Sheets.
Method 4: Dragging and Dropping
In addition to the menu options and shortcut keys, Google Sheets also allows you to add rows by dragging and dropping. This method provides a visual and intuitive way to insert rows, especially when you want to place them in a specific position within your sheet.
To add a row using the drag and drop method, follow these steps:
- Select the entire row or the cells within the row that you want to move.
- Hover your cursor over the edge of the selected row until it turns into a four-sided arrow icon.
- Click and hold the left mouse button.
- Drag the row to the desired position within your sheet.
- Release the mouse button to drop the row at the new location.
By following these steps, you can easily insert a row by dragging and dropping it to the desired position. The existing rows will automatically adjust to accommodate the new row.
This method is particularly useful when you need to insert a row at a specific location, such as in the middle of a sheet. It offers flexibility and precision when organizing your data. Additionally, you can use the drag and drop method to move rows to a different sheet altogether.
Now that you’ve learned about the drag and drop method, let’s explore the final approach for adding rows in Google Sheets.
Method 5: Using the “+” Button
One of the simplest and most user-friendly methods for adding rows in Google Sheets is by utilizing the “+” button. This method allows you to quickly insert new rows at the end of your sheet, making it ideal for situations where you need to add rows for additional data.
To add a row using the “+” button, follow these steps:
- Navigate to the bottom of your sheet.
- Locate the row number at the leftmost side of the sheet.
- Click on the gray “+” button that appears below the last row number.
Once you click on the “+” button, a new row will be added at the bottom of your sheet. This method is particularly useful when you want to append new rows to your existing data without the need for rearranging or shifting any existing rows.
The “+” button method offers convenience and simplicity, especially when you have a large dataset and want to add rows quickly. It eliminates the need for selecting, right-clicking, or dragging and dropping rows, making it a straightforward option for adding rows at the end of your sheet.
Now that you know how to use the “+” button to add rows, let’s summarize what we’ve covered in this article.
Conclusion
In this article, we explored five different methods for adding rows in Google Sheets. By now, you should be familiar with using the insert menu, right-clicking on a row, utilizing shortcut keys, dragging and dropping rows, and using the “+” button at the bottom of your sheet. These methods offer flexibility and efficiency, allowing you to organize your data effectively and save time in the process.
Depending on your preferences and workflow, you can choose the method that suits you best. Whether you prefer menu options, keyboard shortcuts, mouse actions, or a combination of these techniques, Google Sheets provides multiple ways to add rows and customize your sheet to your needs.
Remember, proper data organization is crucial for maintaining a structured spreadsheet. Take advantage of these methods to keep your data accurate and easily accessible. Whether you’re working on personal projects, collaborating with a team, or analyzing data for business purposes, adding rows in Google Sheets is a fundamental skill that will enhance your productivity and efficiency.
So go ahead and try out these methods to add rows in Google Sheets and take your spreadsheet management to the next level. Happy organizing!