Introduction
Upgrading the RAM in your HP Pavilion laptop can significantly improve its performance, allowing you to run more applications simultaneously and handle demanding tasks with ease. RAM, or Random Access Memory, is crucial for storing and accessing data that your laptop needs to operate efficiently. If you find your laptop running slow or struggling with multitasking, adding more RAM can provide a much-needed boost.
Before diving into the process of adding more RAM to your HP Pavilion laptop, it’s important to determine whether your specific model is upgradeable. Not all laptop models have user-accessible RAM slots, so it’s essential to check the compatibility and accessibility of your device. This guide will help you navigate the process and ensure a successful RAM upgrade.
In this article, we will walk you through the necessary steps to add more RAM to your HP Pavilion laptop, from checking compatibility to the actual installation process. Follow along closely, and soon enough, you’ll have a faster and more efficient laptop at your disposal.
Check Compatibility
Before purchasing RAM for your HP Pavilion laptop, it’s vital to ensure compatibility between your device and the RAM modules. Compatibility entails checking several factors, such as the type of RAM supported, maximum capacity, and speed.
The easiest way to determine compatibility is by referring to your laptop’s specifications. You can find this information in the user manual or by visiting the manufacturer’s website. Look for details regarding the RAM type supported, such as DDR3 or DDR4, as well as the maximum capacity.
Additionally, you’ll want to check the speed of the RAM modules your laptop can handle. While it’s possible to install RAM modules with a higher speed, they will only operate at the maximum speed supported by your laptop. Therefore, it’s advisable to obtain RAM with a speed that matches or is slightly higher than the existing modules.
Keep in mind that some laptops have limitations on the maximum RAM capacity they can support. If your laptop has only one RAM slot occupied, you may be able to add an additional module. However, if both slots are already occupied, you’ll need to replace the existing modules with higher-capacity ones.
Moreover, when selecting compatible RAM, consider the form factor. Laptops generally use SO-DIMM (Small Outline Dual In-Line Memory Module) RAM modules, which are smaller than the standard DIMM modules used in desktop computers. Ensure that the RAM you purchase is designed specifically for laptops.
Lastly, it’s worth double-checking with the manufacturer’s website or support team to confirm compatibility and avoid any compatibility issues. Taking the time to ensure compatibility will save you from the frustration of purchasing incompatible RAM modules and having to return or exchange them.
Purchase the RAM
Once you have determined the compatibility of the RAM for your HP Pavilion laptop, it’s time to make your purchase. When buying RAM, there are a few factors to consider, including the brand, capacity, and price.
Start by researching reputable brands that offer high-quality RAM modules. Well-known manufacturers often provide reliable products with good customer reviews and warranties. It’s recommended to stick with trusted brands to ensure the longevity and compatibility of the RAM.
Next, consider the capacity of the RAM modules. Choose a capacity that suits your computing needs. If you’re an average user who primarily performs basic tasks like web browsing, document editing, and multimedia playback, 8GB of RAM should suffice. However, if you’re a power user or frequently work with demanding applications such as video editing or CAD software, consider upgrading to 16GB or more.
Another factor to consider is the price of the RAM modules. Prices can vary depending on the brand, capacity, and speed. Compare prices from different retailers to ensure you’re getting the best deal. However, be cautious of extremely low prices, as they could indicate lower-quality or counterfeit RAM.
It’s also worth noting that if you intend to add more RAM to your laptop without removing the existing modules, make sure the new RAM matches the specifications of the existing ones. This includes factors such as the capacity, speed, and form factor (SO-DIMM).
Lastly, consider the warranty and return policy offered by the retailer or manufacturer. Having a warranty will give you peace of mind in case any issues arise after the purchase. Additionally, it’s good practice to read reviews and gather more information about the RAM modules you plan to purchase to ensure their reliability and compatibility.
Prepare Your Laptop
Before starting the process of adding more RAM to your HP Pavilion laptop, it’s crucial to properly prepare your device. Following the necessary steps will ensure a smooth and successful RAM installation process.
Firstly, save all your work and close any open applications on your laptop. It’s important to have a clean slate before making any hardware changes to avoid any potential data loss or conflicts.
Next, shut down your laptop completely. It’s essential to turn off your laptop and disconnect it from any power source before proceeding with any hardware modifications. This will minimize the risk of electrical shock or damage to the components.
If your laptop has a removable battery, proceed to remove it. This step will vary depending on the model of your HP Pavilion laptop. Refer to your laptop’s user manual or manufacturer’s website for instructions on how to safely remove the battery. Removing the battery will prevent any accidental power supply to the laptop during the installation process.
Once the battery is removed or while it’s still intact, locate the RAM slot on your laptop. This information can usually be found in the laptop’s user manual or by performing a quick search online. The RAM slot is where the RAM modules are inserted, and it’s typically accessible by removing a panel on the bottom of the laptop.
Take a moment to familiarize yourself with the RAM slot and its position. This will help you when it comes time to actually insert the new RAM modules. Additionally, ensure that you are working on a clean and static-free surface to prevent any damage to the sensitive electronics of your laptop.
By properly preparing your laptop, you are setting the stage for a successful RAM upgrade. Following these steps will help keep your data safe and ensure that you can easily access and install the new RAM modules.
Shut It Down
Before proceeding with the installation of the new RAM modules, it’s crucial to shut down your HP Pavilion laptop completely. Properly shutting down your laptop will ensure that no power is running through the system during the upgrade process, reducing the risk of electrical shock and potential damage to the hardware.
To shut down your laptop, follow these steps:
- Save any open files or documents and close all running applications.
- If your laptop is connected to a power source, unplug the power cord from the wall socket or the laptop itself.
- Ensure that any peripheral devices, such as external hard drives or USB devices, are disconnected from your laptop.
- Click on the “Start” button in the Windows taskbar and select “Power” from the menu.
- Choose “Shut down” from the drop-down menu.
Alternatively, you can use the keyboard shortcut by pressing the “Windows” key and then pressing the letter “X” on your keyboard. From the resulting menu, select “Shut down or sign out” and choose “Shut down.”
Allow your laptop a few moments to complete the shutdown process. You can confirm that your laptop is powered off by ensuring that the screen is completely black, the fans have stopped spinning, and there are no indicator lights illuminated on the laptop’s chassis.
It’s crucial to ensure that your laptop is completely shut down before proceeding with the RAM upgrade. This will guarantee that the system is not receiving any power and is in a safe state for hardware modifications. Taking this step will help protect your laptop and the new RAM modules from any potential damage that could occur if power is still running through the system.
Remove the Battery
If your HP Pavilion laptop has a removable battery, it’s essential to remove it before proceeding with the RAM upgrade. Removing the battery ensures that there is no electrical current flowing through the system, reducing the risk of damage to both the laptop and the new RAM modules.
To safely remove the battery from your HP Pavilion laptop, follow these steps:
- Make sure your laptop is shut down completely. Refer to the previous section for instructions on properly shutting down your laptop.
- Flip your laptop over so that the bottom side is facing up.
- Locate the battery release latch or switch. This is typically located near the back of the laptop, near the battery compartment.
- Slide or press the battery release latch or switch in the direction indicated to unlock the battery.
- While holding the latch or switch in the unlocked position, gently slide or lift the battery out of its compartment.
- Set the battery aside in a safe place.
It’s important to remove the battery properly to prevent any accidental damage to both the battery and the laptop. Be sure to handle the battery with care and avoid any excessive force or bending. Additionally, keep the battery away from heat sources and liquids, as they can cause damage.
By removing the battery, you are ensuring that there is no residual power flowing through the system. This is a necessary step to protect both your laptop and the new RAM modules from any electrical surges or damage. Once the battery is removed, you can proceed with the next steps of the RAM upgrade process.
Locate the RAM Slot
Before you can install the new RAM modules in your HP Pavilion laptop, you need to locate the RAM slot. The RAM slot is where the memory modules are inserted and will vary in location depending on the specific model of your laptop.
Here are the general steps for locating the RAM slot:
- Ensure your laptop is turned off and the battery is removed (if applicable). Follow the previous sections for instructions on shutting down your laptop and removing the battery.
- Flip your laptop over so that the bottom side is facing up.
- Examine the bottom panel of your laptop. Look for a removable panel or compartment that is secured by screws.
- Use a screwdriver or a suitable tool to unscrew and remove the screws securing the panel. Place the screws in a safe location to prevent them from getting lost.
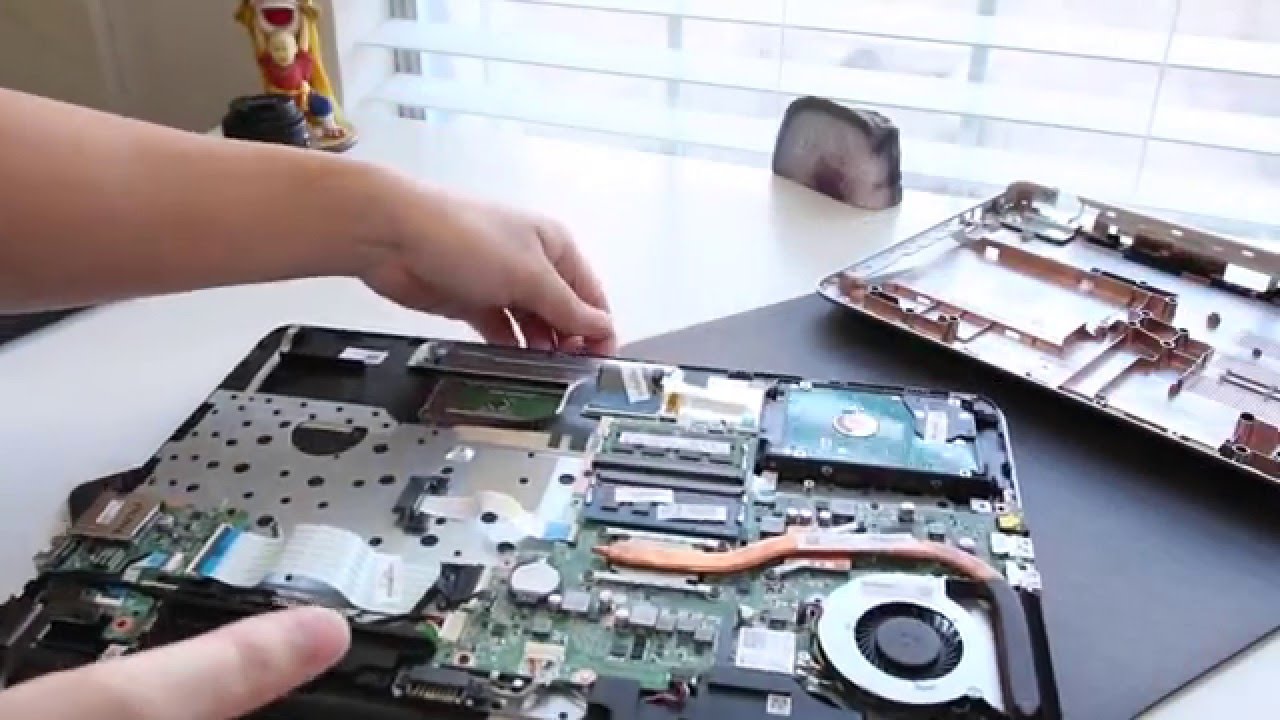
- Once the screws are removed, carefully lift off the panel to reveal the internal components of your laptop.
- Locate the RAM slot(s). The RAM slot is typically a long, rectangular-shaped opening on the motherboard. It may be labeled “DIMM” or “SODIMM” and will have metal contacts inside.
- Note the number of available RAM slots in your laptop. This will determine the maximum number of RAM modules you can install.
It’s important to exercise caution when handling the internal components of your laptop. Avoid touching the sensitive electronic components with your fingers, as this can damage them with static electricity. Additionally, be mindful of any cables or connectors that may be near the RAM slot to prevent accidental disconnection.
By successfully locating the RAM slot, you are one step closer to upgrading the RAM in your HP Pavilion laptop. Familiarize yourself with the location and number of available RAM slots to ensure a smooth installation process.
Remove Existing RAM (if applicable)
If your HP Pavilion laptop already has RAM modules installed, you will need to remove them before installing the new ones. Removing the existing RAM is necessary to make space for the upgraded modules and ensure compatibility. Follow these steps to remove the existing RAM modules:
- Ensure your laptop is turned off, the battery (if applicable) is removed, and you have located the RAM slot. Refer to the previous sections for instructions on properly preparing your laptop and locating the RAM slot.
- Locate the existing RAM modules in the RAM slot or slots. The RAM modules will have metal contacts and are typically secured in place by small clips on either side.
- Gently press outward on the clips of the RAM module(s) to release them. The module will pop up at an angle.
- Once the clips are released, carefully lift the RAM module(s) out of the slot(s) by gripping them by the edges. Avoid touching the metal contacts or any other components to prevent damage from static electricity.
- If there are multiple RAM modules installed, remove them one at a time by following the above steps.
- Set the removed RAM module(s) aside in a safe place. It’s a good practice to keep them in an anti-static bag to prevent any electrostatic damage.
It’s crucial to handle the existing RAM modules with care to avoid any damage. Place them down gently and store them in a safe location, as you may need them in the future or as a backup. Removing the existing RAM modules will create space for the new ones and allow you to upgrade your laptop’s memory effectively.
If your laptop has additional RAM slots available and you do not need to remove the existing modules, you can skip this step and move on to the next section, which covers the installation of the new RAM modules.
Insert New RAM
With the existing RAM modules removed (if applicable), it’s time to insert the new RAM modules into your HP Pavilion laptop. Properly inserting the new RAM ensures a secure connection and allows for optimal performance. Follow these steps to insert the new RAM:
- Double-check that your laptop is turned off, the battery (if applicable) is removed, and you have located the RAM slot. Refer to the previous sections for instructions on preparing your laptop and finding the RAM slot.
- Take the new RAM module and align it with the slot at a slight angle. Make sure the notch on the module aligns with the notch in the slot.
- Gently insert the RAM module into the slot, applying even pressure until the module is fully seated. You should feel a slight click or snap indicating that the module is securely in place.
- If you have multiple RAM modules to install, repeat the above steps for each module.
Note that some laptops have different configurations for the RAM slots, such as having one slot placed on top of another or having the slots separated by a gap. Refer to your laptop’s user manual or online resources for specific information regarding the RAM slot configuration of your model.
Once all the new RAM modules are inserted, ensure that they are securely in place by gently pressing down on them. They should sit evenly and be flush with the slot. Avoid applying excessive force, as it can damage the module or the slot.
By properly inserting the new RAM modules, you have successfully upgraded your laptop’s memory. The new RAM will boost performance and allow for smoother multitasking. The next step is to replace the battery (if applicable) and start your laptop to confirm the successful installation.
Replace the Battery
If you removed the battery earlier as part of the preparation process, now is the time to replace it in your HP Pavilion laptop. Reconnecting the battery is crucial to restore power to the system and ensure the laptop functions properly. Follow these steps to replace the battery:
- Ensure your laptop is still turned off and the AC power adapter is disconnected.
- Take the battery and align it with the battery compartment in the correct orientation. Look for any alignment guides or markings to assist you.
- Gently slide the battery into the compartment, making sure it fits snugly and is fully inserted.
- If your battery has a latch or a locking mechanism, secure it in place by sliding or pushing it as directed.
- Once the battery is properly inserted and secured, you can reconnect the AC power adapter to charge the battery.
It’s essential to handle the battery with care and avoid any excessive force during the replacement process. Ensure that the battery is properly aligned and inserted to prevent any loose connections or potential damage to the battery or laptop.
After replacing the battery, allow it to charge for a sufficient amount of time to ensure it reaches an optimal level. Consult your laptop’s user manual for specific recommendations on charging times for a new or replacement battery.
Reconnecting the battery completes the hardware aspect of the RAM upgrade process. The final step is to start your laptop and verify the successful installation of the new RAM modules.
Start the Laptop
After successfully installing the new RAM modules in your HP Pavilion laptop and reconnecting the battery (if applicable), it’s time to start your laptop. Starting the laptop allows you to confirm whether the new RAM installation was successful and ensures that your system recognizes the upgraded memory.
To start your laptop, follow these steps:
- If your laptop was completely powered off, press the power button to turn it on.
- Wait for the laptop to boot up. Depending on your laptop’s model and specifications, it may take a few moments to complete the startup process.
- Observe the startup screen and any messages that may appear. The laptop should display the manufacturer’s logo or a startup screen before loading the operating system.
- Once your laptop has booted up, log in to your user account as you normally would.
- Go to your laptop’s system settings or task manager to verify the upgraded RAM. You should see the new total amount of RAM displayed.
- If the system recognizes the new RAM modules and displays the correct amount of memory, you have successfully installed and configured the new RAM.
It’s worth noting that sometimes the updated RAM may not be recognized immediately. In such cases, try restarting your laptop a few times to allow the system to detect and adjust to the new memory configuration. If the RAM is still not recognized, double-check the installation to ensure the modules are securely inserted in the RAM slots.
Starting your laptop and confirming the successful installation of the new RAM modules is an essential step in the upgrade process. With the increased memory capacity, your laptop should experience improved performance and the ability to handle more demanding tasks and applications.
Check for Successful Installation
After starting your HP Pavilion laptop with the newly installed RAM modules, it’s crucial to verify whether the RAM upgrade was successful. Checking for successful installation ensures that your laptop recognizes and utilizes the upgraded memory, providing you with the improved performance you desired. Here’s what you should do to check for a successful RAM installation:
- Open your laptop’s system settings or task manager. The method for accessing these settings may vary depending on your operating system version.
- Navigate to the “About” or “System” section, which typically provides information about your laptop’s hardware components.
- Look for the section that displays the total amount of installed RAM.
- Verify that the displayed amount matches the capacity of the new RAM modules you installed. For example, if you installed two 8GB RAM modules, the total displayed RAM should be 16GB.
- Additionally, check the RAM speed to ensure it matches the specifications of the new modules you purchased.
- If the system settings or task manager correctly displays the new RAM capacity and speed, this confirms that the installation was successful.
While checking the system settings is a reliable method to verify the RAM upgrade, you can also assess the performance of your laptop through real-world usage. Notice the improved speed and responsiveness when multitasking or running memory-intensive applications compared to before the upgrade.
If you encounter any issues or your laptop does not recognize the new RAM, double-check the installation to ensure the modules are properly inserted. If necessary, consult your laptop’s user manual or seek assistance from the manufacturer’s support team for further guidance.
By confirming the successful installation of the new RAM modules, you can confidently enjoy the enhanced performance and increased multitasking capabilities of your HP Pavilion laptop.
Conclusion
Adding more RAM to your HP Pavilion laptop can significantly improve its performance and allow for smoother multitasking. With the right approach and careful consideration of compatibility, purchasing the appropriate RAM modules becomes a straightforward process. By following the steps outlined in this guide, you can successfully upgrade the RAM in your laptop.
Starting with checking the compatibility of your laptop and identifying the necessary RAM specifications is crucial. Ensure that the RAM modules you purchase are compatible with your laptop’s model, support the correct type and speed, and fit the required form factor.
Once you have the compatible RAM modules, it’s essential to prepare your laptop by shutting it down and, if applicable, removing the battery. Familiarize yourself with the location of the RAM slot, and if necessary, remove the existing RAM modules before proceeding with the installation.
Inserting the new RAM modules into the proper slots is a critical step, ensuring a secure connection and optimal performance. Pay attention to aligning the modules correctly and applying gentle pressure until they click into place.
After inserting the new RAM, replace the battery (if applicable) and start your laptop to confirm the successful installation. Verify the new RAM capacity and speed through the system settings or task manager.
Checking for the successful installation is essential to ensure that your laptop recognizes and utilizes the upgraded memory effectively. This will enable you to enjoy improved performance, enhanced multitasking capabilities, and a smoother computing experience.
With the upgraded RAM in your HP Pavilion laptop, you’ll be able to handle more demanding tasks, run multiple applications simultaneously, and experience a noticeable boost in overall performance. Take the time to research, follow the steps carefully, and enjoy the benefits of a RAM upgrade that will enhance your laptop’s capabilities for years to come.


