Introduction
Shopify is one of the most popular e-commerce platforms, empowering businesses to create and manage their online stores with ease. For merchants looking to provide more payment options to their customers, integrating Afterpay into their Shopify store can be a game-changer.
Afterpay is a “buy now, pay later” solution that allows customers to make purchases and pay for them in installments over a set period of time. It offers a seamless and flexible payment option, enabling customers to split their total purchase amount into four equal payments, without any interest or additional fees.
By adding Afterpay to your Shopify store, you can unlock a range of benefits for both your business and your customers. It can help increase customer satisfaction, boost conversions, and drive repeat purchases. Additionally, it allows customers to purchase items they may not have been able to afford upfront, thus expanding your potential customer base.
In this article, we will guide you through the step-by-step process of integrating Afterpay into your Shopify store. By following these instructions, you’ll be able to provide your customers with the option to use Afterpay, enhancing their shopping experience and ultimately growing your business.
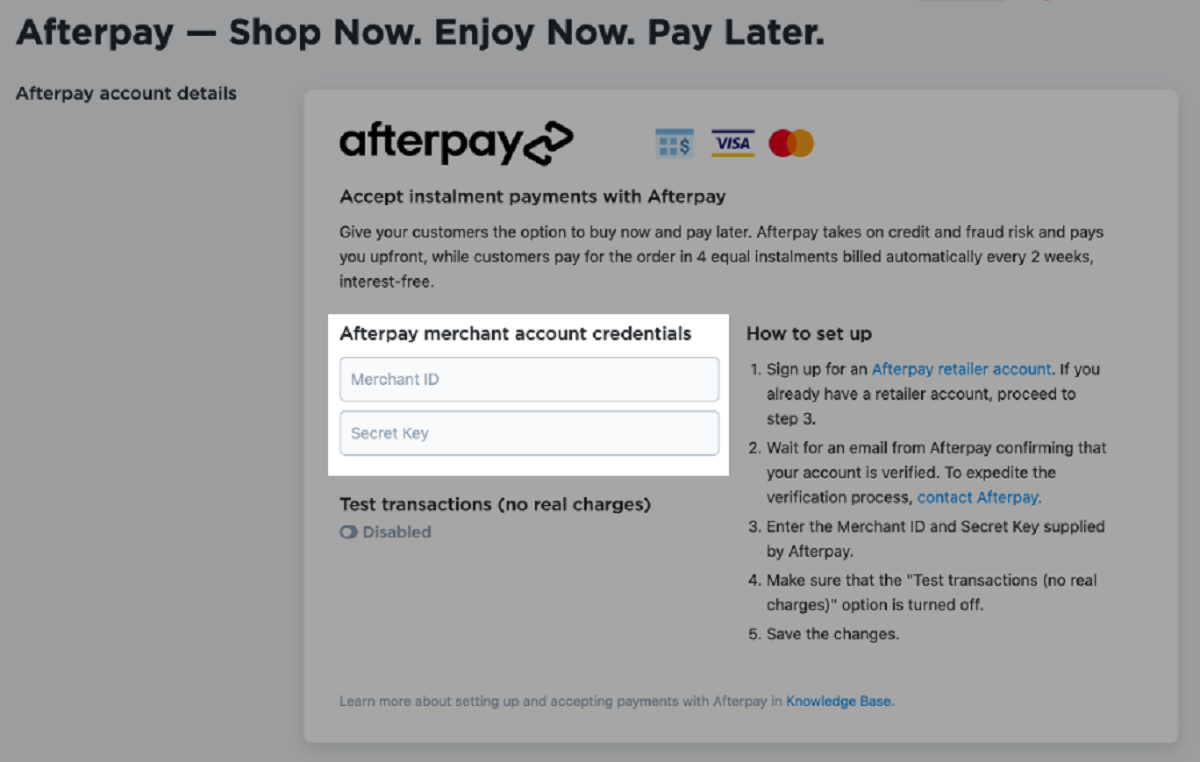
Step 1: Create an Afterpay merchant account
The first step in adding Afterpay to your Shopify store is to create an Afterpay merchant account. This account will enable you to access and manage your Afterpay integration.
To create an Afterpay merchant account, follow these simple steps:
- Go to the Afterpay website and navigate to the merchant sign-up page.
- Fill out the required information, including your business details, contact information, and banking details.
- Read and accept the Afterpay terms and conditions.
- Submit your application.
Once you have submitted your application, Afterpay will review it to ensure that your business meets their requirements. This may include factors such as your location, industry, and financial stability.
Afterpay typically processes applications within a few business days. Once your application is approved, you will receive an email confirmation with instructions on how to proceed.
It’s important to note that Afterpay may have specific requirements and restrictions based on your location and business type, so make sure to familiarize yourself with their guidelines to ensure a swift and successful application process.
After you have successfully created your Afterpay merchant account, you’re ready to move on to the next step: installing the Afterpay app on your Shopify store.
Step 2: Install the Afterpay app on your Shopify store
Now that you have your Afterpay merchant account set up, the next step is to install the Afterpay app on your Shopify store. This will enable the integration of Afterpay’s payment solution into your online store.
Follow these steps to install the Afterpay app:
- Login to your Shopify admin dashboard.
- Navigate to the Shopify App Store.
- Search for the Afterpay app in the search bar.
- Select the Afterpay app from the search results.
- Click on the “Add app” button to install it.
- Follow the on-screen instructions to connect your Afterpay merchant account to your Shopify store.
Once the installation is complete, you will see the Afterpay app listed among your installed apps. You can access the app by clicking on its icon in your Shopify admin dashboard.
It’s important to note that the Afterpay app may require you to enter your Afterpay merchant credentials during the installation process to establish a connection between your Shopify store and your Afterpay account. Make sure to have your Afterpay login information readily available.
With the Afterpay app now installed on your Shopify store, you’re ready to move on to the next step: configuring your Afterpay settings.
Step 3: Configure your Afterpay settings
After installing the Afterpay app, it’s time to configure the settings to ensure that Afterpay functions correctly on your Shopify store. Customizing these settings will allow you to align Afterpay with your specific business requirements.
Follow these steps to configure your Afterpay settings:
- Access the Afterpay app from your Shopify admin dashboard by clicking on the Afterpay app icon.
- Navigate to the “Settings” or “Configuration” tab within the Afterpay app.
- Review and adjust the various settings available, such as payment display options, order cancellation policies, and refund settings.
- Ensure that your store’s currency is properly set and aligned with Afterpay. This ensures a smooth payment processing experience for your customers.
- Save your changes once you have configured the settings according to your preferences.
It’s recommended to spend some time exploring all the available settings and options within the Afterpay app to ensure you customize Afterpay to fit seamlessly into your Shopify store. You can refer to the Afterpay documentation or contact their support if you have any specific questions or need assistance with the configuration process.
It’s worth mentioning that Afterpay provides detailed instructions and best practices to help you optimize your Afterpay integration. Pay attention to any additional guidelines they provide to enhance the customer experience and maximize the benefits of integrating Afterpay into your Shopify store.
Once you have successfully configured your Afterpay settings, you can move on to the next step: customizing your Afterpay widget.
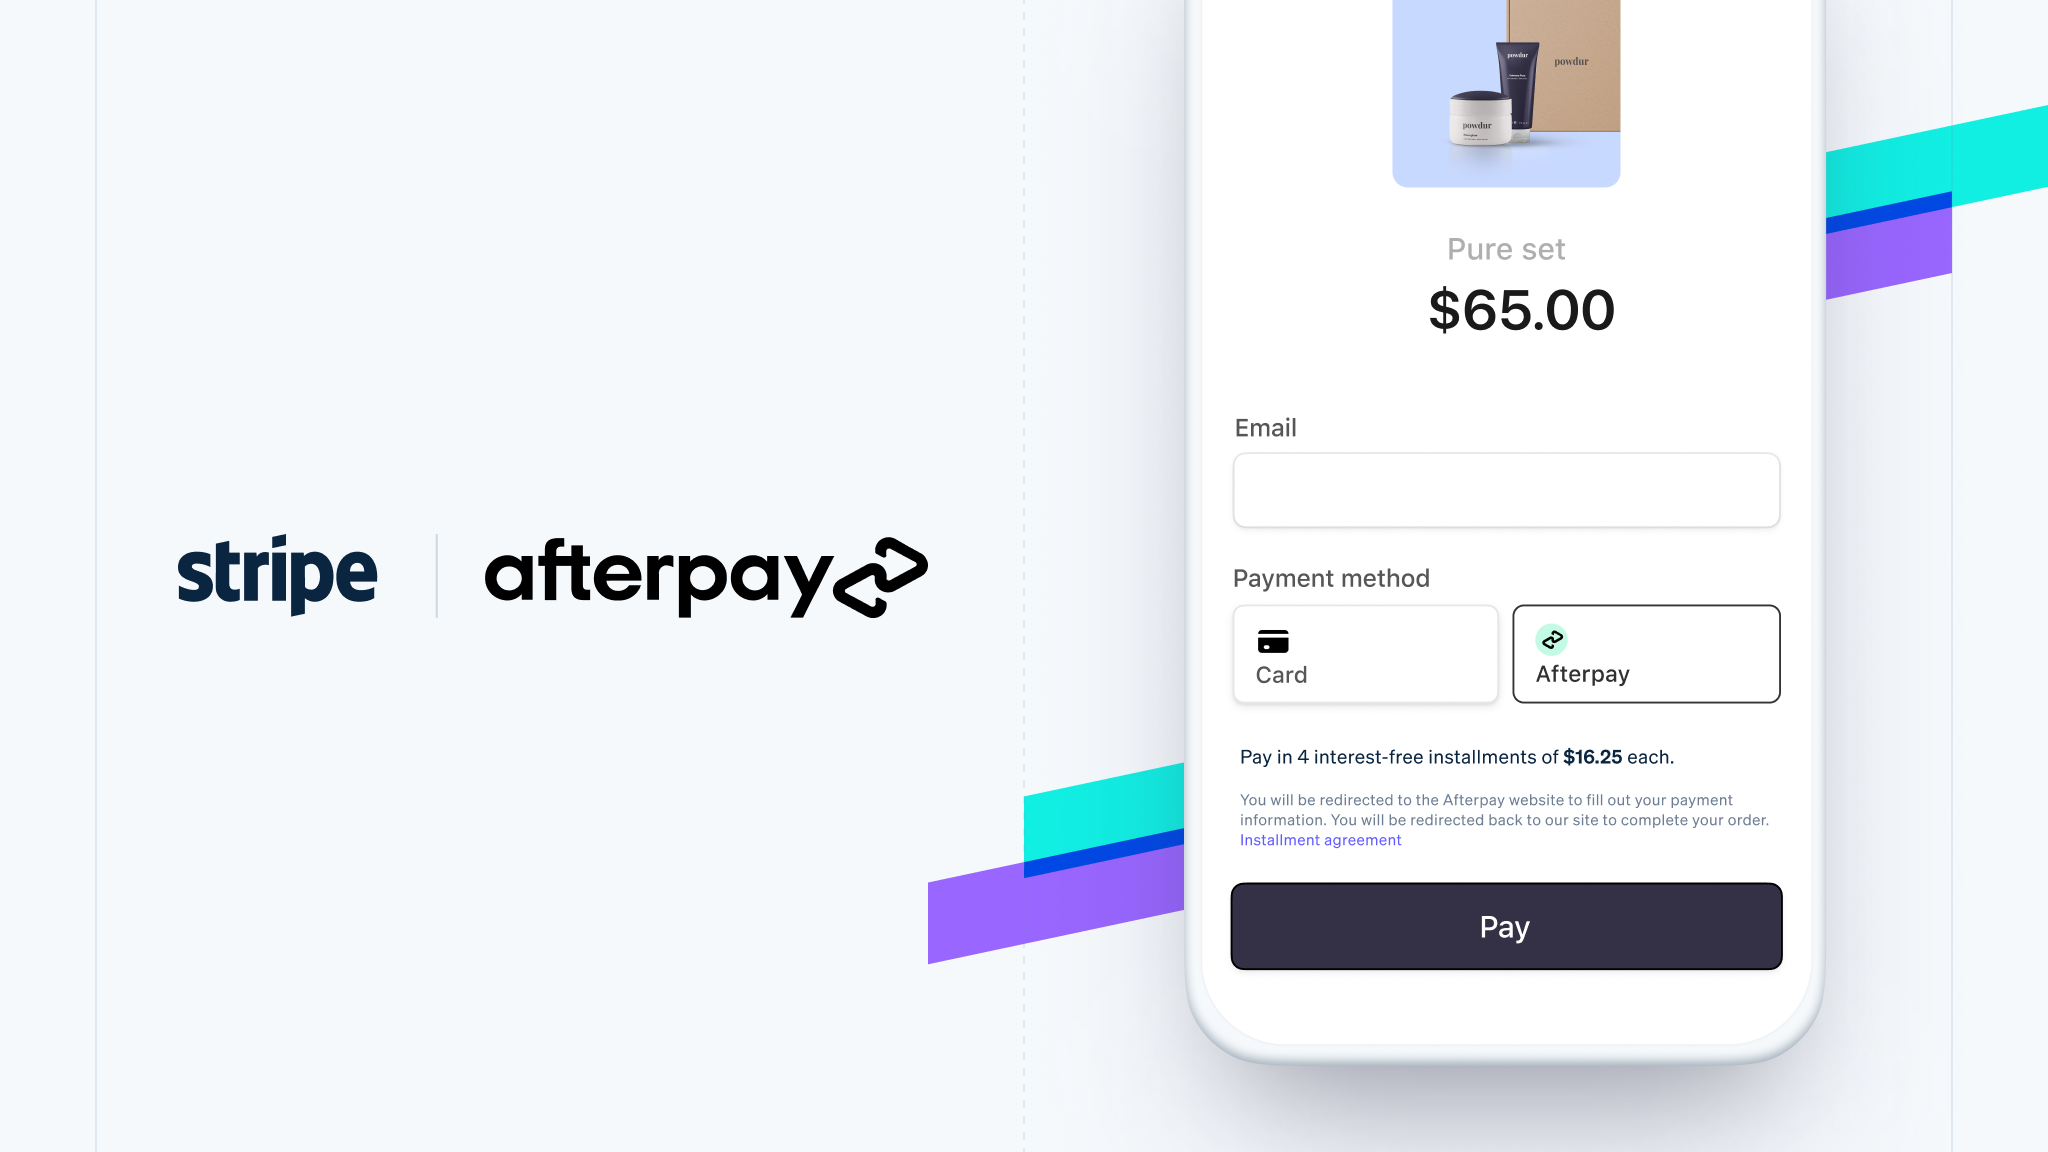
Step 4: Customize your Afterpay widget
Customizing your Afterpay widget is an important step in ensuring that it aligns with the design and branding of your Shopify store. By customizing the widget, you can create a cohesive and seamless user experience for your customers.
Here are the steps to customize your Afterpay widget:
- Access the Afterpay app from your Shopify admin dashboard and navigate to the “Widgets” or “Visuals” section.
- Explore the available customization options, such as widget color, text style, and layout.
- Select your preferred customization options that best reflect your store’s branding and design guidelines.
- Preview the changes to ensure they align with your vision.
- Save your customization settings once you are satisfied with the changes.
After saving your customization settings, the Afterpay widget on your Shopify store will reflect the changes you have made. This allows for a more integrated and visually appealing user experience.
Remember to strike a balance between customization and usability. While it’s essential to align the widget with your store’s branding, it’s equally important to ensure that the widget remains clear and intuitive for your customers to use.
If you have any questions or need further assistance with customizing your Afterpay widget, you can refer to the Afterpay documentation or reach out to their support team for guidance.
With your Afterpay widget customized, you can move on to the next step: adding Afterpay messaging to your store.
Step 5: Add Afterpay messaging to your store
Adding Afterpay messaging to your store is crucial for informing your customers about the option to use Afterpay as a payment method. This will help create awareness and drive customer interest in utilizing Afterpay for their purchases.
Follow these steps to add Afterpay messaging to your store:
- Access the Afterpay app from your Shopify admin dashboard and navigate to the “Messaging” or “Promotions” section.
- Choose the type of Afterpay messaging you want to display on your store, such as banners, product labels, or text notifications.
- Customize the appearance and placement of the Afterpay messaging to ensure it integrates seamlessly with your store’s design.
- Preview the changes to see how the messaging will appear on your store.
- Save your configuration settings once you are satisfied with the changes.
By adding Afterpay messaging strategically throughout your store, such as on product pages, cart pages, and checkout pages, you can effectively communicate the availability of Afterpay as a payment option. This can help increase customer confidence and encourage them to make purchases by leveraging the flexibility of Afterpay’s installment payments.
Remember to keep the messaging clear, concise, and visually appealing. Avoid overcrowding your store with excessive messaging, as it may distract or overwhelm your customers. Find the right balance that showcases Afterpay as a convenient and beneficial payment option without overshadowing your product offerings.
If you need further assistance or guidance with adding Afterpay messaging to your store, refer to the Afterpay app documentation or reach out to their support team for more detailed instructions.
With Afterpay messaging successfully added to your store, you can move on to the next step: testing your Afterpay setup.
Step 6: Test your Afterpay setup
Before launching Afterpay on your Shopify store, it’s crucial to test your setup to ensure that it functions correctly and provides a seamless experience for your customers. Testing will allow you to identify and resolve any potential issues before making Afterpay available to your customers.
Follow these steps to test your Afterpay setup:
- Place a test order on your Shopify store, selecting Afterpay as the payment method during checkout.
- Proceed through the checkout process, entering all the required information.
- Ensure that Afterpay processes the payment successfully without any errors.
- Verify that the order details, including the payment method and installment plan, are accurately reflected on both the Shopify and Afterpay platforms.
- Perform a test refund to confirm that the refund process works as intended.
By conducting these tests, you can validate that Afterpay integrates seamlessly with your Shopify store and is fully functional. It’s important to simulate a real customer journey to replicate the user experience and identify any potential hiccups or discrepancies.
Document any issues or errors encountered during the testing process and work closely with Afterpay support to troubleshoot and resolve them. This will help ensure smooth and reliable payment processing for your customers once Afterpay is officially launched.
It’s recommended to perform multiple tests and thoroughly review the results to gain confidence in your Afterpay setup. Pay attention to any details that may impact the user experience, such as the visibility of installment amounts and payment due dates, as these are key factors in utilizing Afterpay successfully.
Once you have thoroughly tested your Afterpay setup and resolved any issues, you can confidently proceed to the final step: launching Afterpay on your Shopify store.
Step 7: Launch Afterpay on your Shopify store
Congratulations! You have reached the final step of integrating Afterpay into your Shopify store. Now it’s time to officially launch Afterpay and make it available to your customers as a payment option.
Follow these steps to launch Afterpay on your Shopify store:
- Ensure that you have completed all the previous steps outlined in this guide, including creating an Afterpay merchant account, installing the Afterpay app, configuring settings, customizing the widget, and adding Afterpay messaging to your store.
- Double-check that you have thoroughly tested your Afterpay setup and resolved any issues or errors that may have been identified during testing.
- Once you are confident that everything is in order, you can activate Afterpay on your Shopify store by toggling the “Active” button or similar option within the Afterpay app settings.
- Once Afterpay is activated, it will be visible as a payment option on your Shopify store’s checkout page.
- Monitor the performance of Afterpay and ensure that the integration continues to function smoothly for your customers.
Launching Afterpay on your Shopify store opens up a new payment option for your customers, providing them with greater flexibility and convenience. This can lead to increased conversions, customer satisfaction, and repeat purchases.
Remember to regularly review your Afterpay integration and stay up to date with any updates or improvements released by Afterpay. This will help you make the most of this powerful payment solution and optimize the overall shopping experience for your customers.
Congratulations once again on successfully adding Afterpay to your Shopify store. Your customers can now enjoy the benefits of “buy now, pay later” payments, while you can reap the rewards of increased sales and customer loyalty.
Conclusion
Integrating Afterpay into your Shopify store can be a valuable addition to your business, offering your customers a convenient “buy now, pay later” option. In this step-by-step guide, we have covered the process of adding Afterpay to your Shopify store, from creating a merchant account to launching Afterpay as a payment option. By following these steps, you can enhance your customers’ shopping experience and drive increased conversions.
After creating your Afterpay merchant account and installing the Afterpay app on your Shopify store, it’s crucial to configure the Afterpay settings to align with your business requirements. Customizing your Afterpay widget and adding Afterpay messaging to your store will further enhance the user experience and ensure a seamless integration.
Testing your Afterpay setup is a vital step in identifying and resolving any potential issues before making Afterpay available to your customers. By simulating a real customer journey and conducting thorough tests, you can ensure that Afterpay functions correctly and provides a smooth payment process.
Finally, the launch of Afterpay on your Shopify store enables your customers to utilize this flexible payment option. As you monitor its performance, it’s important to stay updated with any improvements or updates released by Afterpay to maximize its benefits.
Integrating Afterpay into your Shopify store can significantly enhance your customers’ shopping experience and boost your sales. By coupling convenience with flexibility, you can cater to a wider range of customers and grow your business. So, take the steps outlined in this guide and embark on your journey towards a successful Afterpay integration on Shopify.