Introduction
Adding Afterpay to your website can be a game-changer for your business. With its flexible payment options, Afterpay allows customers to buy now and pay later, breaking down the cost of their purchase into manageable installments. This not only improves the shopping experience but also increases the likelihood of conversion and customer loyalty.
In today’s competitive online landscape, offering convenient and flexible payment options has become crucial. Afterpay provides a seamless and user-friendly interface that integrates smoothly with your website, giving your customers the freedom to shop without financial constraints. By incorporating Afterpay into your website, you can attract a wider range of potential buyers, increase order value, and ultimately drive more sales.
In this article, we will explore the benefits of adding Afterpay to your website and guide you through the process of integrating it into your online store. Whether you run an e-commerce business or offer services online, implementing Afterpay has the potential to revolutionize your customer experience and boost revenue.
So, let’s dive in and discover why adding Afterpay to your website is a smart move.
Benefits of Adding Afterpay to Your Website
Integrating Afterpay into your website offers several compelling benefits for both your business and your customers. Let’s take a closer look at these advantages:
1. Increased Conversion Rates: By offering Afterpay as a payment option, you remove the financial barrier that often leads to cart abandonment. Customers are more likely to make a purchase when they can spread out the cost and pay in installments, resulting in higher conversion rates for your online store.
2. Expanded Customer Base: Afterpay attracts a wider range of customers who prefer to shop with flexible payment options. This includes budget-conscious shoppers, millennials, and even those without credit cards. By catering to their needs, you can tap into a larger audience and capture more sales.
3. Improved Average Order Value (AOV): Afterpay encourages customers to spend more by enabling them to purchase higher-priced products that may have been beyond their budget. With the option to split the payment into installments, customers are more inclined to add those extra items to their cart, increasing your AOV.
4. Enhanced Customer Experience: Afterpay provides a seamless and intuitive payment process, creating a positive buying experience for your customers. With its user-friendly interface and transparent terms, customers can easily understand how Afterpay works, thereby increasing customer satisfaction and loyalty.
5. Reduced Risk and Guaranteed Payments: With Afterpay, you receive payment in full from the start, while customers have the convenience of paying in installments. This reduces the risk of non-payment and ensures guaranteed revenue for your business.
6. Competitive Advantage: By incorporating Afterpay into your website, you differentiate your business from competitors who may not offer flexible payment options. This can give your online store a distinct advantage and make it more appealing to potential customers.
Overall, adding Afterpay to your website is a win-win situation. It not only benefits your customers by providing them with a convenient and budget-friendly payment solution but also benefits your business by boosting conversion rates, increasing average order value, and enhancing customer loyalty.
How to Add Afterpay to Your Website
Adding Afterpay to your website is a relatively straightforward process. Follow the steps below to integrate Afterpay into your online store:
1. Sign up for an Afterpay Account: Visit the Afterpay website and sign up for an account. Provide the necessary information and ensure that your business meets the eligibility criteria specified by Afterpay.
2. Install the Afterpay Plugin or Integration: Afterpay offers plugins and integrations for popular e-commerce platforms like Shopify, WooCommerce, Magento, and more. Choose the plugin or integration that is compatible with your website and follow the installation instructions provided by Afterpay.
3. Configure Afterpay Settings: Once the plugin or integration is successfully installed, you will need to configure the Afterpay settings. This includes specifying the payment options, installment terms, and any additional customization options available. It is important to align the settings with your business needs and customer preferences.
4. Customize the Afterpay Button and Display: Afterpay provides customization options to match the look and feel of your website. You can customize the appearance of the Afterpay button, including its placement, size, and color scheme. This ensures a seamless integration and provides a cohesive user experience.
5. Test the Afterpay Feature: Before making Afterpay available to your customers, it is crucial to thoroughly test the integration. Place test orders and go through the payment process to ensure that everything is working as expected. Resolve any issues or errors that may arise during the testing phase.
Once you have completed these steps, Afterpay will be successfully integrated into your website, and your customers will be able to select Afterpay as a payment option during checkout.
Remember, it is essential to regularly update and maintain your Afterpay integration to ensure optimal functionality and a seamless user experience. Stay up to date with any plugin or integration updates released by Afterpay and make necessary adjustments to keep your Afterpay integration running smoothly.
By following these steps, you can easily add Afterpay to your website, providing your customers with a convenient and flexible payment option that can significantly boost your sales and customer satisfaction.
Step 1: Sign up for an Afterpay Account
The first step to adding Afterpay to your website is to sign up for an Afterpay account. By creating an account, you will gain access to the necessary tools and resources to integrate Afterpay seamlessly.
Here’s how you can sign up for an Afterpay account:
1. Visit the Afterpay website: Go to the official Afterpay website using any web browser on your computer or mobile device.
2. Click on “Sign Up for Merchants”: On the Afterpay homepage, locate and click on the “Sign Up for Merchants” button. This will redirect you to the merchant sign-up page.
3. Enter your business information: Fill out the required fields on the sign-up form with your business information. This typically includes your business name, contact details, website URL, and location.
4. Review and accept the terms and conditions: Carefully review the terms and conditions outlined by Afterpay. Ensure that you meet the eligibility criteria for using their services. If you agree to the terms, check the box to indicate your acceptance.
5. Click “Submit” to create your account: Once you have entered all the necessary information and agreed to the terms, click the “Submit” button to create your Afterpay account.
6. Wait for account approval: After submitting your application, Afterpay will review your information to confirm your eligibility. This approval process typically takes a few business days. You will receive an email notification once your account is approved.
7. Log in to your Afterpay account: After your account is approved, you can log in to your Afterpay merchant account using the credentials you provided during the sign-up process.
By completing these steps, you will have successfully signed up for an Afterpay account, giving you access to the tools and resources needed to integrate Afterpay into your website.
It is important to note that Afterpay may have specific requirements and conditions for merchant accounts, so it’s essential to familiarize yourself with their terms and guidelines to ensure compliance.
Once your Afterpay account is set up, you can move on to the next steps, which involve installing the Afterpay plugin or integration and configuring the settings to make Afterpay available on your website.
Step 2: Install the Afterpay Plugin or Integration
After signing up for an Afterpay account, the next step is to install the Afterpay plugin or integration on your website. Depending on the platform you’re using, such as Shopify, WooCommerce, or Magento, Afterpay provides specific plugins or integrations to simplify the integration process.
Follow these steps to install the Afterpay plugin or integration:
1. Access your Afterpay merchant account: Log in to your Afterpay merchant account using the credentials you received after signing up. This will provide you with access to the Afterpay resources and documentation.
2. Locate the plugins or integrations: Once you’re logged in, navigate to the plugins or integrations section within your Afterpay merchant account. This section will provide information and resources for the specific platform you’re using.
3. Select the correct plugin or integration: From the available options, choose the plugin or integration that is relevant to your website platform. Make sure to select the version that matches your platform’s version.
4. Download the plugin or integration: Click on the download button or link provided to download the Afterpay plugin or integration file. Save the file to your computer in a location that is easily accessible.
5. Install the plugin or integration: Access your website’s content management system (CMS) or backend, and find the section to install plugins or integrations. Upload the plugin or integration file you downloaded in the previous step and follow the instructions provided by your CMS platform to complete the installation process.
6. Configure the plugin or integration: After the installation is complete, you may need to configure the plugin or integration settings according to your preferences. This may include settings such as payment methods, currency options, and display options.
7. Save and activate the plugin or integration: Once you have configured the settings, save the changes and activate the Afterpay plugin or integration on your website. This will make Afterpay available as a payment option during the checkout process.
It’s important to follow the specific instructions provided by Afterpay for your chosen platform. This will ensure a seamless integration and proper functionality of Afterpay on your website.
By completing this step, you will have successfully installed the Afterpay plugin or integration, bringing you one step closer to providing your customers with the option to use Afterpay for their purchases.
Step 3: Configure Afterpay Settings
Once you have installed the Afterpay plugin or integration on your website, the next step is to configure the Afterpay settings to align with your business requirements. Customizing the settings will ensure that Afterpay seamlessly integrates into your website and provides a smooth payment experience for your customers. Follow these steps to configure Afterpay settings:
1. Access the Afterpay settings: Login to your website’s backend or admin panel and navigate to the Afterpay plugin or integration settings page. This page will allow you to customize various Afterpay settings to match your preferences.
2. Set up payment options: Determine the payment options you want to offer to your customers through Afterpay. This could include options like paying in full or splitting the payment into installments, depending on Afterpay’s available features and your business strategy.
3. Configure installment terms: Specify the installment terms that Afterpay will offer to your customers. This will include parameters like the number of installments, payment frequency, and any related fees or charges. Ensure that the installment terms align with your business model and comply with Afterpay’s guidelines.
4. Define currency options: Choose the currencies in which you want Afterpay transactions to be processed. Consider the currencies most relevant to your customer base and the geographic locations you cater to. Afterpay supports multiple currencies, so select those that align with your target audience.
5. Customize display options: Take advantage of customization features to ensure the Afterpay integration visually matches your website’s design and branding. Customize the appearance of the Afterpay button, such as its color, size, and placement on the checkout page. Make sure the button is prominently displayed and easily recognizable to your customers.
6. Review Afterpay terms and conditions: Familiarize yourself with the terms and conditions provided by Afterpay for using their service. Ensure that you understand and comply with their guidelines to avoid any issues with your Afterpay integration. Stay updated with any changes or updates to their terms and conditions as well.
7. Test the integration: Before making Afterpay live on your website, internally test the integration to ensure everything works as expected. Perform test transactions to verify that the payment process, installment calculations, and order management are functioning correctly. This will help you identify and resolve any issues or discrepancies before your customers start using Afterpay.
By configuring the Afterpay settings according to your business model and preferences, you can ensure that the integration seamlessly aligns with your website’s checkout process. This customization will enhance the user experience and make it easier for your customers to use Afterpay as a payment option.
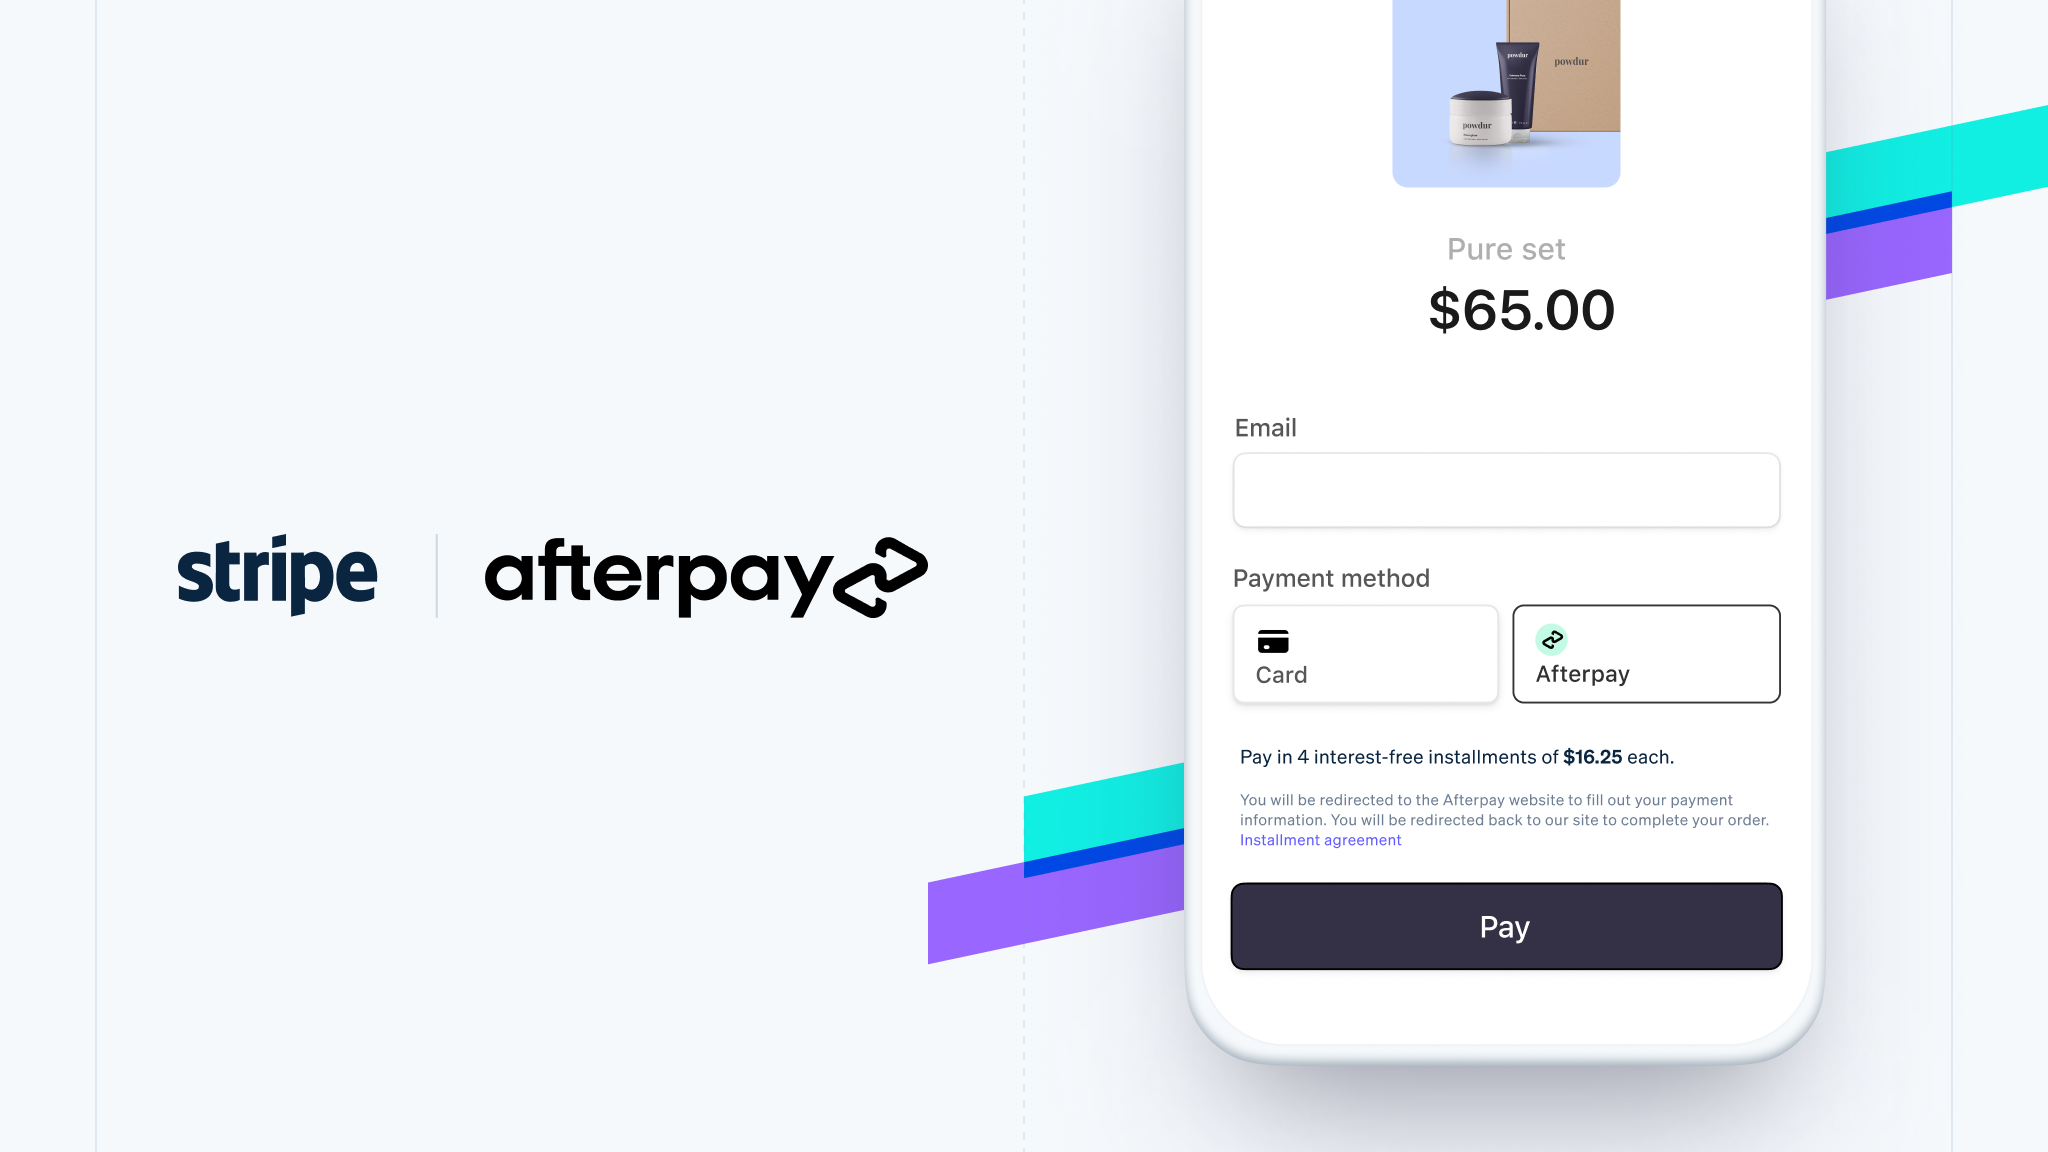
Step 4: Customize the Afterpay Button and Display
After configuring the Afterpay settings, the next step is to customize the Afterpay button and its display on your website. Customizing the button and its placement ensures that it seamlessly integrates with your website’s design and provides a clear and visible option for customers to choose Afterpay as a payment method. Here’s how you can customize the Afterpay button and display:
1. Access the Afterpay customization options: Log in to your website’s backend or admin panel and navigate to the Afterpay plugin or integration settings page. Look for the customization options related to the Afterpay button and display.
2. Customize the appearance of the button: Use the provided settings to modify the appearance of the Afterpay button. You can change its size, color, and style to align with your website’s branding and design. Ensure that the button is visually appealing and stands out on your checkout page.
3. Choose the placement of the button: Decide where the Afterpay button will be displayed on your checkout page. Common placements include near the total purchase amount or alongside other payment options. Consider the flow of your checkout process and make sure the button is easily noticeable and accessible to customers.
4. Ensure responsive design: Check that the Afterpay button and display elements are responsive on various devices, including desktops, tablets, and mobile phones. Test the display on different screen sizes to ensure that the button remains visible and doesn’t hinder the overall user experience.
5. Preview the customized button: Use the preview functionality provided by the Afterpay plugin or integration to see how the customized button will appear in real-time. This allows you to make any necessary adjustments before making it live on your website.
6. Consider accessibility: Ensure that the Afterpay button meets accessibility standards, such as adhering to color contrast guidelines and being compatible with assistive technologies. This ensures that all users, including those with disabilities, can easily identify and use Afterpay as a payment option.
7. Test the button and display: After customizing the Afterpay button and display, perform thorough testing to ensure it functions properly. Test the button’s responsiveness, clickability, and its integration with other payment options. Verify that the button leads customers to the correct Afterpay payment process and displays accurate installment information.
By customizing the Afterpay button and display, you can create a visually appealing and easily accessible option for customers to select Afterpay as their payment method. This enhances the user experience and promotes a seamless checkout process, ultimately boosting your conversion rates and customer satisfaction.
Step 5: Test the Afterpay Feature
After customizing the Afterpay button and display, the next crucial step is to thoroughly test the Afterpay feature on your website. Testing ensures that the integration is working correctly, payments are processed accurately, and customers have a seamless experience when using Afterpay as a payment option. Follow these steps to test the Afterpay feature:
1. Create test orders: Place test orders on your website to simulate real transactions. Select products, add them to the cart, and proceed to the checkout page. Choose Afterpay as the payment option and complete the checkout process just as a customer would.
2. Verify payment processing: Check that payments made through Afterpay are properly processed. Validate that the correct amount is deducted from the customer’s account, and the payment is successfully received by your business. This step confirms the accuracy and reliability of the payment processing function.
3. Ensure accurate installment calculations: If customers choose to pay in installments, verify that the installment calculations are accurate and align with the terms set in the Afterpay settings. Ensure that the total purchase amount is divided correctly, and any applicable fees or charges are calculated accurately.
4. Test order management: Confirm that when customers complete an order using Afterpay, the order details are correctly recorded and integrated with your backend system or order management software. This includes verifying that customer information, products purchased, and order status are accurately captured.
5. Check email notifications: Review the email notifications sent to both the customer and your business when an order is placed using Afterpay. Check that the email notifications contain all the relevant details, such as order confirmation, payment confirmation, and installment schedule, if applicable.
6. Perform refunds and cancellations: Test the refund and cancellation process for orders paid through Afterpay. Process refunds and cancellations and ensure that the Afterpay system updates the payment status accordingly and refunds the customer as expected.
7. Test on different devices and browsers: Test the Afterpay feature on various devices and browsers to ensure compatibility and responsiveness. Check that the integration works seamlessly on desktops, tablets, and mobile devices with different screen sizes and resolutions.
By thoroughly testing the Afterpay feature on your website, you can identify and resolve any issues or discrepancies before your customers encounter them. This ensures a great user experience and allows you to provide reliable and efficient payment options through Afterpay.
Conclusion
Adding Afterpay to your website can significantly enhance the shopping experience for your customers and drive more sales for your business. The flexibility and convenience of Afterpay’s buy now, pay later option can attract a wider customer base, increase conversion rates, and improve average order value. By following the steps outlined in this guide, you can successfully integrate Afterpay into your website:
In Step 1, sign up for an Afterpay account to gain access to the necessary tools and resources. Step 2 involves installing the Afterpay plugin or integration specific to your website platform. In Step 3, configure the Afterpay settings to align with your business requirements. Customizing the Afterpay button and display is covered in Step 4 to ensure seamless integration with your website’s design. Finally, Step 5 emphasizes the importance of thoroughly testing the Afterpay feature to ensure proper functionality and a seamless customer experience.
By adding Afterpay to your website, you provide customers with a convenient and flexible payment option, ultimately enhancing their shopping experience. This, in turn, can lead to increased customer loyalty, higher conversion rates, and improved revenue for your business.
Remember to keep your Afterpay integration up to date, review any updates or changes to terms and conditions, and regularly test the feature to ensure optimal performance. By providing a smooth and hassle-free payment experience with Afterpay, you can differentiate your business in the competitive landscape and drive success in the ever-evolving e-commerce industry.
So, take the leap and integrate Afterpay into your website to enjoy the benefits of this popular payment solution. Start attracting more customers, increasing order value, and driving growth for your online business today!