Introduction
Welcome to the world of convenient online shopping and seamless payment options. In today’s digital era, consumers are continually seeking ways to simplify their shopping experience and streamline their payments. Two popular options that cater to these demands are Afterpay and Apple Pay. But what exactly are Afterpay and Apple Pay, and how can you use them together?
Afterpay is a buy now, pay later service that allows consumers to make purchases and pay off the total amount in installments. On the other hand, Apple Pay is a digital wallet that enables users to make secure payments via their Apple devices, including iPhones, iPads, and Apple Watches. Both Afterpay and Apple Pay offer unique advantages, making them widely preferred payment methods.
With Afterpay, you can enjoy the flexibility of splitting your payment into four equal installments over a period of six weeks, without any interest or additional fees (unless you miss a scheduled payment). Apple Pay, on the other hand, allows you to make payments using your chosen credit or debit cards securely. It uses cutting-edge technology like Touch ID or Face ID for authentication, making transactions quick and secure. What if you could combine the convenience of Afterpay with the security and ease of Apple Pay? Well, it turns out you can!
In this guide, we will delve into the world of utilizing Afterpay with Apple Pay. We will explore how these two payment methods work, whether they can be used together, and the benefits of doing so. Additionally, we will walk you through the process of setting up Apple Pay, adding Afterpay as a payment method, making a purchase, and managing your payments through Apple Pay.
So, if you’re ready to elevate your online shopping experience and maximize your payment options, let’s dive in and discover how to use Afterpay with Apple Pay!
What is Afterpay?
Afterpay is a popular and innovative payment platform that allows shoppers to buy products and pay for them in installments. With Afterpay, you can split your purchase price into four equal payments, which are due every two weeks. This convenient buy now, pay later service enables you to enjoy your purchase immediately, without the need to pay the full amount upfront.
Afterpay aims to provide a flexible and convenient payment option for consumers, especially those who want to manage their budget effectively. By breaking down the total cost of your purchase into smaller, manageable payments, Afterpay helps you stay within your budget and avoid the burden of a lump sum payment.
One of the key benefits of Afterpay is that it does not charge any interest or ongoing fees. As long as you pay your installments on time, you can take advantage of this service at no additional cost. However, it’s important to note that if you miss a scheduled payment, you may incur late fees and your Afterpay account may be restricted until the outstanding amount is settled.
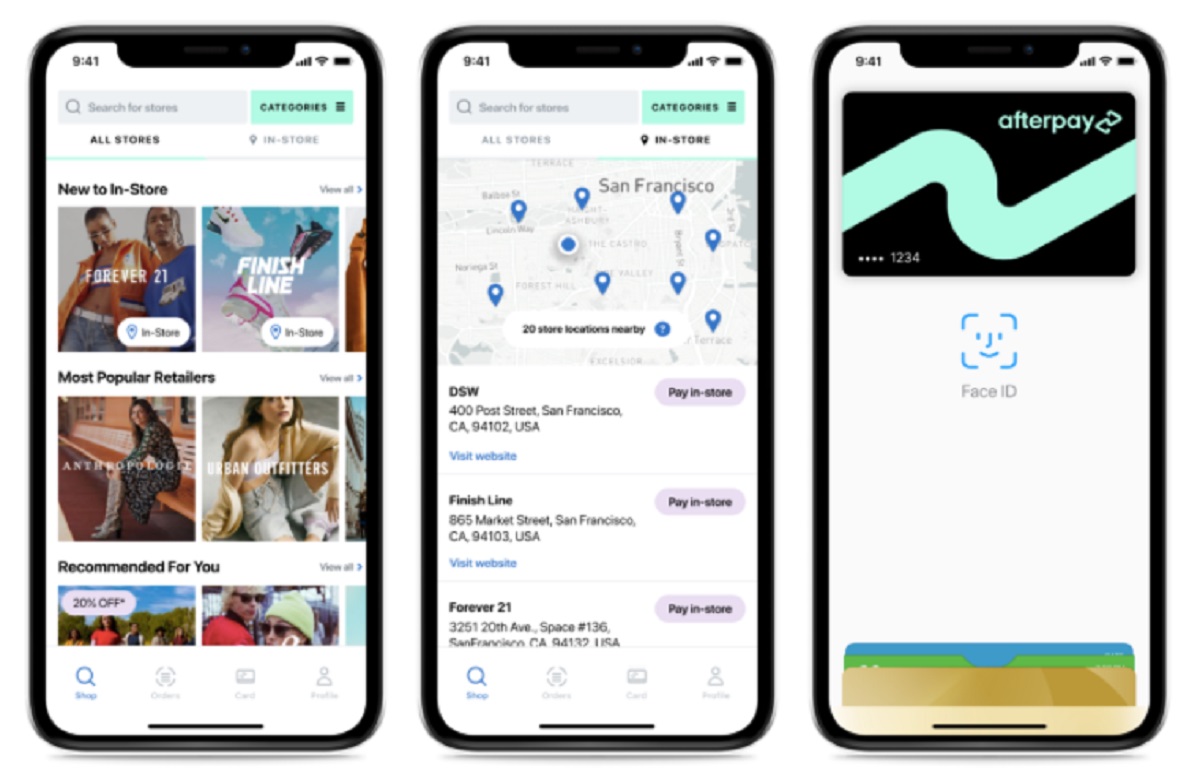
Afterpay offers a seamless and frictionless checkout process, both online and in-store. When shopping online, you simply select Afterpay as your preferred payment method, and you will be redirected to the Afterpay platform to complete your purchase. In physical stores, you can also use Afterpay at participating retailers by scanning the Afterpay barcode provided on your phone.
In summary, Afterpay provides a convenient way to make purchases and manage your budget by splitting payments into four installments. This popular payment option has gained significant traction among consumers who value flexibility and want to avoid the burden of lump sum payments. Next, we will explore what Apple Pay is and how it works, and delve into the possibility of using Afterpay with Apple Pay to enhance your payment experience.
What is Apple Pay?
Apple Pay is a secure and contactless payment method that allows users to make purchases using their Apple devices, such as iPhones, iPads, and Apple Watches. With Apple Pay, you can link your credit or debit cards to your device, eliminating the need to carry physical cards or cash.
One of the distinguishing features of Apple Pay is its advanced security measures. When you make a payment with Apple Pay, your actual card details are not shared with the merchant. Instead, a unique device account number is assigned to your device, and this number is used to process your payment. This ensures that your financial information is kept secure and minimizes the risk of fraud.
Using Apple Pay is incredibly convenient. To make a payment, you simply hold your device near the contactless payment terminal and authenticate the transaction with either Touch ID or Face ID. Your device will vibrate or display a checkmark to indicate that the payment was successful. The entire process is quick, seamless, and safeguarded against unauthorized use.
Apple Pay also offers additional features, such as the ability to store and redeem rewards cards, gift cards, and even transit cards on your device. This means that you can effortlessly access and use these cards without the need to carry physical copies with you.
Furthermore, Apple Pay has partnered with various apps and online merchants, allowing you to make secure and convenient payments within these platforms. With just a touch or a glance, you can complete your purchase without the need to manually enter your payment details.
Overall, Apple Pay provides a secure, fast, and hassle-free way to make payments using your Apple devices. Now that we have discussed what Afterpay and Apple Pay are individually, let’s explore the possibility of using Afterpay with Apple Pay to unlock even more benefits and convenience in your shopping experience.
How Does Afterpay Work?
Afterpay operates on a simple and straightforward principle: allowing consumers to make a purchase now and pay for it later in equal installments. The process of using Afterpay can be broken down into four key steps.
1. Select Afterpay as your Payment Method: When making a purchase online or in-store, look for the Afterpay option at the checkout. Afterpay is available at thousands of retailers across various industries, including fashion, beauty, technology, and more.
2. Create an Afterpay Account: If you’re using Afterpay for the first time, you will need to sign up for an account. This process is quick and easy, and you will be asked to provide personal information and a valid payment method to link to your Afterpay account.
3. Make the First Payment: Once you’ve selected Afterpay and completed your purchase, you will make your first payment at the time of checkout. This payment typically covers 25% of the total order value. However, if you’re a new Afterpay user, your first payment may be slightly different, as determined by Afterpay’s assessment of your account.
4. Repay in Installments: After the initial payment, the remaining balance will be divided into three equal installments. These installments will be automatically deducted from your linked payment method every two weeks. It’s important to ensure that the funds are available in your account on the scheduled payment dates to avoid any late fees or penalties.
Afterpay makes it easy to manage your payments by providing notifications and reminders, as well as an online portal where you can view your payment schedule and make early repayments if desired. It’s important to note that Afterpay does not charge any interest on your payments, as long as they are made on time. However, late payments may incur fees and may impact your eligibility for future Afterpay purchases.
Overall, Afterpay offers a flexible and convenient way to make purchases and manage your budget. By splitting your payments into manageable installments and providing transparency in the payment schedule, Afterpay empowers consumers to enjoy their purchases while staying in control of their finances.
How Does Apple Pay Work?
Apple Pay is a secure and convenient payment method that simplifies the checkout process both in-store and online. It leverages Near Field Communication (NFC) technology to enable contactless payments through compatible Apple devices, such as iPhones, iPads, and Apple Watches. Here’s how Apple Pay works:
1. Add Your Cards: To start using Apple Pay, you need to add your credit or debit cards to your device. This can be done by opening the Wallet app on your iPhone or going to the Settings app and selecting “Wallet & Apple Pay.” From there, you can either manually enter your card details or use the device’s camera to capture the information.
2. Verify Your Card: After adding your cards, you may need to go through a verification process, which depends on your card issuer. This verification step ensures that you are the authorized cardholder, and it typically involves verifying your identity via a verification code or a phone call.
3. Make a Payment: Once your cards are added and verified, making a payment with Apple Pay is simple. When shopping in-store, look for the contactless payment symbol at the payment terminal. Just hold your device near the terminal, and authenticate the payment using Touch ID or Face ID. A subtle vibration or sound will confirm the successful transaction.
4. Online Payments: For online purchases, Apple Pay simplifies the checkout process. When you reach the payment page on a compatible app or website, select Apple Pay as your payment method. With a single touch or glance at your device, the payment will be securely authorized, eliminating the need to manually enter your card details or shipping address.
5. Identity Verification: In certain cases, when making a payment with Apple Pay, you may need to verify your identity using Touch ID or Face ID. This adds an extra layer of security by ensuring that only the authorized user can complete the transaction.
Apple Pay is supported by a massive network of merchants worldwide, enabling you to use it in a wide range of stores, restaurants, apps, and websites. Moreover, it’s not limited to payments. You can also use Apple Pay to store and redeem loyalty cards, gift cards, and transit cards, consolidating all your essential cards in one convenient place.
With its advanced security features, seamless checkout process, and compatibility with various devices and platforms, Apple Pay revolutionizes the payment experience and provides users with a convenient and secure way to make transactions.
Can You Use Afterpay with Apple Pay?
Yes, you can use Afterpay with Apple Pay to enjoy the benefits of both payment methods. Afterpay and Apple Pay are independent services that serve different purposes, but they can be seamlessly used together to enhance your shopping experience.
When making a purchase, you can select Afterpay as the payment option during the checkout process, and if the retailer accepts Apple Pay, you can use Apple Pay to complete the transaction. This allows you to split your total payment into four equal installments with Afterpay while enjoying the security and convenience of Apple Pay for the actual transaction.
The integration of Afterpay and Apple Pay offers several advantages for consumers. By using Afterpay, you have the flexibility to spread out your payments over time without incurring any interest or fees. This can help you manage your finances effectively and avoid the burden of paying the entire amount upfront.
On the other hand, Apple Pay provides a secure and contactless payment method, allowing you to make transactions quickly and effortlessly using your Apple devices. With Apple Pay, your card information is protected, as it is never shared with the merchant, reducing the risk of fraud.
Using Afterpay with Apple Pay also streamlines the checkout process. Instead of entering your card details manually, you can simply authenticate the payment with Touch ID or Face ID, making the transaction seamless and reducing the potential for errors.
It’s important to note that while Afterpay and Apple Pay can be used together, not all retailers offer both payment options. However, many major retailers accept both Afterpay and Apple Pay, providing you with more flexibility and convenience when making your purchases.
By combining Afterpay with Apple Pay, you can enjoy the advantages of both services and enjoy a hassle-free shopping experience. You can make more informed purchasing decisions, manage your budget effectively, and complete transactions securely using your Apple device.
In the following sections, we will guide you through the steps of setting up Apple Pay, adding Afterpay as a payment method, making a purchase with Afterpay using Apple Pay, and managing your payments. Let’s dive in and discover how to make the most of these payment options!
Benefits of Using Afterpay with Apple Pay
Using Afterpay with Apple Pay can offer several advantages for shoppers looking for a convenient and flexible payment experience. Here are some of the key benefits of using these two payment methods together:
1. Convenience: By combining Afterpay and Apple Pay, you can enjoy a seamless and hassle-free checkout process. Afterpay allows you to split your payments into manageable installments, making it easier to budget your expenses. Meanwhile, Apple Pay eliminates the need to carry physical cards, allowing you to make contactless payments with just a touch or a glance on your Apple device.
2. Security: Both Afterpay and Apple Pay prioritize the security of your financial information. Afterpay utilizes encryption and secure practices to protect your personal and payment details, while Apple Pay uses tokenization and biometric authentication (such as Touch ID or Face ID) to ensure that your transactions are secure. By using both services together, you benefit from a double layer of security.
3. Budgeting and Financial Management: Afterpay offers an effective way to manage your budget by allowing you to spread out your payments over time. By integrating Afterpay with Apple Pay, you can stay organized by tracking your Afterpay installment due dates and amounts within the Apple Pay app. This can help you stay on top of your repayments and avoid missing any scheduled payments.
4. Flexibility in Payment Options: Combining Afterpay and Apple Pay expands your payment options. Afterpay allows you to make purchases without paying the full amount upfront while splitting the payment into interest-free installments. At the same time, Apple Pay enables you to make payments using your connected credit or debit cards, all conveniently accessible on your Apple device. This flexibility enables you to choose the payment method that suits your needs and preferences.
5. Access to a Wide Range of Retailers: Both Afterpay and Apple Pay have partnerships with a vast network of retailers, offering you a wide range of options when it comes to where you can shop. Many retailers accept both Afterpay and Apple Pay, allowing you to experience the benefits of combining the two services at various online and physical stores.
These benefits highlight the value of using Afterpay with Apple Pay to maximize your payment options and enhance your shopping experience. Now that you understand the advantages, let’s explore how to set up Apple Pay, add Afterpay as a payment method, and make purchases using Afterpay with Apple Pay to experience these benefits firsthand.
How to Use Afterpay with Apple Pay
Using Afterpay with Apple Pay is a straightforward process that allows you to enjoy the convenience and flexibility of Afterpay’s installment payments while leveraging the security and ease of Apple Pay. To use Afterpay with Apple Pay, follow these steps:
Step 1: Set Up Apple Pay: If you haven’t already, the first step is to set up Apple Pay on your Apple device. Open the Wallet app on your iPhone or go to the Settings app and select “Wallet & Apple Pay.” Follow the prompts to add your credit or debit cards to Apple Pay.
Step 2: Install the Afterpay App: To access Afterpay, download the Afterpay app from the App Store and sign up for an Afterpay account. If you already have the Afterpay app installed, make sure it is up to date.
Step 3: Link Afterpay to Apple Pay: Open the Afterpay app and navigate to the settings or payment methods section. Look for the option to add Afterpay to your digital wallet and follow the instructions to link Afterpay to Apple Pay.
Step 4: Make a Purchase: When you’re ready to make a purchase with Afterpay and Apple Pay, go to the retailer’s online store or visit a physical store that accepts both payment methods. Select your desired items and proceed to checkout.
Step 5: Choose Afterpay and Authenticate: At the checkout, select Afterpay as your payment method. If the retailer accepts Apple Pay, you can now choose Apple Pay as your payment option as well. Authenticate the payment with Touch ID or Face ID, depending on your device’s capabilities.
Step 6: Complete Your Purchase: Once the payment is authorized, you will receive confirmation of your purchase. Afterpay will automatically schedule your installment payments, which will be charged to your linked payment method every two weeks.
Step 7: Manage Your Payments: To keep track of your Afterpay payments, open the Afterpay app and access your account. You can view your payment schedule, make early repayments, and manage your Afterpay transactions directly within the app.
By following these steps, you can easily use Afterpay with Apple Pay to enjoy the benefits of flexible payments and secure transactions. Remember to stay proactive in managing your Afterpay payments to avoid late fees and keep your account in good standing.
Now that you know how to use Afterpay with Apple Pay, let’s explore the process of setting up Apple Pay and adding Afterpay as a payment method in more detail.
Setting Up Apple Pay
Setting up Apple Pay on your Apple device is a quick and straightforward process. Follow these steps to get started:
Step 1: Open the Wallet app: Locate and open the Wallet app on your iPhone or iPad. This app comes pre-installed on most Apple devices and has a white icon with blue edges that resembles a wallet.
Step 2: Add your cards: Once the Wallet app is open, tap the “+” symbol in the top right corner of the screen. Follow the prompts to add your credit or debit cards. You can either enter your card information manually or use the camera to capture the details.
Step 3: Verify your card: Depending on your card issuer, you may need to verify your card to ensure its authenticity. This can usually be done by entering a verification code sent by your bank or by contacting your card issuer directly.
Step 4: Set a default card: If you have added multiple cards to Apple Pay, you can set a default card by tapping and dragging the cards in the Wallet app. The default card is automatically used for transactions unless you specify otherwise.
Step 5: Enable Face ID or Touch ID: To secure your Apple Pay transactions, ensure that either Face ID or Touch ID is enabled on your device. This allows you to authenticate payments using facial recognition or your fingerprint, depending on your device’s capabilities.
Step 6: Manage settings: In the Wallet app, you can access additional settings for Apple Pay. This includes options such as adjusting transaction notifications, selecting transit cards, or managing your payment information.
Once you have completed these steps, you are now set up to use Apple Pay for contactless and quick payments. When making purchases in-store or online, look for the contactless payment symbol or the Apple Pay logo. You can then use Apple Pay to authorize the transaction securely and conveniently with Face ID or Touch ID.
Now that you have set up Apple Pay, let’s move on to the next step and add Afterpay as a payment method within the Apple Pay app.
Adding Afterpay as a Payment Method in Apple Pay
Adding Afterpay as a payment method within the Apple Pay app is a simple process. Follow these steps to link Afterpay to your Apple Pay account:
Step 1: Open the Wallet app: Locate and open the Wallet app on your Apple device. This app is pre-installed on most iPhones and iPads and is represented by a white icon with blue edges.
Step 2: Tap on the “+” symbol: In the Wallet app, tap on the “+” symbol in the top right corner to add a new card or payment method.
Step 3: Select “Add Another Card”: When prompted to add a card, tap on “Add Another Card” to explore additional payment options.
Step 4: Look for the Afterpay option: Scroll through the list of available payment methods and look for the Afterpay option. Afterpay is represented by its logo, which consists of the word “Afterpay” in white letters on a black background.
Step 5: Tap on Afterpay: Once you have located the Afterpay option, tap on it to initiate the setup process.
Step 6: Authenticate: Follow the prompts to authenticate your Afterpay account within the Apple Pay app. This may involve providing your Afterpay login credentials or completing a verification process.
Step 7: Confirmation: After successfully linking Afterpay to your Apple Pay account, you will receive confirmation that Afterpay is now added as a payment method.
That’s it! After completing these steps, Afterpay is now added as a payment method within Apple Pay. You can now conveniently select Afterpay during the checkout process when making purchases with compatible retailers.
Remember that not all retailers may accept Afterpay as a payment method, so it’s always a good idea to check for the Afterpay logo or consult the retailer’s payment options before making a purchase.
With Afterpay added to your Apple Pay account, you’re now ready to make a purchase using Afterpay. In the next section, we will guide you through the process of making a purchase with Afterpay using Apple Pay.
Making a Purchase with Afterpay Using Apple Pay
Now that you have Afterpay added as a payment method in your Apple Pay account, you can enjoy the convenience of making purchases using Afterpay and Apple Pay together. Follow these steps to make a purchase with Afterpay using Apple Pay:
Step 1: Browse and Select Items: Visit a retailer’s website or go to a physical store that accepts both Afterpay and Apple Pay. Browse through the available products and select the items you wish to purchase.
Step 2: Add to Cart: Once you have chosen your items, add them to your shopping cart or bag as you would with any other online or in-store purchase.
Step 3: Proceed to Checkout: When you’re ready to complete your purchase, proceed to the checkout page. This is where you will select your preferred payment method.
Step 4: Select Afterpay: On the checkout page, look for the Afterpay option among the available payment methods. Choose Afterpay to use the buy now, pay later service for your purchase.
Step 5: Authenticate with Apple Pay: If the retailer also accepts Apple Pay, you will have the option to select Apple Pay as your payment method in addition to Afterpay. Select Apple Pay and authenticate the payment using Touch ID or Face ID.
Step 6: Complete the Transaction: Once you have authenticated the payment, review your order details one more time, and proceed to complete the transaction. At this point, the retailer will process your payment through Afterpay and provide an order confirmation.
Step 7: Manage Afterpay Payments: After the purchase is complete, Afterpay will automatically schedule your installment payments according to the agreed-upon terms. You can manage your Afterpay payments and view your payment schedule through the Afterpay app.
By following these steps, you can easily make a purchase using Afterpay and Apple Pay together. This allows you to enjoy the convenience and flexibility of Afterpay’s installment payments while benefiting from the security and ease of Apple Pay for transaction authentication.
Remember that Afterpay and Apple Pay availability may vary among retailers, so always check if both payment methods are accepted before making a purchase. Additionally, ensure that you have enough funds in the linked payment method to cover the first Afterpay installment payment.
In the next section, we will discuss how you can manage your payments and keep track of your Afterpay installments through Apple Pay.
Managing Payments with Afterpay Through Apple Pay
If you’re using Afterpay with Apple Pay, you can conveniently manage your installment payments and keep track of your transactions within the Apple Pay app. Here’s how you can manage your payments with Afterpay through Apple Pay:
Step 1: Open the Wallet app: Locate and open the Wallet app on your Apple device. This app allows you to access and manage your payment methods, including Afterpay.
Step 2: Select the Afterpay Card: In the Wallet app, find the Afterpay card, which represents your Afterpay account. Tap on the Afterpay card to view the details and options associated with your Afterpay payments.
Step 3: View Payment Schedule: Within the Afterpay card details, you will be able to view your payment schedule. This schedule outlines the amount and due date of each installment payment you need to make.
Step 4: Make Early Repayments: If you wish to pay off your Afterpay installments early, you can initiate early repayments through the Afterpay card in the Wallet app. This allows you to settle your payments sooner and potentially reduce the overall interest-free installment period.
Step 5: Keep Track of Transactions: The Wallet app also provides a transaction history for your Afterpay purchases. This allows you to review your previous transactions and keep an accurate record of your Afterpay payments.
Step 6: Set Payment Notifications: You have the option to set up payment notifications for your Afterpay installments through the Wallet app. This can help you stay informed about upcoming payment due dates and ensure that you make your payments on time.
Step 7: Contact Afterpay Support: If you require assistance with your Afterpay payments or have any questions, you can find contact information for Afterpay support within the Afterpay card details in the Wallet app.
By utilizing the payment management features in the Apple Pay app, you can stay organized and effectively manage your Afterpay installments. This ensures that you stay on top of your payment obligations, avoid late fees, and maintain a positive relationship with Afterpay.
Remember to regularly check your transaction history and payment schedule within the Wallet app to maintain transparency and control over your Afterpay payments. Timely repayments will also contribute to your eligibility for future Afterpay purchases and help you build a positive credit history with the service.
In the next section, we will wrap up our guide on using Afterpay with Apple Pay and summarize the benefits they bring to your shopping and payment experience.
Conclusion
Using Afterpay with Apple Pay allows you to combine the benefits of both payment methods and elevate your shopping and payment experience. Afterpay offers flexible installment payments, enabling you to spread the cost of your purchase over time without any interest or fees, while Apple Pay provides a secure and convenient way to make payments using your Apple devices.
By using Afterpay with Apple Pay, you can enjoy the convenience of splitting your payments into manageable installments while taking advantage of the security features and contactless payments of Apple Pay. This combination allows you to shop with ease and flexibility while maintaining control over your budget.
Setting up Apple Pay is a simple process, and adding Afterpay as a payment method within the Apple Pay app allows for seamless integration. You can make a purchase by selecting Afterpay and authenticating the transaction through Apple Pay with a touch or a glance.
Managing your Afterpay payments through Apple Pay is convenient and accessible. You can view your payment schedule, make early repayments, and track your transaction history within the Wallet app. These features enable you to stay organized and ensure that your payments are made on time.
Overall, the combination of Afterpay and Apple Pay provides you with a powerful payment solution that offers convenience, flexibility, and security. It empowers you to make purchases responsibly and enjoy your shopping experience without the burden of full upfront payments.
Remember to always check if the retailer accepts both Afterpay and Apple Pay before making a purchase. Additionally, staying proactive in managing your Afterpay payments and keeping track of your financial commitments will help you make the most of these payment methods and maintain a positive payment history.
So, now that you have a comprehensive understanding of how to use Afterpay with Apple Pay, you’re ready to take advantage of these convenient and innovative payment methods. Start enjoying the benefits of flexible payments and secure transactions today!