Introduction
3D printing has revolutionized the manufacturing industry, offering innovative solutions and unlimited possibilities. Among the various 3D printing technologies available, Polyjet stands out as a versatile and precise method. This article will explore how Polyjet 3D printing works and its key components.
Polyjet technology utilizes a polymer jetting process to create highly detailed and complex 3D models. It allows for the simultaneous printing of multiple materials with varying properties, including different colors and levels of transparency. The result is a high-resolution, multi-material prototype that closely resembles the final product.
One of the notable features of Polyjet 3D printing is the ability to achieve exceptionally smooth surfaces, fine details, and intricate geometries. This makes it an ideal choice for applications in industries such as automotive, medical, consumer goods, and even entertainment.
In this article, we will delve into the key components of a Polyjet 3D printer, examine the polymer jetting technology behind it, and provide a step-by-step overview of how the printing process works. We will also explore the advantages of this technology and delve into various applications that benefit from Polyjet 3D printing.
So, let’s embark on a journey through the exciting world of Polyjet 3D printing and uncover the inner workings and vast potential of this cutting-edge technology.
What is Polyjet 3D Printing?
Polyjet 3D printing is a powerful additive manufacturing technology that uses inkjet-like technology to build three-dimensional objects layer by layer. It combines the versatility of inkjet printing with the precision and reliability of 3D printing to produce highly detailed and accurate models.
The process starts with a 3D model created using computer-aided design (CAD) software. The model is then converted into digital instructions that the Polyjet 3D printer can understand. These instructions dictate the placement and curing of photopolymer materials, which are jetted onto the build platform.
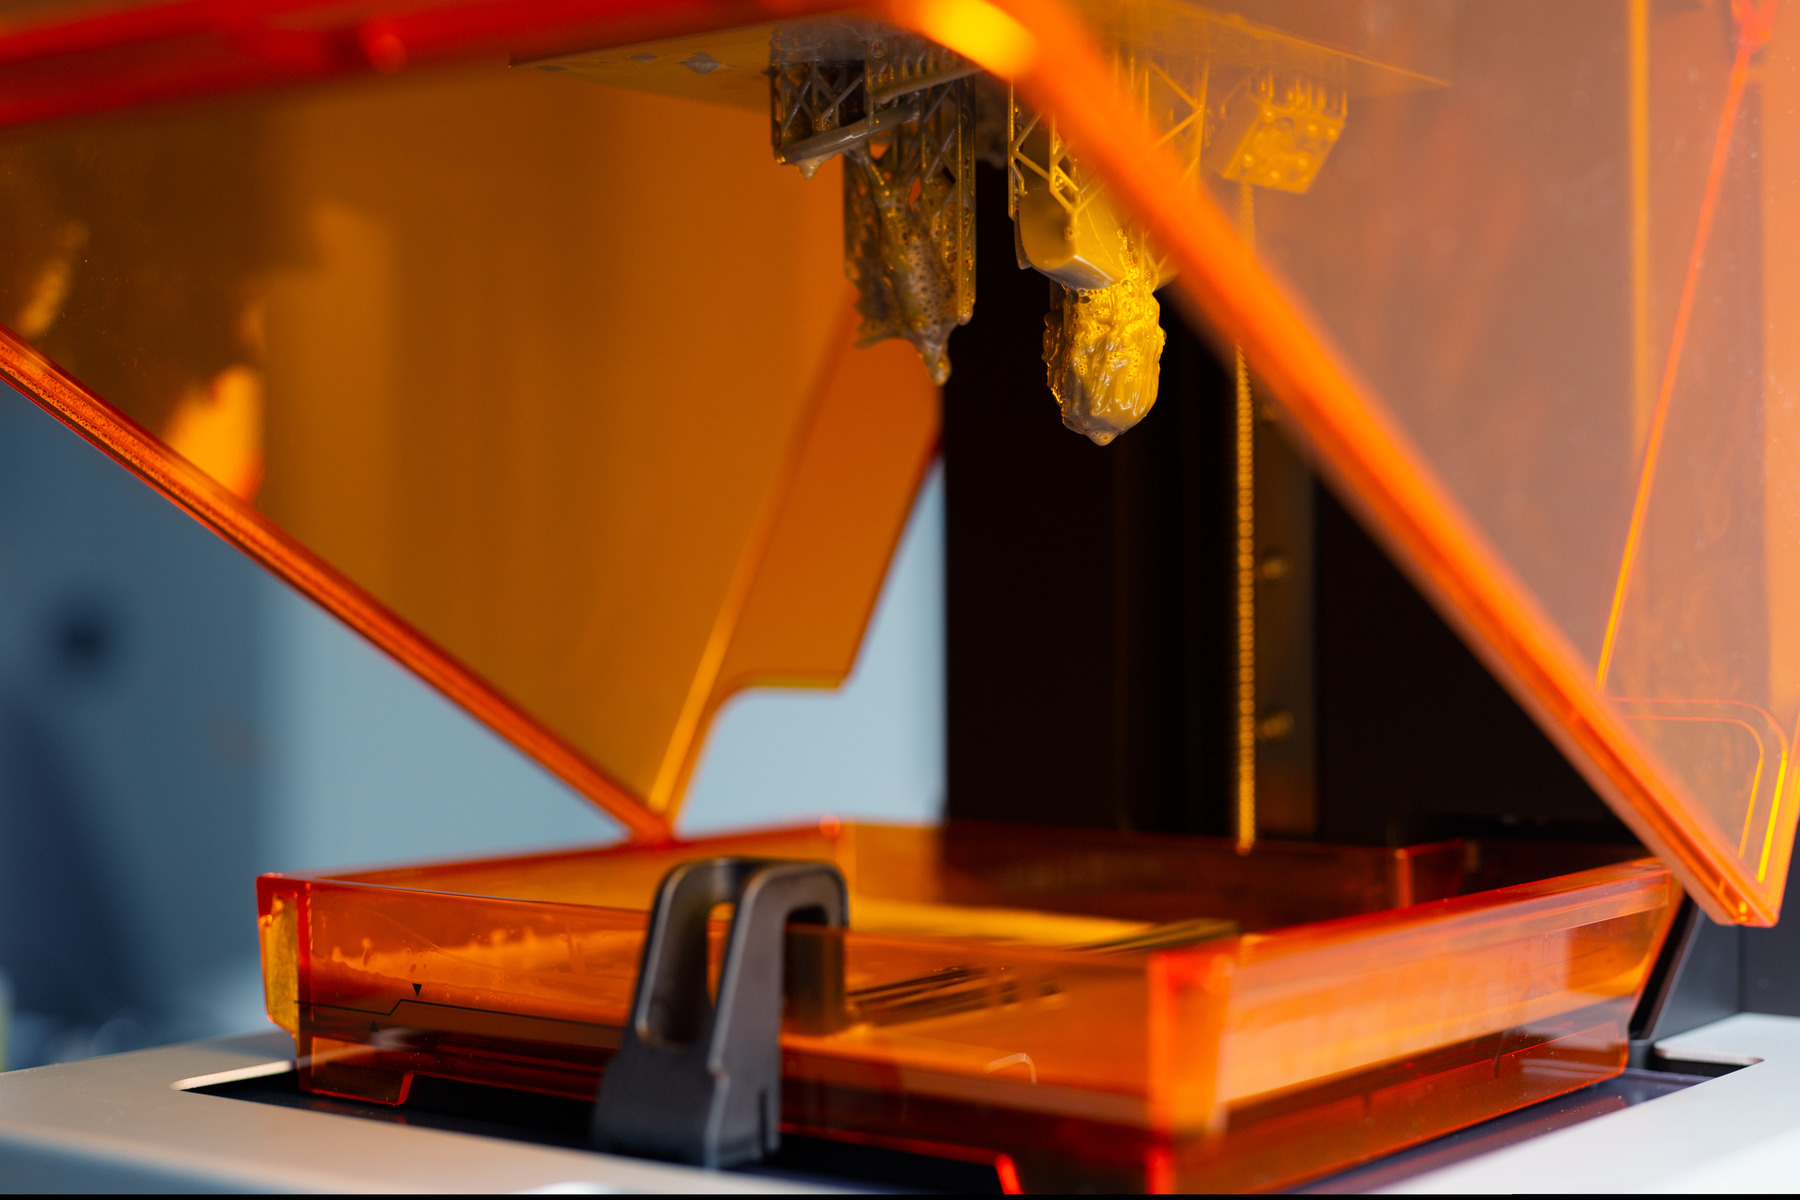
The key feature of Polyjet technology is the ability to jet liquid photocurable materials, also known as resins, onto the build platform with exceptional precision. These resins are then instantly cured or hardened using UV lights, resulting in solid layers of material. By selectively jetting different materials, the printer can create objects with varying properties such as color, transparency, and flexibility within a single print.
The precision of Polyjet 3D printing allows for layer thicknesses as low as 16 microns, resulting in extremely smooth surface finishes and fine details that cannot be achieved through other 3D printing technologies. This makes Polyjet particularly suitable for applications that demand high accuracy and intricate geometries, such as jewelry, dental models, and architectural prototypes.
Another advantage of Polyjet technology is its support material system. Since the printer can simultaneously jet both build and support materials, it can create complex structures and overhangs without the need for manual support removal. This reduces post-processing time and effort, making Polyjet an efficient and time-saving technology.
In essence, Polyjet 3D printing is a versatile and accurate method that allows for the production of highly detailed and multi-material objects. Its ability to jet different resins and create complex geometries opens up a wide range of possibilities for various industries, making it a popular choice among designers, engineers, and manufacturers.
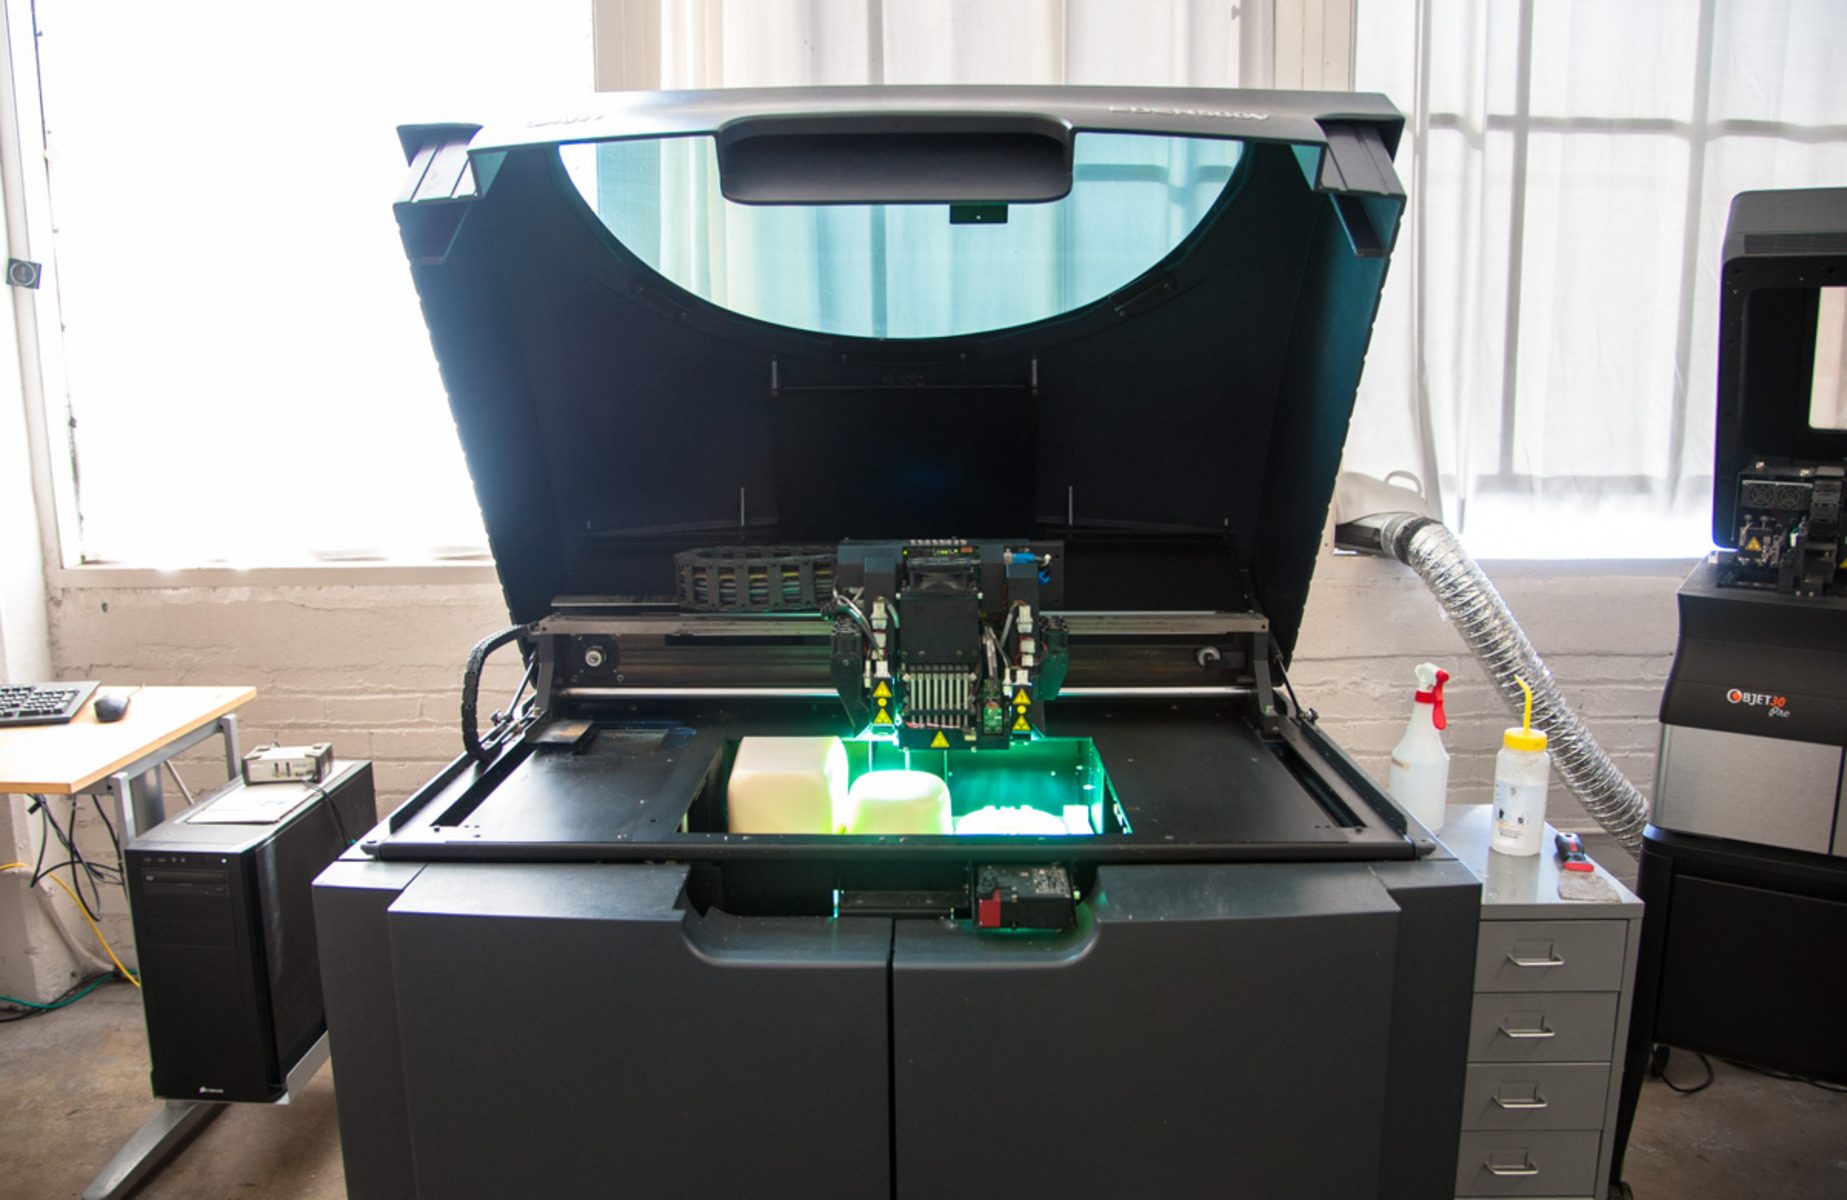
Key Components of a Polyjet 3D Printer
A Polyjet 3D printer consists of several essential components that work together to create precise and detailed models. Understanding these key components is crucial for comprehending the functioning of a Polyjet printer.
1. Build Platform: The build platform is where the 3D model is created layer by layer. It is typically a flat surface that moves vertically or horizontally, allowing for the accurate positioning of each layer of material.
2. Print Head: The print head is responsible for jetting and depositing the photocurable materials onto the build platform. It contains multiple microjets that selectively dispense the different resins or materials in precise patterns.
3. Photopolymer Materials: Polyjet printers utilize liquid photopolymer materials that solidify when exposed to UV light. These materials, also known as resins, are available in various formulations, each with its own unique characteristics such as color, transparency, and flexibility.
4. UV Curing System: The UV curing system consists of UV lights that rapidly cure or harden the liquid resins once they are deposited on the build platform. The UV light exposure is carefully controlled to ensure proper curing of each layer.
5. Support Material System: Polyjet printers often incorporate a support material system. Support materials are used to create temporary structures that provide stability to overhangs or complex geometries during printing. These support structures can be easily removed after the printing process is complete, leaving behind the desired object.
6. Control Software: Polyjet printers are controlled by software that translates the digital instructions from the 3D model into specific movements and material deposition. The software allows for precise control over the printing process, including parameters like layer thickness, material selection, and printing speed.
7. Material Cartridges: The photopolymer materials used in Polyjet printing are typically stored in material cartridges. These cartridges are inserted into the printer, providing a convenient and easily changeable source of resins during the printing process.
Understanding the key components of a Polyjet 3D printer is essential for optimizing the printing process and achieving accurate and high-quality results. Each component plays a vital role in the overall functionality of the printer, enabling the creation of complex, multi-material objects with exquisite details.
Polymer Jetting Technology
Polymer jetting technology is at the core of Polyjet 3D printing, enabling the precise and simultaneous deposition of multiple materials to create intricate models. This technology relies on the use of inkjet-like printheads to jet liquid photopolymer resins onto the build platform.
The process begins with the digital representation of the 3D model, which is sliced into thin layers using specialized software. The printer then uses this information to selectively jet and cure the liquid resins layer by layer.
Each print head in a Polyjet printer contains an array of microjets, each with a diameter as small as 16 microns. These microjets dispense tiny droplets of the liquid resin onto the build platform in precise locations based on the digital instructions.
During the printing process, the printhead moves across the build platform, jetting the desired resins layer by layer. Once the resin is deposited, it is quickly cured using UV lights mounted on the print head or within the printer itself.
Polymer jetting technology allows for the simultaneous jetting of multiple resins in a single print job. This capability enables the creation of complex models with varying material properties, such as different colors, levels of transparency, or even rigid and flexible parts within the same object.
In addition to the variety of materials that can be printed simultaneously, polymer jetting technology offers exceptional accuracy and detail. The small droplet size and precise positioning of the microjets result in smooth surfaces, sharp edges, and fine details that are difficult to achieve with other 3D printing technologies.
Moreover, the ability to jet support materials alongside the build materials simplifies the production of intricate designs with overhangs or complex geometries. The support structures can be easily removed after the printing process, leaving clean and precise end products.
Overall, polymer jetting technology is a key component of Polyjet 3D printing, allowing for the precise deposition of multiple materials layer by layer. This technology offers high accuracy, intricate detail, and versatile material capabilities, making it a popular choice for a wide range of applications in various industries.
How Does Polyjet 3D Printing Work?
Polyjet 3D printing is a multi-step process that involves the conversion of a digital 3D model into a physical object. Here is a step-by-step overview of how Polyjet 3D printing works:
Step 1: Creation of 3D Model
The first step in Polyjet 3D printing is creating or obtaining a digital 3D model of the desired object. This can be achieved through computer-aided design (CAD) software, 3D scanning, or by downloading existing models from online repositories.
Step 2: Conversion to Digital Instructions
Once the 3D model is obtained, it needs to be sliced into thin layers using specialized software. Each layer is converted into digital instructions that the Polyjet 3D printer can understand. These instructions include details such as the placement and properties of each material to be jetted.
Step 3: Preparation of the 3D Printer
Before printing, the Polyjet 3D printer needs to be prepared. This involves tasks such as ensuring the build platform is clean and level, calibrating the print heads, and checking the availability of the necessary resin cartridges.
Step 4: Loading the Resin Cartridges
The printer utilizes liquid photopolymer resins, which are stored in cartridges. The appropriate cartridges containing the desired materials are loaded into the printer. This allows for the simultaneous jetting of multiple materials during the printing process.
Step 5: Printing Process
Once the printer is prepared and the cartridges are loaded, the printing process begins. The print heads move across the build platform, precisely jetting the liquid resins onto the surface according to the digital instructions. The UV curing system simultaneously cures the deposited resins, solidifying them into each layer.
Step 6: Post-processing
Once the printing is complete, the object is removed from the build platform. Depending on the desired end product, post-processing steps such as support structure removal, polishing, or painting may be necessary to achieve the desired appearance and functionality.
Polyjet 3D printing can achieve exceptionally smooth surface finishes, intricate details, and multi-material capabilities. This makes it a versatile technology that finds applications in various industries, including prototyping, manufacturing, and product development.
By understanding the step-by-step process of Polyjet 3D printing, designers, engineers, and manufacturers can harness the capabilities of this technology to create complex and highly detailed prototypes and end-use parts.
Step 1: Creation of 3D Model
The first step in the Polyjet 3D printing process is the creation or acquisition of a digital 3D model. This model serves as the blueprint for the physical object that will be printed. There are several methods for creating a 3D model:
Computer-Aided Design (CAD): CAD software is commonly used to design 3D models from scratch. Designers can use various tools and features within the software to create an accurate representation of their intended object. This method is particularly useful for custom designs or when precise dimensions and specifications are required.
3D Scanning: Another method of obtaining a 3D model is by using a 3D scanner. This device captures the physical object from multiple angles, creating a digital representation of its shape and surface details. 3D scanners can be helpful when replicating existing objects or when intricate details need to be incorporated into the model.
Online Repositories: There are numerous online repositories that provide access to a wide range of pre-designed 3D models. Users can browse through these collections and download models that suit their needs. This method is beneficial when time is a constraint or when a generic object is sufficient for the purpose.
Regardless of the method used, the 3D model should be created in a format compatible with the Polyjet 3D printer and the associated software. Common file formats for 3D models include STL (Standard Triangle Language) and OBJ (Object).
During this step, it is important to consider the design considerations for 3D printing. This includes ensuring an appropriate wall thickness, adding supports for overhangs or complex geometries, and optimizing the model for the desired material properties. By taking these factors into account during the creation of the 3D model, users can ensure a successful and accurate printing process.
Overall, the creation of a 3D model is the crucial first step in the Polyjet 3D printing process. Whether created through CAD software, 3D scanning, or downloaded from online repositories, the 3D model serves as the basis for the physical object that will be reproduced through the printing process.
Step 2: Conversion to Digital Instructions
Once the 3D model is created, the next step in the Polyjet 3D printing process is the conversion of the model into digital instructions that the printer can understand. This step is essential for ensuring accurate and precise printing.
Software programs specifically designed for 3D printing are used to convert the 3D model into a series of thin slices or layers. Each layer is assigned specific information related to material deposition, curing parameters, and other printing settings. This process is known as slicing or file preparation.
The slicing software analyzes the 3D model and determines the necessary toolpaths and support structures needed for successful printing. It takes into account factors such as layer height, model orientation, and material compatibility to optimize the printing process.
During the conversion process, users can adjust several parameters to control the quality, accuracy, and speed of the 3D print. This includes settings such as layer thickness, infill density, and print speed. These parameters impact the final appearance and strength of the printed object.
Once the slicing process is complete, the software generates a G-code file that contains the digital instructions for the Polyjet 3D printer. This file provides detailed information to the printer on how to move the print heads, dispense the specific resins, and cure the layers.
It is important to note that the accuracy and precision of the final print depend on the settings chosen during the conversion process. Careful consideration should be given to factors such as layer thickness, support structure density, and material compatibility to achieve the desired outcome.
Various software options are available for slicing and preparing 3D models for Polyjet printing, ranging from user-friendly interfaces to advanced tools for professional applications. These software solutions enable users to fine-tune their models and optimize the printing process based on their specific requirements.
In summary, the conversion of a 3D model into digital instructions is a crucial step in the Polyjet 3D printing process. Slicing software analyzes the model, determines the necessary parameters, and generates the instructions that guide the printer during the printing process. By carefully configuring these settings, users can achieve accurate and high-quality prints.
Step 3: Preparation of the 3D Printer
Before starting the Polyjet 3D printing process, it is crucial to prepare the 3D printer to ensure optimal printing conditions and accurate results. This step involves several essential tasks to set up the printer for a successful printing session.
Calibration: Calibration is a critical step in preparing the 3D printer. It ensures that the printer’s axes are correctly aligned, and the build platform is level. Proper calibration is essential for maintaining accuracy and preventing issues such as misaligned layers or warped prints.
Heating: Many Polyjet printers require preheating to ensure consistent temperature control during the printing process. The printer’s hot-end and build platform may need to be heated to specific temperatures to ensure proper material flow and adhesion. Checking and adjusting the temperature settings is an important part of printer preparation.
Build Platform Preparation: The build platform needs to be clean and free of any debris or residue. Proper cleaning ensures optimal adhesion between the printed object and the platform. Depending on the printer model, applying a thin layer of adhesive or using a specialized build surface may be necessary to improve adhesion and prevent warping.
Firmware Update: It is advisable to check for any firmware updates for the 3D printer and install them if available. Firmware updates often include bug fixes, improvements, or new features that can enhance the printer’s performance and reliability.
Material Compatibility: Ensure that the correct materials and resin cartridges are compatible with the printer. Some printers may have specific requirements or limitations regarding the types or brands of materials that can be used. Verify the compatibility and availability of the required materials before proceeding with the printing process.
Nozzle Cleaning: If required, cleaning the nozzle or print heads is essential to remove any residual material from previous prints. Accumulated residue can affect the quality of the print and cause inconsistencies in material deposition. Following the manufacturer’s guidelines, perform a nozzle cleaning process to ensure optimal performance.
By properly preparing the 3D printer, users can minimize potential issues and ensure a smooth printing process. Attention to detail during this step helps prevent errors and achieve consistent and accurate results. Following the manufacturer’s guidelines and regularly maintaining the printer is crucial for ensuring long-term performance and extending the lifespan of the machine.
Step 4: Loading the Resin Cartridges
Once the 3D printer is prepared for the printing process, the next step is to load the resin cartridges. Resin cartridges contain the liquid photopolymer materials that will be jetted onto the build platform during the Polyjet 3D printing process.
Material Selection: Before loading the cartridges, it is essential to choose the appropriate materials for the desired print. Polyjet printers offer a wide range of materials with different characteristics, such as colors, transparency, rigidity, and flexibility. Selecting the correct materials ensures that the final printed object meets the intended design specifications and performance requirements.
Cartridge Compatibility: It is crucial to ensure that the resin cartridges are compatible with the specific 3D printer model being used. Different printers may have unique cartridge designs or specifications. Verify that the cartridges match the printer’s requirements to ensure proper fit and functionality.
Cartridge Loading: The process of loading the resin cartridges varies depending on the printer model. Follow the manufacturer’s instructions for properly inserting the cartridges into the designated slots or holders on the printer. Take care to seat the cartridges firmly to ensure a secure connection.
Cartridge Alignment: Once the cartridges are loaded, it may be necessary to align them properly to ensure the correct material flow. Some printers have alignment features or sensors that ensure the optimal flow of materials during printing. Check the printer’s user manual or guidelines for any specific alignment instructions.
Material Verification: Before proceeding with the printing process, it is a good practice to verify that the correct materials are loaded and are being recognized by the printer. Many printers have display screens or software interfaces that provide information about the loaded cartridges, including material type, color, and remaining quantity. Confirm that the displayed information aligns with the intended materials and cartridge positions.
Material Handling: Proper handling and storage of the resin cartridges are essential for maintaining their quality and effectiveness. Follow the manufacturer’s guidelines for storing the cartridges, including temperature and storage duration recommendations. Avoid exposing the cartridges to extreme temperatures or direct sunlight, as this can degrade the material quality.
Accurately loading the resin cartridges ensures the consistent and reliable deposition of materials during the 3D printing process. By adhering to the manufacturer’s instructions and guidelines, users can optimize the printing performance and achieve high-quality prints with the desired material characteristics.
Step 5: Printing Process
The printing process is the core stage of Polyjet 3D printing, where the deposition and curing of materials take place to transform the digital model into a physical object. Here is an overview of the key aspects of the printing process:
Print Head Movement: The Polyjet printer’s print heads move across the build platform, following the digital instructions generated during the conversion process. The print heads precisely position themselves to jet the photopolymer materials onto the build platform, layer by layer.
Material Jetting: As the print heads traverse the build platform, they jet tiny droplets of liquid photopolymer materials onto the surface. The materials are ejected from the microjets in controlled patterns and amounts, based on the digital instructions. The jetting process is highly precise and rapid, allowing for intricate and detailed material deposition.
Simultaneous Material Jetting: Polyjet 3D printers have the capability to jet multiple materials simultaneously. This means that different resins or materials can be jetted at the same time, allowing for the creation of models with multiple colors, various levels of transparency, and different material properties within a single print job.
UV Curing: Immediately after the deposition of each layer, the printer’s UV curing system comes into play. The UV lights mounted on the print heads or within the printer cure the liquid photopolymer materials, causing them to solidify and harden. This instantaneous curing ensures the layers remain in place and adhere to each other firmly, forming a solid structure.
Layer-by-Layer Building: The printer continues the process of material jetting and UV curing, layer by layer, until the entire object is complete. The number of layers depends on the complexity and height of the 3D model. Each subsequent layer is precisely aligned and bonded to the previous layer, resulting in a smooth and cohesive final print.
Support Structures: If the object being printed requires complex geometries or overhangs, support structures may be automatically generated and printed alongside the main structure. These support structures provide temporary stability and prevent deformation during the printing process. After printing, the support structures can be removed manually, leaving behind the desired object.
The printing process requires minimal user intervention once initiated. However, it is crucial to closely monitor the printer during the process to ensure it is functioning correctly and to address any potential issues that may arise, such as material flow problems or print head blockages.
By following best practices and guidelines provided by the printer manufacturer, users can achieve accurate and high-quality prints through the Polyjet 3D printing process. Attention to detail during the printing process helps ensure successful material deposition, proper curing, and the creation of detailed and complex 3D models.
Step 6: Post-processing
Once the printing process is complete and the object is removed from the build platform, post-processing steps may be necessary to refine and enhance the final 3D printed model. Post-processing plays a vital role in achieving the desired appearance and functionality of the object. Here are some common post-processing techniques used in Polyjet 3D printing:
Support Removal: If the printed object contains support structures, they need to be carefully removed. Support structures are typically designed to be easily detachable, allowing for manual removal without damaging the main structure. Depending on the complexity of the supports, different tools such as pliers, tweezers, or a scalpel may be used for precise removal.
Surface Finishing: Polyjet 3D printed models often possess smooth surfaces right out of the printer. However, additional surface finishing techniques may be employed for further refinement. This can include sanding, polishing, or using specialized post-processing solutions to achieve the desired level of smoothness or texture.
Painting and Coloring: To enhance the appearance of the printed object, painting or coloring techniques can be applied. Acrylic paints or specialized coloring solutions can be used to add vibrant colors, gradients, or realistic textures to the object. The surface may need to be primed or prepared before applying the desired coloration.
Assembling and Integration: If the printed object consists of multiple parts or requires assembly, post-processing may involve joining or integrating these components. Methods such as adhesive bonding, screwing, or heat welding can be used to ensure the parts are securely connected in the desired configuration.
Quality Inspection: Post-processing also entails inspecting the final printed object for any defects, imperfections, or inaccuracies. This step involves a visual inspection to identify any necessary touch-ups or corrections. It is important to ensure the object meets the desired specifications, accuracy, and functionality before it is considered complete.
The post-processing steps may vary depending on the requirements of the specific 3D printed object. Certain applications or industries may have additional or specialized post-processing techniques to achieve specific functional or cosmetic results.
It is important to note that post-processing adds time to the overall production process. Each step should be executed carefully and with attention to detail to ensure the integrity of the printed object and maintain the desired design characteristics.
By effectively utilizing post-processing techniques, users can fine-tune the appearance and functionality of the Polyjet 3D printed models, bringing them to their desired level of quality and suitability for their intended applications.
Advantages of Polyjet 3D Printing
Polyjet 3D printing offers numerous advantages that make it a preferred choice for many applications across various industries. Here are some key advantages of using Polyjet technology:
High Precision and Detail: Polyjet 3D printing enables the creation of highly detailed and precise models. With layer thicknesses as low as 16 microns, it can produce smooth surfaces, fine features, and intricate geometries that are difficult to achieve through other manufacturing techniques.
Multi-Material Capabilities: One of the notable advantages of Polyjet 3D printing is the ability to print multiple materials simultaneously in a single print job. This allows for the creation of complex models with different material properties, colors, and levels of transparency within the same object.
Wide Range of Material Choices: Polyjet printers offer a broad selection of materials to meet various application requirements. From rigid and flexible resins to specialized materials with properties like high-temperature resistance or biocompatibility, the availability of diverse materials expands the potential applications of Polyjet technology.
Smooth Surface Finish: Polyjet 3D printing produces objects with exceptional surface finish straight from the printer. The fine droplets of resin and the precise curing process result in smooth surfaces that often require minimal post-processing for a polished appearance.
Support Material System: Polyjet printers can jet support materials along with the build materials, allowing for the creation of complex structures and overhangs without the need for additional manual support removal. This saves time and effort in post-processing and improves the overall efficiency of the printing process.
Fast Printing Speed: Polyjet technology enables rapid prototyping and production due to its high speed of material jetting and curing. It can swiftly build up multiple layers, reducing overall print time compared to other 3D printing technologies.
Easy Iteration and Design Validation: Polyjet 3D printing facilitates quick design iterations and validation. Design changes can be implemented easily without the need for expensive tooling or molds, allowing for rapid iterations and validation of product designs.
Applications in Various Industries: Polyjet 3D printing finds applications in numerous industries, including automotive, aerospace, medical, consumer goods, and education. Its ability to create high-resolution prototypes, functional models, and custom production parts makes it versatile for a wide range of applications.
The advantages of Polyjet 3D printing make it a popular choice in industries that require high precision, intricate details, multi-material capabilities, and speedy production. Its versatility, combined with its ability to deliver high-quality and realistic prototypes, positions Polyjet as a valuable technology in the field of additive manufacturing.
Applications of Polyjet 3D Printing
Polyjet 3D printing, with its ability to produce intricate and detailed models, is widely used across various industries. Here are some of the key applications of Polyjet technology:
Prototyping: Polyjet 3D printing is commonly used in the prototyping phase of product development. It allows designers and engineers to quickly create physical prototypes that accurately represent their design ideas. The high level of detail and multi-material capabilities of Polyjet printers enable the production of realistic and functional prototypes for design validation and testing.
Medical and Dental Models: Polyjet technology finds extensive applications in the healthcare industry. It is employed in the production of anatomical models for surgical planning, patient-specific medical devices, prosthetics, and dental models. The accuracy and realism of Polyjet prints make them invaluable in advancing patient care and tailored medical solutions.
Consumer Goods and Jewelry: Cosmetic and aesthetic industries benefit greatly from Polyjet 3D printing. The ability to print intricate details and multi-color models makes it ideal for creating consumer goods such as customized phone cases, fashion accessories, and intricate jewelry. Polyjet technology allows designers to bring their creative visions to life with high-quality, personalized products.
Architectural and Design Visualization: Architects and designers can leverage Polyjet 3D printing to produce accurate and detailed architectural models for visualization and presentation purposes. The ability to print realistic scale models, multi-colored textures, and fine details aids in communicating design concepts effectively to clients and stakeholders.
Education and Research: Polyjet 3D printing plays a crucial role in educational institutions and research facilities, enabling hands-on learning experiences and advancing scientific inquiries. Students and researchers can utilize the technology to fabricate models, prototypes, and anatomical replicas for educational purposes, experimentation, and scientific investigation.
Custom Production Parts: In certain industries, Polyjet 3D printing is employed for small-scale production of custom parts and components. It offers the capability to create small, intricate parts with varying material properties within a single print job. This enables the production of complex assemblies, jigs, fixtures, and tooling components with minimal lead time and manufacturing constraints.
Entertainment and Animation: The film, gaming, and animation industries utilize Polyjet technology for the creation of visually stunning and accurate models. From character prototypes and miniatures to concept art and props, Polyjet 3D printing enables the realization of intricate designs and brings imagination to life in the entertainment industry.
These applications demonstrate the versatility and wide-ranging capabilities of Polyjet 3D printing. Its ability to produce high-resolution, multi-material, and intricate models makes it a valuable tool across industries, enabling innovation, customization, and efficiency in various fields.
Conclusion
Polyjet 3D printing has brought about a transformation in the way objects are designed, prototyped, and manufactured. Its ability to create highly detailed, multi-material models with exceptional accuracy and surface finish has opened up new possibilities across various industries.
Throughout this article, we explored the key components of a Polyjet 3D printer, the polymer jetting technology that drives it, and the step-by-step process of printing with Polyjet technology. From the creation of a 3D model to the loading of resin cartridges and the actual printing process, each step is critical in achieving successful and high-quality prints.
We also discussed the advantages of Polyjet 3D printing, including its high precision and detail, multi-material capabilities, smooth surface finish, and fast printing speed. The wide range of applications, such as prototyping, medical and dental models, consumer goods, architecture, education, and entertainment, highlights the versatility and versatility of this technology.
Polyjet 3D printing continues to drive innovation, facilitating faster iterations, reducing lead times, and enabling customization in product development. Its impact on sectors such as healthcare, manufacturing, design, and education cannot be overstated. As the technology advances, we can expect even more intricate and complex prints, further expanding the possibilities of Polyjet 3D printing in the future.
Whether it’s creating realistic prototypes, functional medical models, personalized consumer goods, or detailed architectural models, Polyjet 3D printing opens doors to endless creativity and innovation. As the technology continues to evolve, it will undoubtedly play a pivotal role in shaping the future of manufacturing and design.