Introduction
As the popularity of YouTube continues to grow, so does the demand for accurate and high-quality subtitles. Whether you are a non-native English speaker trying to understand the content or a viewer who prefers to watch videos with subtitles, having access to English subtitles on YouTube can greatly enhance the viewing experience.
Fortunately, there are several methods available to get English subtitles on YouTube. In this article, we will explore five different approaches that can help you achieve this, ranging from automatic subtitles generated by YouTube itself to hiring professional subtitling services.
Adding English subtitles to YouTube videos not only benefits the viewers, but also the creators. It expands their potential audience and makes their content more accessible to a wider range of people. Additionally, with the integration of subtitles, YouTube videos become more search engine-friendly, aiding in discoverability and improving overall SEO.
Whether you are a YouTube content creator looking to add subtitles to your videos or simply a viewer searching for English subtitles, this guide will provide you with the necessary information to achieve your goal. So, let’s dive in and explore these five methods in detail.
Method 1: Automatic Subtitles
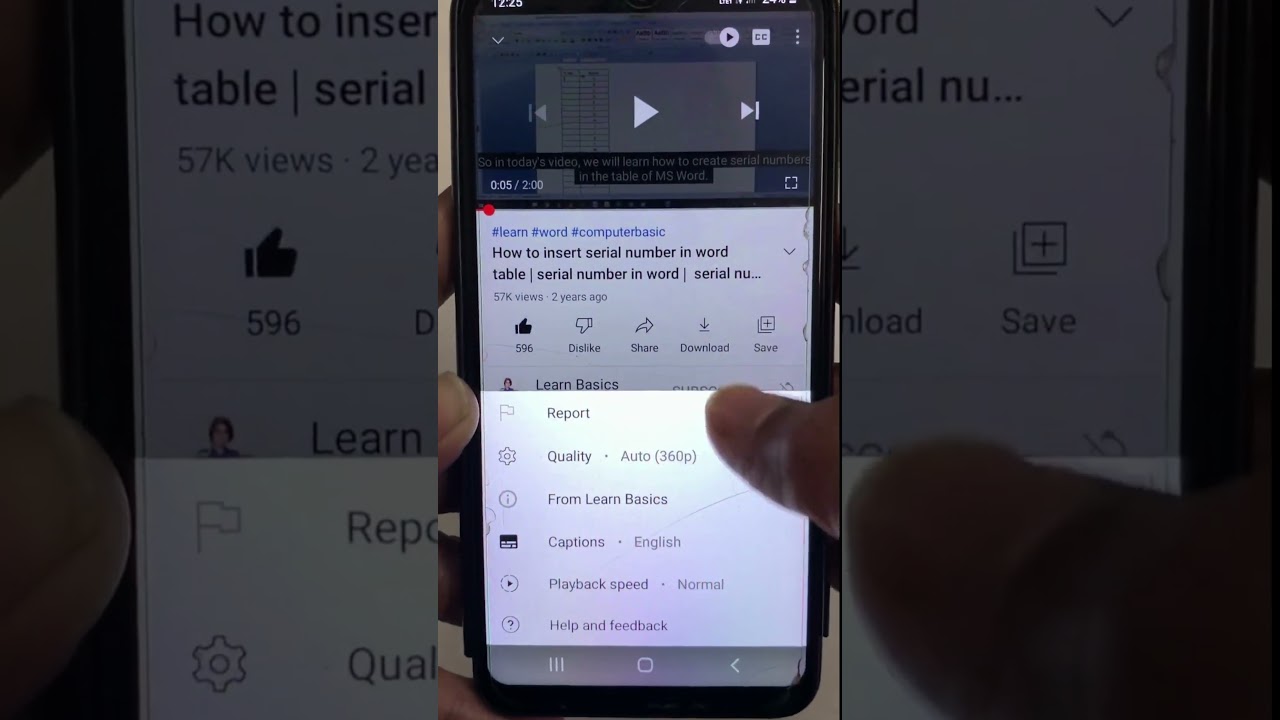
YouTube offers an automatic subtitle generation feature that uses speech recognition technology to generate subtitles for videos. While this method is convenient and time-saving, it is important to note that the accuracy of these automatic subtitles may vary.
To enable automatic subtitles on a YouTube video, follow these steps:
- Open the video on YouTube and click on the “Settings” gear icon beneath the video player.
- Click on “Subtitles/CC” from the drop-down menu.
- Click on the “Auto-generated” option.
- Choose the language you want the subtitles to be in, in this case, English.
- Click on “Set as default” to apply the settings to all YouTube videos.
Once you have followed these steps, YouTube will automatically generate subtitles for the video. You can toggle the visibility of the subtitles by clicking on the “CC” button on the video player.
Keep in mind that automatic subtitles may not always be accurate, especially for videos with background noise, multiple speakers, or unclear speech. It is recommended to review the generated subtitles and make any necessary edits for clarity and correctness.
Creators can make manual edits to the automatic subtitles by going to the same “Subtitles/CC” menu and selecting the “Edit” option. This allows them to correct any mistakes or inconsistencies in the subtitles.
While automatic subtitles provide a quick and easy solution, they may not be suitable for videos with complex content, technical terms, or specialized vocabulary. In such cases, manual subtitles or other methods may be more appropriate.
Method 2: Manual Subtitles
If you want more control over the accuracy and quality of the subtitles, manually adding subtitles to your YouTube videos is a great option. This method allows you to create custom subtitles that cater to the specific nuances of your content.
To add manual subtitles to your YouTube video, follow these steps:
- On the video page, click on the “Settings” gear icon below the video player.
- Select “Subtitles/CC” from the drop-down menu.
- Click on the “Add subtitles/CC” button.
- Select the language for your subtitles, in this case, English.
- Choose whether you want to create “Subtitles” or “Closed captions”. Subtitles are burned into the video and cannot be toggled on/off, while closed captions can be turned on or off by viewers.
- Click on the “Create new subtitles or closed captions” button.
YouTube’s video editor will then open, allowing you to manually add and time your subtitles. You can type in the text for each subtitle, set the timing, and make adjustments as needed.
Adding manual subtitles requires careful attention to detail, including proper timing, punctuation, and ensuring that the text accurately represents the spoken content. It may take some time and effort, especially for longer videos, but the result is precise and high-quality subtitles that enhance the viewing experience for your audience.
Once you have completed adding the manual subtitles, make sure to save your changes and publish the subtitles to make them available for viewers.
It is worth noting that YouTube also offers the option to upload subtitle files in various formats, such as .srt or .vtt, which can be created using third-party subtitle editing software. This can be a more efficient method for creators who prefer to work offline or already have pre-made subtitle files.
Manual subtitles ensure accurate and contextually appropriate subtitles for your YouTube videos. This method is particularly beneficial for videos that require precise timing, such as music videos, tutorials, or dialogue-heavy content.
Method 3: Using YouTube’s Subtitle/CC Feature
In addition to automatic and manual subtitles, YouTube provides a built-in subtitle/CC (Closed Caption) feature that allows viewers to contribute and improve the accessibility of videos. This collaborative approach ensures that accurate subtitles are available for a wider audience.
To use YouTube’s subtitle/CC feature, follow these steps:
- Open the video on YouTube and click on the “CC” button below the video player.
- Select “Add subtitles/CC” and choose the language, in this case, English.
- Choose whether you want to contribute “Subtitles” or “Closed captions”.
- You can then select the option to contribute “With automatic timing” or “Create new subtitles or closed captions”.
By choosing the “With automatic timing” option, YouTube will generate a draft of the subtitles based on its speech recognition technology. You can then review and edit the subtitles as needed to ensure accuracy.
Alternatively, selecting the “Create new subtitles or closed captions” option allows you to manually add subtitles from scratch. This gives you full control over the accuracy and timing of the subtitles.
Once you have contributed or created the subtitles, they will undergo a review process by YouTube and other contributors. This ensures that the subtitles meet the guidelines and standards set by YouTube.
YouTube’s subtitle/CC feature promotes inclusivity and allows viewers to contribute to the accessibility of videos. It enables a community-driven approach, where users from around the world can collaborate to provide accurate and high-quality subtitles.
Creators can also benefit from this feature by opening up their videos to a diverse audience and ensuring better accessibility for viewers who rely on subtitles.
It is important to note that the accuracy and quality of subtitles contributed through YouTube’s subtitle/CC feature may vary. Therefore, it is recommended to review and make any necessary adjustments to the subtitles to ensure their accuracy before publishing.
Method 4: Using Third-Party Websites
If you prefer an alternative method for adding English subtitles to YouTube videos, you can utilize third-party websites that specialize in subtitle creation and integration.
There are several reputable third-party websites that offer easy-to-use tools and services for generating subtitles. These websites typically provide a user-friendly interface where you can upload your video, transcribe the audio, and synchronize the subtitles with the video playback.
To add subtitles using a third-party website, follow these general steps:
- Choose a reliable third-party website that offers subtitle creation and integration services.
- Sign up for an account if required.
- Upload your video to the website’s platform.
- Transcribe the audio by manually typing the content or using automated transcription tools provided by the website.
- Edit and synchronize the subtitles with the video timeline using the website’s tools.
- Preview and make any necessary adjustments to ensure accuracy.
- Save and download the subtitles in a compatible format, such as .srt or .vtt.
Once you have downloaded the subtitle file, you can then upload it to your YouTube video using the “Subtitles/CC” feature, as mentioned in Method 2. This allows you to add custom, professionally made subtitles created using third-party websites.
Using third-party websites can be particularly beneficial for videos with challenging audio, specialized vocabulary, or complex content. These websites often offer advanced features such as automated transcription, translation services, and collaborative editing, making the subtitle creation process more efficient for creators.
However, it’s important to choose reputable and trustworthy third-party websites to ensure the security of your videos and the confidentiality of your content. Do thorough research and read reviews before selecting a website to use.
Keep in mind that some third-party websites may require a subscription or charge fees for using their services. Evaluate the pricing plans and features offered by different platforms to determine the best option for your needs.
Method 5: Hiring a Professional Service
If you want the highest level of accuracy and quality in your English subtitles, hiring a professional subtitling service is an excellent option. Professional subtitling services have experienced linguists and translators who can create precise and culturally appropriate subtitles for your YouTube videos.
To utilize a professional subtitling service, follow these steps:
- Research and choose a reputable subtitling service that specializes in your desired language, in this case, English.
- Contact the service provider and provide them with the details of your video, including the duration, content, and specific requirements.
- Agree on the pricing, turnaround time, and any additional services required.
- Provide the video file to the service provider using their preferred method of transfer.
- Based on your agreement, the service provider will create accurate subtitles that align with your video’s audio.
- Review the completed subtitles and communicate any necessary changes or adjustments to the service provider.
- Once the final subtitles are approved, receive the subtitle file from the service provider.
After receiving the subtitle file, you can then upload it to your YouTube video using the “Subtitles/CC” feature as described in Method 2. This will enable your viewers to access professionally created subtitles that ensure the highest level of accuracy and quality.
Hiring a professional subtitling service is especially beneficial for videos that require a meticulous and specialized approach, such as documentaries, interviews, or educational content. Professional linguists can handle challenging audio conditions, technical terminology, and maintain cultural nuances to provide a seamless viewer experience.
While professional subtitling services typically come at a cost, the investment can greatly enhance the viewer experience and broaden the accessibility of your YouTube videos. Be sure to research various service providers, compare their pricing and reviews, and choose one that aligns with your specific needs and budget.
Additionally, consider establishing a long-term relationship with a subtitling service if you regularly produce videos with subtitles. This can ensure consistency and save time in the future, as the service provider will become familiar with your requirements and maintain a consistent style for your subtitles.
Conclusion
Adding English subtitles to YouTube videos is a valuable way to improve accessibility, enhance the viewing experience, and reach a wider audience. In this article, we explored five different methods for obtaining English subtitles on YouTube.
Method 1 involved utilizing YouTube’s automatic subtitle generation feature, which provides a convenient option, albeit with varying accuracy. Method 2 focused on manually adding subtitles, providing more control and precision over the subtitles’ content and timing. Method 3 showcased YouTube’s own subtitle/CC feature, which allows viewers to contribute and improve the accessibility of videos.
In Method 4, we discussed using third-party websites that specialize in subtitle creation and integration. These platforms offer advanced tools and services, making the creation process more efficient for content creators. Finally, Method 5 explored the option of hiring a professional subtitling service, providing the highest level of accuracy and quality.
Depending on your needs and preferences, you can choose the method that best suits your situation. Keep in mind factors such as accuracy, efficiency, and budget when making your decision.
Adding English subtitles to YouTube videos not only benefits viewers but also content creators. It makes videos more accessible to non-native English speakers, improves search engine optimization, and expands the potential audience for a video.
Remember to review and edit subtitles for accuracy and clarity regardless of the method you choose. This ensures a seamless viewing experience and avoids any misinterpretation of the content.
By utilizing one of these five methods for obtaining English subtitles on YouTube, you can enhance the accessibility, reach, and overall quality of your videos. Experiment with different approaches to find the one that best meets your needs and ensures an enjoyable experience for your viewers.