Introduction
Welcome to this guide on how to void a check in QuickBooks. QuickBooks is a popular accounting software that provides businesses with the tools to manage their finances efficiently and accurately. One of the essential features offered by QuickBooks is the ability to void a check.
Voiding a check is a crucial financial management task that allows you to cancel a payment and reverse its effects on your organization’s books. Whether you need to correct a mistake, resolve a discrepancy, or simply cancel a payment that is no longer needed, understanding how to void a check in QuickBooks is essential.
In this guide, we will walk you through the process of voiding a check in QuickBooks, step by step. We will also discuss when it is appropriate to void a check and what happens after voiding it. By the end of this guide, you will have the knowledge and confidence to handle check voiding efficiently in QuickBooks.
Please note that the instructions provided in this guide are based on the latest version of QuickBooks at the time of writing. Depending on the version you are using, there may be slight differences in the user interface and navigation. However, the general process of voiding a check remains the same across versions.
So, if you’re ready to dive in and learn how to void a check in QuickBooks, let’s get started!
What Does It Mean to Void a Check in QuickBooks?
Before we delve into the process of voiding a check in QuickBooks, let’s first clarify what it means to void a check. When you void a check, you essentially cancel the payment that was initially recorded. This action allows you to reverse the effects of the payment on your financial statements.
Unlike deleting a check, which completely removes it from your records, voiding a check leaves a clear audit trail. Voiding is a more appropriate option when you want to retain a record of the canceled payment while ensuring it does not affect your financial statements.
Voiding a check in QuickBooks has a few key implications:
- Financial Accuracy: Voiding a check ensures that the payment is removed from your account balances, preventing any discrepancies in your financial statements.
- Audit Trail: QuickBooks maintains a record of voided checks, allowing you to easily trace and reference the voided payment in the future if needed.
- No Reversal: Once a check is voided, you cannot undo the void action. However, if necessary, you can reissue a new check to correct any errors or make a replacement payment.
Voided checks are typically marked with a “VOID” watermark, making them easily identifiable when reviewing your records. This visual indicator helps to maintain the integrity and clarity of your financial documentation.
Now that we have a clear understanding of what it means to void a check in QuickBooks, let’s explore when it is appropriate to void a check in the next section.
When Should You Void a Check?
Voiding a check in QuickBooks should be done in specific situations to ensure the accuracy and integrity of your financial records. Here are a few scenarios where you may need to void a check:
- Incorrect Information: If you entered incorrect payee details, amount, or any other vital information on the check, voiding the check is recommended. Instead of deleting the check and losing the record, voiding allows you to maintain an audit trail while correcting the errors.
- Stale Checks: A stale check is a check that remains uncashed or unprocessed for an extended period. If a check becomes stale, voiding it is a prudent course of action. Voiding the check ensures the amount is not debited from your account, allowing you to reclaim the funds and take appropriate action.
- Stop Payments: In some cases, you may need to issue a stop payment on a check that has been lost, stolen, or is no longer needed. Voiding the check in QuickBooks alerts your bank to halt any payment related to that specific check.
- Replacements: If you need to issue a replacement check for a payment that was initially recorded and issued but needs to be canceled and reissued for any reason, voiding the original check is necessary. Voiding maintains a clear record of the canceled payment while allowing you to create a new check with the correct details.
- Bounced Checks: If a check is returned due to insufficient funds or any other reason, voiding the check is important to update your financial records accurately. Voiding ensures that the amount is not erroneously accounted for in your books.
By voiding checks in these situations, you can ensure the accuracy of your financial statements, maintain a clear audit trail, and effectively manage your organization’s cash flow.
Now that you understand when it is appropriate to void a check, let’s move on to the next section to learn how to actually void a check in QuickBooks.
How to Void a Check in QuickBooks
Voiding a check in QuickBooks is a straightforward process that can be done in just a few simple steps. Follow the steps outlined below to void a check in QuickBooks:
Step 1: Open the Check to Be Voided
First, open QuickBooks and navigate to the “Banking” or “Transactions” section. Locate and open the check that you want to void. This can be done by searching for the check number or the payee’s name.
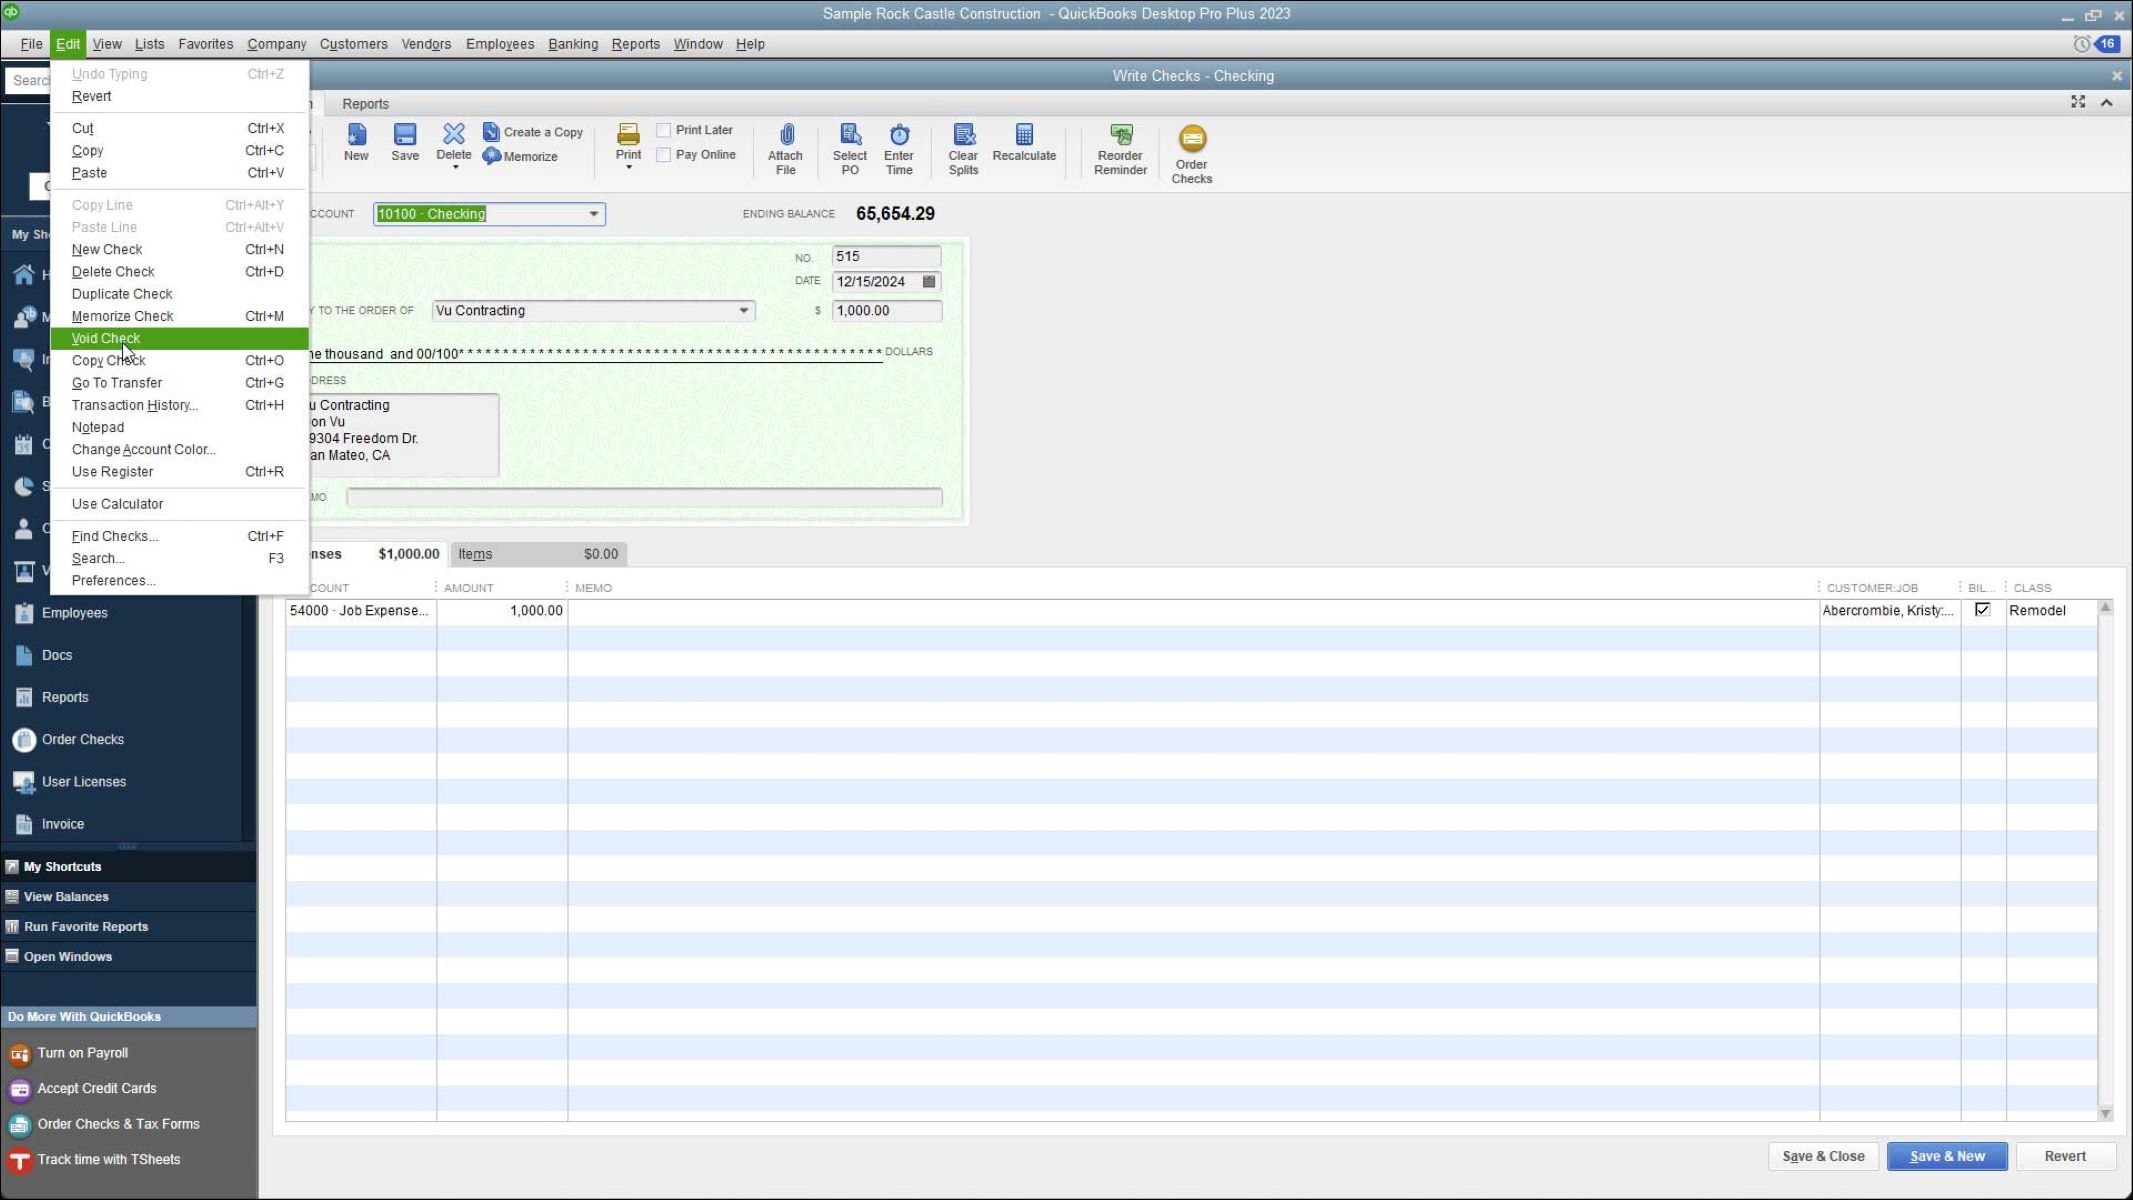
Step 2: Choose the Void Option
Once the check is open, click on the “More” or “Edit” option (depending on your QuickBooks version). From the dropdown menu, select “Void.”
Step 3: Confirm the Voiding of the Check
A confirmation prompt will appear, asking if you are sure you want to void the check. Verify that you have selected the correct check and click “Yes” or “OK” to proceed with voiding the check.
Step 4: Review the Check Status
After confirming the void action, the check status will be updated to “Voided” or “Cancelled.” This change in status ensures that the check will no longer impact your financial statements.
Step 5: Verify that the Check is Voided
To ensure that the check has been successfully voided, you can review the check details or generate a report to check for the voided status. The voided check will typically display a “VOID” watermark or mark to indicate its status clearly.
It’s important to note that once a check is voided in QuickBooks, the action cannot be reversed. However, you can still view the voided check’s details and maintain an audit trail within QuickBooks.
Congratulations! You have successfully voided a check in QuickBooks. Now, let’s move on to the next section to understand what happens after voiding a check.
Step 1: Open the Check to Be Voided
The first step in voiding a check in QuickBooks is to open the check that you want to void. This allows you to access the necessary information and perform the voiding action accurately. Here’s how to open the check:
- Launch QuickBooks on your computer and log in to your account.
- From the main dashboard or navigation menu, locate and click on the “Banking” or “Transactions” tab.
- In the Banking or Transactions section, you will find a list of your recent transactions or checks.
- Depending on your QuickBooks version, you can either search for the check number or the payee’s name to locate the specific check you want to void.
- Once you have found the check you wish to void, click on it to open the check details.
By opening the check, you gain access to all the relevant information associated with it, including the payee’s name, amount, date, and any memo or description. Taking the time to review this information before voiding the check ensures that you are voiding the correct payment.
If you have a large number of transactions or checks to manage, you may find it helpful to use QuickBooks’ search and filter options to narrow down your search. This can save you time and make it easier to locate the check you need to void.
Once you have successfully opened the check that you want to void, you can proceed to the next step in the voiding process, which is selecting the void option.
Now that you know how to open the check in QuickBooks, let’s move on to the next section to learn how to choose the void option for the check.
Step 2: Choose the Void Option
After opening the check to be voided in QuickBooks, the next step is to choose the void option. This allows you to initiate the voiding action for the selected check. Follow these steps to choose the void option:
- Once you have the check open in QuickBooks, locate the “More” or “Edit” option in the check details. The exact location may vary depending on your QuickBooks version and edition.
- Click on the “More” or “Edit” option to reveal a dropdown menu with various actions you can take.
- From the dropdown menu, select the “Void” option.
By selecting the void option, you are indicating that you want to cancel the payment associated with the check and reverse its effects on your organization’s books.
It’s worth noting that in some versions of QuickBooks, the void option may be directly available under the “Edit” menu, without the need to click on “More.” Additionally, there may be a keyboard shortcut for voiding a check, which can be useful if you frequently perform this action.
Before proceeding to the next step, ensure that you have selected the correct check to void. Verify the check number, payee’s name, and other essential details to avoid voiding the wrong payment by mistake.
Now that you have successfully chosen the void option for the check, let’s move on to the next step: confirming the voiding of the check.
Step 3: Confirm the Voiding of the Check
After selecting the void option for the check in QuickBooks, the next step is to confirm the voiding of the check. This step ensures that you have intentionally chosen to cancel the payment and reverse its effects. Follow these steps to confirm the voiding of the check:
- After selecting the void option, a confirmation prompt will appear on your screen.
- In the confirmation prompt, QuickBooks will typically display the check details, including the check number, payee’s name, and amount.
- Verify that the details displayed in the confirmation prompt match the check you intend to void.
- Once you have confirmed that you have selected the correct check to void, click “Yes” or “OK” to proceed with voiding the check.
By confirming the voiding of the check, you are indicating your explicit agreement to cancel the payment and reverse its effects on your financial statements. This step helps prevent any accidental voiding of checks and ensures the accuracy of your financial records.
It is crucial to be attentive during the confirmation step and review the check details carefully. This extra caution helps to avoid any potential errors or unintended consequences.
Once you have confirmed the voiding of the check, QuickBooks will proceed with the void action, and the status of the check will be updated accordingly.
Now that you have successfully confirmed the voiding of the check, let’s move on to the next step: reviewing the check status.
Step 4: Review the Check Status
After confirming the voiding of a check in QuickBooks, the next step is to review the check’s status. This step allows you to verify that the voiding action has been successfully processed and that the check is now marked as voided. Here’s how you can review the check status:
- Once you have confirmed the voiding of the check, QuickBooks will update the check’s status to reflect its new state.
- Navigate back to the list of checks or transactions in the Banking or Transactions section of QuickBooks.
- Locate the voided check you just processed.
- Check the status column or field associated with the check.
The check status in QuickBooks will now indicate that the check has been voided. It may display as “Voided,” “Cancelled,” or a similar term, depending on your QuickBooks version.
Reviewing the check status is essential to ensure that the voiding action was carried out successfully. Verifying the updated status helps you confirm that the check will no longer affect your financial statements and that it has been formally canceled.
In addition to checking the status column, you may also notice that a voided check is visually distinguished in QuickBooks. This includes displaying a “VOID” watermark or a mark on the check itself when viewed in QuickBooks.
By reviewing the check status, you can have confidence that the voiding action has been completed and that the check is no longer considered a valid payment.
Now that you have reviewed the check status, let’s move on to the final step: verifying that the check is successfully voided.
Step 5: Verify that the Check is Voided
The final step in the process of voiding a check in QuickBooks is to verify that the check has been successfully voided. This step allows you to ensure that the voiding action has taken effect and that the check is no longer considered a valid payment. Follow these steps to verify that the check is voided:
- After reviewing the check status, return to the check details in QuickBooks.
- Take a moment to review the check information, including the check number, payee’s name, and other relevant details.
- Look for any visual indicators that the check has been voided, such as a “VOID” watermark or mark on the check image.
- Check that the check’s status is consistently displayed as “Voided,” “Cancelled,” or a similar term.
Verifying that the check is voided is essential to ensure that it no longer affects your financial statements. By confirming the voiding status, you can be confident that the payment has been successfully canceled and that it will not be reflected in your organization’s financial records.
Keep in mind that once a check is voided in QuickBooks, the voiding action cannot be reversed. However, you can still access and view the details of the voided check for reference and auditing purposes within QuickBooks.
By carefully reviewing the check details and verifying the voiding status, you can confirm that the check has been successfully voided in QuickBooks, allowing you to maintain accurate financial records.
Now that you have completed all the steps and verified the voiding of the check, you have successfully voided a check in QuickBooks!
What Happens After Voiding a Check?
After the successful voiding of a check in QuickBooks, several important actions and updates take place. Understanding what happens after voiding a check is crucial to ensure proper financial management and accurate reporting. Here are the key things that occur:
- Check Status: The check’s status is updated in QuickBooks to reflect its voided state. It is typically marked as “Voided,” “Cancelled,” or a similar term. This change ensures that the check no longer affects your financial statements.
- Audit Trail: QuickBooks maintains a clear audit trail of voided checks. This allows you to easily trace and reference the voided check in the future if needed. Having an audit trail supports transparency and ensures accurate financial documentation.
- Financial Accuracy: Voiding a check in QuickBooks ensures that the payment amount is not debited from your account balances. It helps maintain the accuracy of your financial statements by eliminating any discrepancies that the check might have caused.
- Visual Indicator: QuickBooks may visually distinguish voided checks by displaying a “VOID” watermark or a mark on the check itself when viewed in the software. This visual indicator serves as a reminder that the check has been canceled.
- Reissue or Replacement: While voiding a check cancels the original payment, it does not prevent you from issuing a new check as a replacement if necessary. If a replacement payment is required, you can initiate the process to ensure accurate record-keeping and timely payments.
By understanding what happens after voiding a check, you can ensure that the payment is properly canceled, your financial statements remain accurate, and you maintain a clear audit trail. It also allows you to take any necessary follow-up actions, such as issuing replacement payments or addressing any underlining issues that may have led to the need for voiding.
Now that you are familiar with what happens after voiding a check in QuickBooks, you have the knowledge to manage voided checks effectively and maintain the integrity of your financial records.
Conclusion
Voiding a check in QuickBooks is a crucial process that allows you to cancel a payment and maintain accurate financial records. Whether you need to correct an error, resolve a discrepancy, or cancel a payment that is no longer needed, knowing how to void a check in QuickBooks is essential for effective financial management.
In this guide, we have walked you through the steps of voiding a check in QuickBooks, from opening the check to confirming the voiding action. We have also discussed when it is appropriate to void a check and what happens after voiding it.
Remember, voiding a check in QuickBooks ensures financial accuracy, provides a clear audit trail, and helps maintain the integrity of your financial statements. By following the steps outlined in this guide, you can confidently void checks in QuickBooks and manage your organization’s finances more effectively.
It is important to note that the instructions provided in this guide are based on the latest version of QuickBooks at the time of writing. Depending on the version you are using, there may be slight differences in the user interface and navigation. However, the general process of voiding a check remains consistent across versions.
By understanding and implementing the steps outlined in this guide, you can successfully void checks in QuickBooks and ensure the accuracy of your financial records. If you encounter any difficulties or have specific questions, it is always recommended to consult the official QuickBooks documentation or reach out to their support team for assistance.
We hope this guide has provided you with valuable insights and knowledge on how to void a check in QuickBooks. With this information, you are now equipped to handle check voiding efficiently and effectively manage your organization’s financial transactions.