Introduction
If you own an HP Pavilion 20 All-In-One PC and need to remove the hard drive for replacement or other purposes, this guide is for you. The hard drive is an essential component of your computer that stores all your important files and data. Whether you want to upgrade to a larger capacity drive or troubleshoot drive-related issues, removing the hard drive from your HP Pavilion 20 All-In-One PC is a relatively straightforward process that can be done with basic tools and minimal technical expertise.
By following this step-by-step guide, you’ll be able to safely remove the hard drive without causing any damage to your PC. It’s important to note that this guide is specifically for the HP Pavilion 20 All-In-One PC, and the steps may vary for other models or brands. Additionally, always remember to handle computer components with care, ensuring that you’re working on a clean and static-free surface to prevent any accidental damage or electrostatic discharge.
Before we dive into the steps, make sure to back up any important files or data stored on the hard drive. This ensures that you don’t lose any valuable information during the removal process. Once you’ve completed the backup, you can proceed with confidence, knowing that your data is safely stored elsewhere.
Step 1: Power off the PC
The first step in removing the hard drive from your HP Pavilion 20 All-In-One PC is to power off the computer. This ensures that you’re working with the device in a safe and stable state.
To power off your PC, locate the power button on the front or side of the monitor. Press and hold the power button for a few seconds until the screen goes dark and the PC shuts down completely. You can also choose to shut down the computer through the operating system by clicking on the “Start” button, selecting “Power,” and then choosing “Shut down” from the options provided.
Once the computer is completely powered off, it’s important to unplug the power cord from the electrical outlet. This step eliminates any risk of electric shock or damage to the internal components while you’re working on the PC. It’s always a good idea to double-check that the PC is truly powered off and unplugged before proceeding to the next steps.
Taking the time to properly power off your PC ensures the safety of both yourself and the computer. It reduces the risk of accidental damage to the internal components and prevents any potential data loss or corruption. Once you’ve completed this step, you’re ready to move on to the next stage of removing the hard drive from your HP Pavilion 20 All-In-One PC.
Step 2: Unplug all cables
After powering off your HP Pavilion 20 All-In-One PC, the next step is to unplug all cables connected to the computer. This includes the power cord, any peripheral devices such as keyboards or mice, and any other cables that may be attached.
Start by unplugging the power cord from the electrical outlet and disconnecting the power cable from the back of the computer. Take care to gently remove the plug by holding onto the connector, not yanking on the cord itself. Setting the power cord aside, proceed to unplug any additional cables, such as HDMI, USB, or Ethernet cables.
To remove the peripherals, such as a keyboard or mouse, disconnect them from the computer’s USB ports by gently pulling the connectors out. If you have any other devices connected to the PC, such as external hard drives or printers, unplug them as well.
Taking the time to unplug all cables ensures that you have a clear workspace and allows for easier access to the components inside your HP Pavilion 20 All-In-One PC. It reduces the risk of accidentally damaging the cables or tugging on them while working on the computer.
Once all the cables are unplugged, it’s a good practice to organize and label them if needed. This will make the reconnection process easier when you have finished working on the PC. With the cables safely disconnected, you’re now ready to move on to the next step of removing the hard drive.
Step 3: Locate the access panel
To remove the hard drive from your HP Pavilion 20 All-In-One PC, you need to locate the access panel on the back of the computer. The access panel is designed to provide easy access to the internal components of the PC, including the hard drive.
Turn the PC around so that the back panel is facing you. Take note of the various ports and connectors on the back of the computer. Look for a removable panel that is typically located towards the bottom or side of the PC. This panel is usually secured with screws or clips to ensure a tight fit.
Inspect the back panel carefully to identify any markings or indicators that suggest it is the access panel. These might include labels such as “Hard Drive Access” or an outline of a hard drive symbol. Additionally, the panel might have a distinct shape or be slightly different in color compared to the rest of the back panel.
Once you have identified the access panel, take note of the screws or clips that secure it in place. This will help you when it comes time to remove the panel in the next step. If there are any screws, you may need a screwdriver that matches the type and size of the screws.
Locating the access panel is an essential step in the process of removing the hard drive from your HP Pavilion 20 All-In-One PC. It provides you with direct access to the internal components and makes it easier to access and remove the hard drive. Once you have spotted the access panel, you’re ready to move on to the next step of removing the hard drive.
Step 4: Remove the access panel
Now that you have located the access panel on the back of your HP Pavilion 20 All-In-One PC, it’s time to remove it. The access panel is what allows you to gain access to the internal components of the computer, including the hard drive.
If the access panel is secured with screws, use a screwdriver that matches the type and size of the screws to remove them. Carefully unscrew each screw and set them aside in a safe place, such as a small container or magnetic tray, to prevent loss or misplacement. If the access panel is secured with clips, gently push or press on the panel until the clips release and allow the panel to come off.
Depending on the design of your HP Pavilion 20 All-In-One PC, the access panel may come off completely or remain attached by a hinge or latch. In either case, handle the panel with care and avoid applying excessive pressure to prevent any damage.
Once the access panel is removed, set it aside in a safe and clean area. While the panel is off, take a moment to inspect the inside of the PC for any signs of dust or debris buildup. If necessary, use a can of compressed air or a soft brush to gently clean the internal components, including the fan and vents.
Removing the access panel is a crucial step in gaining access to the internal components of your HP Pavilion 20 All-In-One PC. With the panel out of the way, you can now proceed to the next step of removing the hard drive from the computer.
Step 5: Remove the hard drive cables
After successfully removing the access panel from your HP Pavilion 20 All-In-One PC, it’s time to remove the cables connected to the hard drive. These cables include the data cable and the power cable, which provide the necessary connections for the hard drive to function.
Start by identifying the data cable, which is usually a flat, ribbon-like cable that connects the hard drive to the motherboard. Carefully grip the plastic connector attached to the end of the data cable and gently pull it straight out from the hard drive. Do not twist or bend the cable excessively, as this may damage it or the connector.
Next, locate the power cable that supplies power to the hard drive. This cable typically has a larger, rectangular connector with multiple pins. Similar to the data cable, hold onto the connector firmly and pull it straight out from the hard drive.
As you remove the cables, take note of their orientation and how they are connected to the hard drive. This will be helpful when installing a new hard drive or reconnecting the cables later on. If necessary, you can take a photo or make a simple diagram for reference.
Once the cables are disconnected, set them aside in a safe place to prevent any tangles or damage. Take a moment to inspect the cables for any signs of wear or fraying. If you notice any damage, it’s recommended to replace the cables to ensure proper functionality and prevent any potential issues.
By removing the hard drive cables, you have now severed the connections between the hard drive and the rest of the computer. This allows you to proceed with the next step of actually removing the hard drive from your HP Pavilion 20 All-In-One PC.
Step 6: Unscrew the hard drive
With the cables disconnected, it’s time to unscrew the hard drive from your HP Pavilion 20 All-In-One PC. The hard drive is securely mounted in place to ensure stability and proper functioning. Removing the screws that hold it in place will allow you to release the hard drive from its housing.
Take a close look at the mounting brackets or screws holding the hard drive in place. Depending on the design of your PC, there may be screws located on the sides or the bottom of the hard drive. Use a screwdriver that matches the size and type of screws to carefully unscrew them.
As you unscrew the brackets, make sure to support the hard drive with your other hand to prevent it from falling or pulling on any remaining cables. Take your time to remove each screw and set them aside in a safe place. It’s a good practice to keep them organized so you can easily locate them when needed.
Once all the screws are removed, gently slide or lift the hard drive out of its housing. Be cautious not to force or apply excessive pressure, as the hard drive should come out smoothly. If it feels stuck, double-check to ensure that all screws have been fully removed.
As you remove the hard drive, keep an eye out for any additional cables or connectors that may still be attached. If you come across any, disconnect them carefully following the same process as described in Step 5.
By successfully unscrewing the hard drive, you have completed a significant step in removing it from your HP Pavilion 20 All-In-One PC. With the hard drive now disconnected and freed from its housing, you can proceed to the next step in safely removing it from the computer.
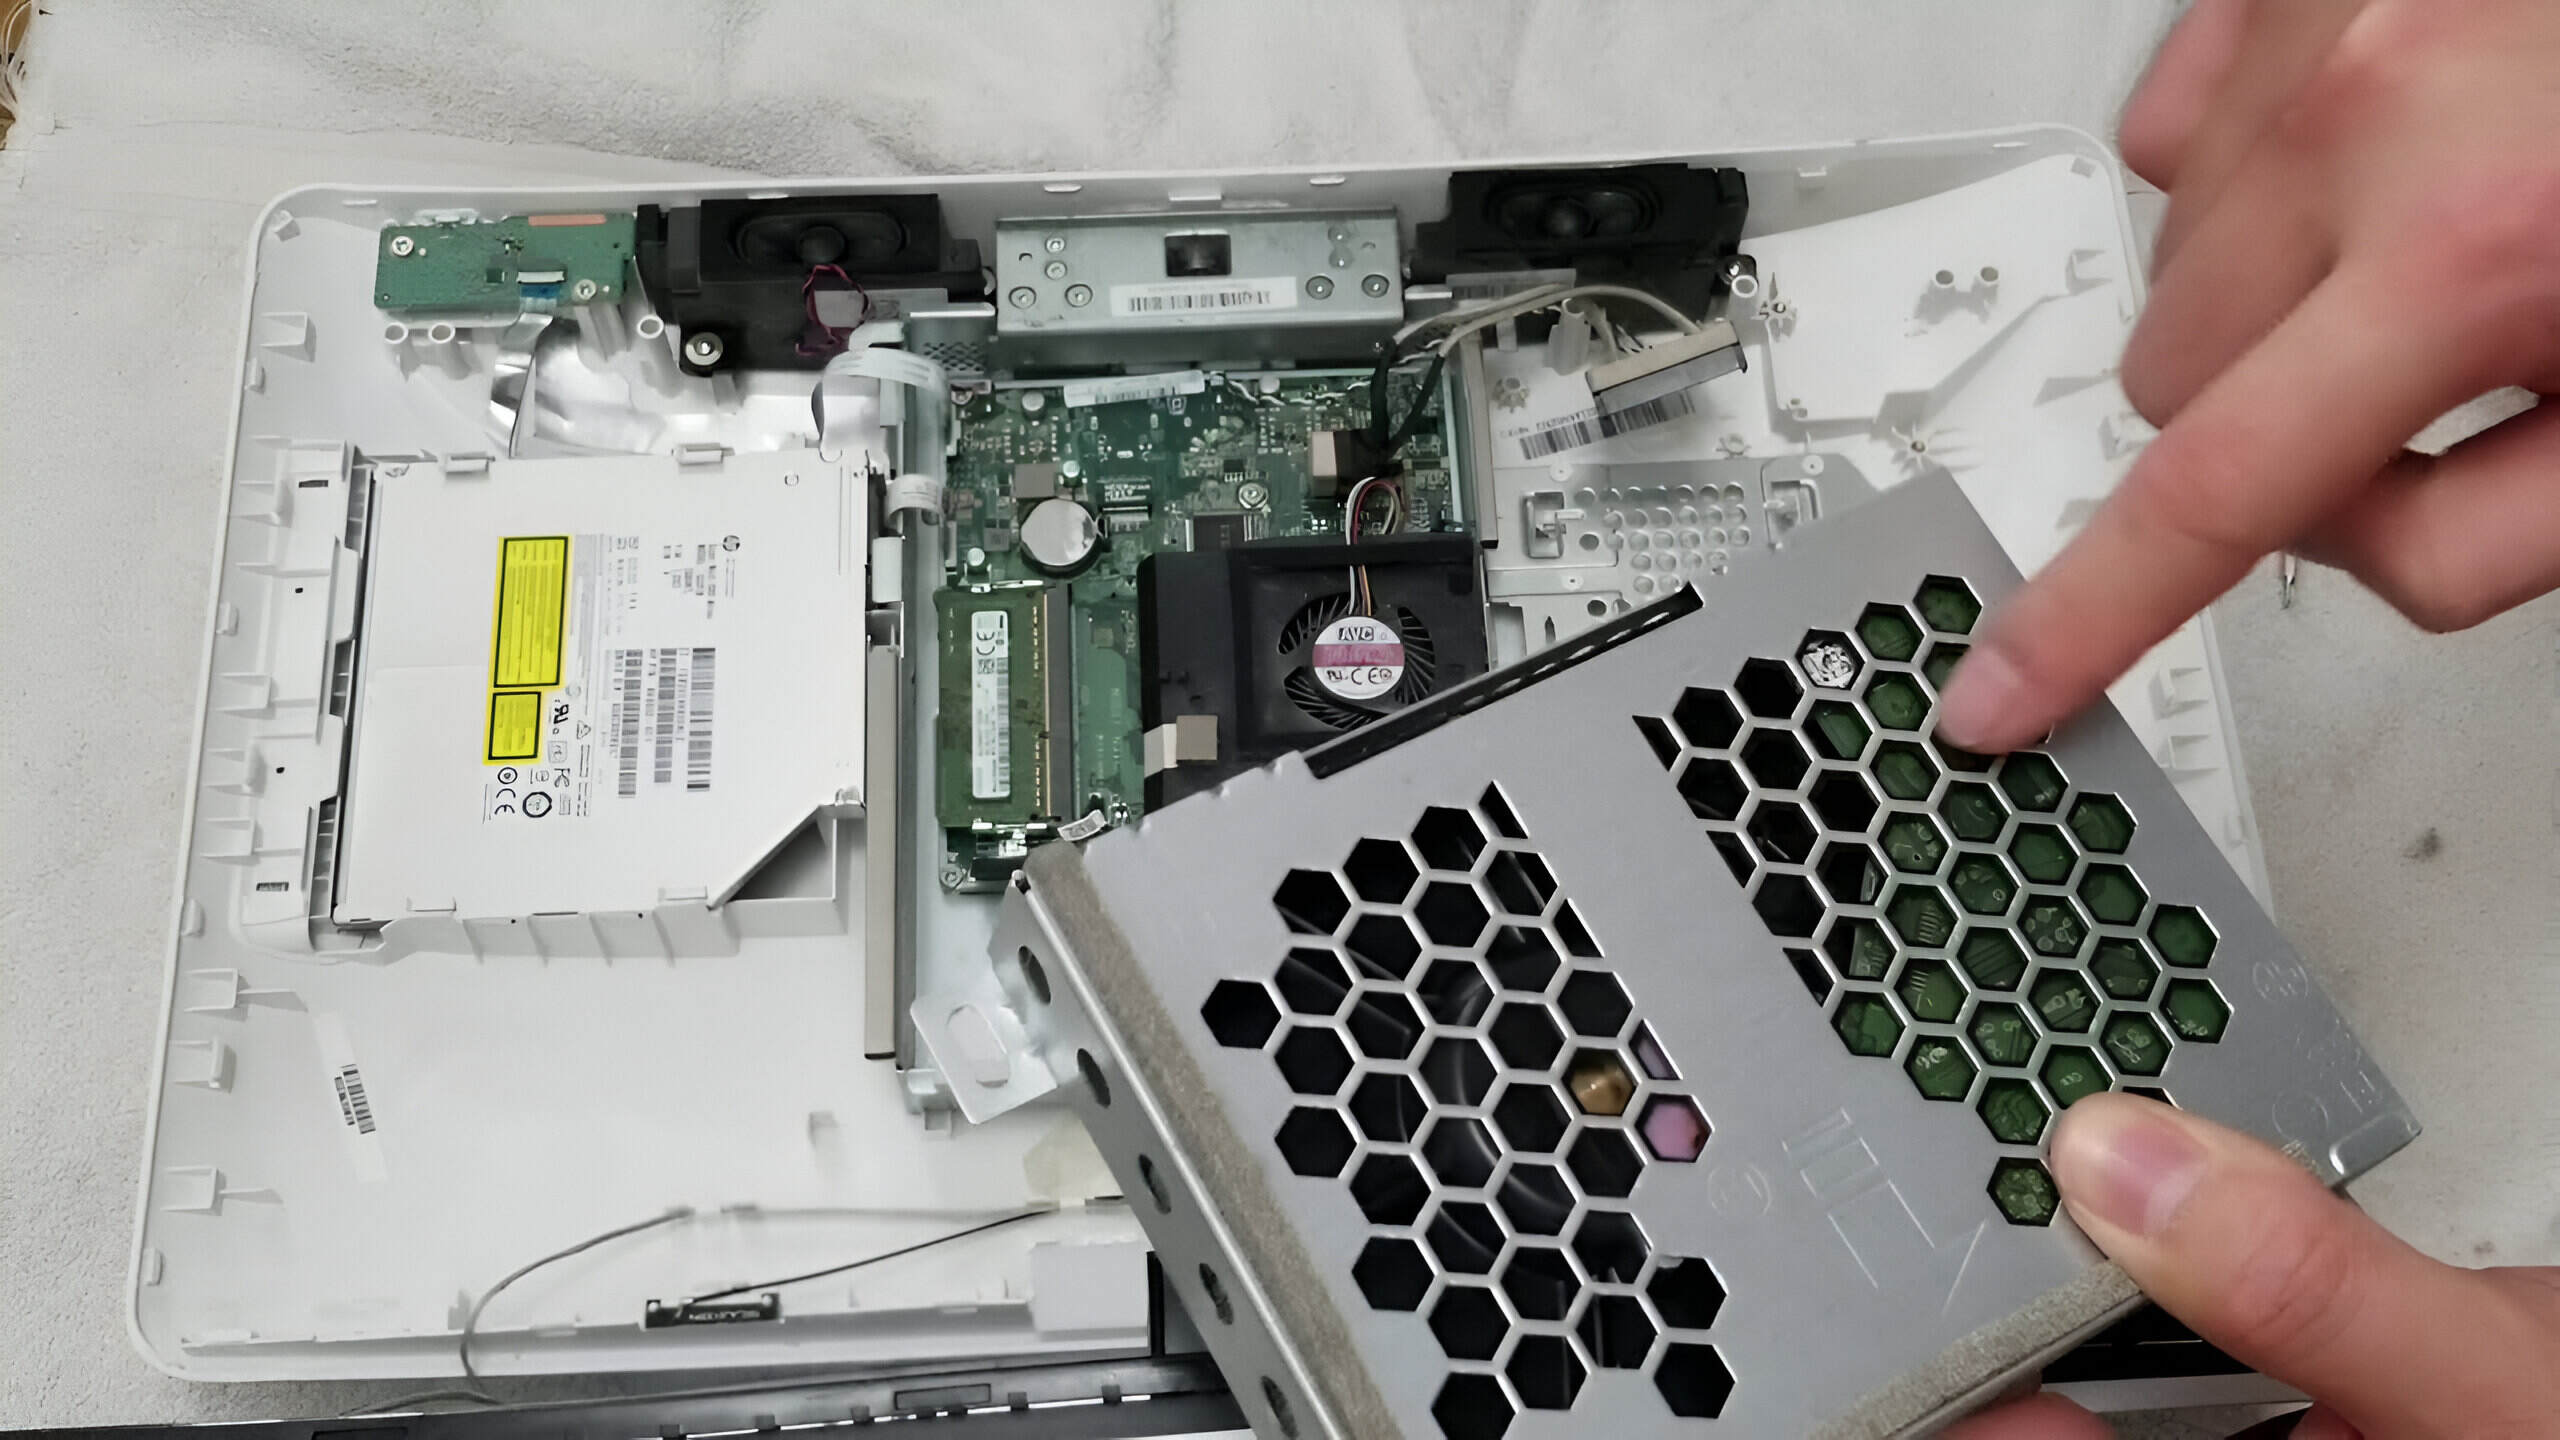
Step 7: Carefully remove the hard drive
Now that the hard drive is no longer secured in place, it’s time to carefully remove it from your HP Pavilion 20 All-In-One PC. This step requires a gentle touch and cautious handling to prevent any accidental damage to the hard drive or other components.
Slowly and steadily, slide the hard drive out of its slot or housing. Take note of any obstacles or tight spaces that may require slight adjustments or angling to ensure a smooth removal process. It’s important to keep the hard drive level as you remove it to avoid any unnecessary stress on the connectors or internal components.
Make sure to support the hard drive with your hand or use an anti-static mat or wrist strap throughout the removal process. This helps to prevent any electrostatic discharge that may damage the hard drive or other sensitive components. Avoid touching the exposed circuitry or connectors on the hard drive to minimize the risk of static electricity transfer.
If you encounter any resistance or difficulties while removing the hard drive, double-check that all cables and screws have been disconnected and removed. If necessary, gently wiggle or maneuver the hard drive to release it from any tight spots or connectors.
Once the hard drive is completely free from its housing, handle it with care and place it on a clean and static-free surface. Avoid placing it on any metal surfaces or materials that could potentially generate static electricity.
By carefully removing the hard drive, you have successfully taken a crucial step in the process of removing it from your HP Pavilion 20 All-In-One PC. With the hard drive now safely disconnected and removed from the computer, you can proceed to install a new hard drive, troubleshoot the existing one, or continue with any other necessary maintenance tasks.
Step 8: Install the new hard drive (optional)
If you are replacing the old hard drive with a new one or installing an additional hard drive, this step will guide you through the process of installing the new hard drive into your HP Pavilion 20 All-In-One PC.
Begin by carefully aligning the new hard drive with the empty slot or housing in the computer. Make sure the connectors on the hard drive are properly oriented to match the corresponding ports or sockets. Gently slide the new hard drive into place until it is fully inserted, ensuring a secure fit.
Once the new hard drive is in place, refer to the manufacturer’s instructions or the original documentation to guide you in connecting the necessary cables. Connect the data cable to the appropriate port on the hard drive and the motherboard, ensuring it is firmly attached. Then, connect the power cable to the power port on the hard drive.
Take a moment to double-check that all cables are securely connected and properly aligned. Pay attention to any markings or indicators on the cables to ensure they are connected to the correct ports or sockets. Avoid applying excessive force while connecting the cables to avoid any damage.
If you had removed any additional cables or connectors during the removal process, now is the time to reconnect them to the appropriate ports or sockets. Carefully line them up and press them in until they click into place, ensuring a secure connection.
After verifying that all connections are secure, you can proceed to secure the new hard drive in place. Align the mounting brackets or screw holes on the hard drive with those on the computer housing. Insert the screws or fastening mechanisms and tighten them gently, ensuring that the hard drive is held securely without causing any damage.
With the new hard drive installed and securely attached, you can now proceed to reassemble the access panel. Align it with the corresponding slots or hinges and gently press it into place. If screws were used, insert and tighten them accordingly, making sure not to overtighten.
Congratulations! You have successfully installed a new hard drive into your HP Pavilion 20 All-In-One PC. This step completes the process of installing the new hard drive and ensures that it is securely in place and ready for use.
Conclusion
Removing the hard drive from an HP Pavilion 20 All-In-One PC may seem like a daunting task, but by following the step-by-step guide provided, you can accomplish it with ease. Whether you need to replace a faulty hard drive, upgrade to a larger capacity drive, or perform other troubleshooting tasks, this guide has walked you through each essential step.
Remember to always take precautions and handle computer components with care. Power off the PC and unplug all cables before starting the removal process. Locate and remove the access panel, ensuring you’re working in a clean and static-free environment. Carefully disconnect the hard drive cables and unscrew the hard drive from its housing. Then, remove the hard drive with caution, remembering to support it to avoid any accidental damage.
If you’re installing a new hard drive, follow the additional steps provided in this guide to properly connect and secure the new drive. Take your time, double-check all connections, and be mindful of static electricity and any potential hazards.
By successfully removing and installing a new hard drive, you have gained the ability to manage your data storage and maintain the performance of your HP Pavilion 20 All-In-One PC. Whether you’re a seasoned computer enthusiast or a beginner, this guide has equipped you with the knowledge and confidence to handle this essential task.
Remember to back up your important files before making any changes to your computer’s hard drive. It’s always better to be safe than sorry, and having a backup ensures that your valuable data is protected.
Now that you have completed the guide, take a moment to appreciate your accomplishment. You have gained a new skill and expanded your understanding of your HP Pavilion 20 All-In-One PC. With this knowledge, you’ll be better equipped to handle future hardware maintenance tasks or upgrades.
Thank you for using this guide, and we hope it has been a helpful resource for your hard drive removal journey. Should you have any questions or encounter any difficulties along the way, don’t hesitate to seek further assistance from the manufacturer or a qualified technician. Happy computing!