Introduction
Windows 8.0, released in 2012, introduced a new user interface with a tiled start screen, improved performance, and a range of exciting features. However, if you have upgraded to a newer version of Windows and find yourself longing for the familiarity and simplicity of Windows 8.0, you may be wondering how to go back to the older version. Fortunately, it is possible to revert to Windows 8.0 if you are not satisfied with your current operating system.
In this article, we will guide you through the process of going back to Windows 8.0, whether you have upgraded to a newer version of Windows or simply want to return to the previous operating system. We will cover various methods, including using system restore, reinstalling from a disk, and reverting from Windows 10. Additionally, we will address common issues that may arise during the process and provide troubleshooting tips to help you navigate any challenges you encounter.
Going back to Windows 8.0 can be a viable option if you prefer its interface, features, or compatibility with certain applications. Whether you miss the Start screen, desire the enhanced performance of Windows 8.0, or simply prefer the older version, this guide will assist you in returning to Windows 8.0 seamlessly and efficiently.
Reasons to Go Back to Windows 8.0
While newer versions of Windows offer improved features and security updates, there are several reasons why you might want to consider going back to Windows 8.0. Here are some compelling factors to help you make an informed decision:
- Familiar User Interface: Windows 8.0 introduced a visually distinct tiled interface known as the Start screen. If you found this interface intuitive and easy to navigate, reverting to Windows 8.0 will reacquaint you with the familiar layout.
- Legacy Application Compatibility: Some older applications may not be fully compatible with newer versions of Windows. If you rely on specific legacy software that functions flawlessly on Windows 8.0, going back to this version can ensure smooth operation without compatibility issues.
- Performance on Older Hardware: Windows 8.0 is renowned for its optimized performance on older hardware. If you are using an older computer or laptop, reverting to Windows 8.0 can breathe new life into your system and provide a smoother user experience compared to a more resource-intensive operating system.
- Minimalist Start Screen: The Start screen in Windows 8.0 offers a clean and clutter-free interface, allowing you to focus on the essentials. If you prefer a minimalist approach and do not require advanced features or extensive customization options, returning to Windows 8.0 can provide a streamlined digital environment.
- Stability and Reliability: Over time, Windows 8.0 has matured into a stable and reliable operating system. If you have experienced stability issues or encounter frequent crashes on a newer version of Windows, reverting to the tried-and-tested Windows 8.0 can offer a more reliable computing experience.
- Preference for Desktop Mode: Windows 8.0 strikes a balance between the touch-centric Start screen and the traditional desktop mode. If you primarily use your computer in desktop mode and find the touch-oriented design of newer versions cumbersome, going back to Windows 8.0 can provide a more desktop-focused experience.
Keep in mind that while there are valid reasons for returning to Windows 8.0, it is important to weigh the pros and cons based on your specific needs and preferences. Consider factors such as software compatibility, hardware limitations, and desired features before making a decision. The next sections will guide you through the process of reverting to Windows 8.0 using different methods, ensuring a smooth transition back to the older operating system.
Backing Up Important Files
Prior to reverting to Windows 8.0, it is crucial to create a backup of all your important files to prevent any data loss during the process. While the reversion process itself should not delete your files, it is always recommended to take precautionary measures to safeguard your data. Here are the steps to back up your important files:
- Create a Folder: Start by creating a new folder on an external storage device, such as a USB drive or an external hard drive. This folder will be used to store your backup files.
- Identify Critical Files: Determine which files are essential to you. These may include documents, photos, videos, music, and any other files that are irreplaceable. Organize them in a separate folder on your computer for easier backup.
- Copy the Files: Select and copy the identified files to the newly-created folder on the external storage device. You can simply drag and drop the files or use the ‘Copy’ and ‘Paste’ commands.
- Verify the Backup: Once the files have been copied, take a moment to verify that the backup was successful. Double-check that all the files you intended to back up are present in the designated folder on the external storage device.
- Test the Backup: To ensure that the backup is functional and the files are intact, try opening some of the files from the backup folder on the external storage device. This will help confirm that the backup process was completed successfully and the files are accessible.
By following these steps, you can create a backup of your important files before proceeding with the reversion process. By doing so, you will have peace of mind knowing that your files are safely stored and can be easily restored once Windows 8.0 has been reinstalled.
Once you have completed the backup process, you are ready to proceed with reverting to Windows 8.0. The next sections will outline different methods you can use to accomplish this, depending on your specific scenario and requirements.
Restoring Windows 8.0 Using System Restore
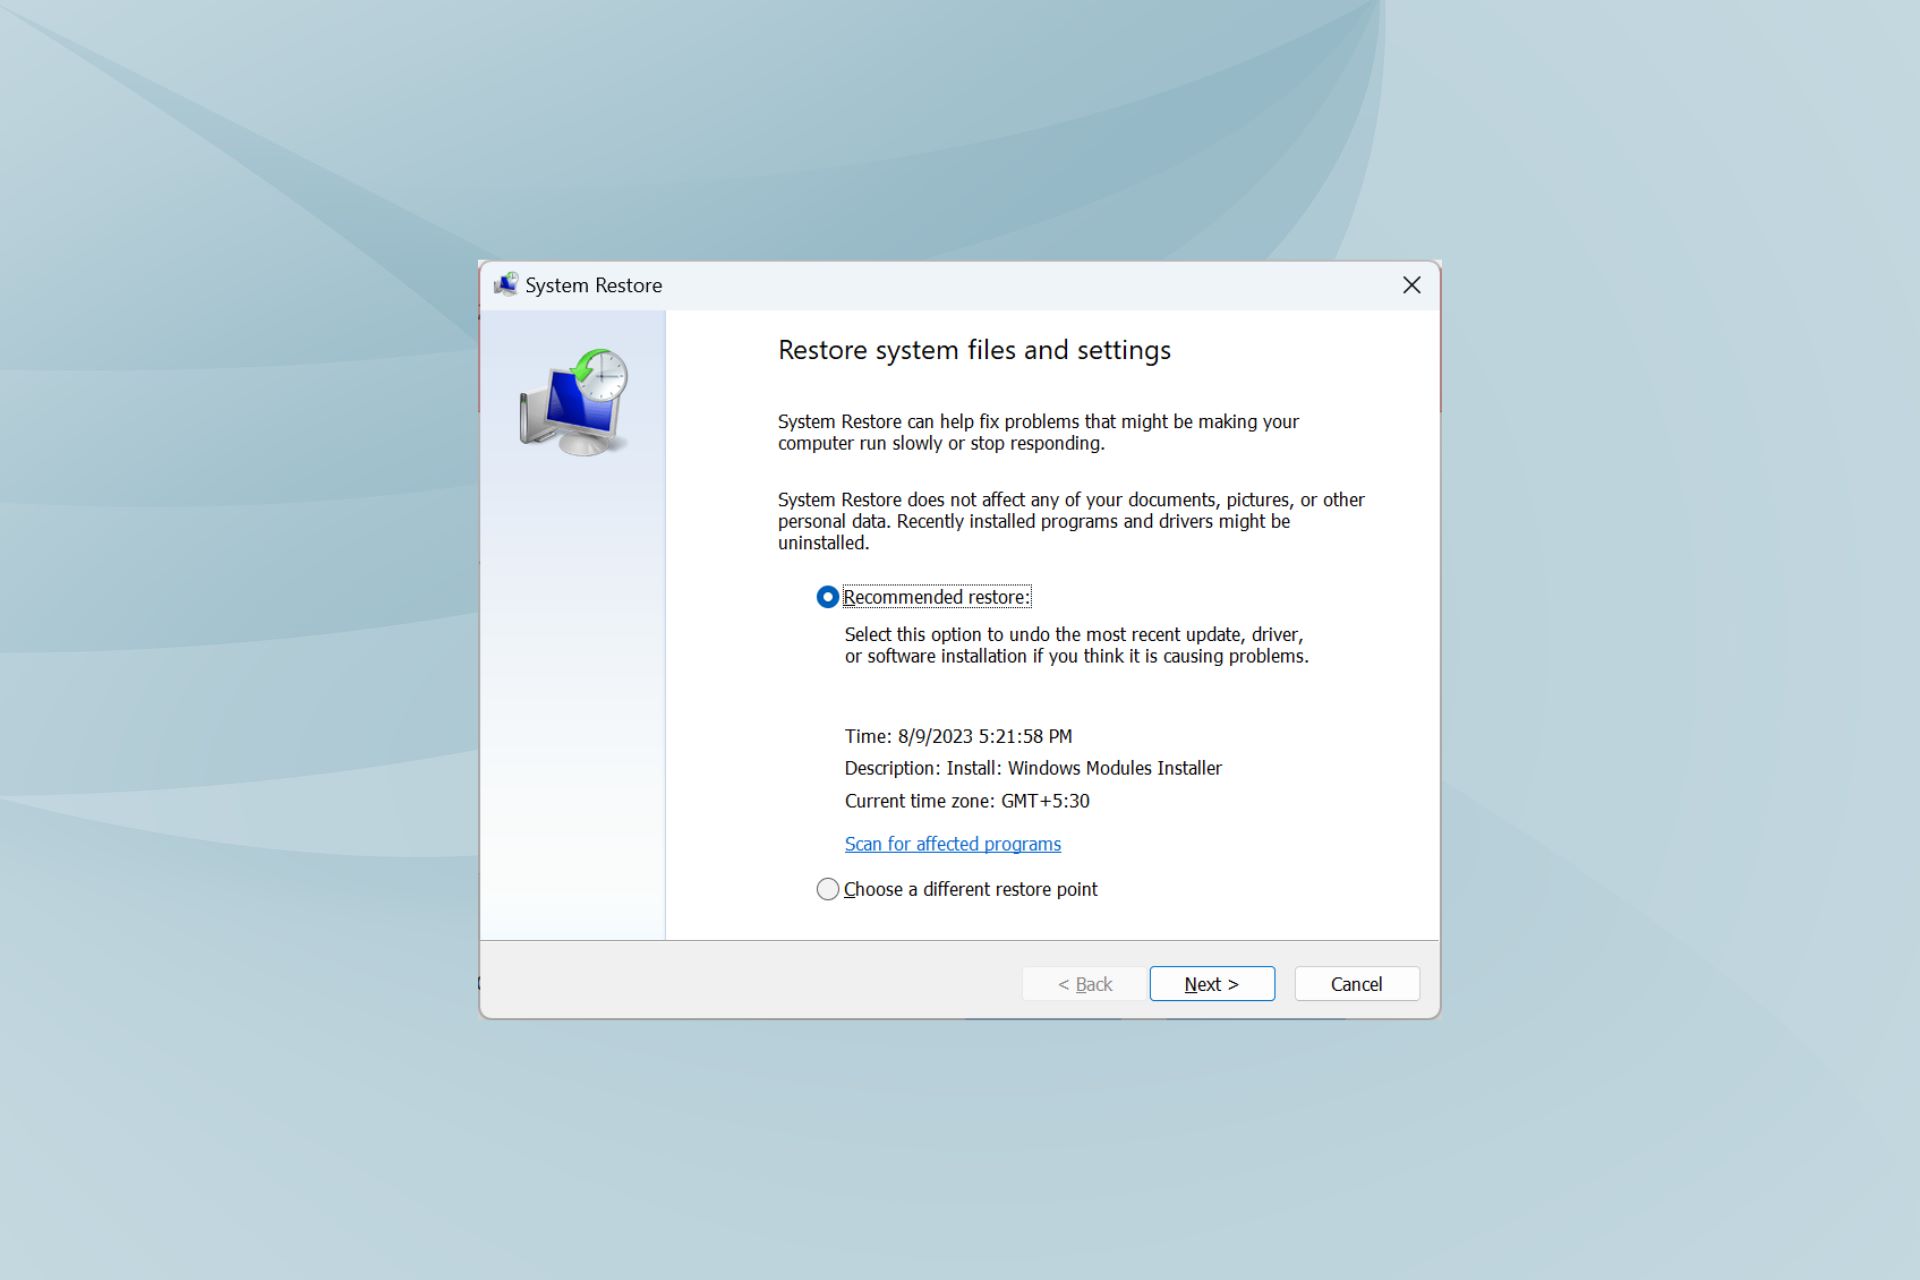
If you have recently upgraded to a newer version of Windows and want to go back to Windows 8.0, one of the simplest methods is to use the System Restore feature. System Restore allows you to roll back your operating system to a previous state, effectively undoing any system changes that might have been made. Here’s how you can restore Windows 8.0 using System Restore:
- Open System Restore: Go to the Start menu and search for “System Restore.” Click on the “Create a restore point” option from the search results, and it will open the System Properties window with the “System Protection” tab selected.
- Select the Operating System Drive: In the System Protection tab, under the “Protection Settings” section, you will see a list of available drives. Select the drive on which your Windows 8.0 installation is located (usually the C: drive) and click on the “Configure” button.
- Enable System Restore: In the System Protection settings, make sure that the “Turn on system protection” option is selected. Adjust the disk space usage according to your preferences, but it is recommended to allocate at least 5% of your disk space for system restore points. Click “OK” to save the changes.
- Create a Restore Point: With system protection enabled, click on the “Create” button in the System Protection tab to manually create a restore point for your Windows 8.0. Give the restore point a descriptive name and click “Create.” Wait for the process to complete.
- Restore to Previous Restore Point: To restore your Windows 8.0 to a previous state, go back to the System Properties window and click on the “System Restore” button. This will launch the System Restore wizard.
- Select a Restore Point: In the System Restore wizard, you will be presented with a list of available restore points. Choose a restore point that predates your Windows upgrade and click “Next.”
- Confirm and Restore: Review the details of the restore point and click “Finish” to confirm and initiate the system restore process. Your computer will restart, and the restoration process will begin.
- Wait for the Process to Complete: The system restore process may take some time to complete, depending on the size of the restore point and your computer’s speed. Do not interrupt the process and allow it to finish.
- Log In to Windows 8.0: Once the restoration process is complete, your computer will restart again. Log in to your Windows 8.0 account, and you should find your operating system restored to its previous state.
Using System Restore is a convenient method to revert to Windows 8.0, especially if you have recently upgraded and encountered issues with the newer version. It allows you to seamlessly restore your previous operating system configuration without the need for extensive technical knowledge or reinstalling the entire operating system.
Note that the availability and functionality of the System Restore feature may vary depending on the specific version and edition of Windows you are using. If you cannot find the System Restore option or encounter any issues during the restoration process, refer to the documentation provided by Microsoft or consult their support resources for further assistance.
Reinstalling Windows 8.0 from a Disk
If you have made the decision to go back to Windows 8.0 and have access to a Windows 8.0 installation disk or USB drive, you can perform a clean installation of the operating system. Reinstalling Windows 8.0 will erase all the data on your computer, so it is crucial to back up your important files before proceeding. Here’s how you can reinstall Windows 8.0:
- Back Up Your Files: As mentioned earlier, create a backup of all your important files to an external storage device before starting the reinstallation process.
- Insert the Installation Disk or USB Drive: Insert the Windows 8.0 installation disk into the CD/DVD drive or connect the USB drive to your computer.
- Boot from the Disk or Drive: Restart your computer and enter the BIOS settings by pressing the appropriate key (usually displayed on the boot screen). Set your computer to boot from the installation disk or USB drive.
- Begin the Installation: Once your computer boots from the installation disk or USB drive, you will see the Windows 8.0 installation screen. Follow the on-screen prompts to begin the installation process.
- Enter the Product Key: When prompted during the installation, enter the product key for your Windows 8.0 license. This key is typically found on the packaging or documentation that came with your original purchase.
- Accept License Terms and Choose Installation Type: Read and accept the license terms, then choose the type of installation you prefer. Select the “Custom” option for a clean installation that removes all previous files and settings.
- Format the Hard Drive: In the installation wizard, you will see a list of available disk partitions. Select the partition where your previous Windows installation was located and click on the “Format” option to erase the data on that partition.
- Install Windows 8.0: After formatting the partition, select it as the destination for the Windows 8.0 installation. Click “Next” to begin the installation process, which may take some time to complete.
- Follow On-Screen Prompts: Follow the on-screen prompts to set up your language preferences, time zone, user accounts, and other settings required to customize your Windows 8.0 installation.
- Complete the Installation: Once the installation is complete, your computer will restart. At this point, you will need to go through the initial setup steps, such as creating a user account, setting up a password, and configuring your privacy settings.
- Restore Your Backed-Up Files: After completing the Windows 8.0 installation, restore your backed-up files from the external storage device to your computer.
Reinstalling Windows 8.0 from a disk ensures a fresh start and allows you to have full control over the installation process. It is essential to have a valid Windows 8.0 license key to activate the operating system after the reinstallation is complete.
Remember, reinstalling Windows 8.0 will remove all the data on your computer, so double-check that you have backed up any important files before proceeding. Additionally, make sure to download and install any necessary drivers and updates after the installation process to ensure optimal performance and compatibility.
Reverting to Windows 8.0 from Windows 10
If you have upgraded to Windows 10 and now wish to go back to Windows 8.0, it is important to note that Microsoft provides a limited time window for reverting to the previous operating system. This option is available for 10 days after upgrading to Windows 10. Here’s how you can revert to Windows 8.0 from Windows 10:
- Backup Your Files: Before you begin the reversion process, it is crucial to back up your important files to ensure they are not lost during the transition. Use an external storage device to create a backup of your files.
- Open the Settings Menu: Click on the “Start” button, then select the “Settings” icon (shaped like a gear) from the Start menu. This will open the Windows Settings menu.
- Access the Update & Security Settings: Within the Windows Settings menu, locate and click on the “Update & Security” option.
- Go to the Recovery Options: In the Update & Security settings, choose the “Recovery” tab from the left-hand side menu.
- Select the Get Started Button: Under the “Go back to the previous version of Windows 10” section, click on the “Get Started” button.
- Provide Feedback (Optional): You will be presented with a prompt asking why you want to revert to Windows 8.0. You can select a reason from the list or choose “I don’t like this version” to proceed without providing feedback.
- Begin the Reversion Process: Click on the “Next” button to begin the reversion process. Windows 10 will guide you through the necessary steps to revert to Windows 8.0.
- Wait for the Process to Complete: The reversion process may take some time, and your computer will restart multiple times. Allow the process to complete without interruption.
- Set Up Windows 8.0: Once the reversion process is complete, you will be guided through the initial setup process of Windows 8.0, including personalizing settings, creating a user account, and configuring preferences.
- Restore Your Backed-Up Files: After completing the initial setup, restore your backed-up files from the external storage device to your computer.
It is crucial to note that the reversion process will only be available for 10 days after upgrading to Windows 10. After this time period, you won’t be able to revert to Windows 8.0 using the built-in recovery options provided by Microsoft. If this is the case, you will need to perform a clean installation of Windows 8.0 using a disk or USB drive, as outlined in the previous section.
Finally, keep in mind that when reverting to Windows 8.0 from Windows 10, you may encounter compatibility issues with certain applications and hardware drivers. Ensure that you have the necessary drivers and updates ready to install after the reversion process to ensure a smooth experience on Windows 8.0.
Common Issues and Troubleshooting
While reverting to Windows 8.0 can typically be a smooth process, there are some common issues that users may encounter. It’s important to be aware of these potential challenges and to be prepared with troubleshooting methods to overcome them. Here are some common issues and their potential solutions:
- Driver Compatibility: After reverting to Windows 8.0, you may find that some drivers are not compatible or need to be updated. To address this, visit the manufacturer’s website for your hardware and download the appropriate drivers for Windows 8.0.
- Missing Software: If you had specific software installed on your previous version of Windows, it may not carry over after the reversion. You will need to reinstall any necessary applications or programs manually.
- Network Connectivity: In some cases, reverting to Windows 8.0 can disrupt network connectivity. To resolve this, ensure that network drivers are up to date and try restarting your router or modem to refresh the connection.
- Activation Issues: If Windows 8.0 prompts you to activate your license key after the reversion, ensure you have the correct product key on hand. If you are unable to activate, contact Microsoft Support for assistance.
- Compatibility with Newer Applications: Keep in mind that Windows 8.0 may not be compatible with all of the latest applications available. Check compatibility requirements before installing new software to avoid potential issues.
- Missing Files: Although uncommon, there is a possibility of losing files during the reversion process. This is why it is crucial to back up your important files before undertaking any system changes. If files are missing, restore them from your backup.
If you encounter any issues that are not addressed here, consider reaching out to Windows support forums, community groups, or contacting Microsoft Support directly for further assistance. They can provide additional troubleshooting steps based on your specific situation.
Remember, troubleshooting methods may vary depending on the nature of the issue and your individual hardware and software configuration. Exercise caution when making changes to your system and be mindful of potential risks and data loss that could occur. It is always recommended to seek professional assistance if you are unsure or uncomfortable performing certain troubleshooting steps.
Conclusion
Reverting to Windows 8.0 can be a straightforward process if you follow the appropriate methods and take necessary precautions along the way. Whether you want to return to Windows 8.0 for its familiar user interface, legacy application compatibility, or optimized performance on older hardware, there are various options available to help you achieve your goal.
In this article, we discussed the reasons why you might consider reverting to Windows 8.0, including its familiar user interface, compatibility with older applications, and improved performance on older hardware. We also covered the importance of backing up your important files before proceeding with any system changes.
We outlined the steps to revert to Windows 8.0 using system restore, reinstalling from a disk, and reverting from Windows 10. We also highlighted common issues you may encounter and provided troubleshooting tips to help address these challenges.
Remember, before making the decision to revert to Windows 8.0, carefully consider your specific needs and requirements. Evaluate the factors like software compatibility, hardware limitations, and desired features to ensure that reverting is the right choice for you.
It’s essential to note that reverting to Windows 8.0 may not be a permanent solution, and it may have limitations compared to the newer operating systems available. Keep in mind that Microsoft regularly releases updates and improvements to enhance the user experience and address issues, so staying updated is crucial for security and functionality.
We hope this guide has provided you with valuable information to help you navigate the process of reverting to Windows 8.0. Remember to refer back to this guide as needed, and don’t hesitate to seek support from Microsoft or online communities if you encounter any difficulties along the way.