Introduction
When it comes to gaming monitors, the quality of the display is of paramount importance. One common issue that can affect the visual experience is dead pixels. Dead pixels are tiny defects on the screen that do not display the correct color or appear as black dots.
Whether you’re a professional gamer or an everyday user, a dead pixel can be quite bothersome and disruptive to your gaming or computing experience. It can be frustrating to spend a significant amount of money on a high-resolution monitor, only to discover dead pixels on its surface.
In this article, we will discuss what dead pixels are, the different types of dead pixels, and most importantly, how to detect them. Additionally, we will explore various methods you can employ to check for dead pixels on your gaming monitor.
By knowing how to identify dead pixels, you can make an informed decision on whether to keep the monitor, return it, or consider repairing it. Let’s dive in and learn how to detect and deal with dead pixels on your gaming monitor.
What are dead pixels?
Dead pixels, also known as stuck pixels, are defects that occur on the liquid crystal display (LCD) of a monitor. They are small, unresponsive areas on the screen that fail to display the correct color or remain permanently black. Dead pixels can be caused by manufacturing defects, physical damage, or aging of the monitor.
There are three main types of dead pixels:
- Hot pixels: These pixels always display white, regardless of the image being shown. They are caused by a malfunctioning subpixel and are often more noticeable on dark backgrounds.
- Stuck pixels: Stuck pixels are pixels that get stuck in one color and do not respond to the electrical signals that control the display. They can appear as red, green, blue, or other colors, depending on the subpixel affected.
- Dead pixels: Dead pixels are pixels that remain black and unlit. They fail to display any color or respond to electrical signals.
Dead pixels can be quite distracting, especially when they appear on a bright or uniform-colored background. They can affect the overall visual quality and immersion while gaming or using the monitor for day-to-day tasks. It’s important to identify dead pixels as early as possible to determine if they are within acceptable limits or if further action needs to be taken.
Now that we have a clear understanding of what dead pixels are and the different types, let’s move on to the next section, where we will explore various methods to detect them on your gaming monitor.
Types of dead pixels
There are three main types of dead pixels that you may encounter on your gaming monitor:
- Hot pixels: Hot pixels are pixels that are constantly displaying bright white light and fail to respond to changes in the image being displayed. They are often more noticeable on dark or black backgrounds. Hot pixels can be caused by manufacturing defects or aging of the monitor.
- Stuck pixels: Stuck pixels are pixels that get stuck in one color and do not change despite the display content. They can appear as red, green, blue, or other colors, depending on the subpixel affected. Stuck pixels can be caused by manufacturing defects or physical damage to the monitor.
- Dead pixels: Dead pixels are pixels that remain black and unresponsive. They do not show any color or light, making them stand out on the screen. Dead pixels can occur due to manufacturing defects, physical trauma to the monitor, or natural wear and tear over time.
It’s worth noting that dead pixels are typically measured based on their proximity to each other. Manufacturers often define a pixel threshold or class for dead pixels, indicating the maximum number of dead pixels acceptable on a monitor before it can be considered defective. For example, a display with no more than five dead pixels may be considered within the acceptable range.
It’s important to check the manufacturer’s warranty policy regarding dead pixels before making a purchase. Some warranties may cover dead pixel replacement or repair within a specific period after the purchase.
Now that we have discussed the different types of dead pixels, it’s time to move on to the next section where we will explore the methods to detect dead pixels on your gaming monitor.
Checking for dead pixels
Before we delve into the methods to detect dead pixels on your gaming monitor, it’s essential to understand the importance of checking for these defects. Checking for dead pixels allows you to assess the quality of your monitor and determine if any action needs to be taken, such as returning the monitor or seeking repair.
Here are a few reasons why checking for dead pixels is crucial:
- Visual quality: Dead pixels can significantly impact the visual quality of your gaming experience or general computer usage. They can be distracting, especially when they appear on bright or uniform-colored backgrounds. By checking for dead pixels, you can ensure that your monitor is delivering the best visual experience possible without any defects.
- Manufacturing defects: Dead pixels are often indicative of manufacturing defects. Identifying these defects early on can help you decide if you want to keep the monitor or return it for a replacement. It’s important to familiarize yourself with the manufacturer’s dead pixel policy and ensure that you receive a monitor that meets your expectations.
- Warranty coverage: Many manufacturers offer warranties that cover dead pixel replacement or repair within a specified time frame. By checking for dead pixels, you can identify any defects that fall within the warranty guidelines and take advantage of the available coverage.
Now that you understand the significance of checking for dead pixels, let’s explore the various methods you can use to detect them on your gaming monitor.
Methods to detect dead pixels
There are several methods you can employ to detect dead pixels on your gaming monitor. Each method has its own advantages and limitations, so it’s recommended to try multiple methods to ensure accurate results. Here are five commonly used methods:
Method 1: Visual inspection
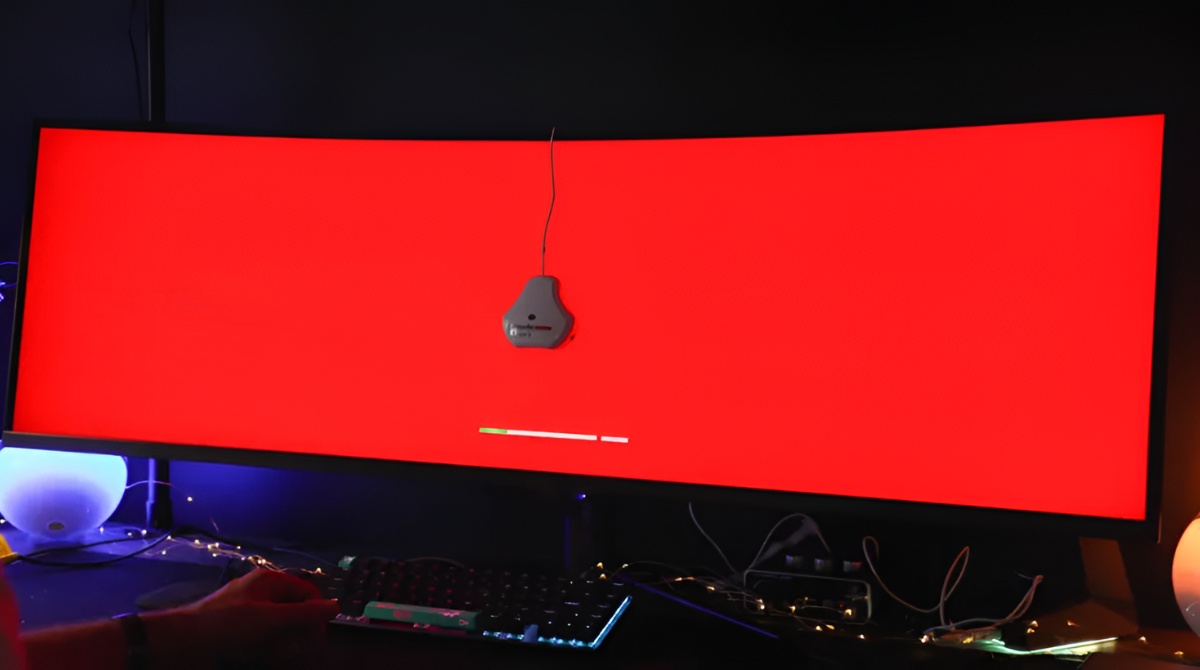
The simplest and quickest way to check for dead pixels is through visual inspection. Display a plain background, such as a solid-colored image, and examine the screen closely. Look for any pixels that appear as black dots or are not displaying the correct color. Move the image around the screen to ensure that the entire display is thoroughly checked.
Method 2: Running pixel checkers
There are various pixel checker apps and software programs available that can help identify dead pixels. These programs display different colors and patterns on your screen, allowing you to easily spot any pixels that are not responding or displaying the correct color.
Method 3: Using software programs
Some software programs, specifically designed for detecting dead pixels, can analyze the entire screen and highlight any malfunctioning pixels. These programs often provide additional features like pixel mapping, which can help identify the exact location of the dead pixels on the screen.
Method 4: Online dead pixel test
There are online tools and websites that offer dead pixel tests. These tests usually involve displaying different colored backgrounds and patterns, allowing you to quickly identify any dead or stuck pixels on your monitor.
Method 5: Using a magnifying glass
If you suspect the presence of dead pixels but cannot easily detect them with the naked eye, using a magnifying glass can help. By magnifying the screen, you can closely inspect each pixel and identify any abnormalities or defects.
By utilizing these methods, you can effectively detect dead pixels on your gaming monitor and determine the extent of the issue. Once you are aware of any dead pixels, you can decide on the appropriate action to take, whether it’s returning or repairing the monitor or accepting it within the manufacturer’s specified limits.
Method 1: Visual inspection
Visual inspection is the simplest and most straightforward method to detect dead pixels on your gaming monitor. This method involves displaying a plain background, such as a solid-colored image, and thoroughly examining the screen for any abnormalities.
To perform a visual inspection for dead pixels, follow these steps:
- Select a plain background: Choose an image or solid color that allows you to easily spot any dead pixels. Solid white, black, or primary colors like red, green, and blue work well for this purpose.
- Display the background: Set the chosen background as your monitor’s wallpaper or open it in an image viewer or browser in fullscreen mode. Ensure that the entire screen is covered by the background.
- Inspect the screen: Carefully examine the display from a normal viewing distance. Look for any anomalies, such as black dots or pixels that are not displaying the correct color. Pay close attention to areas with uniform colors or high contrast to spot any dead pixels.
- Move the background: Move the background image around the screen to cover different areas. This ensures that you inspect the entire display thoroughly for any dead pixels that may have been missed initially.
During the visual inspection, it’s important to maintain a calm and patient approach as dead pixels can sometimes be difficult to spot, especially if they are small or located in less noticeable areas of the screen.
It’s worth mentioning that dead pixels can be more noticeable on certain backgrounds or at specific brightness levels. Therefore, it may be beneficial to try different backgrounds and adjust the brightness settings on your monitor to get a comprehensive view of any potential dead pixels.
By performing a visual inspection, you can quickly identify any dead pixels on your gaming monitor. Once you have detected dead pixels, you can take appropriate action based on the manufacturer’s dead pixel policy or warranty coverage.
Method 2: Running pixel checkers
Another effective method to detect dead pixels on your gaming monitor is by utilizing pixel checker apps or software programs. These tools display different colors and patterns on your screen, allowing you to easily identify any pixels that are not responding or displaying the correct color.
Here’s how you can use pixel checkers to detect dead pixels:
- Choose a pixel checker program: There are several pixel checker apps and software programs available for both desktop and mobile platforms. Some popular options include Dead Pixel Tester, Pixelfixer, and JScreenFix.
- Install and run the program: Download and install the selected pixel checker program on your device. Launch the program to begin the dead pixel detection process.
- Follow the instructions: Most pixel checker programs have simple and intuitive user interfaces. They will guide you through the process of detecting dead pixels using predefined patterns and colors.
- Observe the screen: The pixel checker program will display various colors and patterns across the screen. Carefully observe the entire display and look for any anomalies, such as pixels that remain black or display incorrect colors.
- Take note of the dead pixels: If you come across any dead or stuck pixels during the pixel checker test, make note of their location on the screen. This information can be useful if you need to contact the manufacturer or initiate a warranty claim.
Pixel checker programs are particularly effective at highlighting dead pixels, as they systematically cycle through different colors and patterns to stress test each pixel on the display. This method helps to identify any pixels that are not functioning properly and may require further investigation or repair.
It’s important to note that pixel checkers can effectively identify dead pixels, but they may not be entirely conclusive. Some dead pixels can be intermittent or only visible under specific conditions. Therefore, it’s advisable to use multiple methods, including visual inspection, to ensure accurate detection of dead pixels on your gaming monitor.
By utilizing pixel checkers, you can easily and efficiently identify any dead pixels on your gaming monitor, enabling you to take appropriate actions based on the manufacturer’s warranty policy or personal preferences.
Method 3: Using software programs
Another effective method to detect dead pixels on your gaming monitor is by using software programs specifically designed for this purpose. These programs analyze the entire screen and highlight any malfunctioning pixels that may indicate dead or stuck pixels.
Here’s how you can use software programs to detect dead pixels:
- Research and select a suitable software program: Browse the internet for dead pixel detection software programs. Look for reputable options that have positive user reviews and ratings.
- Download and install the software: Once you have found a suitable software program, download it from the official website or a trusted source. Follow the installation instructions provided by the program.
- Launch the software program: After installing the software, launch the program on your computer. It will typically have a user-friendly interface with options to detect dead pixels.
- Start the detection process: Follow the instructions provided by the software program to initiate the dead pixel detection process. The program will display different colors, patterns, or images on your screen.
- Observe the screen for anomalies: While the software program runs, carefully observe your monitor’s display for any abnormalities. Look for pixels that are not responding, displaying incorrect colors, or remaining black.
- Note down any dead pixels: If you spot any dead or stuck pixels during the software program’s detection process, make note of their location. This information will be useful if you need to report the issue to the manufacturer or initiate a warranty claim.
Using software programs designed for dead pixel detection can provide a more comprehensive and accurate assessment of your gaming monitor’s pixel performance. These programs often have advanced algorithms that analyze the entire screen and provide detailed reports on the presence and location of dead pixels.
It’s important to note that while software programs can effectively identify dead pixels, they may not be infallible. Some dead pixels can be intermittent or only visible under specific conditions. For a thorough assessment, consider using multiple methods in conjunction with software programs, such as visual inspection and pixel checkers.
By utilizing software programs, you can gain a more precise understanding of any dead pixels on your gaming monitor. This knowledge will empower you to make informed decisions, such as seeking warranty assistance or exploring repair options, to ensure optimal display quality and performance.
Method 4: Online dead pixel test
An easy and convenient method to detect dead pixels on your gaming monitor is by using online dead pixel tests. These web-based tools provide a quick and hassle-free way to identify any malfunctioning pixels on your screen.
Here’s how you can use online dead pixel tests to detect dead pixels:
- Search for online dead pixel tests: Look for reliable websites or tools that offer dead pixel tests. You can find several options by searching for “online dead pixel test” in your preferred search engine.
- Select a suitable test: Explore the different online dead pixel tests available and choose one that suits your preferences. Consider factors like ease of use, accuracy, and any additional features offered.
- Open the dead pixel test: Once you have selected an online test, open the website or tool on your web browser. The test will typically have clear instructions on how to proceed.
- Follow the instructions: The online dead pixel test will guide you through the detection process. It may involve displaying specific colors or patterns on your screen and asking you to identify any anomalies.
- Observe the screen closely: Pay close attention to your screen while the online test is running. Look for any pixels that are not displaying the correct color, remaining black, or otherwise exhibiting abnormal behavior.
- Make note of any dead pixels: If you notice any dead or stuck pixels during the online test, make a note of their location. This information will be helpful if you need to report the issue to the manufacturer or refer to it in the future.
Online dead pixel tests offer a convenient way to quickly assess your gaming monitor for dead pixel defects. These tests are designed to provide a straightforward and user-friendly experience, making it accessible to users of all technical levels.
While online dead pixel tests can accurately identify dead pixels, it’s important to note that each test may vary in terms of accuracy and reliability. It’s recommended to try different tests and cross-reference the results to ensure the most accurate assessment of your monitor’s condition.
By utilizing online dead pixel tests, you can easily detect any dead pixels on your gaming monitor. Armed with this knowledge, you can make informed decisions about seeking warranty assistance, replacement, or repair to ensure optimal display performance for your gaming experience.
Method 5: Using a magnifying glass
If you suspect the presence of dead pixels on your gaming monitor but are having difficulty spotting them with the naked eye, using a magnifying glass can be a helpful method to detect these tiny defects more effectively. A magnifying glass allows you to closely examine each pixel on your screen, making it easier to identify any abnormalities or dead pixels.
Here’s how you can use a magnifying glass to detect dead pixels:
- Obtain a magnifying glass: Purchase or borrow a magnifying glass that provides sufficient magnification for detailed examination. Opt for a magnifying glass with a comfortable grip and a lens size appropriate for your needs.
- Prepare your monitor: Clean your gaming monitor’s screen using a microfiber cloth to remove any dust or smudges. Ensure that the screen is turned off to prevent glare or reflections that could interfere with your examination.
- Position the magnifying glass: Hold the magnifying glass at a comfortable distance from the screen, ensuring that the lens is parallel to the monitor’s surface. Adjust the position of both the magnifying glass and your head to find the optimal viewing angle.
- Examine each pixel: Slowly and systematically inspect each pixel on your screen using the magnifying glass. Move the magnifying glass across the screen, focusing on different areas. Look for any dead pixels that appear as black dots or do not display the correct color.
- Take note of any dead pixels: If you come across any dead or stuck pixels during your examination, make a note of their exact location. This information will be useful if you need to report the issue or refer back to it in the future.
Using a magnifying glass can help you detect dead pixels that may not be immediately visible to the naked eye. By magnifying each pixel, you can identify any subtle anomalies or defects that can affect the overall visual quality of your gaming monitor.
It’s important to note that using a magnifying glass may reveal smaller or less noticeable dead pixels, but it may not be entirely conclusive. Some dead pixels can be intermittent or only visible under specific conditions. Therefore, it’s advisable to use multiple methods, including visual inspection and pixel checkers, to ensure accurate detection of dead pixels on your gaming monitor.
By utilizing a magnifying glass, you can closely scrutinize each pixel on your gaming monitor, enabling you to detect dead pixels that might otherwise go unnoticed. This information empowers you to take appropriate actions, such as seeking warranty assistance or considering repair options, to ensure optimal display quality for your gaming experience.
How to fix dead pixels?
Dead pixels on a gaming monitor can be frustrating, but fortunately, there are a few potential methods to try in order to fix or minimize the impact of dead pixels. However, it’s important to note that not all dead pixels can be fixed, and the success rate of these methods may vary.
Finding a solution:
- Gentle pressure: Applying gentle pressure to the area with a dead pixel may sometimes help to revive it. Be careful not to press too hard or use excessive force, as it can damage the monitor. Use a microfiber cloth or a soft, lint-free cloth to apply the pressure.
- Pixel-exercising software: There are specialized software programs available, such as JScreenFix and UDPix, that rapidly cycle colors on the screen to attempt to unstick dead pixels. Run the software for a few hours and check if the dead pixel is fixed. While this method may work for some stuck pixels, it may not be effective for all cases.
- Mild tapping: Lightly tapping or rubbing the area around the dead pixel with a soft object, like a pen eraser or your fingertip, may sometimes help to revive a stuck pixel. However, once again, be cautious not to apply too much pressure to avoid damaging the monitor.
- Professional repair: If the dead pixels persist and none of the DIY methods work, you may need to consider professional repair. Contact the manufacturer or find an authorized repair center to assess the monitor and provide a solution.
- Warranty replacement: Depending on the manufacturer’s warranty policy, if your monitor has a significant number of dead pixels or falls within the warranty limits for dead pixels, you may be eligible for a replacement. Refer to the manufacturer’s warranty information or contact customer support for guidance.
It’s important to note that attempting to fix dead pixels carries risks, and there is no guarantee of success. Be cautious and follow the instructions carefully to avoid causing further damage to the monitor. If you are unsure or uncomfortable with attempting the fixes on your own, seek professional assistance.
In some cases, dead pixels may not be fixable, and you may need to weigh the options of accepting the monitor as it is, seeking a warranty replacement or repair, or purchasing a new gaming monitor.
Remember, prevention is key. When purchasing a new gaming monitor, ensure to check the manufacturer’s dead pixel policy, warranty coverage, and return policy to mitigate potential issues with dead pixels in the future. Conduct thorough inspections when setting up a new monitor to identify any dead pixels and make an informed decision within the designated return period.
Conclusion
Dead pixels can be a frustrating issue to encounter on your gaming monitor, impacting the overall visual experience. In this article, we discussed what dead pixels are, the different types of dead pixels, and most importantly, how to detect them. We explored various methods, such as visual inspection, running pixel checkers, using software programs, online dead pixel tests, and employing a magnifying glass to identify dead pixels effectively.
While dead pixels can be bothersome, it’s essential to understand that not all dead pixels can be fixed. Some methods, such as gentle pressure, pixel-exercising software, or mild tapping, may help restore stuck pixels in some cases. However, it’s crucial to exercise caution and be aware that these methods may not work for all situations.
If your attempts are unsuccessful, seeking professional repair or contacting the manufacturer for warranty coverage or replacement options might be the next step. Familiarize yourself with the manufacturer’s warranty policy and dead pixel thresholds prior to purchasing a gaming monitor to understand your rights and options if dead pixels are present.
Ultimately, the presence of dead pixels on your gaming monitor is an important factor to consider when making a purchasing decision. By employing the methods discussed in this article, you can effectively detect and address dead pixel issues, ensuring that your gaming experience is enhanced by a high-quality display without distracting defects.
Remember, maintaining a clean and properly calibrated monitor, and following the manufacturer’s guidelines for product care, can help prevent dead pixel issues from occurring in the first place. Taking proactive steps and being diligent when setting up and inspecting your gaming monitor will contribute to a seamless and enjoyable visual experience.