Introduction
Chrome Sync is a nifty feature that allows you to seamlessly access your browsing history, bookmarks, passwords, and other settings across multiple devices. Whether you're switching from your laptop to your smartphone or vice versa, Chrome Sync ensures that your browsing experience remains consistent and personalized. By enabling this feature, you can bid farewell to the hassle of manually transferring your browsing data from one device to another.
Imagine this: You're researching a new recipe on your laptop but need to head out. With Chrome Sync, you can effortlessly pick up where you left off on your smartphone while strolling through the grocery store. This seamless transition is made possible by the synchronization of your browsing data, which is securely stored and accessible across your devices.
In this article, we'll delve into the ins and outs of Chrome Sync, guiding you through the process of turning it on, managing your synced data, and troubleshooting any potential issues. By the end of this journey, you'll be equipped with the knowledge to harness the full potential of Chrome Sync, enhancing your browsing experience and productivity across all your devices. So, let's embark on this exploration of Chrome Sync and unlock the convenience it offers.
Accessing Chrome Settings
Accessing Chrome settings is the first step towards enabling Chrome Sync. Whether you're using Chrome on your desktop, laptop, or mobile device, the process of accessing settings remains consistent. Here's how you can navigate to the settings menu on different platforms:
Desktop or Laptop
- Launch Chrome on your computer.
- Look for the three vertically aligned dots, also known as the "More" icon, located at the top-right corner of the browser window.
- Click on the "More" icon to reveal a dropdown menu.
- From the dropdown menu, select "Settings." This action will redirect you to the Chrome settings page, where you can customize various aspects of your browsing experience.
Mobile Device
- Open the Chrome app on your smartphone or tablet.
- Tap the three vertically aligned dots, which represent the "More" icon, typically found in the top-right corner of the screen.
- Select "Settings" from the menu that appears. This will direct you to the settings interface, allowing you to configure Chrome according to your preferences.
Upon accessing the settings, you'll encounter a plethora of options that enable you to personalize your browsing experience. From managing your privacy and security settings to customizing the appearance of the browser, the settings menu serves as a control center for tailoring Chrome to suit your needs.
Now that you've successfully accessed the Chrome settings, you're ready to proceed to the next crucial step: turning on Chrome Sync. This process will seamlessly synchronize your browsing data across devices, ensuring a consistent and personalized experience regardless of the platform you're using. Let's delve into the intricacies of enabling Chrome Sync and harnessing its full potential.
Turning on Sync
Enabling Chrome Sync is a straightforward process that empowers you to seamlessly access your browsing data across multiple devices. By turning on Sync, you ensure that your bookmarks, browsing history, passwords, and other settings are harmonized, allowing for a consistent and personalized browsing experience. Let's delve into the step-by-step process of activating Chrome Sync:
-
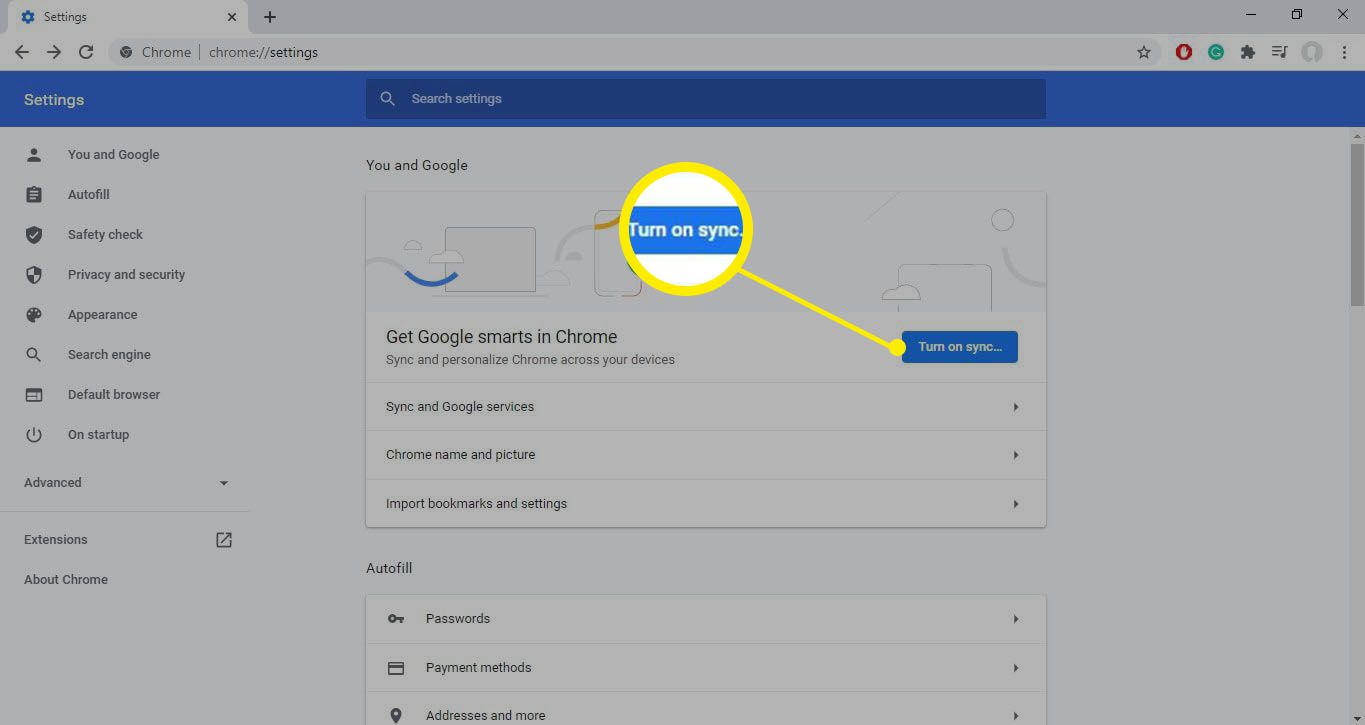
Accessing Sync Settings: After navigating to the Chrome settings menu, look for the "Sync" option. On the desktop or laptop version, you'll find it in the left-hand sidebar. For mobile devices, it may be located within the main settings interface. Click or tap on the "Sync" option to proceed.
-
Sign into Your Google Account: To enable Chrome Sync, you need to be signed into your Google account. If you're not already signed in, you'll be prompted to do so at this stage. Enter your credentials to log in and proceed to the next step.
-
Customizing Sync Settings: Once you're signed in, you'll encounter a range of sync options. These include toggles for syncing browsing history, bookmarks, passwords, and other data types. You can customize which elements you want to sync across your devices by toggling the corresponding switches. This level of customization allows you to tailor the sync process to your specific preferences.
-
Encryption and Security: Chrome Sync employs encryption to safeguard your synced data, ensuring that it remains secure and inaccessible to unauthorized users. This robust security measure provides peace of mind, knowing that your sensitive information is protected throughout the synchronization process.
-
Confirmation and Activation: After customizing your sync settings, confirm your preferences and activate Chrome Sync. Once enabled, your browsing data will be seamlessly synchronized across all devices linked to your Google account.
By following these steps, you've successfully turned on Chrome Sync, unlocking the convenience of accessing your browsing history, bookmarks, and other settings across your various devices. This synchronization process streamlines your browsing experience, eliminating the need to manually transfer data between devices. With Chrome Sync activated, you can seamlessly transition between your desktop, laptop, smartphone, and other devices, knowing that your browsing data is consistently accessible.
Now that you've mastered the art of turning on Chrome Sync, you're ready to explore the management of your synced data and troubleshoot any potential issues that may arise. Let's delve into these aspects to further enhance your browsing experience and ensure a seamless synchronization process across all your devices.
Managing Synced Data
Once you've enabled Chrome Sync, you gain the ability to manage your synced data, ensuring that your browsing experience remains tailored to your preferences across all your devices. This management process allows you to fine-tune the elements that are synchronized, providing a personalized and seamless browsing experience. Let's explore the various aspects of managing synced data and how you can optimize this feature to suit your needs.
Customizing Synced Elements
Upon enabling Chrome Sync, you have the flexibility to customize the specific elements that are synchronized across your devices. This level of customization empowers you to tailor your browsing experience according to your preferences. By accessing the sync settings within Chrome, you can selectively enable or disable the synchronization of browsing history, bookmarks, passwords, and other data types. This granular control ensures that only the desired elements are synchronized, allowing you to maintain a clutter-free and personalized browsing environment.
Adding and Organizing Bookmarks
With Chrome Sync, adding and organizing bookmarks becomes a seamless endeavor. When you bookmark a webpage on one device, it automatically propagates to all your synced devices, ensuring that your bookmark collection remains consistent and readily accessible. Whether you're saving a recipe, a research article, or a favorite website, Chrome Sync ensures that your bookmarked content is harmonized across your devices, eliminating the need to manually replicate your bookmark collection.
Password Management
Chrome Sync extends its convenience to password management, allowing you to securely access your saved passwords across devices. When you save a password on one device, it becomes available on all your synced devices, streamlining the login process and eliminating the need to manually input passwords. This seamless synchronization of passwords enhances both convenience and security, ensuring that your login credentials are readily accessible while remaining encrypted and secure.
Clearing Browsing Data
In instances where you need to clear your browsing data, Chrome Sync offers the flexibility to manage this process across your synced devices. Whether you're clearing your browsing history, cookies, or cached images and files, initiating this action on one device ensures that the selected data is cleared across all your synced devices. This streamlined approach to clearing browsing data simplifies maintenance tasks, allowing you to maintain a consistent browsing environment across all platforms.
By effectively managing your synced data, you can optimize your browsing experience and ensure that your personalized settings and content are seamlessly accessible across all your devices. This level of control empowers you to tailor Chrome Sync to suit your specific needs, enhancing both convenience and personalization in your browsing journey.
Troubleshooting Sync Issues
Despite the seamless nature of Chrome Sync, occasional issues may arise that hinder the synchronization of your browsing data across devices. When encountering sync-related challenges, it's essential to troubleshoot these issues effectively to restore the seamless flow of data across your devices. Let's explore some common sync issues and the corresponding troubleshooting steps to address them.
Verify Internet Connectivity
Before delving into intricate troubleshooting methods, it's crucial to ensure that your devices have stable internet connectivity. Syncing data across devices relies on a stable internet connection, and intermittent connectivity issues can disrupt the synchronization process. Verify that your devices are connected to a reliable network, and if necessary, troubleshoot any connectivity issues to establish a stable connection.
Check Sync Settings
Occasionally, discrepancies in sync settings may impede the seamless synchronization of browsing data. Navigate to the sync settings within Chrome and verify that the desired elements, such as browsing history, bookmarks, and passwords, are enabled for synchronization. Ensure that the sync settings are consistent across all your devices to facilitate a uniform sync experience.
Sign Out and Sign Back In
If you encounter persistent sync issues, signing out of your Google account within Chrome and signing back in may help resolve the issue. This action can refresh the sync process and address any underlying synchronization discrepancies. After signing back in, revisit the sync settings to ensure that the desired data types are set to synchronize across your devices.
Clear Sync Data
In some cases, clearing the sync data within Chrome can resolve persistent sync issues. This action effectively resets the synchronization process, allowing for a fresh start in harmonizing your browsing data across devices. After clearing the sync data, revisit the sync settings to customize the elements you wish to synchronize and monitor the sync process for improvements.
Update Chrome
Outdated versions of Chrome may introduce compatibility issues that affect the sync process. Ensure that your browser is updated to the latest version to leverage the most recent enhancements and bug fixes related to Chrome Sync. Updating Chrome can address underlying issues and optimize the synchronization of your browsing data across devices.
By implementing these troubleshooting steps, you can effectively address sync issues and restore the seamless synchronization of your browsing data across devices. These proactive measures empower you to maintain a consistent and personalized browsing experience, ensuring that Chrome Sync continues to enhance your productivity and convenience across all your devices.