Introduction
Are you tired of setting up your favorite Chrome extensions on every computer you use? Wouldn’t it be convenient if you could sync your extensions across multiple devices and have them readily available whenever you need them? Well, fortunately, with Chrome’s built-in sync feature, you can do exactly that!
Chrome Sync is an incredibly useful tool that allows you to synchronize your browsing data, including bookmarks, history, themes, and of course, extensions, across all your devices. This means that once you set up Chrome Sync on one computer, all your extensions will automatically be installed and updated on any other computer you sign in to with your Google account.
In this article, we will guide you through the process of setting up Chrome Sync and enabling extension synchronization. We will also discuss how you can manually sync your extensions and troubleshoot any issues that may arise during the syncing process.
Whether you’re switching between work and personal computers, or simply prefer using different devices, having your favorite Chrome extensions available without the hassle of reinstalling them will save you time and enhance your browsing experience. Let’s dive in and learn how to make it happen!
Setting Up Chrome Sync
Before you can start syncing your Chrome extensions across computers, you need to set up Chrome Sync on each device you wish to synchronize. Follow these simple steps:
- Open Google Chrome on your computer and click on the three-dot menu located at the top-right corner of the window.
- Select “Settings” from the drop-down menu.
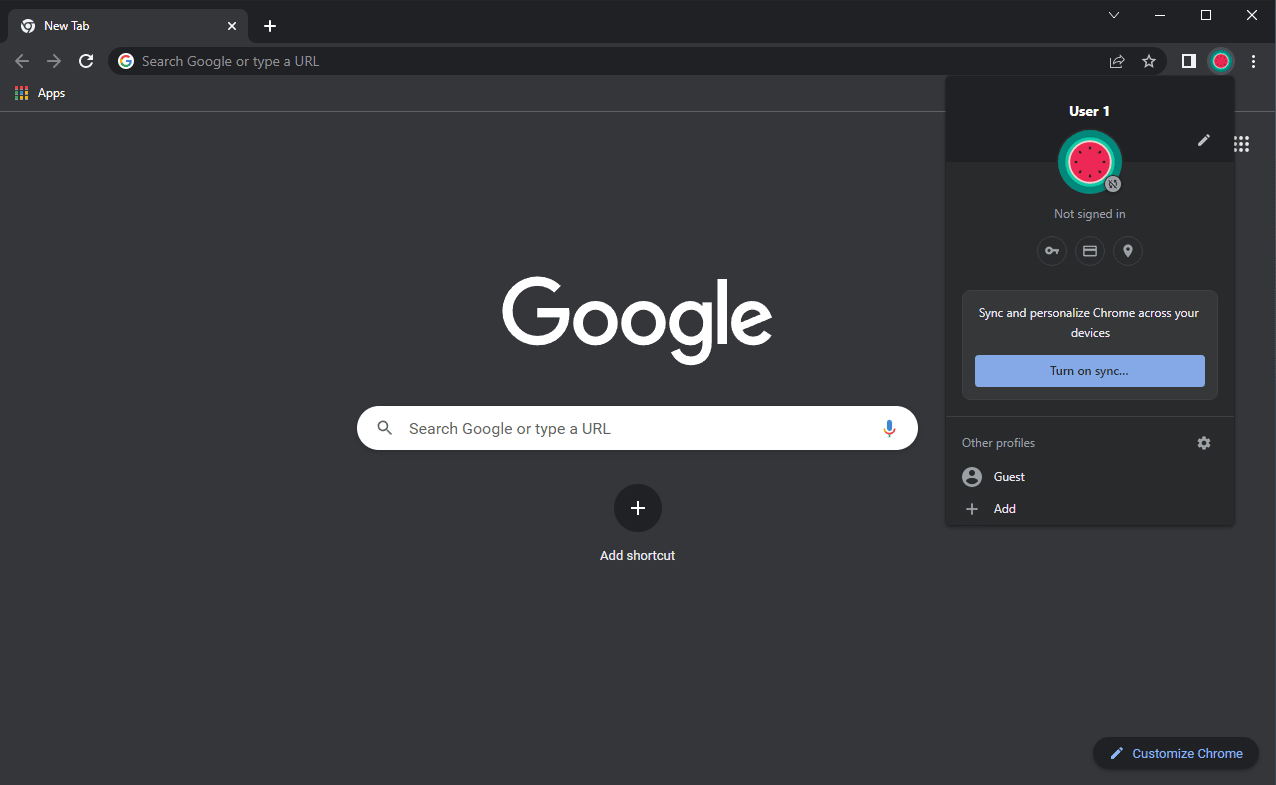
- In the Settings tab, scroll down and click on “Sync and Google services.”
- Make sure the toggle switch next to “Sync your Chrome data” is turned on.
- Sign in to your Google account. If you don’t have a Google account, you’ll need to create one in order to use Chrome Sync.
- Select the data you want to sync. To sync your extensions, make sure the “Extensions” box is checked.
- Click on the “Sync” button. Chrome will start syncing your selected data, including your extensions, to your Google account.
Once you’ve completed these steps on one computer, repeat them on any other devices you want to sync with. It’s important to use the same Google account across all your devices to ensure seamless synchronization.
By setting up Chrome Sync, you’re now ready to enable extension synchronization and enjoy the convenience of having your favorite extensions available on all your devices!
Enabling Extension Sync
Now that you’ve set up Chrome Sync on your devices, it’s time to enable extension synchronization so that your favorite extensions are automatically installed and updated on all your computers. Follow these steps to enable extension sync:
- Open Google Chrome on one of your synced devices.
- Click on the three-dot menu at the top-right corner of the window and select “Settings.”
- In the Settings tab, click on “Sync and Google services.”
- Make sure the toggle switch next to “Extensions” is turned on.
- Chrome will start syncing your extensions to your Google account. This process may take a few moments, especially if you have a large number of extensions.
- Repeat these steps on your other synced devices to ensure that extension sync is enabled on all of them.
Once you’ve enabled extension sync, any new extensions you install or existing extensions you update will be automatically synced across all your devices. This means that you won’t have to manually install or update your extensions every time you switch computers, saving you time and effort.
Note that some extensions may require additional permissions or settings that need to be configured individually on each device. Make sure to review the settings of each extension and adjust them according to your preferences.
Now that you have successfully enabled extension sync, you can enjoy a seamless experience with your favorite Chrome extensions, knowing that they will always be in sync across all your devices!
Manually Syncing Extensions
While Chrome Sync automatically takes care of syncing your extensions across devices, there may be instances where you want to initiate a manual sync. This can be useful if you’ve made changes to your extensions on one computer and want to ensure those changes are reflected on your other devices. To manually sync your extensions, follow these steps:
- Open Google Chrome on the device where you’ve made changes to your extensions.
- Click on the three-dot menu at the top-right corner of the window and select “Settings.”
- In the Settings tab, click on “Sync and Google services.”
- Scroll down to the “Sync” section and click on the “Sync Now” button.
Chrome will start the manual sync process and update your extensions across all synced devices. It may take a few moments for the changes to be reflected on each device, especially if you have a large number of extensions or slow internet connection.
This manual sync option is particularly useful if you’ve installed a new extension on one device and want it to be available immediately on your other devices. It ensures that all your devices stay in sync, providing a consistent browsing experience across the board.
Remember that manual syncing only applies to the changes you’ve made to your extensions. Other synced data, such as bookmarks and history, will continue to be automatically synced by Chrome Sync.
By taking advantage of the manual sync feature, you can ensure that your extensions are always up to date and consistent across all your devices, helping you work and browse efficiently.
Troubleshooting Sync Issues
While Chrome Sync is designed to work seamlessly, there may be instances where you encounter sync issues with your extensions. Here are some common troubleshooting steps you can take to resolve these issues:
- Check your internet connection: Ensure that you have a stable internet connection on all your devices. Syncing requires a reliable internet connection to transfer data between devices.
- Sign out and sign back in: Sometimes, signing out of your Google account and signing back in can resolve sync issues. To do this, open Chrome Settings, click on “Sync and Google services,” and then click on “Turn off” under your account. After a few moments, sign back in to your account.
- Update Chrome and extensions: Ensure that you’re using the latest version of Google Chrome on all your devices. Also, check for any available updates for your extensions and install them to ensure compatibility.
- Check extension permissions: Some extensions may require certain permissions to function correctly. Make sure to review the permissions of each extension and grant the necessary access for them to sync properly.
- Disable conflicting extensions: Sometimes, extensions with conflicting functionalities can cause sync issues. Temporarily disable all extensions except for the ones you want to sync, and then enable them one by one to identify any conflicts.
- Clear Chrome data: If all else fails, you can try clearing your browsing data. Go to Chrome Settings, click on “Privacy and security,” and select “Clear browsing data.” Make sure to select “Sync data” and clear it. Keep in mind that this will clear all your synced data, so ensure you have a backup if there’s any important information.
If you’ve followed these troubleshooting steps and are still experiencing sync issues with your extensions, you may need to seek further assistance. Visit the Chrome Help Center or community forums to find answers to specific sync-related questions or contact Google support for personalized assistance.
Remember that syncing your extensions across devices requires a stable internet connection and proper configuration. By troubleshooting any sync issues that arise, you can ensure a smooth experience and enjoy the benefits of having your favorite extensions available on all your computers.
Conclusion
Syncing your Chrome extensions across computers can greatly enhance your browsing experience by seamlessly transferring your favorite extensions from one device to another. With Chrome Sync, you can easily set up and enable extension synchronization, ensuring that your extensions are always up to date and readily available on all your devices.
In this article, we explored the process of setting up Chrome Sync, enabling extension sync, manually syncing extensions, and troubleshooting any sync issues that may arise. By following these steps, you can save time and effort by not having to individually install and update your extensions on each computer you use.
Remember to use the same Google account across all your devices, review extension permissions, and keep your Chrome and extensions updated to ensure smooth syncing. And if you encounter any issues, try troubleshooting steps such as signing out and signing back in, disabling conflicting extensions, or clearing your browsing data.
Now you have the knowledge to effortlessly sync your Chrome extensions across computers, enabling you to have a consistent browsing experience and access to your favorite tools no matter which device you’re using. Enjoy the convenience and efficiency that Chrome Sync provides, and make the most out of your browsing experience!