Introduction
Google Chrome is a powerful and versatile web browser that offers a wide range of features and customization options to enhance your browsing experience. One of the key elements that users can personalize is the extensions and toolbars that are added to the browser. While these can be incredibly useful, sometimes unwanted toolbars can find their way into your Chrome browser, cluttering your interface and slowing down your browsing experience. If you've found yourself in this situation, fret not, as removing an unwanted toolbar from Google Chrome is a straightforward process.
In this guide, we will walk you through the step-by-step process of removing a toolbar from Google Chrome. Whether it's a toolbar that you inadvertently installed or one that came bundled with another software, we've got you covered. By the end of this tutorial, you'll have the knowledge and confidence to declutter your Chrome browser and optimize it to suit your specific needs.
So, if you're ready to regain control of your browsing environment and bid farewell to that pesky toolbar, let's dive into the simple yet effective methods for removing it from Google Chrome.
Step 1: Open Google Chrome
To begin the process of removing an unwanted toolbar from Google Chrome, the first step is to open the browser itself. You can do this by locating the Google Chrome icon on your desktop, taskbar, or in your list of installed applications. Once you've located the icon, simply double-click on it to launch the browser.
Alternatively, if you're using a Windows computer, you can open Google Chrome by clicking on the Windows Start button, typing "Chrome" into the search bar, and selecting the Google Chrome application from the search results. If you're using a Mac, you can open Chrome by clicking on the Launchpad icon in the Dock, searching for "Chrome," and then clicking on the Chrome icon.
Upon launching Google Chrome, you'll be greeted by the familiar interface, featuring the address bar, tabs, and various menu options. Take a moment to ensure that Chrome has fully loaded and is ready for use before proceeding to the next step.
Opening Google Chrome is the essential first step in the process of removing an unwanted toolbar, as it provides the foundation for accessing the necessary settings and options within the browser. With Google Chrome now open and ready, you're all set to move on to the next step in the process of removing the unwanted toolbar from your browser.
Now that Google Chrome is up and running, let's proceed to the next step to continue the process of removing the unwanted toolbar from your browser.
Step 2: Access the Chrome Menu
Accessing the Chrome menu is a crucial step in the process of removing an unwanted toolbar from your browser. The Chrome menu, located in the top-right corner of the browser window, contains a plethora of options and settings that allow you to customize and manage your browsing experience. Here's how you can access the Chrome menu:
-
Look to the top-right corner of the Chrome window, where you'll find three vertically-aligned dots. This is the Chrome menu icon.
-
Click on the Chrome menu icon to reveal a dropdown menu containing various options and settings for the browser.
-
Upon clicking the menu icon, you'll see a list of options, including "New tab," "New window," "History," "Downloads," "Bookmarks," "Zoom," "Settings," and more.
Accessing the Chrome menu is the gateway to a wide array of features and settings that empower you to take control of your browsing environment. From managing extensions to adjusting privacy and security settings, the Chrome menu serves as a central hub for customizing your browsing experience.
By accessing the Chrome menu, you're one step closer to removing the unwanted toolbar from your browser. The next step will guide you through the process of navigating to the Extensions menu, where you can manage and remove the unwanted toolbar with ease.
With the Chrome menu now accessible, let's move on to the next step to continue the process of removing the unwanted toolbar from your browser.
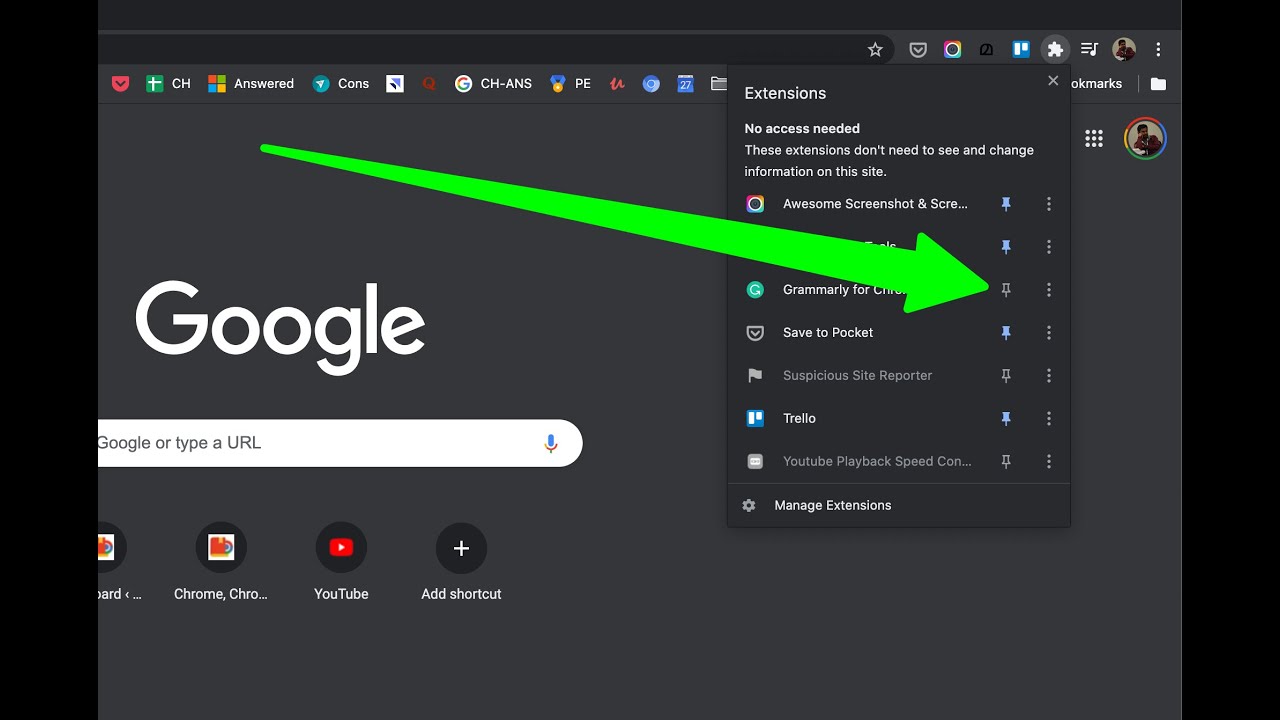
Step 3: Select "More Tools" and then "Extensions"
Once you have accessed the Chrome menu, the next step in removing an unwanted toolbar from Google Chrome is to navigate to the "More Tools" menu and then proceed to the "Extensions" section. This is where you'll find a comprehensive list of all the extensions installed in your browser, including the unwanted toolbar that you aim to remove. Here's a detailed guide on how to accomplish this essential step:
-
After accessing the Chrome menu, hover your cursor over the "More Tools" option in the dropdown menu. This action will reveal a secondary menu containing additional tools and features to enhance your browsing experience.
-
From the expanded "More Tools" menu, click on the "Extensions" option. This will direct you to the Extensions page, where you can view all the extensions currently installed in your Google Chrome browser.
-
Upon entering the Extensions page, you'll be presented with a list of all the extensions, including the unwanted toolbar that you wish to remove. Each extension will be accompanied by its respective icon, name, and a brief description of its functionality.
Navigating to the "More Tools" menu and then proceeding to the "Extensions" section is a pivotal step in the process of removing an unwanted toolbar from Google Chrome. This section serves as the central hub for managing and customizing the extensions installed in your browser, providing you with the necessary tools to declutter your browsing environment and optimize Chrome to suit your preferences.
With the "More Tools" and "Extensions" sections now accessible, you're well on your way to removing the unwanted toolbar from your Google Chrome browser. The subsequent steps will guide you through the process of identifying and removing the specific toolbar, ensuring that your browsing experience remains streamlined and tailored to your needs.
Now that you've successfully accessed the "More Tools" and "Extensions" sections, let's proceed to the next step to continue the process of removing the unwanted toolbar from your browser.
Step 4: Remove the Unwanted Toolbar
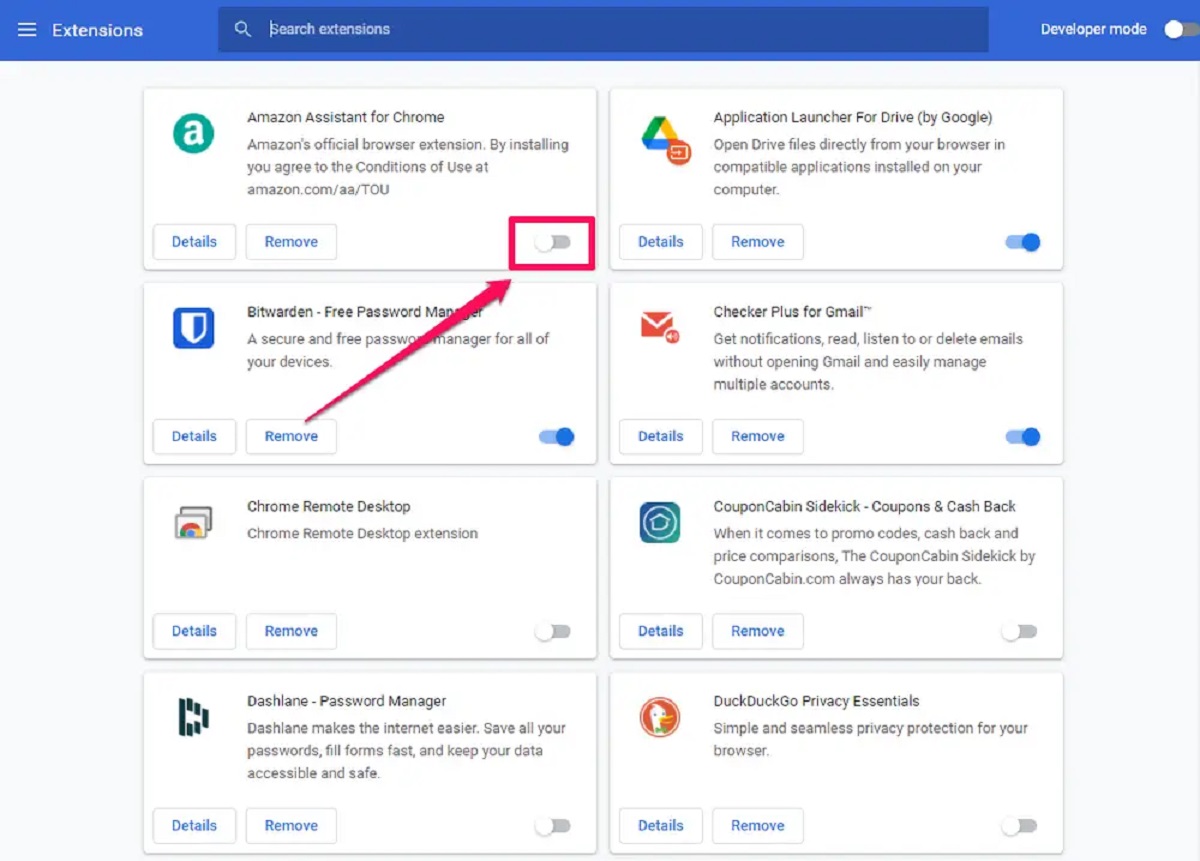
Now that you've accessed the "Extensions" page within Google Chrome, it's time to pinpoint the unwanted toolbar and proceed with its removal. Follow these steps to effectively remove the unwanted toolbar from your browser:
-
Identify the Unwanted Toolbar: Scan through the list of installed extensions to locate the unwanted toolbar. It's essential to accurately identify the toolbar to ensure that you remove the correct extension. Look for the toolbar's name or icon, and take note of any additional information that can help you distinguish it from other extensions.
-
Disable the Unwanted Toolbar: Before completely removing the unwanted toolbar, you have the option to temporarily disable it. This can be useful if you're uncertain about removing the toolbar permanently and want to assess the impact of its absence on your browsing experience. To disable the toolbar, simply toggle the switch or uncheck the box next to the extension's name. This action will deactivate the toolbar without uninstalling it.
-
Remove the Unwanted Toolbar: If you're certain about removing the unwanted toolbar permanently, proceed with the removal process. Locate the unwanted toolbar in the list of extensions and click on the "Remove" or "Trash" icon associated with the toolbar. A confirmation dialog may appear to ensure that you intend to remove the extension. Confirm the removal, and the unwanted toolbar will be uninstalled from your browser.
-
Restart Google Chrome: After removing the unwanted toolbar, it's advisable to restart Google Chrome to allow the changes to take effect. Close the browser and relaunch it to ensure that the toolbar has been successfully removed. Upon restarting, verify that the unwanted toolbar is no longer present in your browser interface.
By following these steps, you can effectively remove the unwanted toolbar from Google Chrome, decluttering your browsing environment and optimizing the browser to align with your preferences. With the unwanted toolbar successfully removed, you can enjoy a streamlined and personalized browsing experience, free from unnecessary clutter and distractions.
Now that you've removed the unwanted toolbar from your browser, you've taken a significant step towards optimizing your browsing environment. Let's conclude by ensuring that the removal process has been successful and that your Google Chrome browser is now free from the unwanted toolbar.
Step 5: Confirm Removal
After removing the unwanted toolbar from your Google Chrome browser, it's essential to confirm that the removal process has been successful. This step ensures that the browser is free from the unwanted toolbar and that your browsing experience remains optimized and clutter-free. Here's how you can confirm the successful removal of the unwanted toolbar:
-
Visual Verification: Upon restarting Google Chrome, visually inspect the browser interface to ensure that the unwanted toolbar is no longer present. Check the area where the toolbar was previously located and verify that it has been removed. Additionally, scan through the browser's toolbar and extension areas to confirm that the unwanted toolbar's icon and associated features are no longer visible.
-
Functional Assessment: Navigate through various web pages and tabs within Google Chrome to assess the impact of the toolbar's removal on your browsing experience. Verify that the removal of the unwanted toolbar has not caused any adverse effects on the browser's functionality or performance. Pay attention to the browser's responsiveness, loading times, and overall usability to ensure that the removal process has not introduced any unexpected issues.
-
Extension Management: Return to the Extensions page within Google Chrome to review the list of installed extensions. Confirm that the unwanted toolbar is no longer listed among the active extensions. This serves as a secondary verification to ensure that the removal process was successful and that the unwanted toolbar has been permanently uninstalled from the browser.
By confirming the successful removal of the unwanted toolbar, you can rest assured that your Google Chrome browser is now free from unnecessary clutter and optimized to align with your preferences. This step provides peace of mind and ensures that your browsing experience remains streamlined and tailored to your specific needs.
With the removal of the unwanted toolbar confirmed, you've successfully decluttered your Google Chrome browser and regained control of your browsing environment. By following the step-by-step process outlined in this guide, you've empowered yourself to manage and customize the extensions in your browser, allowing you to create a personalized and efficient browsing experience.
Now that you've confirmed the removal of the unwanted toolbar, you can enjoy a clutter-free and optimized browsing experience within Google Chrome.
Conclusion
Congratulations! By following the step-by-step guide outlined in this tutorial, you have successfully removed the unwanted toolbar from your Google Chrome browser. This accomplishment marks a significant milestone in reclaiming control of your browsing environment and optimizing your Chrome experience to align with your preferences.
The process of removing the unwanted toolbar involved accessing the Chrome menu, navigating to the Extensions section, identifying the unwanted toolbar, and proceeding with its removal. By following these steps, you have effectively decluttered your browser interface, ensuring that it remains streamlined and free from unnecessary distractions.
As you confirm the successful removal of the unwanted toolbar, take a moment to appreciate the enhanced browsing experience that awaits you. With the clutter removed, you can navigate through web pages and tabs within Google Chrome with improved efficiency and focus, allowing you to make the most of your online activities.
It's important to note that the ability to manage and customize extensions in Google Chrome empowers you to tailor the browser to suit your specific needs. Whether it's removing unwanted toolbars, disabling unnecessary extensions, or exploring new add-ons to enhance your browsing experience, the Extensions page serves as a central hub for optimizing Chrome to align with your preferences.
Moving forward, remember that the process of removing unwanted toolbars from Google Chrome can be applied whenever the need arises. Whether it's addressing inadvertently installed toolbars or removing those that come bundled with other software, you now possess the knowledge and confidence to manage extensions effectively.
By taking control of your browsing environment and customizing Google Chrome to suit your preferences, you are poised to enjoy a personalized and efficient browsing experience. As you navigate through the web, your decluttered browser interface will provide a seamless and distraction-free environment, allowing you to focus on the content that matters most to you.
With the unwanted toolbar successfully removed, you can now explore the full potential of Google Chrome, leveraging its features and customization options to create a browsing experience that reflects your unique preferences and priorities.
Embrace the optimized browsing experience that awaits you, and rest assured that you have the knowledge and capability to manage extensions and customize your Google Chrome browser effectively. Here's to a clutter-free and personalized browsing journey within Google Chrome!