Introduction
Granting microphone access to Google Chrome on your Mac can significantly enhance your browsing experience. Whether you're engaging in video calls, recording audio, or using voice commands, enabling this feature allows you to seamlessly interact with various web-based applications. By following a few simple steps, you can ensure that Chrome has the necessary permissions to utilize your Mac's microphone, empowering you to fully leverage the browser's capabilities.
In this guide, we will walk through the process of granting microphone access to Google Chrome on your Mac. By the end of this tutorial, you will have a clear understanding of how to navigate Chrome's settings to enable microphone access, ensuring that you can make the most of the browser's audio-related features. Whether you're a professional who relies on web-based communication tools or a casual user looking to optimize your browsing experience, this tutorial will equip you with the knowledge to seamlessly integrate your Mac's microphone with Google Chrome.
Let's dive into the steps that will enable you to grant microphone access to Google Chrome on your Mac, allowing you to harness the full potential of this popular web browser.
Step 1: Open Google Chrome
To begin the process of granting microphone access to Google Chrome on your Mac, you first need to launch the browser. Here's a step-by-step guide to help you open Google Chrome effortlessly:
-
Locate the Google Chrome Icon: Look for the Google Chrome icon on your Mac's desktop, dock, or applications folder. The icon typically features a red, yellow, and green circle.
-
Click on the Google Chrome Icon: Once you've located the Google Chrome icon, simply click on it to launch the browser. This action will initiate the opening of Google Chrome, allowing you to proceed to the next steps in the process.
-
Wait for Google Chrome to Load: After clicking on the icon, give the browser a few moments to load. Depending on your Mac's processing speed and internet connection, Google Chrome should open within a few seconds.
-
Verify the Browser Window: Once Google Chrome has loaded, you should see the browser window appear on your screen. This window will serve as the platform from which you can access the necessary settings to enable microphone access.
By following these straightforward steps, you can easily open Google Chrome on your Mac, setting the stage for the subsequent actions required to grant microphone access. With the browser now launched, you're ready to move on to the next step in the process, which involves accessing Chrome's settings to enable microphone access.
Step 2: Access Chrome Settings
Accessing Chrome settings is a crucial step in the process of granting microphone access to Google Chrome on your Mac. By navigating through the browser's settings, you can locate the specific permissions section where you can enable microphone access. Here's a detailed guide on how to access Chrome settings on your Mac:
-
Locate and Click on the Three-Dot Menu: At the top-right corner of the Google Chrome window, you'll find a three-dot menu icon. Click on this icon to reveal a dropdown menu containing various options and settings for the browser.
-
Select "Settings" from the Dropdown Menu: Once you click on the three-dot menu, a dropdown list will appear. Scroll down and select the "Settings" option. This action will redirect you to the main settings page within Google Chrome.
-
Navigate to "Privacy and Security": Within the Settings page, you'll find a list of categories on the left-hand side. Look for the category labeled "Privacy and Security" and click on it to expand the options within this section.
-
Choose "Site Settings": After accessing the "Privacy and Security" category, you'll see a range of options related to site permissions. Click on "Site Settings" to delve into the specific permissions that can be managed for websites you visit using Google Chrome.
-
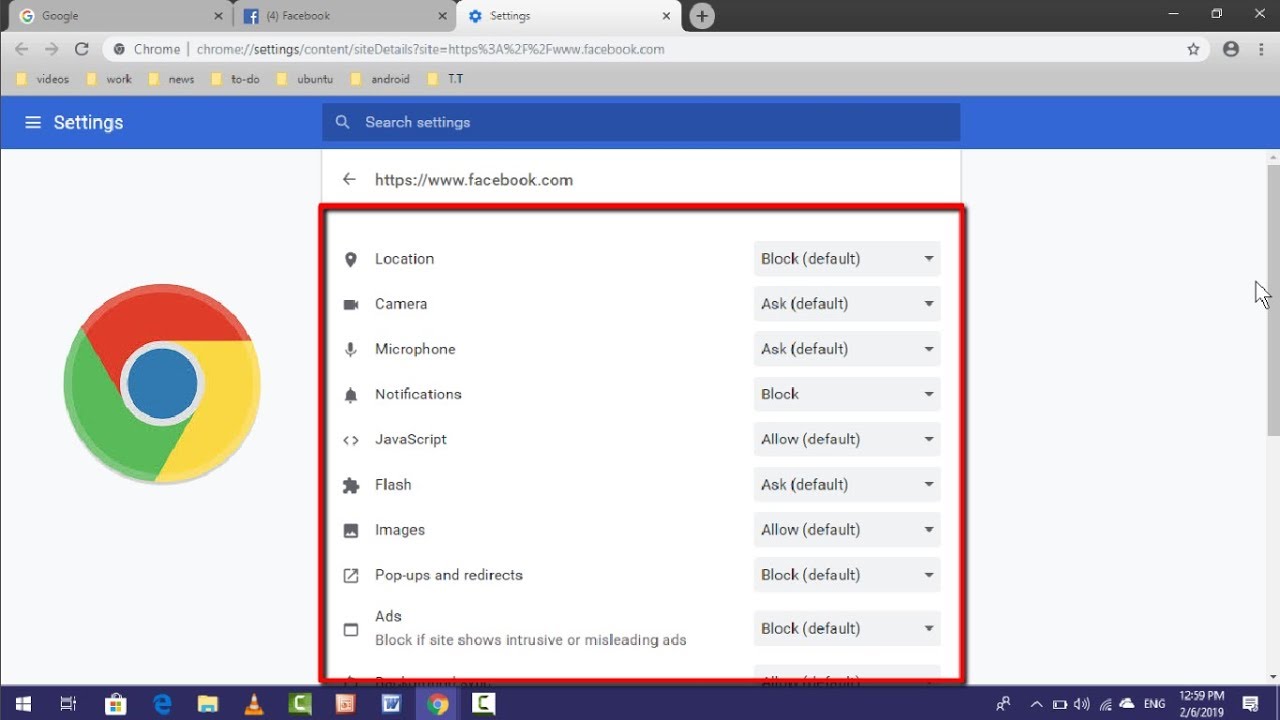
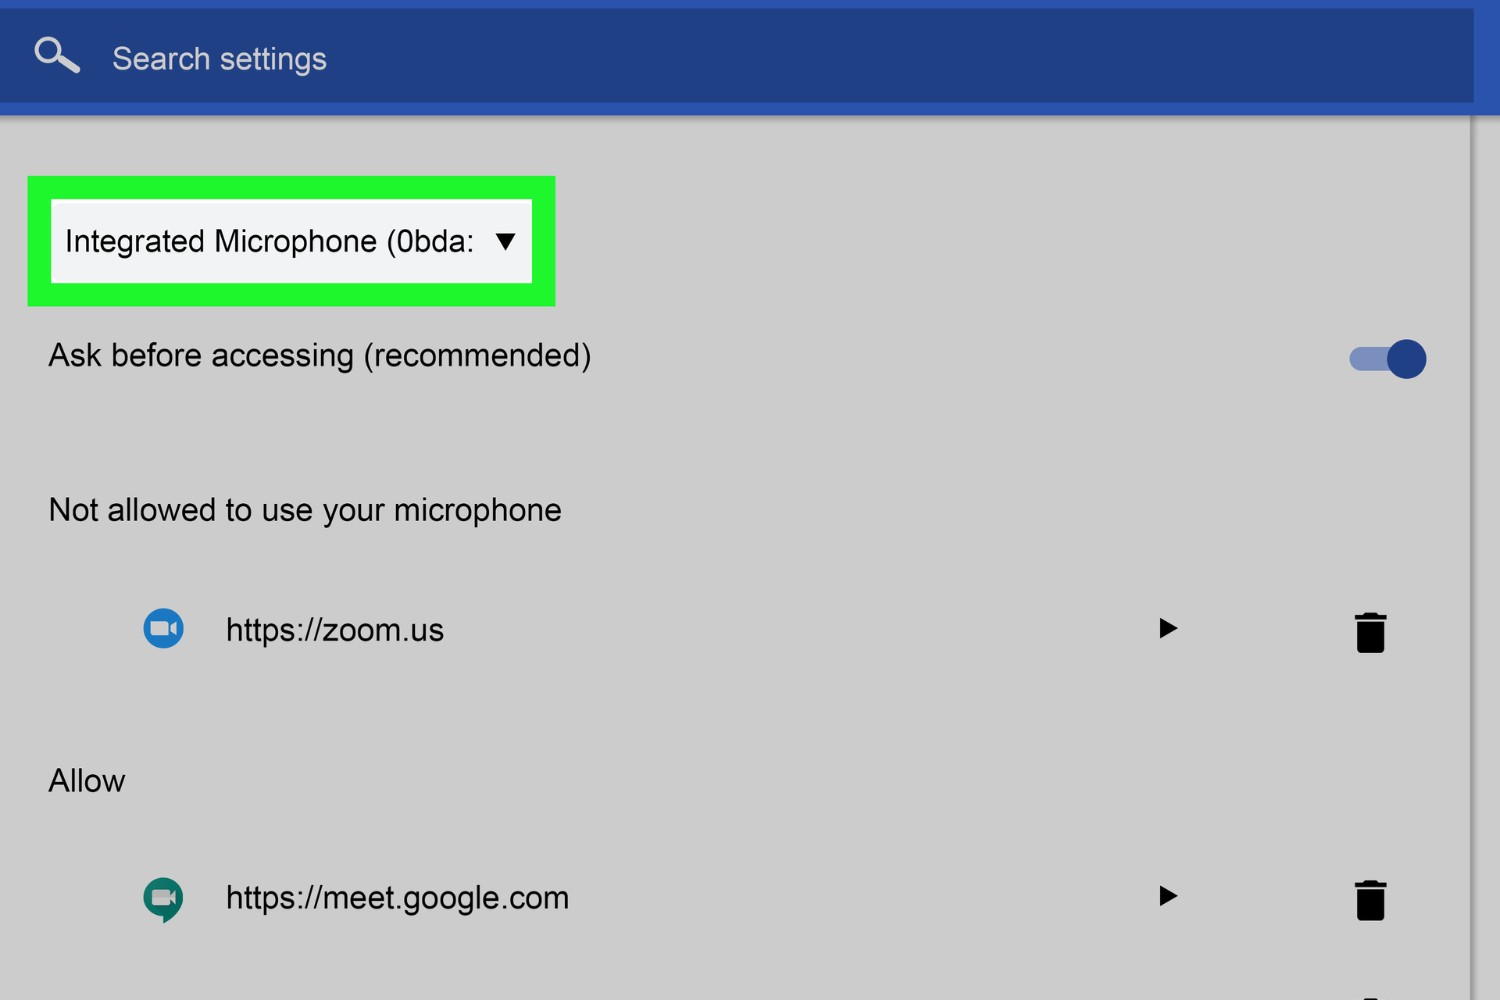
Locate "Microphone" Settings: Within the Site Settings, scroll down until you find the "Microphone" section. This is where you can manage the microphone permissions for websites visited through Google Chrome.
By following these steps, you can successfully access Chrome settings on your Mac, positioning yourself to proceed to the next crucial step of granting microphone access within the browser. With the settings now within reach, you're ready to navigate to the specific section where you can enable microphone access, as outlined in the subsequent step.
Step 3: Grant Microphone Access
Granting microphone access to Google Chrome on your Mac involves navigating to the specific settings that govern permissions for the browser. Once you've accessed Chrome's settings, you can proceed to enable microphone access, empowering the browser to utilize your Mac's microphone for various web-based activities.
Within the "Microphone" section of Chrome's Site Settings, you'll encounter the controls that dictate which websites can access your microphone. Here's a detailed guide on how to grant microphone access to Google Chrome on your Mac:
-
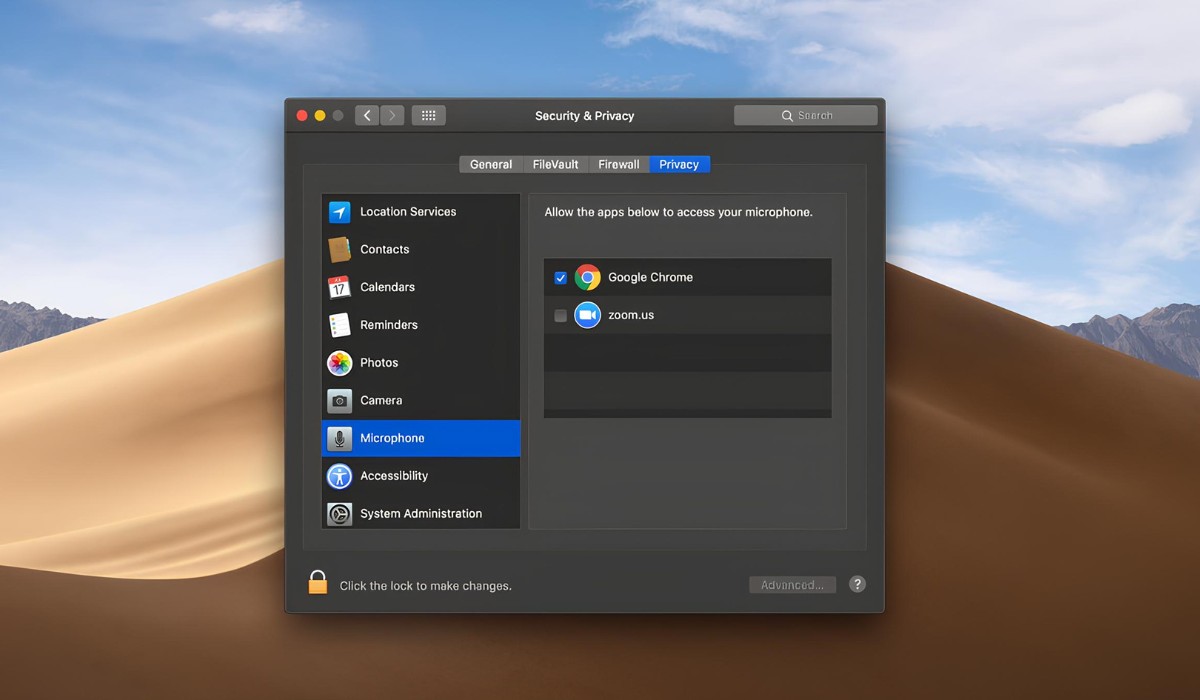
Enable Microphone Access: Upon reaching the "Microphone" section within Chrome's Site Settings, you'll find a toggle switch that allows you to enable or disable microphone access. To grant Google Chrome access to your Mac's microphone, simply toggle the switch to the "On" position. This action signifies your consent for websites visited through Chrome to utilize your microphone for audio input.
-
Manage Individual Site Permissions: In addition to enabling overall microphone access, Chrome provides the flexibility to manage permissions on a per-site basis. By clicking on the "Add" button next to the "Block" section, you can manually add websites and choose to grant or block their access to your microphone. This granular control ensures that you can tailor microphone permissions based on your preferences and the specific websites you interact with.
-
Review and Adjust Permissions: After enabling microphone access and managing individual site permissions, it's essential to review and adjust these settings periodically. As you navigate various websites and engage in diverse online activities, you may encounter scenarios where you need to modify microphone permissions for specific sites. By revisiting Chrome's Site Settings and the "Microphone" section, you can easily review and adjust permissions to align with your evolving usage patterns.
By following these steps, you can effectively grant microphone access to Google Chrome on your Mac, ensuring that the browser has the necessary permissions to utilize your Mac's microphone for a wide range of web-based functionalities. With microphone access enabled, you can seamlessly engage in video calls, record audio, participate in online meetings, and leverage voice commands within compatible web applications, enhancing your overall browsing experience.
Step 4: Test Microphone Access
After granting microphone access to Google Chrome on your Mac, it's crucial to verify that the browser can effectively utilize your Mac's microphone for various audio-related tasks. Testing microphone access allows you to ensure that the permissions you've enabled are functioning as intended, providing you with the confidence to engage in seamless audio interactions within the browser.
Here's a detailed guide on how to test microphone access within Google Chrome:
-
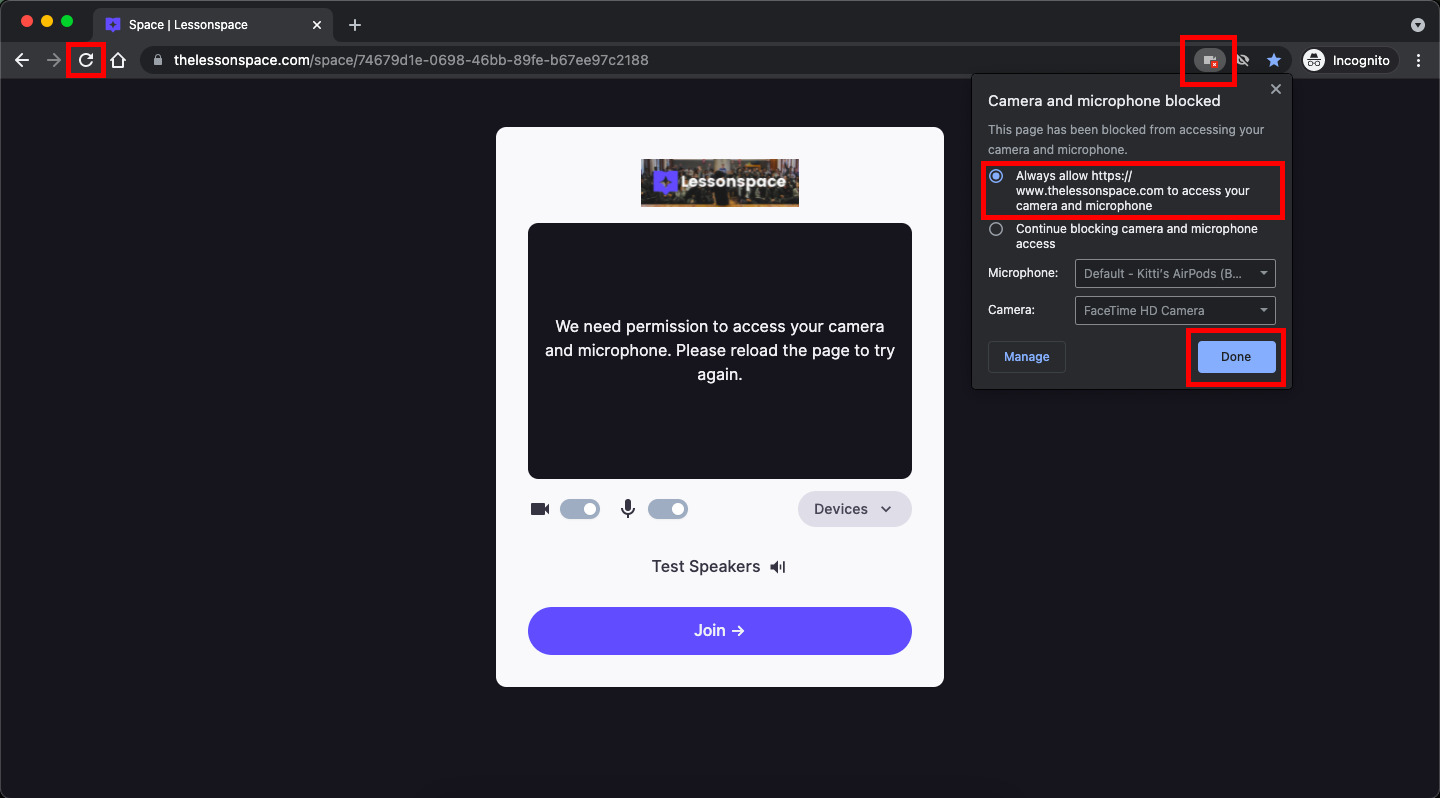
Access a Web-Based Audio Application: To initiate the testing process, navigate to a web-based audio application or website that requires microphone input. This could include video conferencing platforms, online voice recorders, or interactive web applications that utilize voice commands. By accessing such a platform, you can create an environment where Chrome's microphone access will be utilized.
-
Initiate an Audio Input Task: Once you're within the web-based audio application, initiate an audio input task that requires microphone usage. This could involve joining a test video call, recording a brief audio snippet, or engaging with voice commands within the web application's interface. By actively engaging in an audio input task, you can assess whether Google Chrome effectively utilizes your Mac's microphone based on the permissions you've granted.
-
Verify Audio Input Functionality: As you perform the audio input task, pay close attention to the functionality of your Mac's microphone within the web-based application. Verify that the microphone successfully captures and transmits audio input, allowing you to participate in the intended audio interactions without any impediments. This verification step serves as a practical assessment of Chrome's microphone access, confirming that the browser seamlessly integrates with your Mac's audio input capabilities.
-
Adjust Settings if Necessary: If you encounter any issues during the testing process, such as the microphone not capturing audio or encountering compatibility issues within the web-based application, it may be necessary to revisit Chrome's settings to ensure that microphone access is configured optimally. By revisiting the Site Settings and the specific microphone permissions, you can make adjustments to address any issues that arise during the testing phase, ensuring that Chrome's microphone access aligns with your usage requirements.
By following these steps, you can effectively test microphone access within Google Chrome on your Mac, validating that the browser seamlessly integrates with your Mac's microphone for a wide range of audio-related tasks. This testing process provides you with the assurance that Chrome's microphone access functions reliably, empowering you to engage in diverse audio interactions within the browser with confidence.
Conclusion
In conclusion, the process of granting microphone access to Google Chrome on your Mac is a pivotal step in optimizing your browsing experience. By following the outlined steps, you can seamlessly navigate Chrome's settings to enable microphone access, empowering the browser to utilize your Mac's audio input capabilities for a diverse range of web-based activities.
Upon successfully granting microphone access, you gain the ability to engage in video calls, record audio, participate in online meetings, and leverage voice commands within compatible web applications, all within the familiar and user-friendly environment of Google Chrome. This integration of your Mac's microphone with the browser's functionalities enhances your overall online interactions, whether for professional communication, personal productivity, or entertainment purposes.
Furthermore, the granular control provided by Chrome's microphone permissions allows you to manage individual site access, ensuring that you can tailor microphone permissions based on your preferences and the specific websites you interact with. This flexibility empowers you to maintain a secure and personalized browsing environment while harnessing the full potential of audio-related features offered by Google Chrome.
The testing phase serves as a practical validation of Chrome's microphone access, allowing you to verify that the browser seamlessly integrates with your Mac's audio input capabilities. This verification step provides you with the assurance that Chrome's microphone access functions reliably, enabling you to engage in diverse audio interactions within the browser with confidence.
By understanding and implementing the process of granting microphone access to Google Chrome on your Mac, you not only enhance your browsing experience but also unlock the full spectrum of audio-related functionalities offered by the browser. Whether you're a professional relying on web-based communication tools, an enthusiast engaging in online collaborations, or an individual seeking seamless audio interactions, the ability to grant microphone access to Google Chrome on your Mac empowers you to fully leverage the browser's capabilities.
In essence, by following the steps outlined in this guide, you have equipped yourself with the knowledge and practical insights to seamlessly integrate your Mac's microphone with Google Chrome, ensuring a seamless and enriched browsing experience that aligns with your audio-related needs and preferences.