Introduction
Changing the microphone on Google Chrome can significantly enhance your online communication experience. Whether you're engaging in video calls, recording audio, or participating in virtual meetings, having the ability to switch to a different microphone can be invaluable. Google Chrome, one of the most popular web browsers, offers a user-friendly interface that allows you to seamlessly adjust your microphone settings. By following a few simple steps, you can select the most suitable microphone for your needs and ensure clear and crisp audio input.
In this guide, we will walk you through the process of changing your microphone on Google Chrome. You will learn how to access the browser's settings, select the correct microphone from the available options, and test the new microphone to ensure it meets your requirements. Whether you're using Chrome for personal or professional purposes, having a clear understanding of how to change your microphone settings can greatly improve your online interactions.
By the end of this tutorial, you will be equipped with the knowledge and skills to effortlessly switch to a different microphone on Google Chrome. This newfound capability will empower you to tailor your audio input to specific scenarios, whether you're participating in virtual meetings, recording voice notes, or engaging in video calls with friends and colleagues. Let's dive into the step-by-step process of changing your microphone on Google Chrome and unlock the full potential of your online communication experience.
Step 1: Accessing Chrome Settings
Accessing Chrome settings to change your microphone is a straightforward process that begins with opening the browser's settings menu. Here's a detailed guide on how to access Chrome settings and navigate to the microphone section:
-
Open Google Chrome: Launch the Google Chrome browser on your computer or laptop. You can do this by clicking on the Chrome icon on your desktop or by searching for Chrome in your computer's applications.
-
Navigate to the Settings Menu: Once Chrome is open, look for the three vertical dots located at the top-right corner of the browser window. Click on these dots to open the Chrome menu.
-
Access Chrome Settings: In the Chrome menu, scroll down and locate the "Settings" option. Click on "Settings" to access the browser's settings page.
-
Navigate to Advanced Settings: Within the Settings page, scroll down to find the "Advanced" option located at the bottom of the page. Click on "Advanced" to reveal additional settings options.
-
Locate Content Settings: Under the "Privacy and security" section, you will find "Content settings." Click on "Content settings" to access a range of content-related options.
-
Select Microphone Settings: Within the Content settings, locate and click on the "Microphone" option. This will take you to the microphone settings page, where you can manage your microphone preferences.
By following these steps, you can easily access the microphone settings within Google Chrome. Once you have reached the microphone settings page, you will be able to select the microphone you wish to use for various online activities, such as video calls, voice recordings, and web conferences. This seamless process empowers you to customize your microphone settings according to your specific needs, ensuring optimal audio input during your online interactions.
Accessing Chrome settings to change your microphone is a fundamental step that sets the stage for refining your audio input preferences. With the ability to effortlessly navigate to the microphone settings page, you can take full control of your online communication experience and ensure that your chosen microphone aligns with your desired audio quality and performance.
Step 2: Selecting the Correct Microphone
After accessing the microphone settings within Google Chrome, the next crucial step is to select the correct microphone from the available options. This process allows you to choose the most suitable microphone for your online activities, ensuring clear and high-quality audio input. Here's a detailed guide on how to select the correct microphone within Google Chrome:
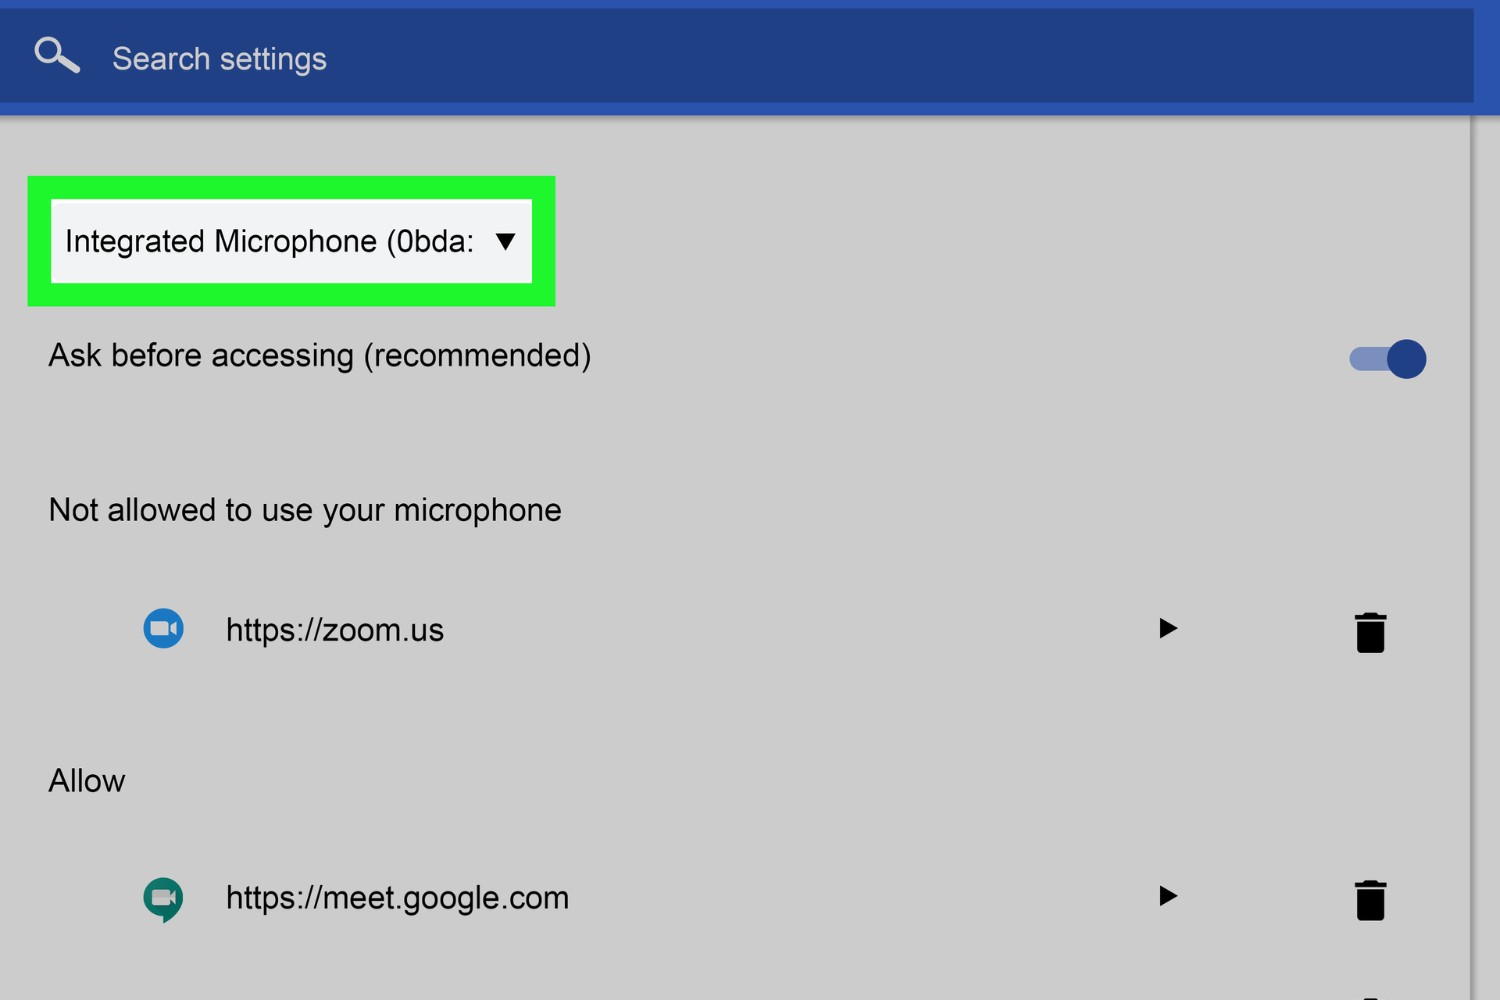
Identifying Available Microphones
Upon reaching the microphone settings page, you will be presented with a list of available microphones that are currently connected to your computer or laptop. These microphones may include built-in device microphones, external USB microphones, headset microphones, and other audio input devices that are compatible with your system. It's essential to identify and differentiate between these options to make an informed decision when selecting the correct microphone for your needs.
Choosing the Preferred Microphone
Carefully assess the available microphones and determine which one you intend to use for your online activities. Consider the specific characteristics and capabilities of each microphone, such as audio quality, noise cancellation features, and directional sensitivity. If you have multiple microphones connected to your device, Chrome allows you to designate a primary microphone for consistent use across various applications and websites. By selecting the preferred microphone, you ensure that your chosen audio input device aligns with your communication requirements and delivers the desired sound clarity.
Testing Microphone Input
Before finalizing your selection, it's advisable to test the microphone input to verify its functionality and performance within Google Chrome. The browser provides a convenient option to test your selected microphone, allowing you to speak into the device and observe the audio input levels. This testing phase enables you to confirm that the chosen microphone is capturing sound accurately and transmitting clear audio signals to the browser. By conducting this test, you can make any necessary adjustments or switch to an alternative microphone if the initial selection does not meet your expectations.
Confirming the Selection
Once you have identified, chosen, and tested the preferred microphone, you can proceed to confirm your selection within the Chrome settings. By confirming the chosen microphone, you establish it as the primary audio input device for your online interactions within the browser. This confirmation ensures that your selected microphone will be utilized consistently across various websites, applications, and communication platforms, providing a seamless and reliable audio input experience.
By following these steps, you can effectively select the correct microphone within Google Chrome, empowering you to tailor your audio input to specific scenarios and optimize your online communication experience. The ability to choose the most suitable microphone for your needs enhances the clarity and effectiveness of your voice input during video calls, voice recordings, and virtual meetings, contributing to a more engaging and productive online interaction environment.
Step 3: Testing the New Microphone
Testing the new microphone within Google Chrome is a crucial step that allows you to verify its functionality and performance before engaging in online activities that require clear and reliable audio input. By conducting a thorough microphone test, you can ensure that the selected device accurately captures your voice and delivers high-quality sound to the browser, contributing to a seamless and effective communication experience.
Accessing the Microphone Test
Upon selecting the preferred microphone within the Chrome settings, you can initiate the testing process to evaluate its audio input capabilities. Google Chrome provides a user-friendly interface that allows you to access the microphone test directly from the settings page. By clicking on the designated test option, you can activate the microphone and begin assessing its performance in real-time.
Speaking into the Microphone
Once the microphone test is initiated, speak into the selected microphone to generate audio input. It's advisable to articulate clear and distinct phrases to gauge the device's ability to capture your voice accurately. As you speak, observe the audio input levels displayed on the browser interface, which provide visual feedback on the sound intensity and clarity of the captured audio signals.
Monitoring Audio Input Levels
During the microphone test, pay close attention to the audio input levels to ensure that the microphone effectively captures your voice without distortion or significant background noise. The visual representation of audio input levels within Google Chrome allows you to assess the consistency and quality of the captured sound, enabling you to make informed decisions regarding the suitability of the selected microphone for your online communication needs.
Adjusting Microphone Settings (if necessary)
If you encounter any issues with the microphone test, such as low audio input levels, background noise interference, or distorted sound, you can utilize the microphone settings within Google Chrome to make necessary adjustments. Chrome offers configurable options to modify microphone sensitivity, noise cancellation settings, and input volume, allowing you to optimize the performance of the selected device based on the testing results.
Verifying Audio Clarity and Consistency
As you conduct the microphone test, focus on verifying the clarity and consistency of the captured audio. Ensure that your voice is accurately reproduced without significant deviations or disruptions, indicating that the selected microphone effectively translates your speech into clear and intelligible audio signals. By verifying the audio clarity and consistency during the test, you can ascertain the suitability of the chosen microphone for your online communication requirements.
By thoroughly testing the new microphone within Google Chrome, you can confidently assess its performance and suitability for various online activities, including video calls, voice recordings, and web conferences. The ability to verify the functionality and quality of the selected microphone through a comprehensive testing process empowers you to make informed decisions regarding your audio input preferences, ultimately enhancing the overall effectiveness and clarity of your online communication experience.
Conclusion
In conclusion, the ability to change the microphone on Google Chrome is a valuable feature that empowers users to customize their audio input preferences and enhance their online communication experience. By following the step-by-step process outlined in this guide, you can seamlessly access Chrome settings, select the correct microphone, and thoroughly test the new microphone to ensure optimal functionality and performance.
The process of accessing Chrome settings to change the microphone involves navigating through the browser's menu to reach the microphone settings page. This fundamental step sets the stage for refining your audio input preferences and grants you full control over your online communication experience. Once within the microphone settings, the ability to identify available microphones, choose the preferred device, and confirm the selection enables you to tailor your audio input to specific scenarios, such as video calls, voice recordings, and virtual meetings.
Selecting the correct microphone within Google Chrome is a crucial step that allows you to choose the most suitable audio input device for your online activities. By carefully assessing the available options and testing the microphone input, you can ensure that your chosen device aligns with your communication requirements and delivers clear and high-quality audio signals. This selection process empowers you to establish the chosen microphone as the primary audio input device within the browser, ensuring a consistent and reliable audio input experience across various websites and applications.
Thoroughly testing the new microphone within Google Chrome is essential to verify its functionality and performance before engaging in online activities that require clear and reliable audio input. By accessing the microphone test, speaking into the device, monitoring audio input levels, and verifying audio clarity and consistency, you can confidently assess the suitability of the selected microphone for video calls, voice recordings, and web conferences. This comprehensive testing process enables you to make informed decisions regarding your audio input preferences, ultimately enhancing the overall effectiveness and clarity of your online communication experience.
In essence, the ability to change the microphone on Google Chrome empowers users to tailor their audio input to specific needs, ensuring clear and high-quality sound during online interactions. By leveraging the step-by-step process outlined in this guide, you can optimize your microphone settings within Google Chrome and unlock the full potential of your online communication experience. Whether for personal or professional use, the flexibility to switch to a different microphone enhances the clarity and effectiveness of your voice input, contributing to a more engaging and productive online interaction environment.