Introduction
So, you've decided to bid farewell to Safari on your iPad. Whether you're looking to free up some space, streamline your browsing experience, or simply prefer an alternative browser, removing Safari is a straightforward process. In this guide, we'll walk you through the steps to delete the Safari app from your iPad. By the end of this tutorial, you'll have a clear understanding of how to remove Safari and potentially explore other browsing options that better suit your needs.
Deleting the Safari app from your iPad can be a liberating experience. It's akin to decluttering your digital space, allowing you to customize your device to align with your preferences. While Safari is a robust and user-friendly browser, there are numerous alternatives available, each with its own set of features and benefits. By removing Safari, you open the door to exploring these alternatives and finding the perfect fit for your browsing habits.
Whether you're a casual iPad user or a tech-savvy individual seeking to optimize your device, understanding how to delete the Safari app is a valuable skill. This knowledge empowers you to take control of your digital environment, tailoring it to your specific requirements. Additionally, by learning the steps to remove an app from your iPad, you gain a deeper understanding of the device's functionality, enhancing your overall user experience.
Now, let's delve into the step-by-step process of removing Safari from your iPad. By following these instructions, you'll be able to confidently navigate the settings and manage your apps, ensuring that your iPad reflects your individual preferences and usage patterns. Let's embark on this journey to declutter your device and explore the myriad of browsing options available to you.
Step 1: Locate the Safari App
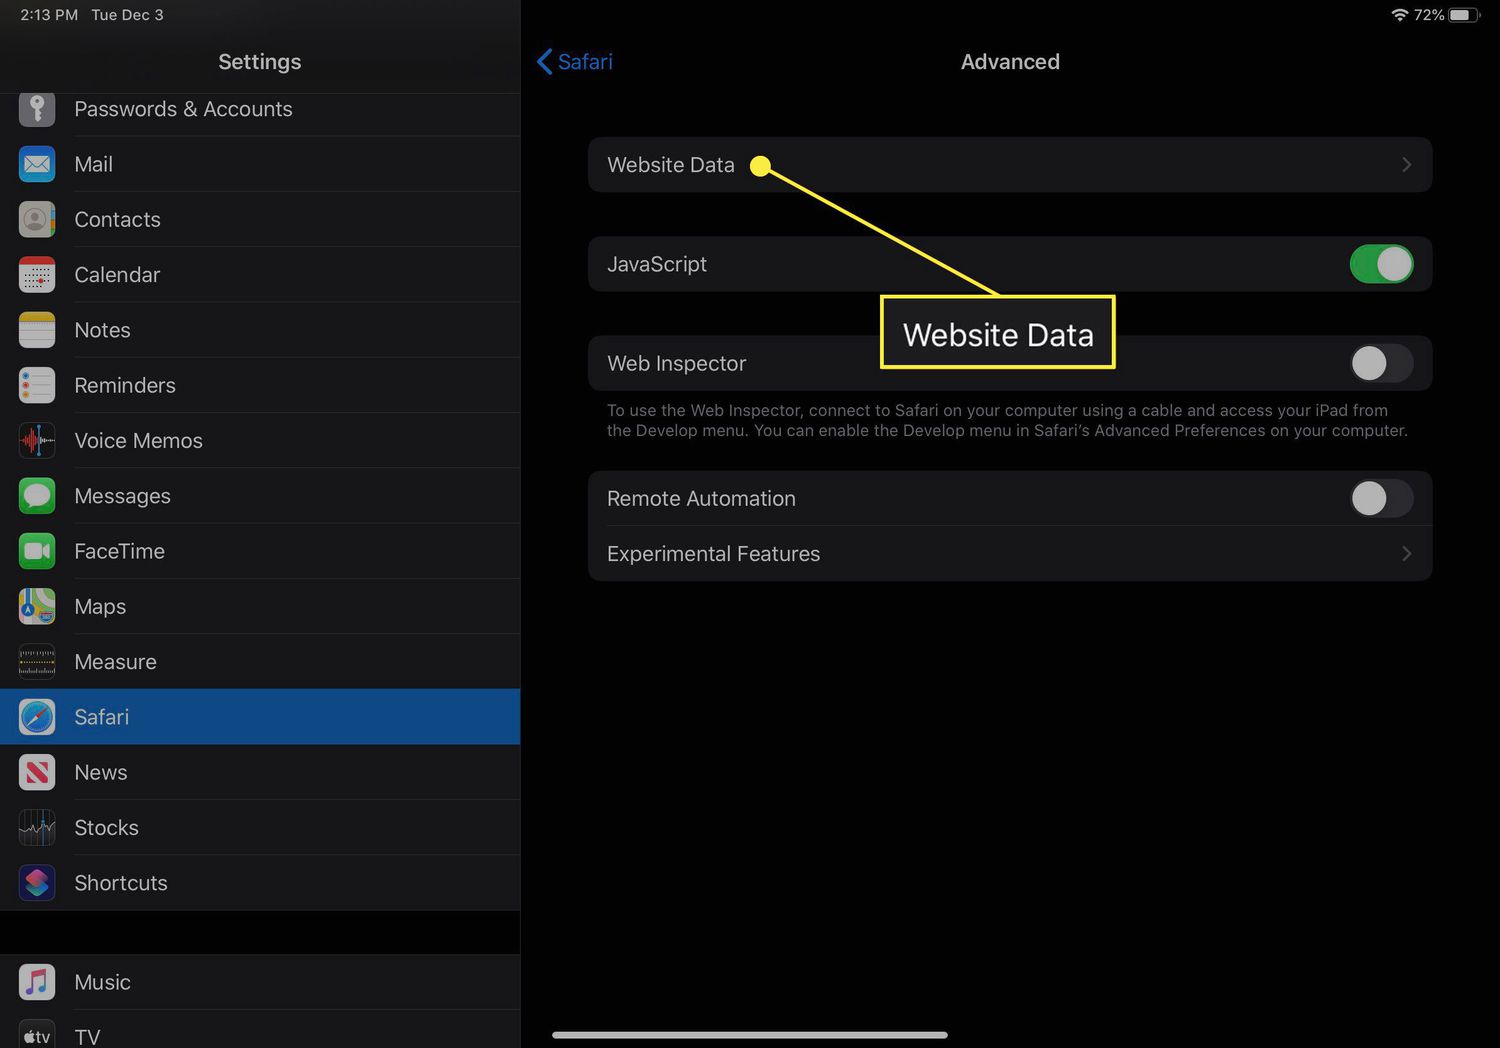
Locating the Safari app on your iPad is the first step towards removing it from your device. Safari is the default web browser on iPads, making it easily accessible from the home screen. To begin the process of deleting Safari, you'll need to pinpoint its location amidst the array of app icons on your iPad.
-
Navigate to the Home Screen: Upon unlocking your iPad, you'll find yourself on the home screen, adorned with a multitude of app icons. Take a moment to familiarize yourself with the layout, as the Safari app icon may be positioned among the various other apps.
-
Swipe Through App Pages: If you don't immediately spot the Safari app on the initial screen, swipe left or right to navigate through additional app pages. iPads can accommodate multiple pages of apps, so it's essential to thoroughly scan each page to locate the Safari icon.
-
Use the Search Feature: Alternatively, you can utilize the search feature by swiping down from the middle of the home screen. This action will reveal the search bar at the top of the screen. Type "Safari" into the search bar, and the iPad will display the app icon, allowing you to access it directly.
-
Spot the Compass Icon: The Safari app is represented by a compass icon, making it easily recognizable amidst the sea of app icons. Look for a blue compass with a red needle, which serves as the distinctive emblem of the Safari browser.
By following these steps, you'll successfully locate the Safari app on your iPad, setting the stage for the subsequent steps to remove it from your device. Once you've identified the Safari app, you can proceed to the next phase of the deletion process, ultimately customizing your iPad to align with your browsing preferences.
Step 2: Press and Hold the Safari App Icon
Once you've located the Safari app on your iPad, the next step is to initiate the deletion process by pressing and holding the Safari app icon. This action triggers the familiar app management interface, allowing you to proceed with removing the Safari browser from your device.
To press and hold the Safari app icon, simply follow these straightforward instructions:
-
Long-Press the Safari App Icon: Position your finger on the Safari app icon and press and hold it for a few seconds. As you do this, the app icons on the screen may start to wiggle slightly, indicating that you've activated the app management mode.
-
Wait for the Icons to Wiggle: When you press and hold the Safari app icon, the surrounding app icons will begin to wiggle, signifying that you've entered the app management mode. This visual cue confirms that you're now able to modify the arrangement of apps on your iPad.
-
Avoid Releasing Too Soon: It's important to maintain the press-and-hold action until the app icons start to wiggle. Releasing too soon may result in the app management interface not being activated, requiring you to repeat the process to access the necessary options.
-
Prepare for Customization: The wiggling app icons indicate that you're now in a position to customize your app layout, including the ability to delete apps from your iPad. This visual feedback serves as a prompt for you to proceed with the next steps in managing your apps.
By pressing and holding the Safari app icon, you've successfully activated the app management mode, setting the stage for the subsequent steps in the deletion process. This simple yet pivotal action paves the way for you to seamlessly navigate the app management interface and proceed with removing the Safari browser from your iPad.
Step 3: Tap "Delete App"
After successfully activating the app management mode by pressing and holding the Safari app icon, the next crucial step in removing Safari from your iPad is to tap the "Delete App" option. This action initiates the deletion process, allowing you to proceed with removing the Safari browser from your device.
To tap "Delete App," follow these straightforward instructions:
-
Locate the 'X' Icon: Upon entering the app management mode, you'll notice that each app icon displays a small 'X' symbol in the top-left corner. This 'X' serves as the visual indicator for deleting an app from your iPad. Locate the 'X' icon overlaid on the Safari app icon, signaling that you can proceed with the deletion process.
-
Tap the 'X' Icon: Position your finger over the 'X' icon on the Safari app and tap it. This action prompts the iPad to display a confirmation dialogue, ensuring that you intend to delete the Safari browser from your device. By tapping the 'X' icon, you're signaling your intent to remove the app, initiating the next phase of the deletion process.
-
Confirm the Deletion: Upon tapping the 'X' icon, the iPad will present a confirmation dialogue, typically asking if you want to delete the app and all its data. This step serves as a safeguard, preventing accidental deletions and ensuring that you consciously choose to remove the Safari browser from your iPad. To proceed with the deletion, tap the "Delete" option within the confirmation dialogue.
-
Wait for the Deletion Process: Once you've confirmed the deletion, the iPad will commence the removal process, erasing the Safari app and its associated data from your device. Depending on the app's size and the amount of data it contains, this process may take a few moments to complete. During this time, it's essential to allow the iPad to finalize the deletion, ensuring that the Safari browser is fully removed from your device.
By tapping "Delete App" and confirming the deletion, you've taken a decisive step towards removing the Safari browser from your iPad. This straightforward yet pivotal action sets the stage for the final phase of the deletion process, ultimately allowing you to customize your device and explore alternative browsing options that better align with your preferences.
Step 4: Confirm Deletion
After tapping the 'X' icon and signaling your intent to delete the Safari app from your iPad, the confirmation dialogue appears, ensuring that you consciously choose to proceed with the deletion. This crucial step serves as a safeguard, preventing accidental deletions and providing you with the opportunity to confirm your decision before finalizing the removal of the Safari browser from your device.
Upon the appearance of the confirmation dialogue, you'll typically encounter a message prompting you to confirm the deletion of the app and its associated data. This message serves as a final checkpoint, ensuring that you're fully aware of the consequences of removing the Safari browser from your iPad. It's essential to take a moment to review this message, reaffirming your decision to proceed with the deletion.
Once you've carefully considered the implications of removing the Safari app, the confirmation dialogue will typically present two options: "Delete" and "Cancel." The "Delete" option serves as the affirmative action, signaling your commitment to removing the app and its data from your device. On the other hand, the "Cancel" option allows you to retract your decision, preserving the Safari browser and its associated data on your iPad.
To confirm the deletion, tap the "Delete" option within the confirmation dialogue. This decisive action signifies your intent to proceed with removing the Safari app, initiating the final phase of the deletion process. By affirming the deletion, you're actively participating in customizing your device, tailoring it to align with your browsing preferences and digital environment.
Upon tapping "Delete," the iPad will commence the deletion process, erasing the Safari app and its associated data from your device. Depending on the app's size and the amount of data it contains, this process may take a few moments to complete. It's essential to allow the iPad to finalize the deletion, ensuring that the Safari browser is fully removed from your device.
By confirming the deletion, you've successfully navigated through the crucial step of finalizing the removal of the Safari browser from your iPad. This affirmative action empowers you to take control of your digital environment, allowing you to explore alternative browsing options and customize your device to better suit your preferences.
Conclusion
Congratulations! By following the step-by-step instructions outlined in this guide, you've successfully navigated the process of removing the Safari app from your iPad. This decisive action not only frees up valuable space on your device but also empowers you to explore a diverse range of alternative browsers, each offering unique features and capabilities. As you bid adieu to Safari, you open the door to a world of browsing possibilities, allowing you to tailor your digital experience to align with your individual preferences and usage patterns.
The removal of the Safari app marks a pivotal moment in customizing your iPad, reflecting your evolving needs and technological preferences. Whether you're seeking enhanced privacy features, advanced customization options, or seamless integration with other devices and platforms, the act of deleting Safari signifies your proactive approach to optimizing your digital environment.
As you embark on this new chapter of browsing freedom, consider exploring alternative browsers such as Google Chrome, Mozilla Firefox, Microsoft Edge, or Opera. Each of these browsers offers a distinct set of features, ranging from robust security measures and intuitive user interfaces to seamless synchronization across devices. By experimenting with different browsers, you have the opportunity to discover the perfect fit for your browsing habits, ultimately enhancing your digital experience.
Furthermore, the knowledge and skills gained from removing the Safari app from your iPad serve as a testament to your ability to navigate the intricacies of app management and device customization. This newfound proficiency empowers you to confidently manage your apps, streamline your digital space, and adapt your device to suit your evolving needs.
In essence, the removal of the Safari app from your iPad represents a transformative step towards personalizing your digital ecosystem. By embracing change and exploring alternative browsing options, you're actively shaping your digital experience, ensuring that it aligns with your unique preferences and requirements.
As you continue to navigate the ever-evolving landscape of technology, remember that the ability to customize and tailor your digital environment is a powerful tool. By staying informed and proactive, you're poised to make informed decisions that enhance your digital experience, ultimately empowering you to make the most of your technological resources.
So, as you bid farewell to Safari and embrace the myriad of browsing options available, may your digital journey be filled with seamless browsing experiences, enhanced productivity, and a personalized approach to technology. Here's to a future of limitless possibilities and tailored digital experiences!