Introduction
Safari's autofill feature is a convenient tool that saves time by automatically populating forms and fields with previously entered information. While this can be incredibly helpful, there are instances where you may need to delete this autofill data. Whether you're looking to clear outdated information, enhance your privacy, or simply streamline your browsing experience, knowing how to delete Safari autofill data is a valuable skill.
In this guide, we'll walk you through the step-by-step process of deleting autofill data in Safari. By following these instructions, you'll gain a better understanding of how to manage your browsing data and maintain control over the information stored in your browser. Whether you're using Safari on a Mac, iPhone, or iPad, the steps outlined here will empower you to take charge of your autofill data and ensure that your browsing experience aligns with your preferences.
Understanding how to delete Safari autofill data is particularly important for those who value privacy and security. By regularly managing and deleting autofill data, you can minimize the risk of inadvertently sharing sensitive information and maintain a clean, organized browsing environment. Additionally, staying informed about these processes allows you to optimize your browser's performance and ensure that it operates smoothly and efficiently.
As we delve into the steps for deleting Safari autofill data, keep in mind that these instructions are designed to be user-friendly and accessible to individuals with varying levels of technical expertise. Whether you're a seasoned Safari user or just getting started with the browser, this guide will equip you with the knowledge and skills needed to effectively manage your autofill data.
Now, let's embark on this journey to discover how to delete Safari autofill data and take control of your browsing experience.
Step 1: Open Safari
To begin the process of deleting autofill data in Safari, the first step is to open the Safari browser on your device. Whether you're using a Mac, iPhone, or iPad, accessing Safari is the initial action that sets the stage for managing your autofill data.
On Mac:
If you're using a Mac, you can open Safari by clicking on the Safari icon located in the Dock or by searching for Safari in the Applications folder. Once you've located the Safari icon, simply click on it to launch the browser. Alternatively, you can use Spotlight Search by pressing Command + Spacebar, typing "Safari," and hitting Enter to open the browser.
On iPhone or iPad:
For iPhone or iPad users, opening Safari is as simple as tapping on the Safari icon on your home screen. This will launch the browser and provide access to the various features and settings that allow you to manage your browsing data, including autofill information.
By opening Safari, you gain entry into the world of web browsing and set the stage for the subsequent steps involved in deleting autofill data. This foundational action serves as the gateway to accessing Safari's preferences and navigating the interface to effectively manage your browsing data.
With Safari now open on your device, you're ready to proceed to the next step and delve into the process of accessing Safari preferences, where you'll gain the ability to manage and delete autofill data. This journey toward taking control of your browsing experience is just beginning, and by opening Safari, you've taken the crucial first step toward achieving your goal.
Now that Safari is open, let's move forward to the next step and explore how to access Safari preferences, setting the stage for managing your autofill data with ease.
Step 2: Access Safari Preferences
Accessing Safari preferences is a pivotal step in the process of managing and deleting autofill data. By navigating to the preferences section, you gain access to a wealth of customization options that empower you to tailor your browsing experience to your preferences.
On Mac:
-
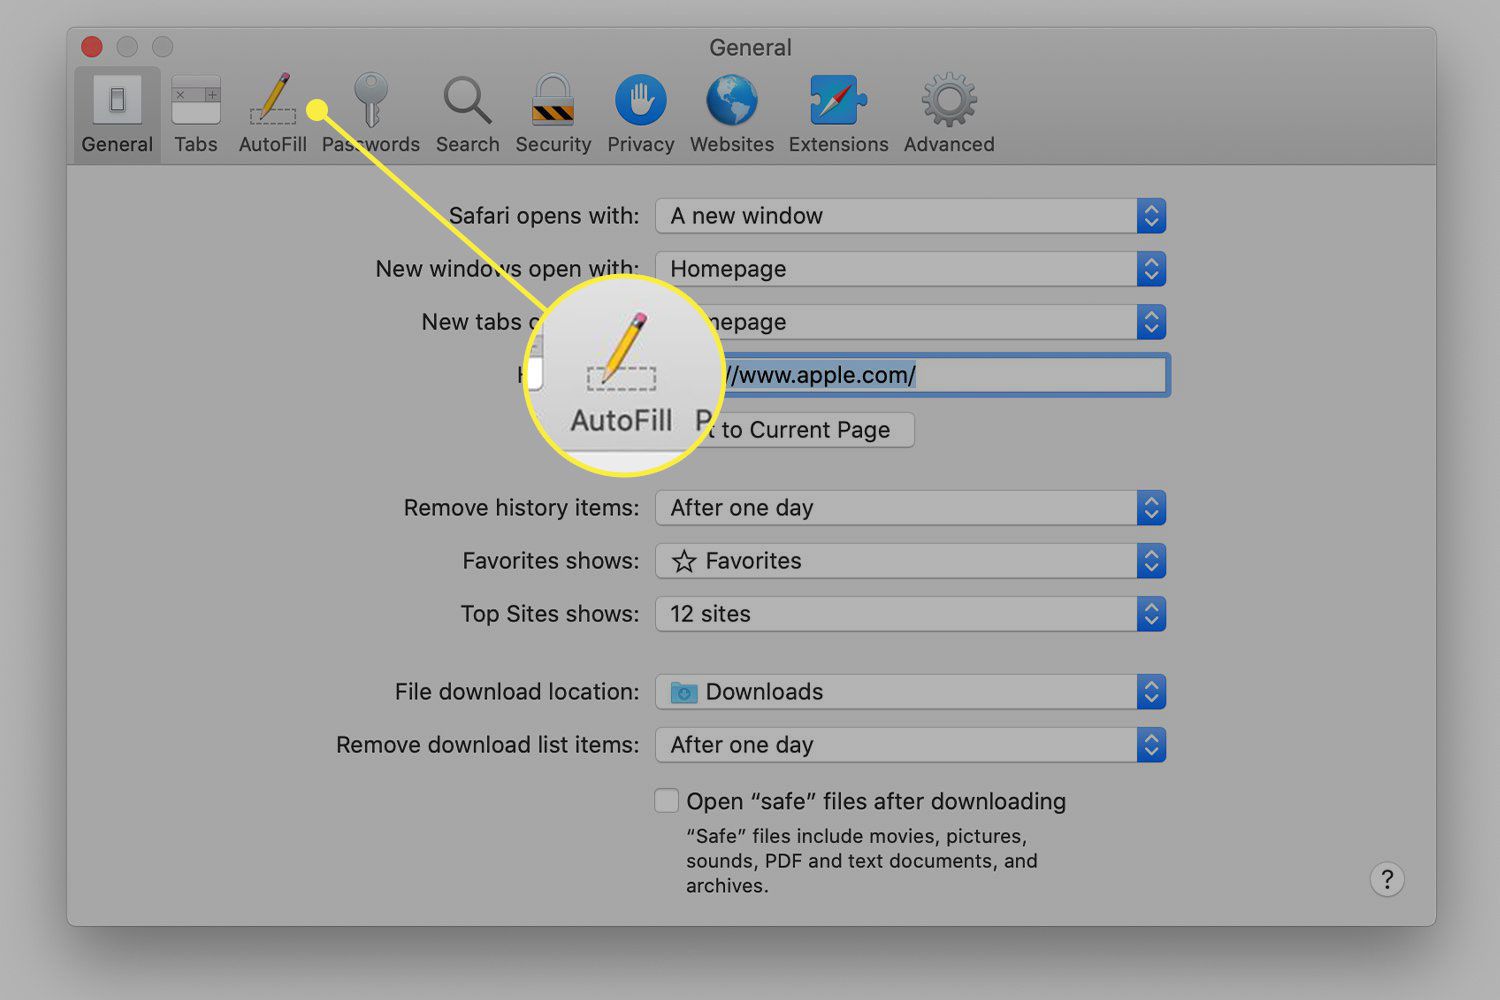
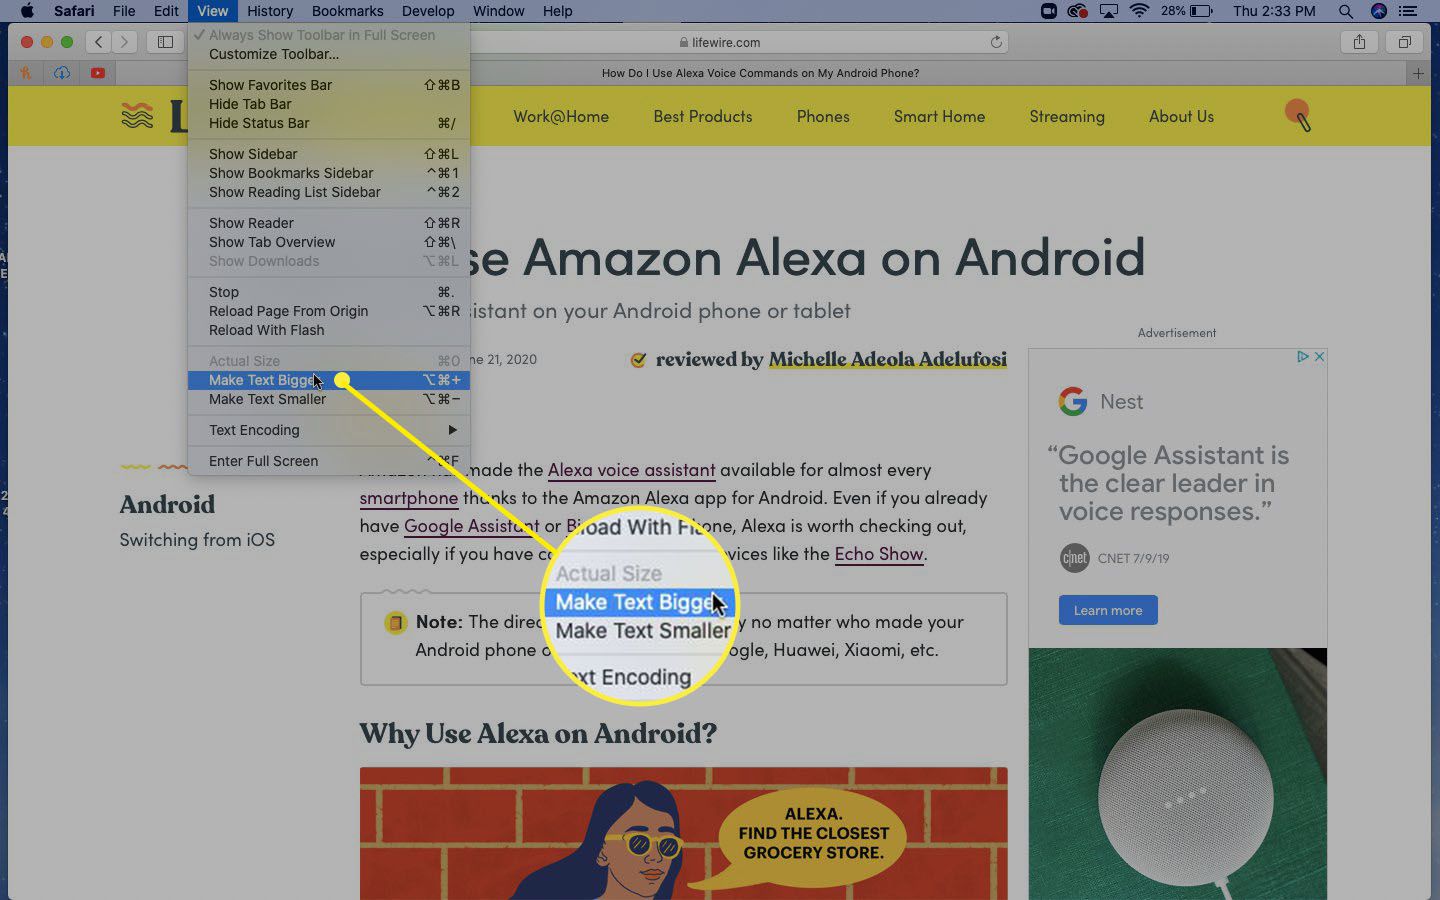
Using the Menu Bar: On a Mac, you can access Safari preferences by first ensuring that Safari is the active application. Next, navigate to the menu bar at the top of the screen and click on "Safari." A drop-down menu will appear, and within this menu, you'll find the "Preferences" option. Click on "Preferences" to open the Safari preferences window.
-
Keyboard Shortcut: Alternatively, Mac users can utilize a keyboard shortcut to access Safari preferences. Simply press "Command + Comma (,)" while Safari is the active application to open the preferences window swiftly.
On iPhone or iPad:
-
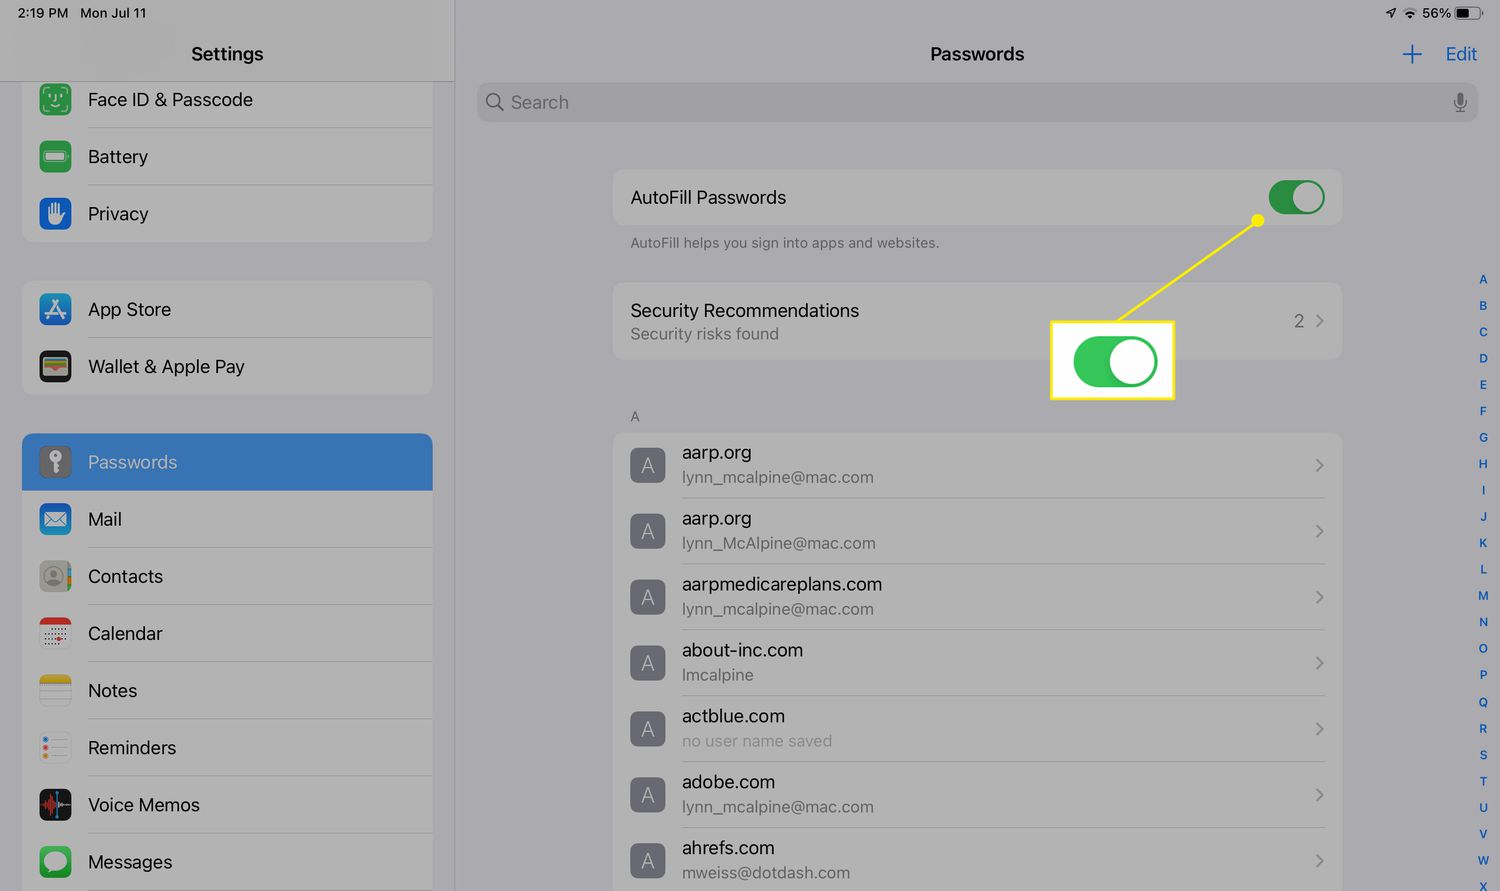
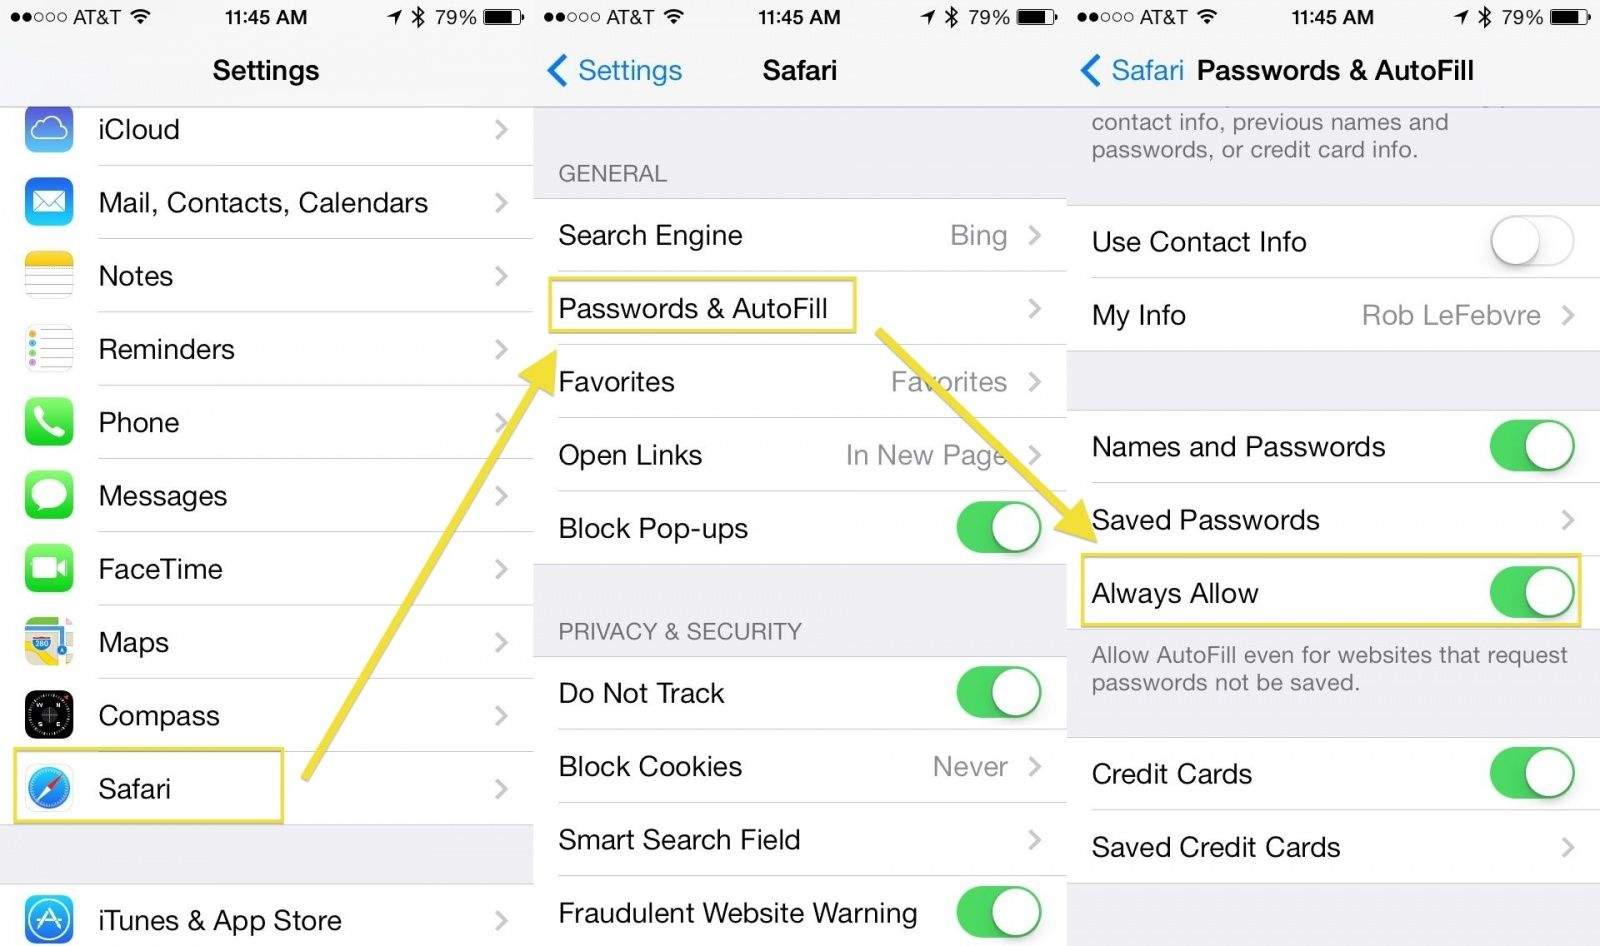
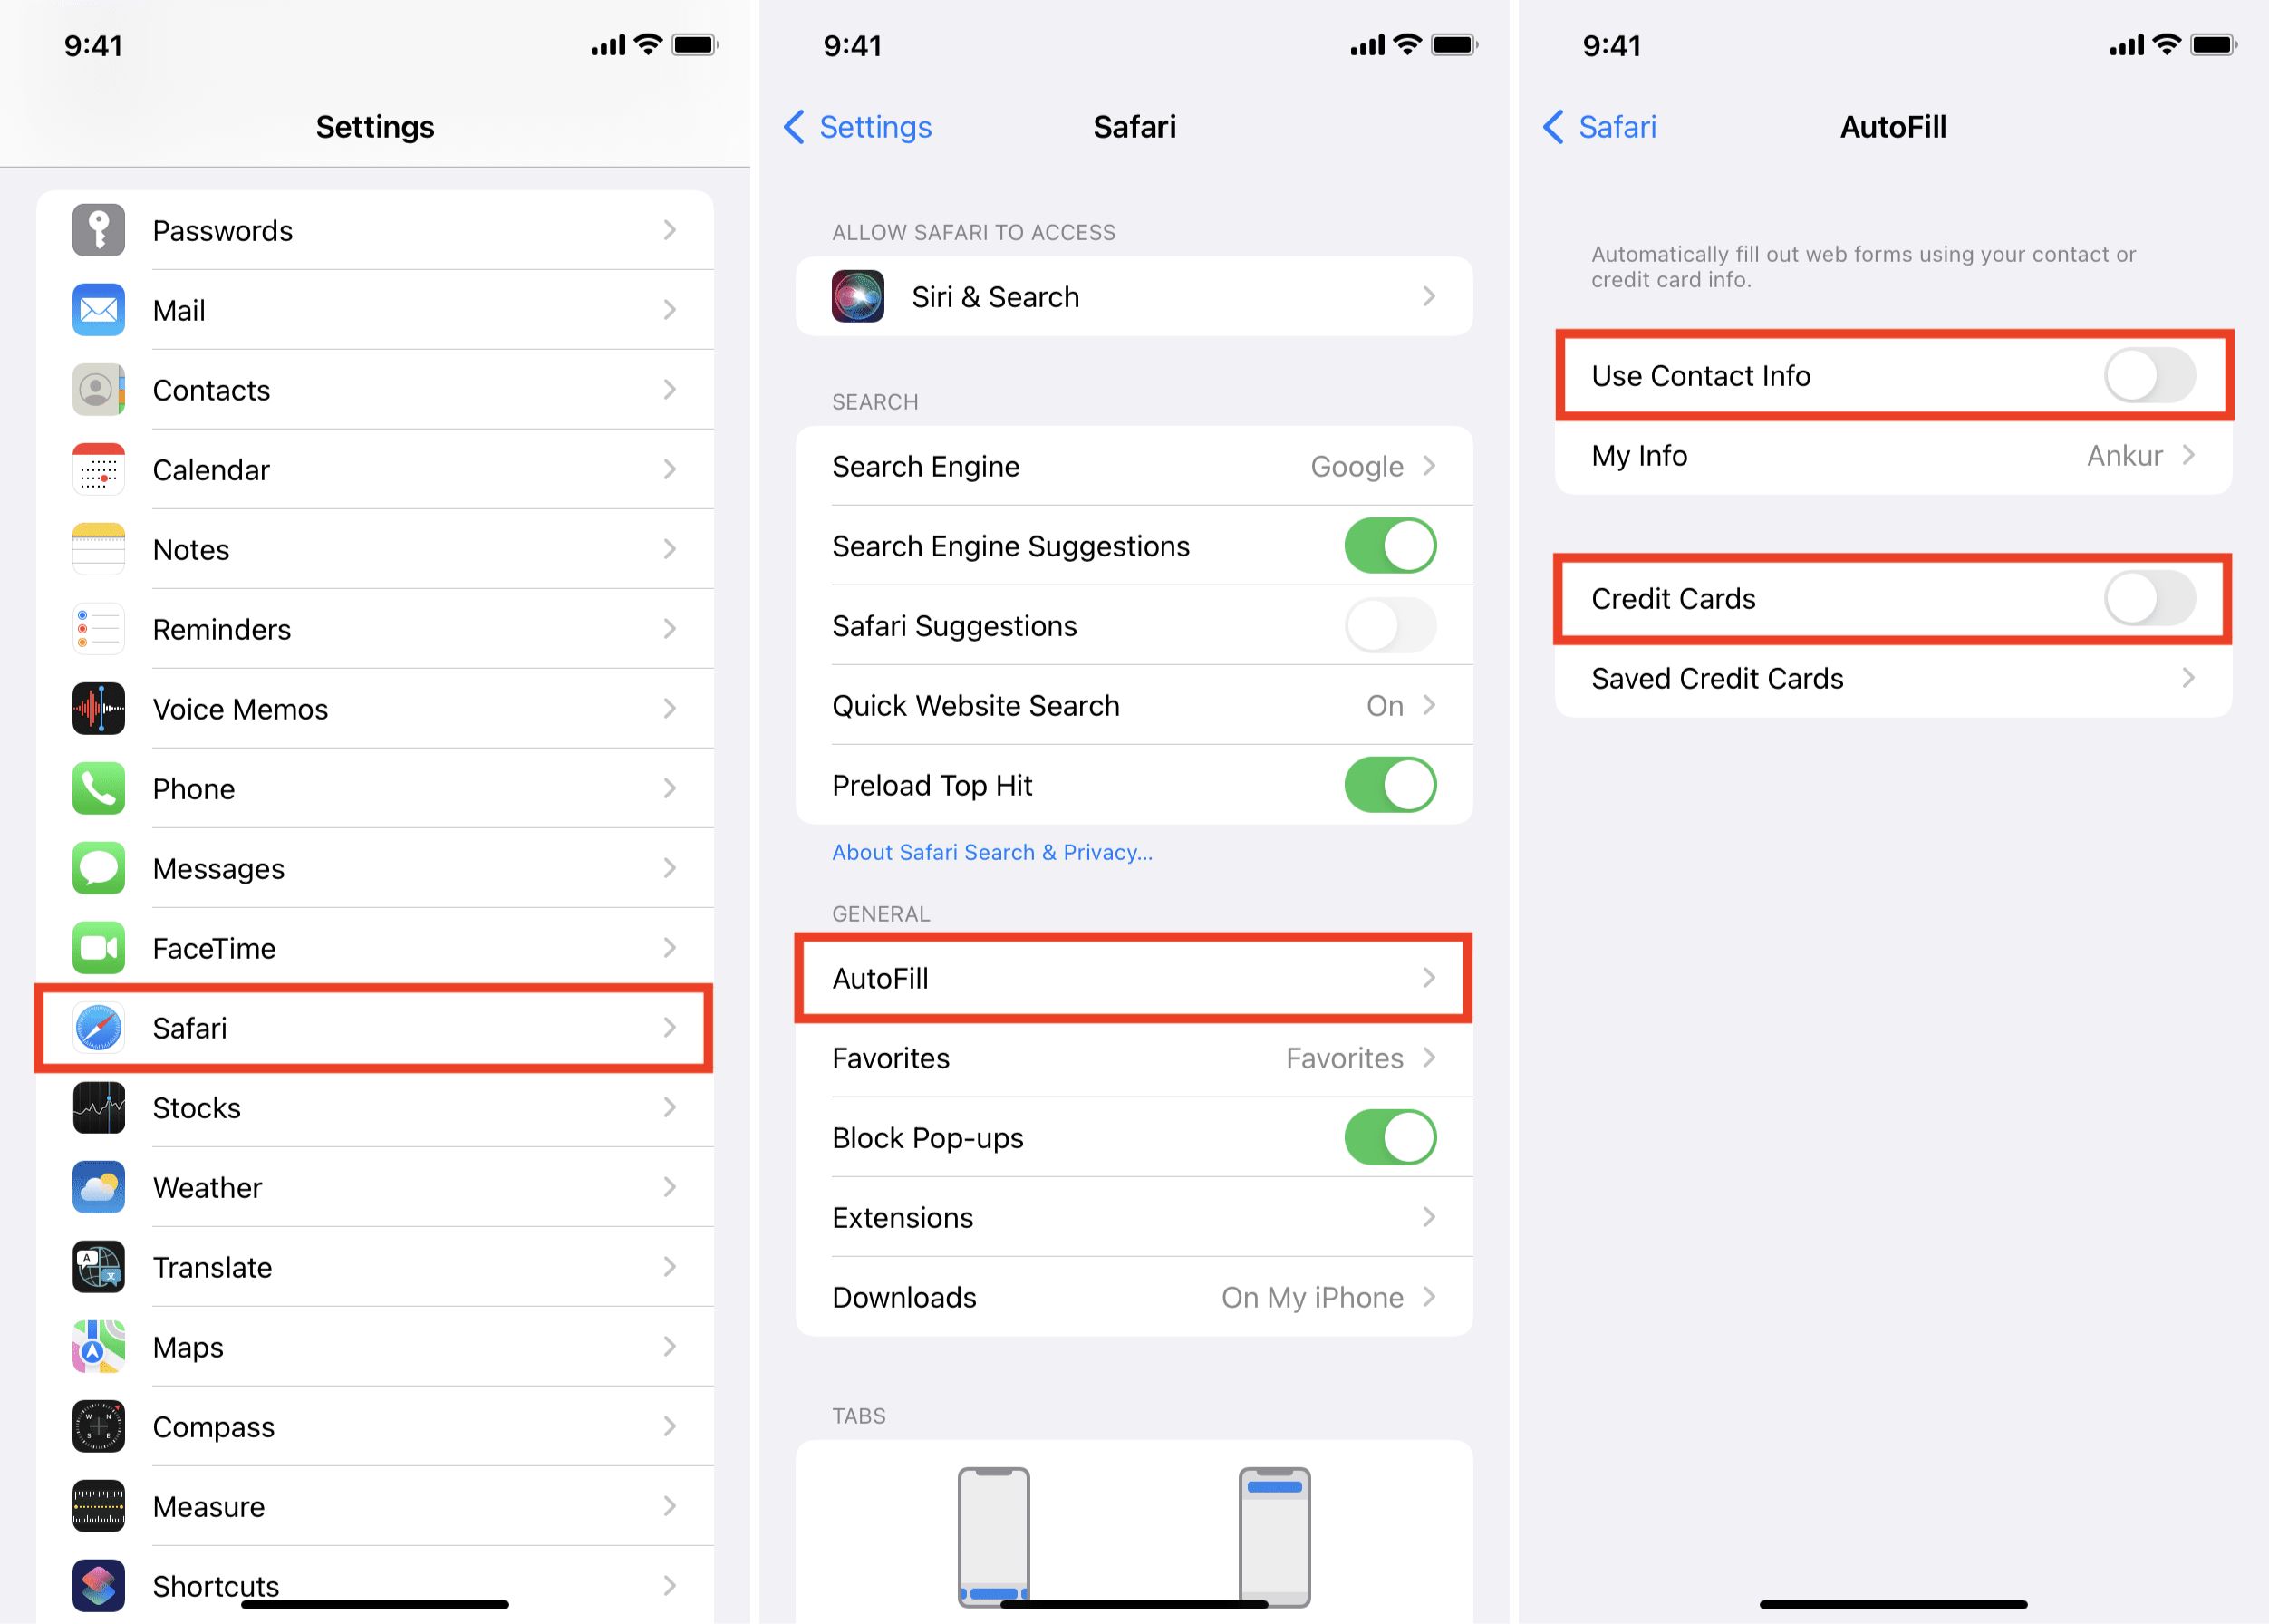
Using the Settings App: For iPhone or iPad users, accessing Safari preferences involves navigating to the device's Settings app. Scroll down and locate the "Safari" option within the list of installed apps. Tapping on "Safari" will reveal a range of settings and preferences that can be customized to suit your browsing needs.
-
Within Safari: Another method for accessing Safari preferences on an iPhone or iPad is by opening Safari and tapping on the "Aa" icon located in the address bar. This will reveal a menu with various options, including "Settings for This Website." Tapping on this option will lead you to a screen where you can access specific settings for the current website and make adjustments as needed.
By accessing Safari preferences, you gain the ability to delve into the inner workings of the browser and fine-tune various settings to align with your browsing preferences. This pivotal step sets the stage for managing autofill data and provides the foundation for the subsequent actions involved in deleting outdated or unwanted autofill information.
With Safari preferences now within reach, you're poised to move forward and explore the next steps in the process of managing and deleting autofill data. This journey toward taking control of your browsing experience is unfolding seamlessly, and by accessing Safari preferences, you've unlocked the gateway to a realm of customization and control within the Safari browser.
Step 3: Manage Autofill Data
Managing autofill data in Safari involves gaining insight into the information stored by the browser and making informed decisions about which data to retain, edit, or remove. By delving into the realm of autofill management, users can exercise greater control over their browsing experience and ensure that their stored information aligns with their current needs and preferences.
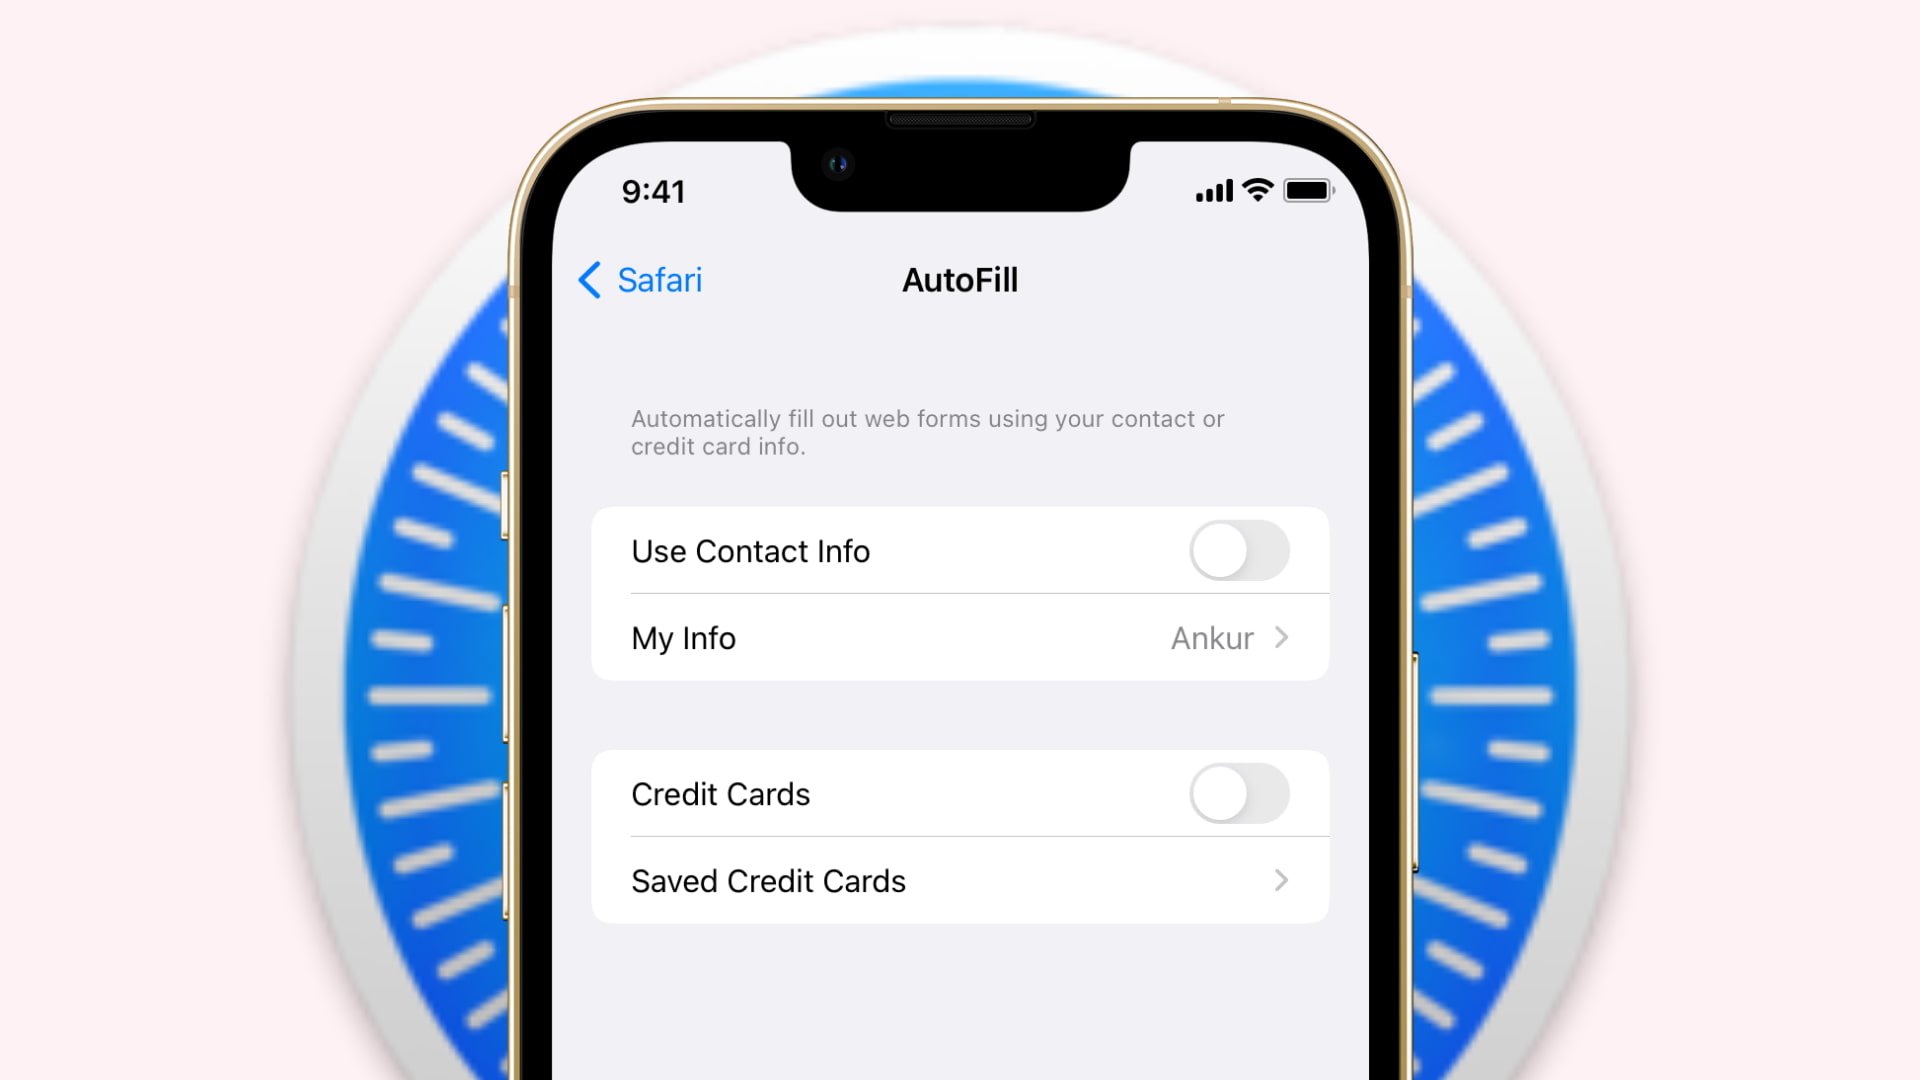
Upon accessing Safari preferences, users can navigate to the "Autofill" tab, where a range of autofill data categories are presented. These categories typically include contact information, such as names, addresses, email addresses, and phone numbers, as well as credit card details and other forms of stored data. Each category can be individually managed, allowing users to tailor their autofill data to suit their specific requirements.
Within the "Autofill" tab, users have the option to review and edit the stored information, add new data, or remove outdated entries. This level of customization empowers users to maintain an accurate and up-to-date autofill database, ensuring that the information populated in forms and fields is relevant and current.
For instance, users can review their stored contact information and make adjustments as needed, such as updating addresses or phone numbers. Similarly, credit card details can be managed to reflect changes in card numbers or expiration dates, providing a seamless autofill experience when making online purchases.
Furthermore, Safari's autofill management capabilities extend to the ability to add new information to the autofill database. This feature is particularly useful for individuals who frequently encounter new forms or fields that require input, as it allows them to seamlessly populate these fields with accurate data.
By actively managing autofill data, users can streamline their browsing experience, reduce the risk of outdated information being populated in forms, and maintain a high level of accuracy and relevance in their autofill database. This proactive approach to autofill management ensures that users are equipped with the most current and pertinent information, enhancing their overall browsing efficiency and convenience.
As we navigate through the process of managing autofill data, it's essential to recognize the value of maintaining a well-organized and accurate autofill database. By taking the time to review, edit, and add new information within the autofill settings, users can optimize their browsing experience and ensure that their stored data remains aligned with their evolving needs and preferences.
Step 4: Delete Autofill Data
Deleting autofill data in Safari is a straightforward yet crucial step in maintaining a clean and organized browsing environment. By removing outdated or unwanted autofill entries, users can ensure that the information populated in forms and fields remains accurate and relevant to their current needs. This proactive approach to managing autofill data contributes to a streamlined browsing experience and minimizes the risk of inadvertently sharing outdated information.
To delete autofill data in Safari, users can navigate to the Safari preferences window, specifically the "Autofill" tab. Within this section, users will find a list of autofill data categories, including contact information, credit card details, and other stored data. To delete specific autofill entries, users can follow these simple steps:
-
Select the Category: Begin by choosing the category of autofill data that you wish to delete. For example, if you want to remove outdated contact information, select the "Names and Addresses" category.
-
Review the Entries: Once the category is selected, review the list of autofill entries within that category. Identify the specific entries that you want to delete, ensuring that you are targeting the correct information.
-
Remove the Entries: To delete individual autofill entries, simply select the entry and press the "Delete" key on your keyboard. Alternatively, right-click on the entry and choose the "Delete" option from the context menu. This action will remove the selected autofill entry from the database.
-
Confirm Deletion: Some versions of Safari may prompt a confirmation dialog to ensure that you intend to delete the selected autofill entry. Confirm the deletion to permanently remove the entry from the autofill database.
By following these steps, users can effectively delete outdated or unwanted autofill data, thereby maintaining a clean and accurate autofill database within Safari. This process empowers users to take control of their browsing experience and ensure that the information populated in forms and fields aligns with their current preferences and requirements.
Deleting autofill data in Safari is a proactive measure that contributes to enhanced privacy, improved browsing efficiency, and a clutter-free autofill experience. By regularly reviewing and removing outdated entries, users can optimize their autofill database and enjoy a seamless browsing experience that reflects their current information and preferences.
Conclusion
In conclusion, mastering the art of deleting Safari autofill data empowers users to take control of their browsing experience, enhance privacy, and maintain a streamlined and efficient autofill database. By following the step-by-step process outlined in this guide, individuals can confidently navigate Safari's preferences, manage their autofill data, and delete outdated or unwanted entries with ease.
Understanding the significance of managing autofill data is pivotal in today's digital landscape, where privacy and data security are paramount. By actively reviewing and deleting autofill entries, users can minimize the risk of outdated or irrelevant information being populated in forms and fields, thereby safeguarding their personal data and ensuring a high level of accuracy in their autofill database.
Moreover, the ability to delete autofill data in Safari contributes to a clutter-free browsing experience, where users can enjoy the convenience of autofill without the burden of obsolete information. This proactive approach to managing browsing data aligns with the evolving needs and preferences of users, allowing them to maintain an organized and relevant autofill database that enhances their overall browsing efficiency.
By taking charge of their autofill data, users can also optimize their browsing experience, ensuring that the information populated in forms and fields accurately reflects their current details. This not only streamlines online form submissions and transactions but also contributes to a seamless and personalized browsing experience tailored to individual preferences.
In essence, the process of deleting Safari autofill data is not merely a technical task but a proactive step toward maintaining privacy, optimizing browsing efficiency, and aligning the autofill experience with individual preferences. By embracing these practices, users can navigate the digital realm with confidence, knowing that their browsing data is managed in a manner that prioritizes relevance, accuracy, and privacy.
As technology continues to evolve, the ability to manage and delete autofill data in Safari remains a valuable skill that empowers users to maintain control over their browsing environment. By staying informed and proactive in managing autofill data, individuals can navigate the digital landscape with confidence, knowing that their browsing experience is tailored to their preferences and aligned with their privacy and security priorities.