Check System Requirements
Before installing Firefox on your Mac, it's essential to ensure that your system meets the necessary requirements. By doing so, you can guarantee a smooth installation process and optimal performance of the browser. Here's a comprehensive guide to checking the system requirements for Firefox on your Mac:
-
Operating System Compatibility: Ensure that your Mac is running an operating system that is compatible with the latest version of Firefox. As of the time of writing, Firefox is compatible with macOS 10.12 or later. To check your macOS version, click on the Apple logo in the top-left corner of your screen, select "About This Mac," and you'll find the version information under "Overview."
-
Processor and RAM: Firefox is designed to run efficiently on a wide range of Mac hardware. However, it's recommended to have at least a 2 GHz processor and 2 GB of RAM for optimal performance. To check your Mac's processor and RAM specifications, click on the Apple logo, select "About This Mac," and then click on "System Report." Here, you can find detailed information about your Mac's hardware, including the processor and memory.
-
Available Disk Space: Ensure that you have sufficient free disk space to accommodate the Firefox installation. While Firefox itself doesn't require a large amount of space, having extra room for caching and temporary files can contribute to a smoother browsing experience. To check your available disk space, click on the desktop to make sure you're in the Finder, then click on "Go" in the top menu and select "Computer." From here, you can view the available space on your Mac's hard drive.
By verifying these system requirements, you can proceed with confidence, knowing that your Mac is ready for the Firefox installation process. Once you've confirmed that your system meets these requirements, you're ready to download and install Firefox on your Mac.
Download Firefox Installer
To begin the process of installing Firefox on your Mac, you'll need to download the Firefox installer. Firefox offers a streamlined and user-friendly approach to obtaining the installer, ensuring that you can quickly get started with the browser. Here's a detailed guide on how to download the Firefox installer for your Mac:
-
Access the Official Website: Open your current web browser and navigate to the official Firefox website. Once there, you'll be greeted by the prominent "Download Firefox" button, which is typically displayed prominently on the homepage. Click on this button to initiate the download process.
-
Automatic Detection: Firefox's website is designed to automatically detect your operating system, which in this case is macOS, and present you with the appropriate download link for the Firefox installer. This ensures that you're directed to the correct version of the installer for your Mac, streamlining the entire process.
-
Customization Options: Before initiating the download, Firefox provides customization options that allow you to tailor the browsing experience to your preferences. These options may include language preferences and the ability to opt in or out of data sharing to help improve Firefox in the future.
-
Download Confirmation: Once you've selected your customization options, the website will prompt you to confirm the download. At this stage, you may also be presented with the option to contribute usage data to Mozilla, the organization behind Firefox, to help improve the browser's performance and features.
-
Initiate the Download: After confirming your preferences, click the "Download" button to initiate the download of the Firefox installer. The download process typically begins automatically, and you can monitor the progress through your web browser's download manager.
-
Alternative Download Options: In the event that the automatic detection process doesn't work as expected, Firefox's website also provides alternative download options. These may include specific download links for different operating systems, ensuring that you can always access the correct installer for your Mac.
By following these steps, you can effortlessly obtain the Firefox installer for your Mac, setting the stage for the subsequent installation process. Once the download is complete, you'll be ready to proceed with installing Firefox and unleashing its powerful features and capabilities on your Mac.
Install Firefox
Once you have successfully downloaded the Firefox installer on your Mac, the next step is to proceed with the installation process. Installing Firefox is a straightforward and seamless procedure, designed to ensure that you can start using the browser efficiently. Here's a comprehensive guide on how to install Firefox on your Mac:
-
Locate the Installer: After the download is complete, navigate to the location where the Firefox installer file is saved on your Mac. This is typically the "Downloads" folder unless you specified a different location during the download process.
-
Open the Installer: Double-click on the Firefox installer file to initiate the installation process. This action will prompt your Mac to verify the file and seek your confirmation to proceed with the installation.
-
Drag and Drop: In many cases, the Firefox installer is designed as a disk image file (.dmg). Upon opening the installer, you may see a window displaying the Firefox icon and a visual prompt to drag the icon into the "Applications" folder. Simply click and hold the Firefox icon, then drag it into the "Applications" folder to begin the installation.
-
Authorization: Depending on your Mac's security settings, you may be prompted to enter your administrator password to authorize the installation. This step is essential to ensure that the browser is installed correctly and can access the necessary system resources.
-
Progress Indicator: As the Firefox installer copies the necessary files to the "Applications" folder, you'll typically see a progress indicator to track the installation process. This provides you with a visual cue of the installation's status and helps you estimate the remaining time until completion.
-
Completion Confirmation: Once the installation is finished, you may receive a confirmation message indicating that Firefox has been successfully installed on your Mac. At this point, you can close the installer window and proceed to access Firefox from your "Applications" folder or the macOS Launchpad.
By following these steps, you can seamlessly install Firefox on your Mac, empowering you to explore its rich set of features and capabilities. With the installation process completed, you're now ready to set Firefox as your default browser, ensuring that it becomes your go-to option for all your browsing needs on your Mac.
Set Firefox as Default Browser
Setting Firefox as your default browser on your Mac ensures that all web links and internet-related activities automatically open in Firefox, providing a seamless and consistent browsing experience. Here's a detailed guide on how to set Firefox as your default browser:
Method 1: Using System Preferences
-
Open System Preferences: Click on the Apple logo in the top-left corner of your screen and select "System Preferences" from the dropdown menu.
-
Select General: Within the System Preferences window, locate and click on the "General" icon. This will open the General preferences pane.
-
Choose Default Web Browser: In the General preferences pane, you'll find the "Default web browser" option. Click on the dropdown menu next to it to reveal a list of installed web browsers, including Firefox.
-
Select Firefox: From the dropdown menu, select "Firefox" as your default web browser. Once selected, the changes will be applied automatically.
Method 2: Using Firefox Preferences
-
Open Firefox: Launch Firefox from your Applications folder or the macOS Launchpad.
-
Access Preferences: Click on the three horizontal lines in the upper-right corner of the Firefox window to open the main menu. From the menu, select "Preferences."
-
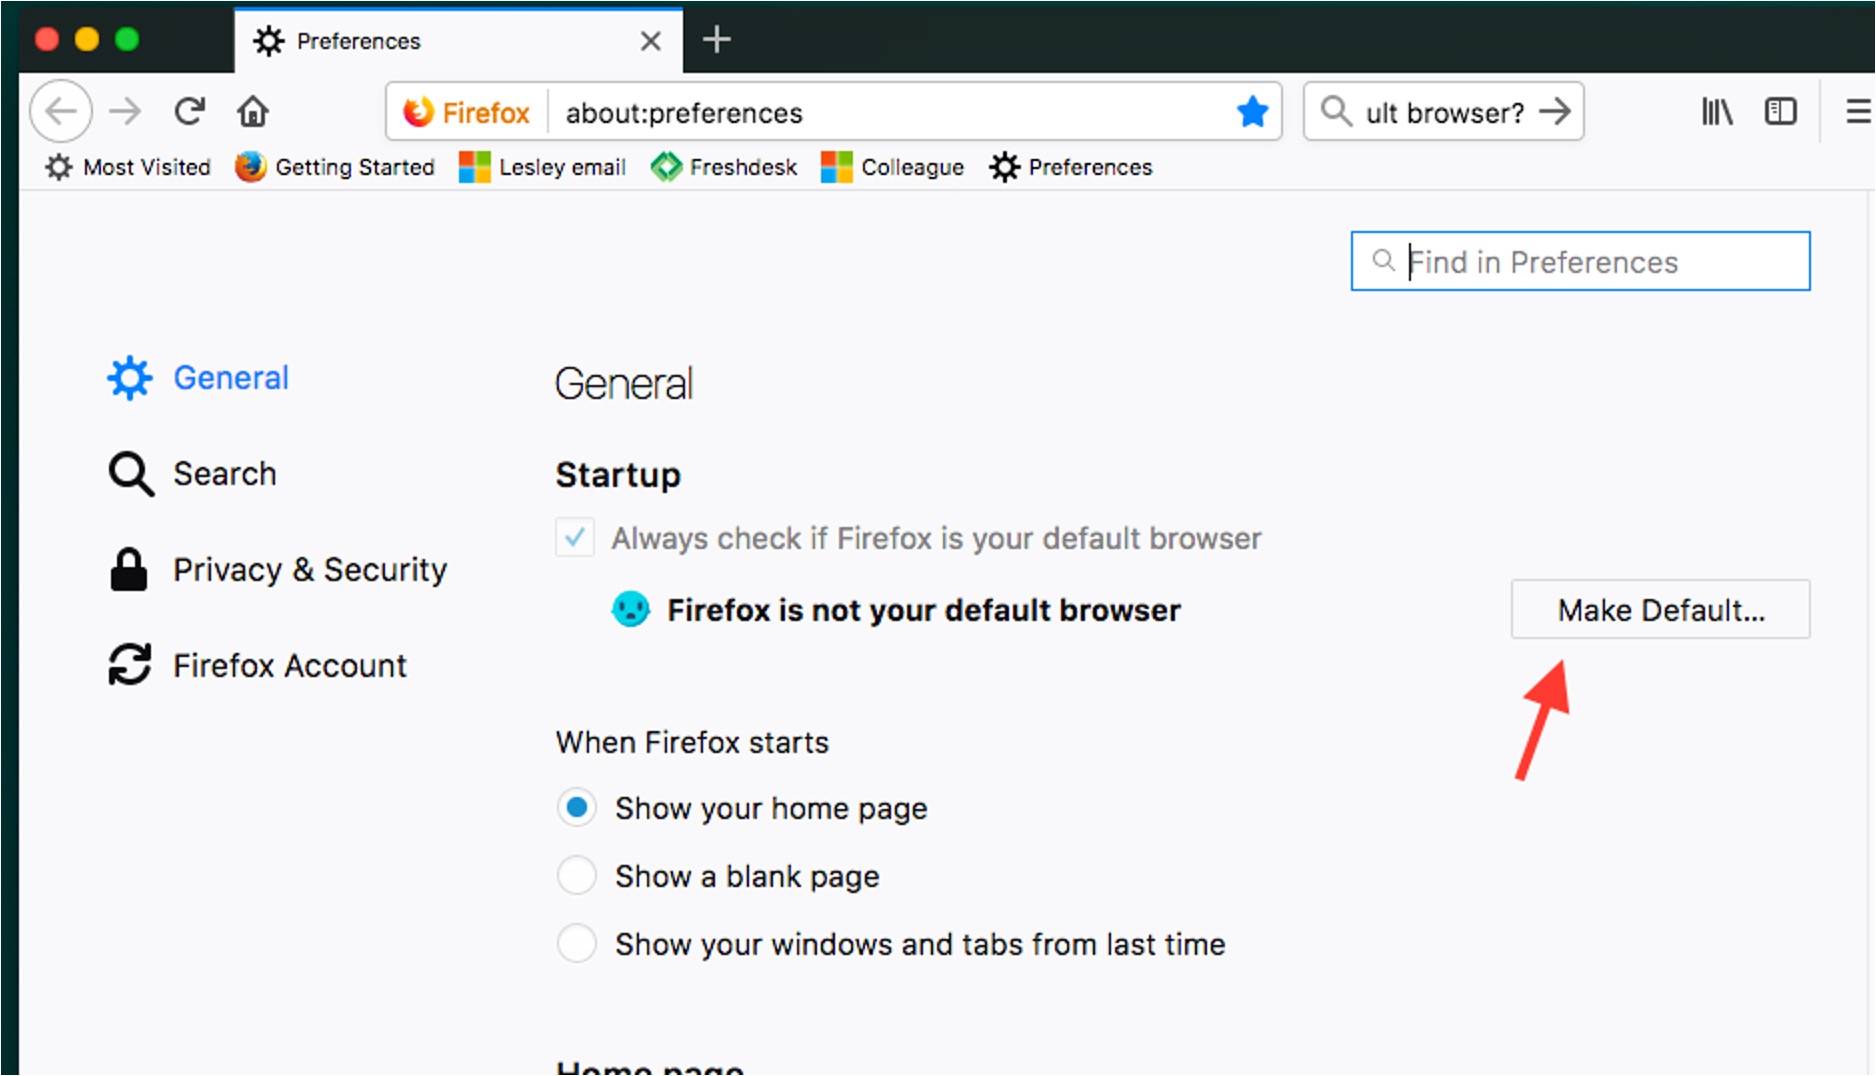
Navigate to General: In the Preferences window, click on "General" in the left-hand sidebar. This will display various general settings for Firefox.
-
Set as Default: Under the "General" settings, you'll find an option to make Firefox your default browser. Click on the "Make Default" button next to this option to set Firefox as your default browser.
Method 3: Using Browser Settings
-
Open Safari: Launch Safari, which is the default web browser on your Mac.
-
Access Safari Preferences: Click on "Safari" in the top menu and select "Preferences" from the dropdown list.
-
Change Default Web Browser: In the Preferences window, navigate to the "General" tab. Here, you'll find the option to set your default web browser. Click on the dropdown menu and select "Firefox" from the list of available browsers.
-
Confirm the Change: Once you've selected Firefox as your default browser, close the Preferences window. Safari will prompt you to confirm the change, and upon confirmation, Firefox will be set as your default browser.
By following these methods, you can seamlessly set Firefox as your default browser on your Mac, ensuring that all your web-related activities are conveniently handled by Firefox, providing you with a consistent and personalized browsing experience.