Introduction
In today's digital age, web browsers have become an integral part of our daily lives, serving as gateways to a vast array of online experiences. From video calls and virtual meetings to interactive websites and online gaming, the ability to access and utilize a device's camera through a web browser has become increasingly important. Whether you're connecting with friends and family, attending virtual events, or participating in remote work, the camera access feature on your browser plays a pivotal role in facilitating these activities.
Understanding how to manage camera access on different browsers is essential for ensuring a seamless and secure online experience. By familiarizing yourself with the specific steps required to allow camera access on popular browsers such as Google Chrome, Mozilla Firefox, Safari, and Microsoft Edge, you can confidently navigate the digital landscape and make the most of the diverse functionalities offered by these platforms.
In this comprehensive guide, we will delve into the intricacies of managing camera access on various web browsers, providing you with clear and actionable insights to empower you in harnessing the full potential of your browser's camera capabilities. Whether you're a seasoned tech enthusiast or a casual internet user, this article aims to demystify the process of enabling camera access, empowering you to engage in a wide range of online activities with confidence and ease. So, let's embark on this enlightening journey through the realms of browser camera access, unraveling the nuances of each major browser's settings and empowering you to take control of your online interactions.
Checking Camera Access on Different Browsers
Before delving into the specifics of allowing camera access on different web browsers, it's crucial to understand how to check the current camera access settings. This initial step ensures that you are aware of the existing permissions and can make informed decisions regarding the management of camera access.
Google Chrome
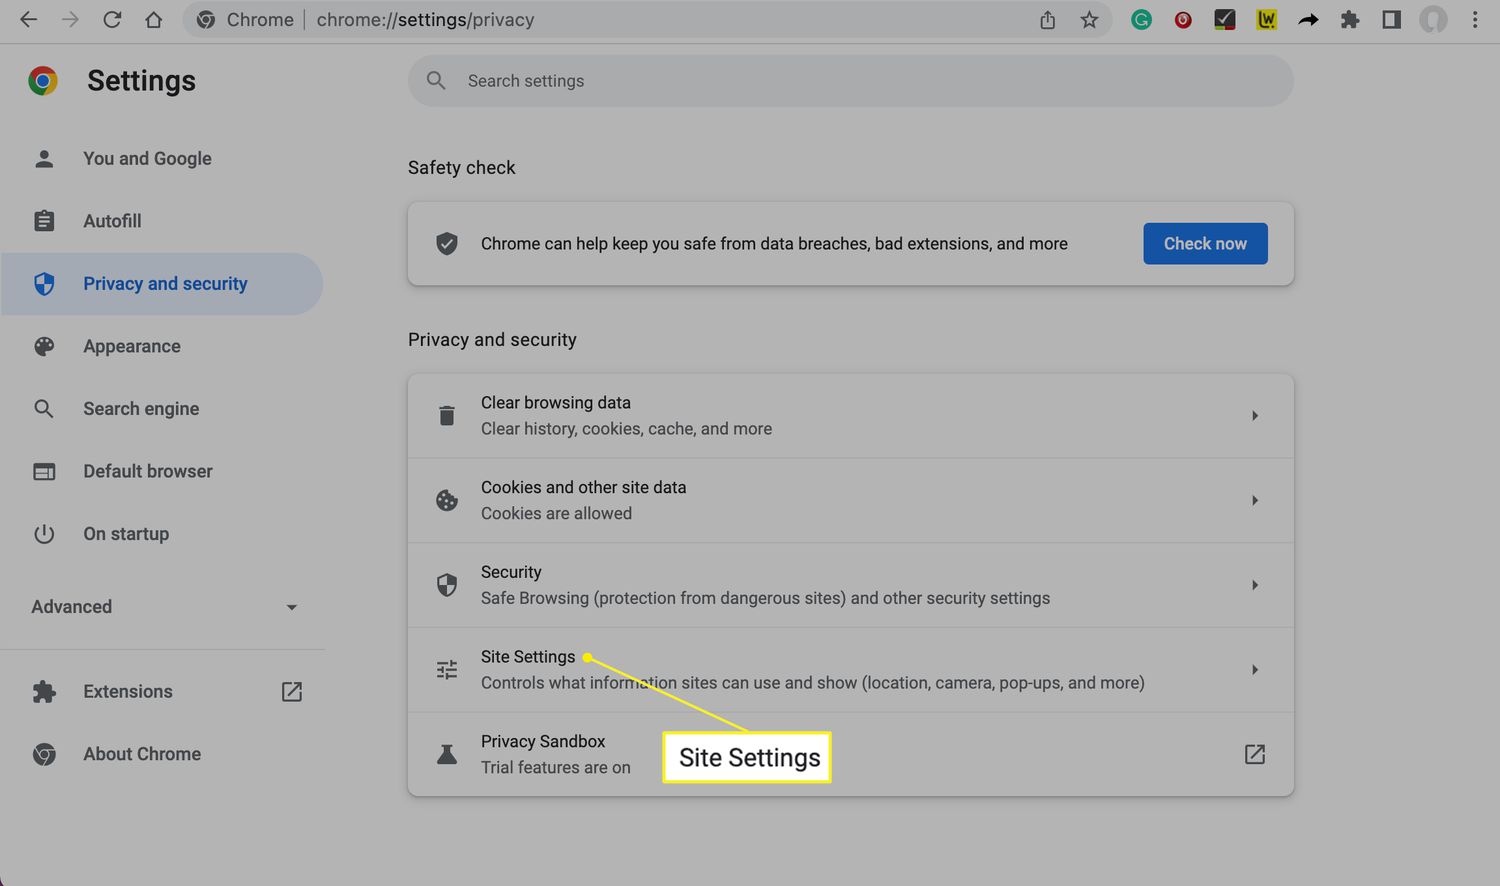
To check camera access on Google Chrome, you can start by clicking on the three-dot menu icon in the top-right corner of the browser window. From the dropdown menu, select "Settings" and navigate to the "Privacy and security" section. Here, you will find the "Site settings" option, which allows you to review and modify permissions for camera access. By clicking on "Camera," you can view the list of websites that have been granted or denied camera access, giving you a comprehensive overview of the current settings.
Mozilla Firefox
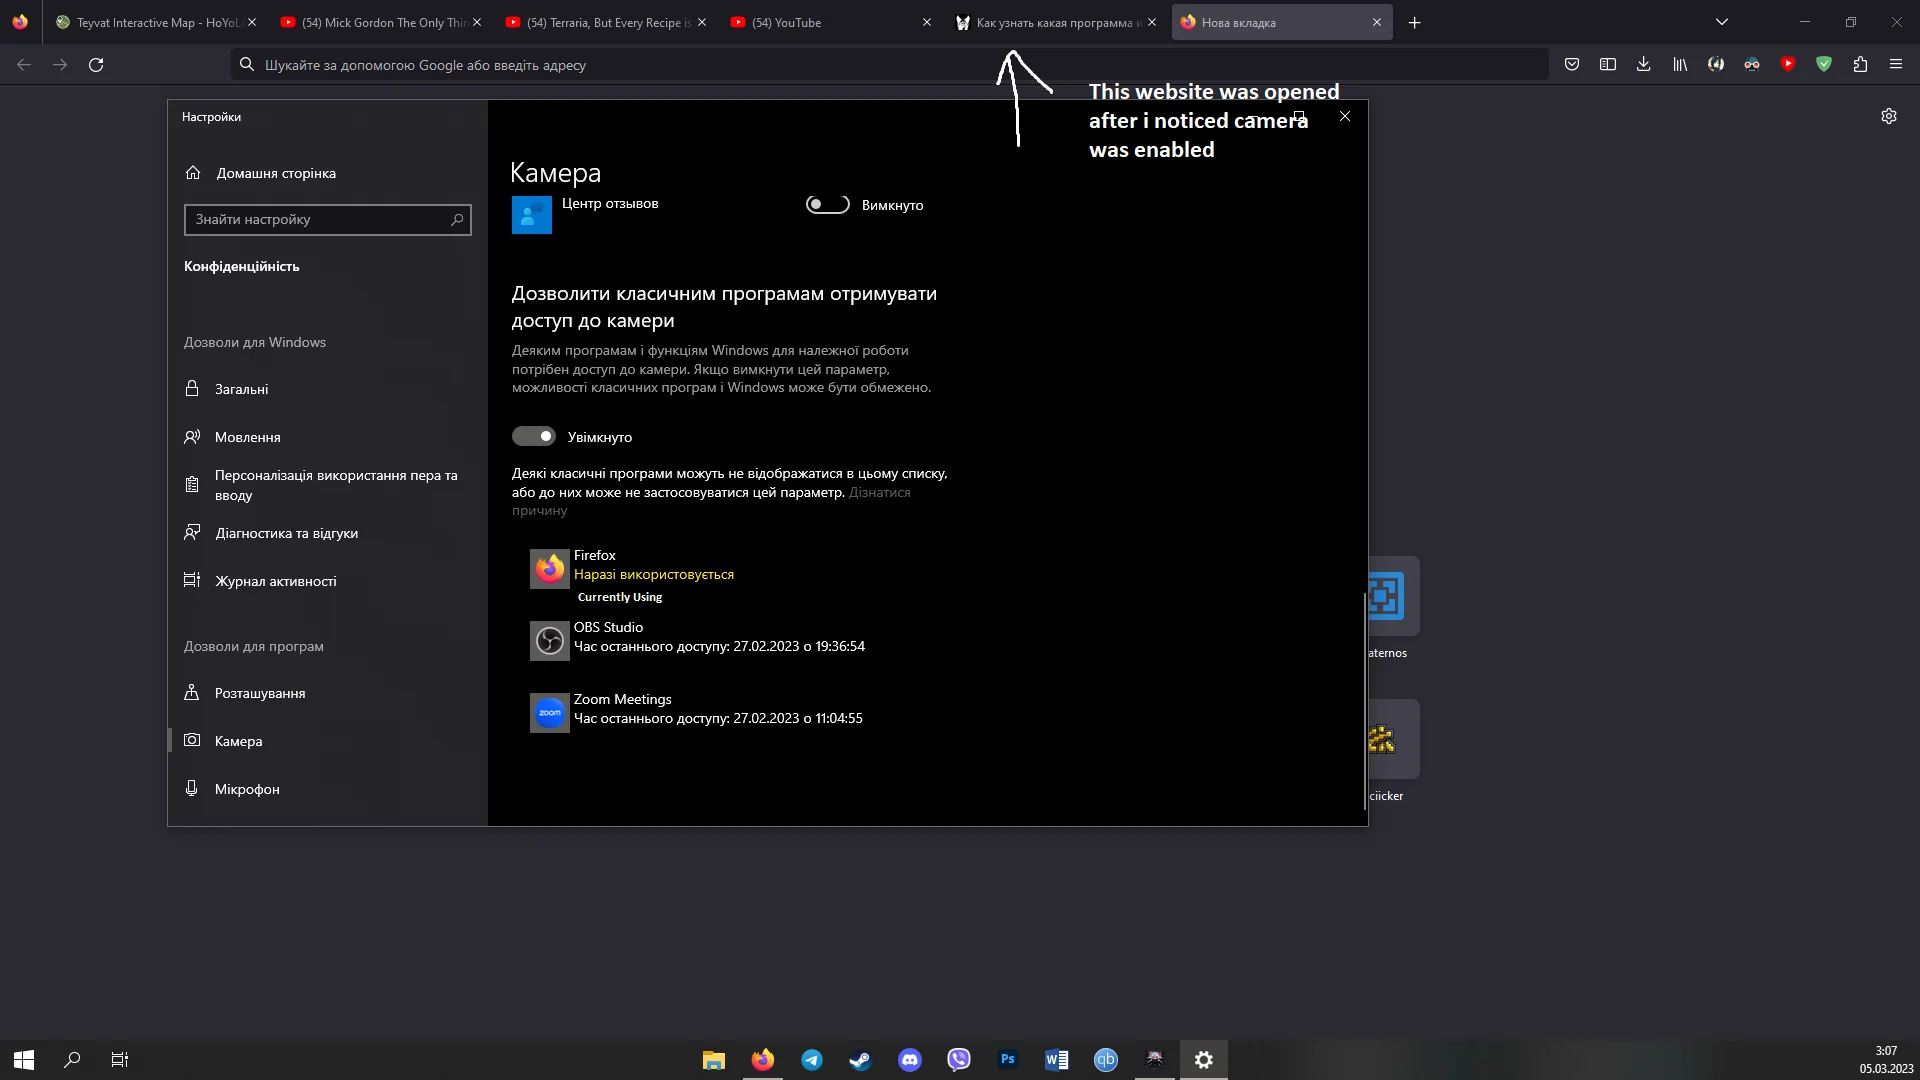
In Mozilla Firefox, checking camera access involves accessing the browser's settings menu. By clicking on the three-line menu icon in the top-right corner and selecting "Options," you can navigate to the "Privacy & Security" tab. Within this section, you will find the "Permissions" category, where you can click on "Settings" next to the "Camera" option. This grants you access to the list of websites with camera permissions, allowing you to review and manage the settings accordingly.
Safari
For Safari users, checking camera access involves accessing the browser's preferences. By clicking on "Safari" in the top menu bar and selecting "Preferences," you can navigate to the "Websites" tab. Here, you will find the "Camera" option in the left-hand sidebar, which provides a comprehensive view of websites with camera access permissions. This allows you to review and adjust the settings based on your preferences.
Microsoft Edge
In Microsoft Edge, checking camera access is a straightforward process. By clicking on the three-dot menu icon in the top-right corner and selecting "Settings," you can navigate to the "Site permissions" section. Here, you will find the "Camera" option, which allows you to review and manage camera access permissions for individual websites, providing you with a clear overview of the current settings.
By familiarizing yourself with the process of checking camera access on different browsers, you can gain valuable insights into the existing permissions and make informed decisions when it comes to managing camera access for various websites. This foundational knowledge sets the stage for seamlessly navigating the subsequent steps of allowing camera access on your preferred web browser.
Allowing Camera Access on Google Chrome
Enabling camera access on Google Chrome is a straightforward process that empowers users to seamlessly engage in video calls, virtual meetings, and interactive web experiences. By granting camera permissions to specific websites, you can harness the full potential of your browser's camera capabilities while maintaining control over your online interactions.
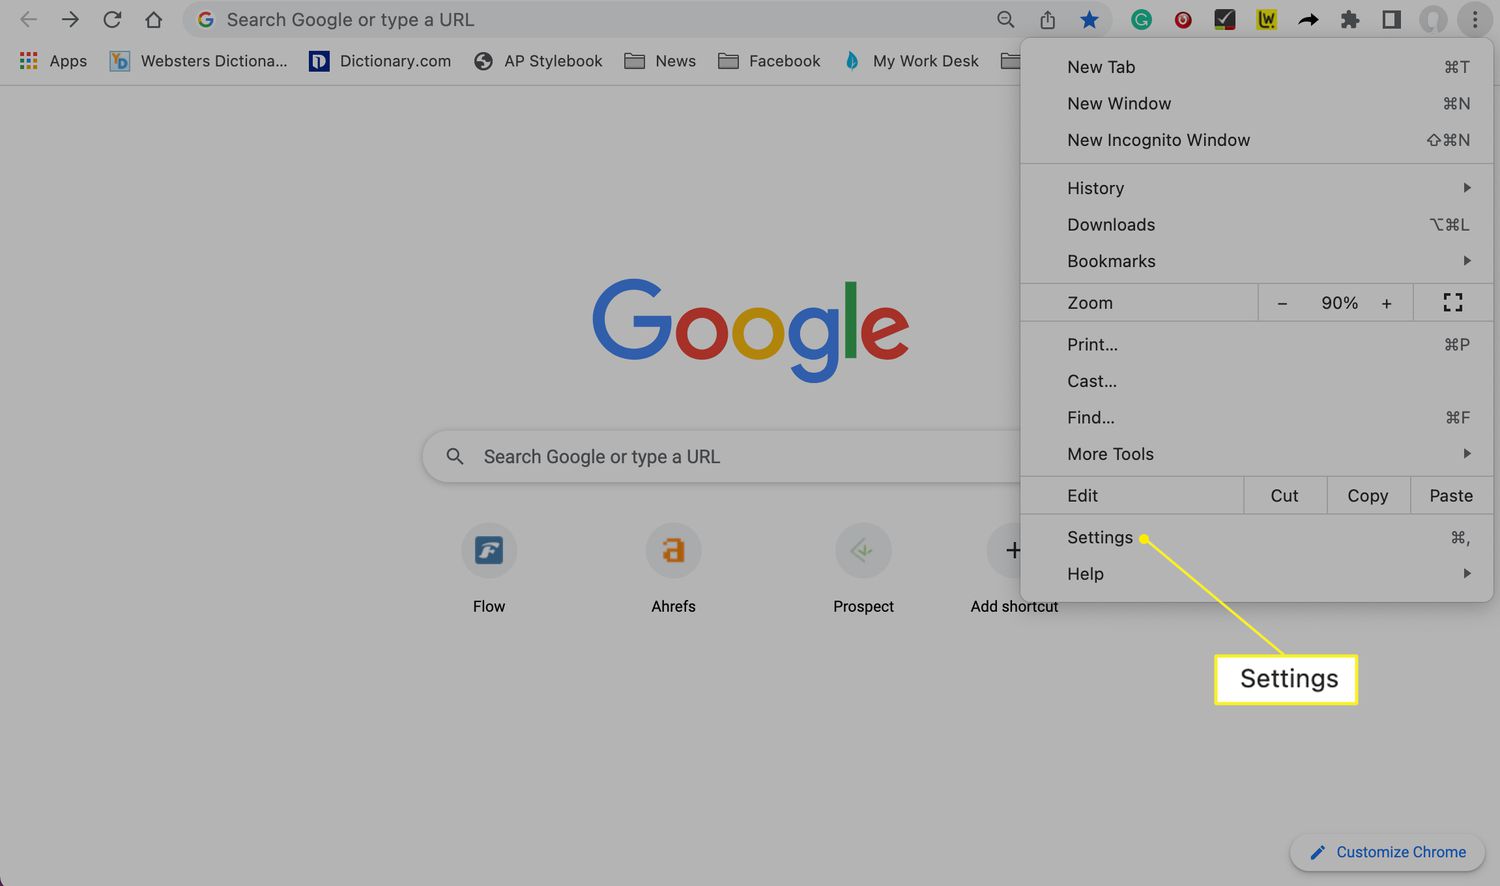
To initiate the process of allowing camera access on Google Chrome, start by clicking on the three-dot menu icon located in the top-right corner of the browser window. From the dropdown menu, select "Settings" to access the comprehensive range of browser customization options.
Within the "Settings" menu, navigate to the "Privacy and security" section, which serves as a gateway to managing various permissions and security settings. Here, you will find the "Site settings" option, which is instrumental in fine-tuning the camera access permissions for individual websites.
Upon selecting "Site settings," you will be presented with a range of site-specific permissions, including camera access. Clicking on the "Camera" option unveils a list of websites that have requested or been granted camera permissions. This intuitive interface allows you to review and modify the camera access settings for each website, providing you with granular control over your browsing experience.
To grant camera access to a specific website, simply click on the "Add" button next to the website's URL and select the "Allow" option from the dropdown menu. This action effectively grants the selected website permission to access your camera, enabling seamless integration of camera functionalities within the site's features and services.
Conversely, if you wish to revoke camera access for a particular website, you can click on the three-dot menu icon next to the website's URL and choose the "Block" option. This straightforward process ensures that you can manage camera access with ease, aligning the browser's permissions with your preferences and privacy considerations.
By navigating through the intuitive settings interface of Google Chrome, you can effectively manage camera access permissions, empowering you to engage with a diverse range of online content and services while maintaining control over your privacy and security.
In essence, allowing camera access on Google Chrome is a user-centric process that prioritizes transparency and control, enabling you to tailor your browsing experience to align with your preferences and security requirements. With the ability to grant or revoke camera permissions for individual websites, you can navigate the digital landscape with confidence, leveraging the full potential of your browser's camera capabilities while safeguarding your online privacy.
Allowing Camera Access on Mozilla Firefox
Enabling camera access on Mozilla Firefox empowers users to seamlessly engage in video calls, virtual meetings, and interactive web experiences. By granting camera permissions to specific websites, you can harness the full potential of your browser's camera capabilities while maintaining control over your online interactions.
To initiate the process of allowing camera access on Mozilla Firefox, start by clicking on the three-line menu icon located in the top-right corner of the browser window. From the dropdown menu, select "Options" to access the comprehensive range of browser customization options.
Within the "Options" menu, navigate to the "Privacy & Security" tab, which serves as a gateway to managing various permissions and security settings. Here, you will find the "Permissions" category, where you can click on "Settings" next to the "Camera" option.
Upon selecting "Settings" next to the "Camera" option, you will be presented with a list of websites that have requested or been granted camera permissions. This intuitive interface allows you to review and modify the camera access settings for each website, providing you with granular control over your browsing experience.
To grant camera access to a specific website, simply click on the "Add Site" button and enter the URL of the website. Once added, you can select the "Allow" option, effectively granting the selected website permission to access your camera. This action enables seamless integration of camera functionalities within the site's features and services.
Conversely, if you wish to revoke camera access for a particular website, you can click on the three-dot menu icon next to the website's URL and choose the "Block" option. This straightforward process ensures that you can manage camera access with ease, aligning the browser's permissions with your preferences and privacy considerations.
By navigating through the intuitive settings interface of Mozilla Firefox, you can effectively manage camera access permissions, empowering you to engage with a diverse range of online content and services while maintaining control over your privacy and security.
In essence, allowing camera access on Mozilla Firefox is a user-centric process that prioritizes transparency and control, enabling you to tailor your browsing experience to align with your preferences and security requirements. With the ability to grant or revoke camera permissions for individual websites, you can navigate the digital landscape with confidence, leveraging the full potential of your browser's camera capabilities while safeguarding your online privacy.
Allowing Camera Access on Safari
Enabling camera access on Safari is essential for seamlessly engaging in video calls, virtual meetings, and interactive web experiences. By granting camera permissions to specific websites, users can harness the full potential of the browser's camera capabilities while maintaining control over their online interactions.
To initiate the process of allowing camera access on Safari, start by clicking on "Safari" in the top menu bar and selecting "Preferences." This action opens a comprehensive range of browser customization options, providing access to essential settings for managing camera permissions.
Within the "Preferences" menu, navigate to the "Websites" tab, which serves as a gateway to managing various website-specific permissions. Here, you will find the "Camera" option in the left-hand sidebar, which provides a clear overview of websites with camera access permissions.
By clicking on the "Camera" option, you can review and modify the camera access settings for individual websites, empowering you with granular control over your browsing experience. This intuitive interface ensures that users can make informed decisions regarding camera access permissions based on their preferences and privacy considerations.
To grant camera access to a specific website, simply select the website from the list and choose the appropriate permission setting. By clicking the dropdown menu next to the website's URL, you can opt to "Allow" camera access, effectively granting the selected website permission to access your camera. This straightforward process enables seamless integration of camera functionalities within the site's features and services.
Conversely, if you wish to revoke camera access for a particular website, you can select the website from the list and choose the "Deny" option. This user-centric approach ensures that users can manage camera access with ease, aligning the browser's permissions with their individual preferences and privacy requirements.
By navigating through the intuitive settings interface of Safari, users can effectively manage camera access permissions, empowering them to engage with a diverse range of online content and services while maintaining control over their privacy and security.
In essence, allowing camera access on Safari prioritizes transparency and control, enabling users to tailor their browsing experience to align with their preferences and security requirements. With the ability to grant or revoke camera permissions for individual websites, users can navigate the digital landscape with confidence, leveraging the full potential of the browser's camera capabilities while safeguarding their online privacy.
Allowing Camera Access on Microsoft Edge
Enabling camera access on Microsoft Edge is pivotal for seamlessly engaging in video calls, virtual meetings, and interactive web experiences. By granting camera permissions to specific websites, users can harness the full potential of the browser's camera capabilities while maintaining control over their online interactions.
To initiate the process of allowing camera access on Microsoft Edge, start by clicking on the three-dot menu icon located in the top-right corner of the browser window. From the dropdown menu, select "Settings" to access a comprehensive range of browser customization options.
Within the "Settings" menu, navigate to the "Site permissions" section, which serves as a gateway to managing various permissions for individual websites. Here, you will find the "Camera" option, which allows you to review and manage camera access permissions for specific sites.
Upon selecting the "Camera" option, you will be presented with a list of websites that have requested or been granted camera permissions. This intuitive interface empowers users to review and modify the camera access settings for each website, providing granular control over their browsing experience.
To grant camera access to a specific website, simply click on the "Add" button and enter the URL of the website. Once added, you can select the "Allow" option, effectively granting the selected website permission to access your camera. This action facilitates seamless integration of camera functionalities within the site's features and services.
Conversely, if you wish to revoke camera access for a particular website, you can click on the three-dot menu icon next to the website's URL and choose the "Remove" option. This straightforward process ensures that users can manage camera access with ease, aligning the browser's permissions with their individual preferences and privacy considerations.
By navigating through the intuitive settings interface of Microsoft Edge, users can effectively manage camera access permissions, empowering them to engage with a diverse range of online content and services while maintaining control over their privacy and security.
In essence, allowing camera access on Microsoft Edge is a user-centric process that prioritizes transparency and control, enabling users to tailor their browsing experience to align with their preferences and security requirements. With the ability to grant or revoke camera permissions for individual websites, users can navigate the digital landscape with confidence, leveraging the full potential of the browser's camera capabilities while safeguarding their online privacy.
Conclusion
In conclusion, the ability to manage camera access on web browsers is a fundamental aspect of ensuring a seamless and secure online experience. By navigating the intricacies of allowing camera access on popular browsers such as Google Chrome, Mozilla Firefox, Safari, and Microsoft Edge, users can harness the full potential of their browser's camera capabilities while maintaining control over their online interactions.
Throughout this comprehensive guide, we have explored the user-centric processes involved in enabling camera access on different web browsers. From checking existing camera access settings to granting or revoking permissions for individual websites, users have been empowered with actionable insights to navigate the nuanced landscape of browser camera access.
By familiarizing themselves with the specific steps required to manage camera access, users can confidently engage in a wide range of online activities, including video calls, virtual meetings, and interactive web experiences. The ability to grant or revoke camera permissions for individual websites underscores the importance of aligning browser permissions with personal preferences and privacy considerations.
Furthermore, the intuitive settings interfaces of Google Chrome, Mozilla Firefox, Safari, and Microsoft Edge prioritize transparency and control, allowing users to tailor their browsing experiences to align with their individual needs and security requirements. The granular control over camera access settings empowers users to make informed decisions regarding the integration of camera functionalities within websites, thereby enhancing their online interactions while safeguarding their privacy.
As technology continues to evolve, the seamless integration of camera capabilities within web browsers has become increasingly important. Whether connecting with friends and family, participating in remote work, or exploring interactive online content, the ability to manage camera access ensures that users can engage with confidence, leveraging the diverse functionalities offered by modern web browsers.
In essence, the process of allowing camera access on web browsers transcends mere technical configurations; it embodies a user-centric approach that prioritizes empowerment, transparency, and control. By demystifying the complexities of camera access management, this guide aims to equip users with the knowledge and confidence to navigate the digital landscape with ease, harnessing the full potential of their browser's camera capabilities while safeguarding their online privacy.