Introduction
When it comes to browsing the web, Google Chrome stands out as one of the most popular and versatile web browsers. Its user-friendly interface and extensive range of features make it a top choice for millions of users worldwide. One such feature is the ability to access and utilize the camera for various online activities, such as video calls, virtual meetings, and live streaming. However, to make the most of these functionalities, it's essential to ensure that the camera access settings are properly configured within the browser.
In this comprehensive guide, we will walk you through the step-by-step process of allowing camera access on Chrome. Whether you're a seasoned Chrome user or just getting started with this powerful browser, understanding how to manage camera permissions can significantly enhance your browsing experience. By following the simple instructions outlined in this article, you'll be able to seamlessly enable camera access and unlock a world of possibilities for interactive online engagement.
So, if you've ever encountered the frustrating "camera not detected" error or struggled to initiate video calls on Chrome, fear not! With our expert guidance, you'll gain the knowledge and confidence to navigate Chrome's settings and grant the necessary permissions for your camera. Whether you're connecting with friends and family, participating in virtual meetings, or engaging in online events, having a clear understanding of how to allow camera access on Chrome is a valuable skill that can elevate your online interactions.
Now, let's embark on this enlightening journey to demystify the process of enabling camera access on Chrome. By the end of this guide, you'll be equipped with the know-how to effortlessly manage your camera settings and harness the full potential of Chrome's capabilities. So, without further ado, let's dive into the first step of this empowering tutorial: opening Chrome settings.
Step 1: Open Chrome Settings
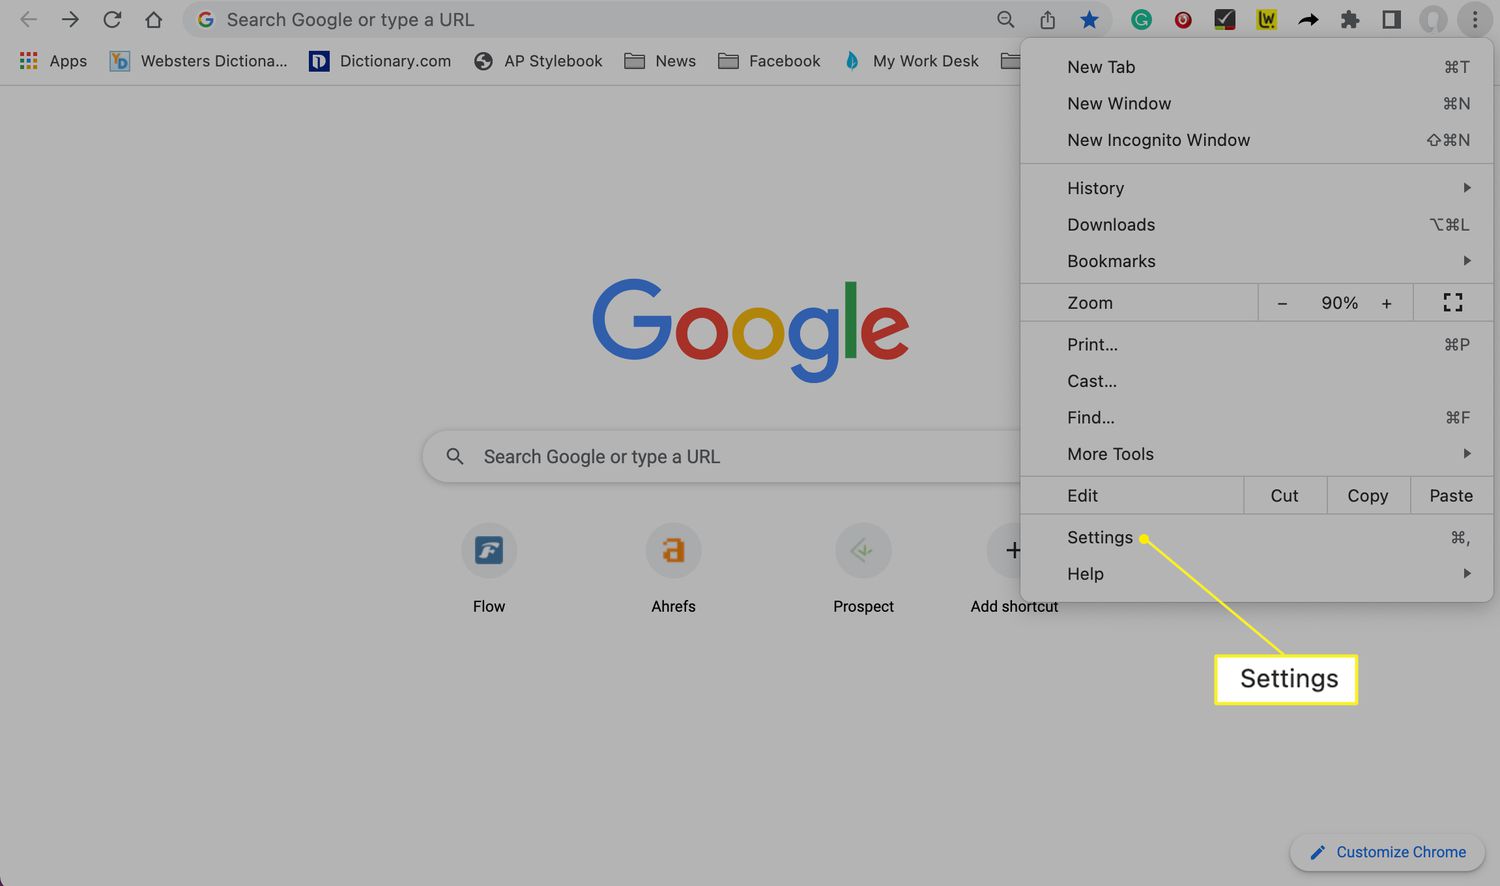
To embark on the journey of enabling camera access on Chrome, the first step is to open the browser's settings. Chrome offers a user-friendly interface, making it convenient to access and customize various features and preferences. Whether you're using Chrome on a desktop or mobile device, the process of accessing settings remains consistent, ensuring a seamless experience across different platforms.
On a desktop or laptop, you can initiate this process by clicking on the three vertical dots located in the top-right corner of the browser window. This action will reveal a dropdown menu, from which you can select the "Settings" option. Alternatively, you can directly access the settings by typing "chrome://settings/" in the address bar and pressing Enter. Both methods lead to the same destination, allowing you to effortlessly navigate to the core settings of the browser.
For mobile users, the process is equally straightforward. Upon launching the Chrome app, tap on the three vertical dots in the top-right corner of the screen to unveil the menu. From there, select the "Settings" option to proceed to the next stage of configuring your browser preferences.
Once you've successfully accessed the settings, you'll be presented with a plethora of customization options, ranging from basic preferences to advanced configurations. This centralized hub empowers users to tailor their browsing experience according to their unique requirements and preferences. It serves as the gateway to a multitude of features, including privacy and security settings, site permissions, and accessibility options.
By opening Chrome settings, you're taking the crucial first step towards optimizing your browsing environment and gaining control over various aspects of the browser's functionality. This foundational action sets the stage for the subsequent steps in our journey to enable camera access, laying the groundwork for a seamless and personalized browsing experience tailored to your specific needs.
With the initial step of opening Chrome settings completed, you're now ready to delve deeper into the intricacies of managing site permissions, including the pivotal task of allowing camera access. As we progress to the next step, you'll gain valuable insights into the precise actions required to navigate Chrome's settings and empower your browsing experience with enhanced camera functionality.
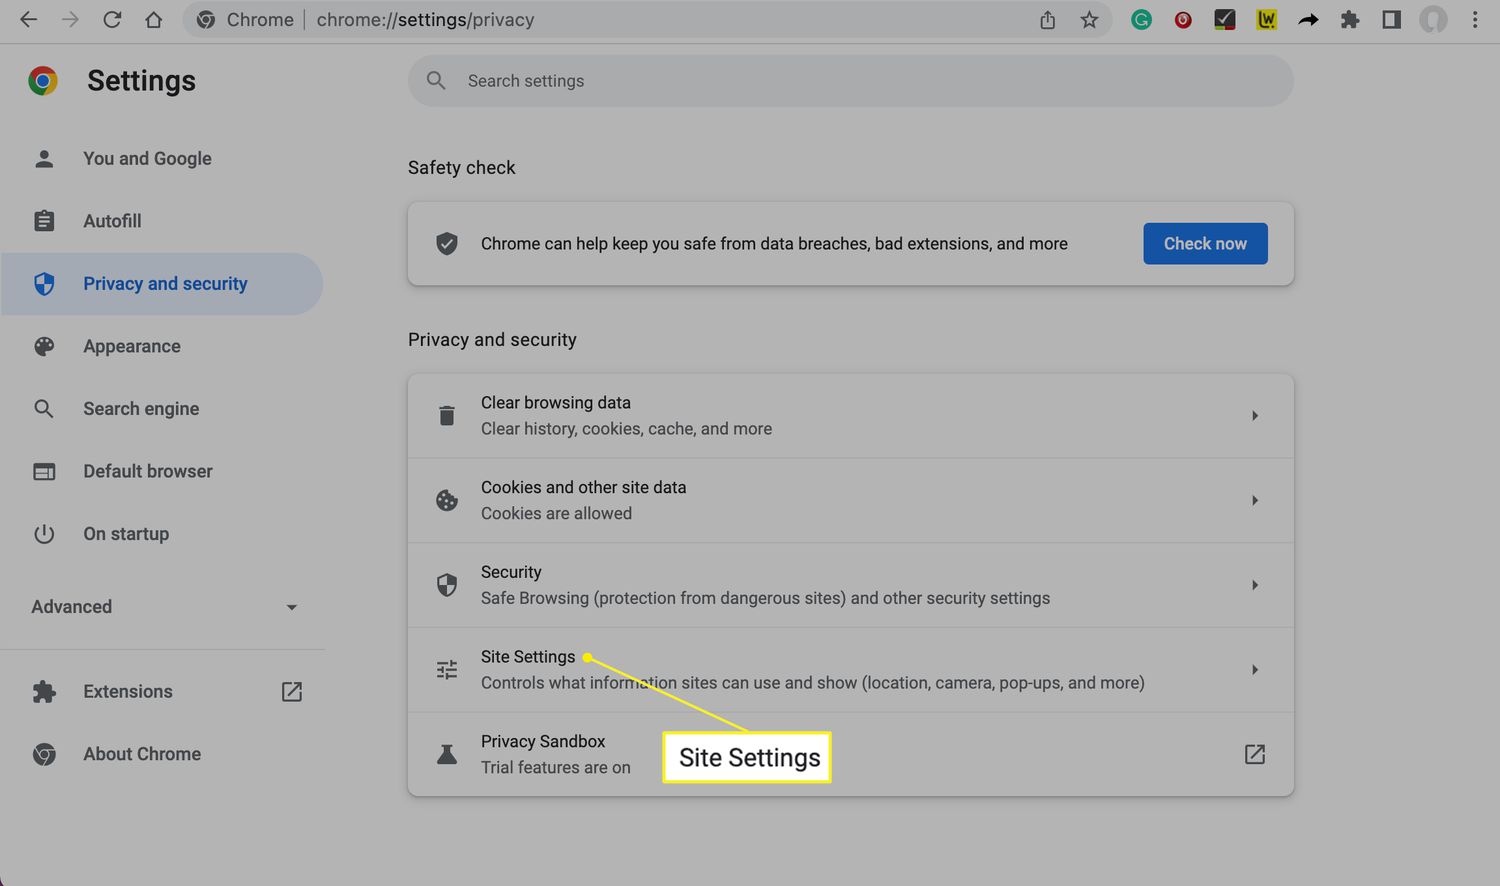
Step 2: Navigate to Site Settings
After successfully accessing Chrome's settings in the previous step, the next crucial stage in enabling camera access involves navigating to the site settings. This pivotal maneuver allows you to delve into the granular details of individual website permissions, including the configuration of camera access for specific sites.
To initiate this process, you can seamlessly navigate to the site settings by clicking on the "Privacy and security" option within the Chrome settings menu. Upon selecting this option, a submenu will appear, presenting you with a range of privacy-related preferences and site-specific permissions. Among these options, you'll find the "Site settings" tab, which serves as the gateway to managing permissions for individual websites.
Upon entering the site settings, you'll be greeted by a comprehensive array of configurable permissions, encompassing camera access, microphone usage, location sharing, and more. This centralized hub empowers users to exercise precise control over how websites interact with their devices, ensuring a tailored and secure browsing experience.
Within the site settings, you'll encounter the "Permissions" section, which provides a detailed overview of the permissions granted to various websites. Here, you can explore and manage the permissions related to camera access, enabling you to fine-tune the settings according to your preferences.
By navigating to the site settings and delving into the permissions framework, you're embarking on a journey of empowerment and customization, enabling you to sculpt your browsing environment to align with your unique needs and preferences. This meticulous approach ensures that you retain full control over how websites interact with your camera, fostering a secure and personalized online experience.
As you navigate through the site settings, you'll gain valuable insights into the intricate web of permissions that govern website interactions, equipping you with the knowledge and tools to manage camera access with precision and confidence. This pivotal stage sets the stage for the subsequent step, where you'll delve into the specific actions required to allow camera access for individual websites, unlocking a world of interactive possibilities within the Chrome browser.
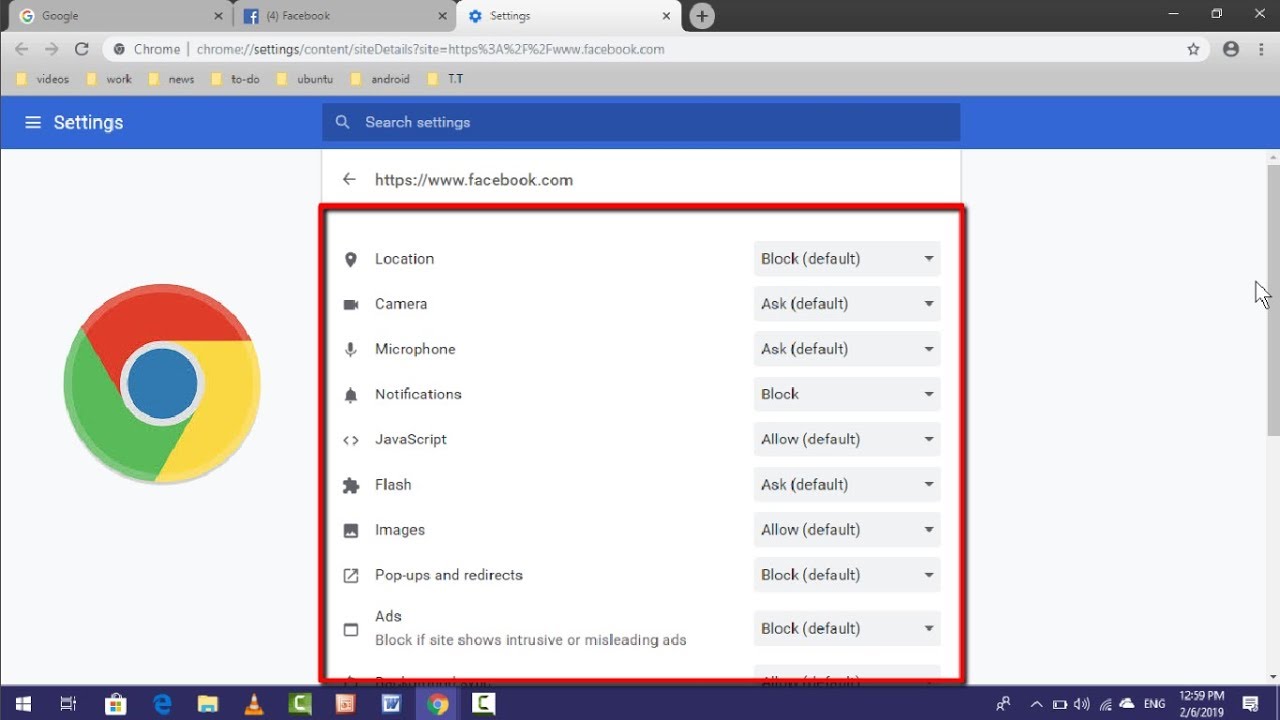
Step 3: Allow Camera Access
Upon reaching the critical stage of allowing camera access within Chrome, you are poised to unlock the full potential of interactive online experiences. This pivotal step empowers you to grant specific websites the necessary permissions to utilize your camera, enabling seamless video calls, virtual meetings, and other engaging activities.
To initiate the process of allowing camera access, navigate to the site settings within Chrome. Once there, locate the "Permissions" section, which provides a comprehensive overview of the permissions granted to individual websites. Within this framework, you'll find the option to manage camera access, allowing you to tailor the settings to align with your preferences.
Upon selecting the camera access option, you'll be presented with a list of websites that have requested or been granted permission to utilize your camera. Here, you have the flexibility to enable or disable camera access for each specific site, providing granular control over how your camera is utilized during online interactions.
By enabling camera access for trusted websites, you can seamlessly engage in video calls, virtual events, and live streaming, leveraging the full potential of your camera for interactive communication and collaboration. Conversely, for websites where camera access is not required or desired, you have the autonomy to disable this permission, ensuring a tailored and secure browsing experience.
Furthermore, Chrome offers the option to manage exceptions, allowing you to customize camera access on a site-by-site basis. This nuanced approach empowers you to curate a personalized permissions framework, ensuring that your camera is utilized in accordance with your preferences and privacy considerations.
As you navigate through the process of allowing camera access, you are embarking on a journey of empowerment and customization, sculpting your browsing environment to align with your unique needs and preferences. By exercising precise control over camera permissions, you are fostering a secure and personalized online experience, where your camera serves as a tool for seamless and enriching interactions.
With camera access successfully configured for trusted websites, you are poised to embrace a world of interactive possibilities within the Chrome browser. Whether connecting with friends and family, participating in virtual meetings, or engaging in online events, the ability to allow camera access empowers you to fully leverage the capabilities of your camera for immersive and engaging online experiences.
Conclusion
In conclusion, mastering the art of allowing camera access on Chrome is a valuable skill that empowers users to harness the full potential of their browsing experience. By following the step-by-step process outlined in this guide, you've gained valuable insights into the intricacies of managing camera permissions within Chrome, setting the stage for seamless and enriching online interactions.
Through the foundational step of opening Chrome settings, you've embarked on a journey of customization and empowerment, gaining access to a myriad of features and preferences that shape your browsing environment. This pivotal action lays the groundwork for the subsequent steps, providing a centralized hub for tailoring your browsing experience according to your unique needs and preferences.
Navigating to the site settings within Chrome has unveiled a world of granular permissions and configurations, allowing you to exercise precise control over how websites interact with your camera. This meticulous approach ensures that you retain autonomy over camera access, fostering a secure and personalized online experience where your privacy considerations are paramount.
By allowing camera access for trusted websites and managing exceptions with finesse, you've sculpted a personalized permissions framework that aligns with your preferences. This nuanced approach empowers you to curate a browsing environment where your camera serves as a tool for seamless and enriching interactions, enabling you to fully leverage its capabilities for immersive online experiences.
As you've journeyed through the process of enabling camera access, you've gained the knowledge and confidence to navigate Chrome's settings with ease, unlocking a world of interactive possibilities within the browser. Whether connecting with friends and family, participating in virtual meetings, or engaging in online events, the ability to allow camera access empowers you to fully leverage the capabilities of your camera for seamless and enriching online experiences.
In essence, the ability to manage camera permissions within Chrome is not just a technical task; it's a gateway to a world of interactive opportunities and personalized browsing experiences. By mastering this skill, you've positioned yourself to embrace a dynamic online landscape where your camera becomes a conduit for seamless communication, collaboration, and engagement.
So, armed with the knowledge and expertise gained from this guide, you're now equipped to navigate Chrome's settings with confidence, allowing you to unlock the full potential of your camera for a myriad of interactive online experiences. Embrace this newfound skill and embark on a journey of enriched online interactions, where your camera becomes a powerful tool for seamless and immersive engagement.