Introduction
Creating a Wi-Fi hotspot on your Windows XP laptop can be a convenient way to share your internet connection with other devices, such as smartphones, tablets, and other laptops. This process essentially turns your laptop into a wireless access point, allowing other devices to connect to the internet through your laptop's internet connection. It's particularly useful when you're in a location with limited or no Wi-Fi access, as it enables you to create your own personal Wi-Fi network.
In this article, we will walk you through the step-by-step process of setting up a Wi-Fi hotspot on your Windows XP laptop. By following these instructions, you'll be able to create a hotspot and connect your other devices to it, providing them with internet access through your laptop's connection. Whether you're traveling, working in a remote area, or simply need to share your internet connection with friends or colleagues, creating a Wi-Fi hotspot on your Windows XP laptop can be a valuable skill to have.
Before we delve into the specific steps for creating a Wi-Fi hotspot, it's important to note that Windows XP is an older operating system, and its support has been discontinued by Microsoft. As a result, some of the features and settings discussed in this article may vary slightly depending on the specific hardware and software configuration of your laptop. However, with the right approach and understanding of the basic principles involved in creating a Wi-Fi hotspot, you should be able to successfully set up and configure a hotspot on your Windows XP laptop.
Now, let's proceed to the first step, where we'll check the compatibility of your laptop for creating a Wi-Fi hotspot. This initial assessment will ensure that your laptop meets the necessary requirements for setting up a hotspot and will help you troubleshoot any potential issues that may arise during the process.
Step 1: Checking Compatibility
Before embarking on the process of creating a Wi-Fi hotspot on your Windows XP laptop, it is crucial to verify the compatibility of your laptop's hardware and software for this functionality. While Windows XP is an older operating system, it is still possible to set up a Wi-Fi hotspot, provided that your laptop meets certain requirements.
-
Wireless Network Adapter: The first and foremost requirement is a wireless network adapter installed on your Windows XP laptop. This adapter enables your laptop to transmit a Wi-Fi signal, essential for creating a hotspot. To check if your laptop is equipped with a wireless network adapter, you can navigate to the "Device Manager" by right-clicking on "My Computer" and selecting "Properties." Under the "Hardware" tab, click on "Device Manager" and look for the "Network Adapters" category. If you find an entry for a wireless network adapter, your laptop likely meets this requirement.
-
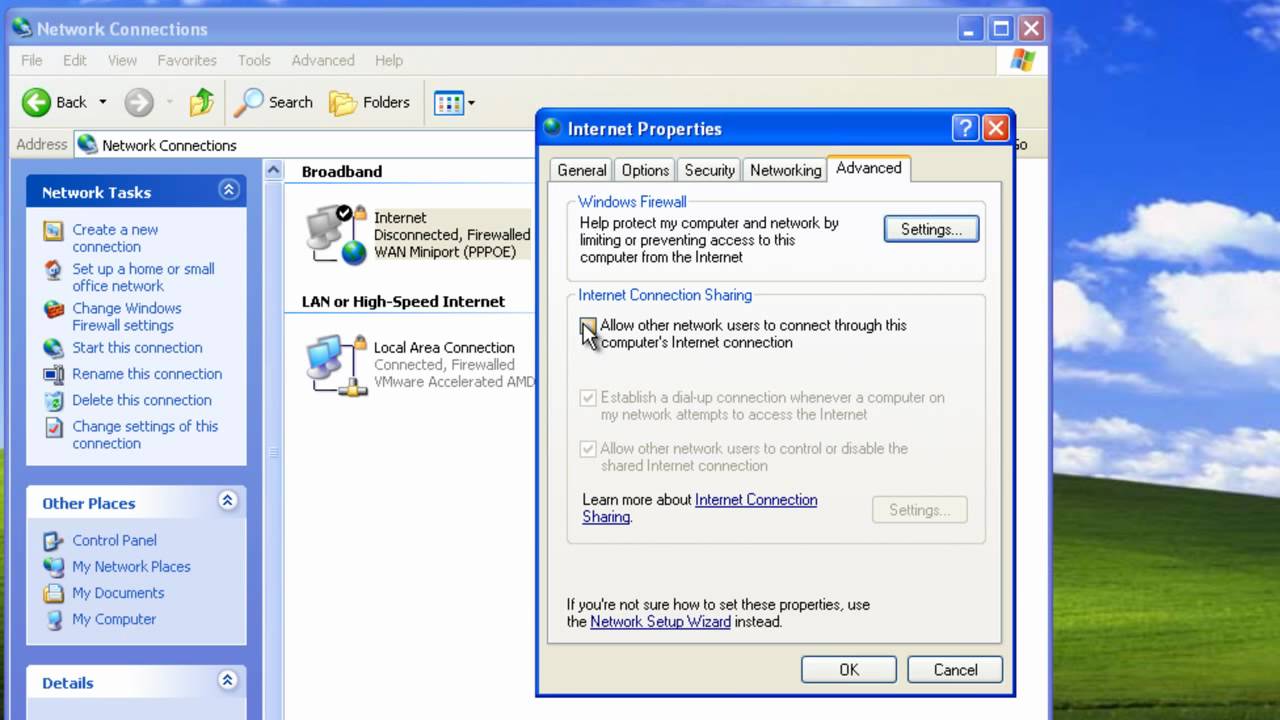
Internet Connection Sharing (ICS): Windows XP includes a feature called Internet Connection Sharing (ICS), which allows you to share your internet connection with other devices. To ensure that ICS is enabled on your laptop, go to the "Network Connections" window, right-click on your active internet connection, and select "Properties." In the "Properties" window, navigate to the "Advanced" tab and verify that the "Allow other network users to connect through this computer's internet connection" option is checked. This setting is essential for enabling your laptop to act as a gateway for other devices to access the internet through the hotspot.
-
Administrative Privileges: To configure the necessary settings for creating a Wi-Fi hotspot, you will need administrative privileges on your Windows XP laptop. Ensure that you are logged in with an account that has administrative rights to make changes to network settings and configurations.
-
Supported Security Protocols: It is important to consider the security protocols supported by your wireless network adapter and the devices that will connect to the hotspot. Windows XP supports various security protocols such as WEP and WPA, and it is advisable to choose a secure encryption method to protect your hotspot from unauthorized access.
By verifying these compatibility factors, you can assess whether your Windows XP laptop is capable of hosting a Wi-Fi hotspot. Once you have confirmed compatibility, you can proceed to the next steps of setting up and configuring the hotspot, as outlined in the subsequent sections.
Now that we have checked the compatibility of your Windows XP laptop, let's move on to the next step, where we will guide you through the process of setting up the Wi-Fi hotspot.
Step 2: Setting up the Hotspot
Setting up a Wi-Fi hotspot on your Windows XP laptop involves configuring the necessary network settings to enable other devices to connect to your laptop and access the internet. This process essentially transforms your laptop into a wireless access point, allowing it to broadcast a Wi-Fi signal that other devices can detect and connect to. Here's a detailed guide on how to set up the hotspot on your Windows XP laptop:
-
Accessing Network Connections: Begin by accessing the "Network Connections" window on your Windows XP laptop. You can do this by clicking on the "Start" button, selecting "Control Panel," and then clicking on "Network Connections." Alternatively, you can right-click on "My Network Places" on the desktop and choose "Properties" to access the network connections.
-
Creating a New Virtual Network: Within the "Network Connections" window, you need to create a new virtual network that will serve as the hotspot. Right-click on the active internet connection of your laptop and select "Properties." In the properties window, navigate to the "Advanced" tab and check the option that says "Allow other network users to connect through this computer's internet connection." This action enables your laptop to share its internet connection with other devices.
-
Configuring the Wireless Network Connection: After enabling internet connection sharing, you need to configure the wireless network connection settings. Right-click on the wireless network adapter within the "Network Connections" window and select "Properties." In the properties window, navigate to the "Wireless Networks" tab and click on the "Add" button to create a new wireless network. You can specify the network name (SSID) and choose the security settings, such as encryption type and password, to secure your hotspot.
-
Enabling the Wireless Access Point: Once you have configured the wireless network settings, you can proceed to enable the wireless access point on your laptop. This action essentially activates the hotspot, allowing other devices to detect and connect to the network. To enable the wireless access point, you may need to access the advanced settings of your wireless network adapter. Look for options related to "hosted network" or "ad-hoc network" and enable the feature to start broadcasting the Wi-Fi signal.
-
Verifying the Hotspot: To ensure that the hotspot is functioning correctly, you can use another device, such as a smartphone or tablet, to scan for available Wi-Fi networks. Your laptop's hotspot should appear in the list of available networks, and you can attempt to connect to it using the security credentials you specified earlier.
By following these steps, you can successfully set up a Wi-Fi hotspot on your Windows XP laptop, allowing other devices to connect and access the internet through your laptop's internet connection. Once the hotspot is operational, you can proceed to the next step of configuring the hotspot settings to optimize its performance and security.
Step 3: Configuring the Hotspot Settings
Configuring the hotspot settings is a crucial step in ensuring that your Wi-Fi hotspot operates efficiently and securely. By fine-tuning the settings, you can optimize the performance of the hotspot and implement security measures to safeguard against unauthorized access. Here's a detailed guide on configuring the hotspot settings on your Windows XP laptop:
1. Network Authentication and Encryption
When configuring the hotspot settings, it's essential to select the appropriate network authentication and encryption methods to protect your hotspot from unauthorized access. Windows XP supports various security protocols, including WEP (Wired Equivalent Privacy) and WPA (Wi-Fi Protected Access). It is recommended to choose WPA, specifically WPA2, as it offers stronger security compared to WEP. By selecting WPA2 and setting a strong password, you can prevent unauthorized users from connecting to your hotspot and ensure that data transmitted over the network is encrypted.
2. Network Name (SSID) and Channel Selection
The network name, also known as the Service Set Identifier (SSID), is the name that identifies your Wi-Fi hotspot. When configuring the hotspot settings, you can specify a unique and easily recognizable SSID for your network. It's advisable to choose a name that is distinct and not commonly used in your vicinity to avoid confusion with other nearby networks. Additionally, you can select the wireless channel for your hotspot, especially if you encounter interference from other nearby networks. Choosing a less congested channel can improve the overall performance and stability of your Wi-Fi hotspot.
3. IP Address Assignment and DHCP
In the hotspot settings, you can configure the method for assigning IP addresses to the devices connecting to your hotspot. Windows XP provides the option to use Dynamic Host Configuration Protocol (DHCP) to automatically assign IP addresses to connected devices. By enabling DHCP, you can streamline the process of IP address allocation and ensure that devices connecting to your hotspot receive the necessary network configurations automatically. This simplifies the setup for connected devices and reduces the likelihood of IP address conflicts within the network.
4. Advanced Security Measures
In addition to network authentication and encryption, you can further enhance the security of your hotspot by implementing advanced security measures. This includes enabling MAC address filtering, which allows you to specify the devices that are permitted to connect to your hotspot based on their unique MAC addresses. By creating a whitelist of approved devices, you can restrict access to the hotspot and prevent unauthorized devices from connecting. Furthermore, you can consider disabling the broadcasting of the SSID to make the network less visible to unauthorized users.
By carefully configuring these hotspot settings, you can establish a secure and efficient Wi-Fi hotspot on your Windows XP laptop. These settings not only contribute to the overall performance and reliability of the hotspot but also play a crucial role in protecting your network from potential security threats. With the hotspot settings configured, you are now ready to connect devices to your hotspot and enjoy the convenience of sharing your internet connection seamlessly.
Step 4: Connecting Devices to the Hotspot
Once you have successfully set up the Wi-Fi hotspot on your Windows XP laptop and configured the necessary settings, the next step involves connecting your devices to the hotspot. By connecting smartphones, tablets, or other laptops to your hotspot, you can provide them with access to the internet through your laptop's internet connection. Here's a detailed guide on how to connect devices to your Wi-Fi hotspot:
-
Scanning for Available Networks: On the device you wish to connect to the hotspot, navigate to the Wi-Fi settings or network connections menu. Depending on the device, this may be found in the settings or control panel. Look for the option to scan for available Wi-Fi networks. Once the scanning is complete, your Windows XP laptop's hotspot should appear in the list of available networks.
-
Selecting the Hotspot: Locate the name of your Windows XP laptop's hotspot, also known as the SSID, in the list of available networks on the device. Click or tap on the hotspot's name to initiate the connection process.
-
Entering Security Credentials: If you have configured security settings for your hotspot, such as a password or passphrase, the device will prompt you to enter this information to authenticate the connection. Enter the security credentials that you specified during the hotspot setup process. This ensures that only authorized users can connect to the hotspot.
-
Establishing the Connection: After entering the security credentials, the device will attempt to establish a connection to the hotspot. Once the connection is established, the device will be able to access the internet through your Windows XP laptop's internet connection. You may see a confirmation message or icon indicating that the device is connected to the Wi-Fi hotspot.
-
Verifying Connectivity: To ensure that the device is successfully connected to the hotspot and has internet access, you can open a web browser or use an internet-dependent app to verify connectivity. If the device is able to access the internet and load web pages, it indicates that the connection to the hotspot is functioning correctly.
By following these steps, you can seamlessly connect your devices to the Wi-Fi hotspot created on your Windows XP laptop. Whether you're using a smartphone, tablet, or another laptop, connecting to the hotspot allows you to leverage your laptop's internet connection and stay connected while on the go or in locations where traditional Wi-Fi access is limited. With your devices connected to the hotspot, you can enjoy the convenience of sharing your internet connection and accessing online resources from multiple devices.
Conclusion
In conclusion, creating a Wi-Fi hotspot on your Windows XP laptop is a valuable skill that can enhance your connectivity options, especially in situations where traditional Wi-Fi access is limited or unavailable. Throughout this guide, we have explored the step-by-step process of setting up a Wi-Fi hotspot, from checking compatibility to configuring the hotspot settings and connecting devices. By following these instructions, you can leverage your Windows XP laptop to share its internet connection with smartphones, tablets, and other devices, providing them with access to the internet through your laptop's connection.
It's important to emphasize that while Windows XP is an older operating system and has reached the end of its support lifecycle, the ability to create a Wi-Fi hotspot remains a viable feature for users who rely on this legacy platform. By understanding the compatibility requirements and following the outlined steps, you can effectively transform your Windows XP laptop into a wireless access point, enabling you to share your internet connection with other devices.
Furthermore, the process of setting up a Wi-Fi hotspot on Windows XP underscores the adaptability and versatility of older technology. Despite the evolution of operating systems and networking standards, the fundamental capability to create a hotspot and share internet connectivity persists, demonstrating the enduring value of legacy systems in specific contexts.
As technology continues to advance, it's essential to recognize that older systems and devices can still serve practical purposes, and with the right knowledge and approach, users can maximize the utility of their existing equipment. Whether you find yourself in a remote location, a temporary workspace, or simply need to extend your internet connection to multiple devices, the ability to create a Wi-Fi hotspot on your Windows XP laptop can provide a convenient solution.
In summary, the process of creating a Wi-Fi hotspot on Windows XP exemplifies the adaptability and resourcefulness of technology users. By leveraging the capabilities of your Windows XP laptop, you can extend the reach of your internet connection and facilitate seamless connectivity for your devices. With the completion of the hotspot setup and device connections, you are now equipped to harness the full potential of your Windows XP laptop and stay connected in diverse settings.