Introduction
The Oculus Quest 2 is a remarkable piece of technology, offering an immersive virtual reality experience that captivates users with its cutting-edge features. However, there may come a time when you need to disassemble the device for maintenance, repair, or customization. This quick guide will walk you through the disassembly process, providing step-by-step instructions and insights to help you navigate the intricate internals of the Oculus Quest 2.
Disassembling the Oculus Quest 2 requires careful attention to detail and the use of precise tools to ensure a successful and safe procedure. Whether you're looking to replace a component, upgrade the device, or simply explore its inner workings, this guide will equip you with the knowledge and confidence to tackle the disassembly process effectively.
By following the steps outlined in this guide, you'll gain a deeper understanding of the Oculus Quest 2's internal components and how they work together to deliver the mesmerizing VR experience. Additionally, this disassembly process can provide valuable insights into the craftsmanship and engineering behind this cutting-edge device, fostering a greater appreciation for its design and functionality.
As we embark on this disassembly journey, it's important to approach the process with patience and precision. Each step is crucial, and attention to detail is paramount to ensure a smooth disassembly and reassembly process. With the right tools, a methodical approach, and a willingness to explore the inner workings of the Oculus Quest 2, you'll be well-prepared to undertake this disassembly adventure.
So, without further ado, let's dive into the intricate world of the Oculus Quest 2 as we embark on the disassembly journey, unraveling the mysteries that lie beneath its sleek exterior.
Tools and Materials Needed
Before embarking on the disassembly of the Oculus Quest 2, it's crucial to gather the essential tools and materials to ensure a smooth and efficient process. Here's a comprehensive list of the items you'll need:
Tools:
-
Phillips Head Screwdriver: A precision Phillips head screwdriver is essential for removing the screws securing various components of the Oculus Quest 2. The size of the screwdriver should match the screws used in the device to avoid damaging them during removal.
-
Plastic Opening Tools: These non-conductive, durable tools are designed to safely pry apart the plastic components of the Oculus Quest 2 without causing damage. They help in separating the device's housing and accessing internal components without risking scratches or other forms of damage.
-
Spudger: A spudger, or a similar non-metallic prying tool, is invaluable for disconnecting delicate ribbon cables and connectors within the Oculus Quest 2. Its non-conductive properties prevent accidental short circuits and protect the internal circuitry.
-
Anti-Static Wrist Strap: To prevent electrostatic discharge (ESD) from damaging sensitive electronic components, an anti-static wrist strap should be worn throughout the disassembly process. This safeguard ensures that any built-up static electricity is harmlessly discharged, safeguarding the integrity of the device's internal electronics.
-
Tweezers: Precision tweezers aid in handling small components and delicate cables within the Oculus Quest 2. They are particularly useful for disconnecting and reconnecting tiny connectors and cables without causing damage or misalignment.
Materials:
-
Clean Workspace: A well-lit, clean, and spacious work area is essential for disassembling the Oculus Quest 2. A clutter-free environment minimizes the risk of misplacing small components and provides ample space for organizing tools and parts.
-
Microfiber Cloth: A soft, lint-free microfiber cloth is ideal for cleaning and handling delicate components, such as the display assembly and lenses, without leaving behind any scratches or residue.
-
Plastic Containers or Trays: Small, labeled containers or trays are indispensable for organizing and storing the screws and components removed during the disassembly process. This organizational approach prevents confusion during reassembly and ensures that no components are misplaced.
By ensuring that you have these tools and materials at your disposal, you'll be well-prepared to commence the disassembly of the Oculus Quest 2 with confidence and precision. Each item plays a crucial role in safeguarding the integrity of the device and facilitating a seamless disassembly process. With these essentials in hand, you're ready to delve into the intricate inner workings of the Oculus Quest 2, gaining valuable insights into its construction and functionality.
Step 1: Removing the Facial Interface
The first step in disassembling the Oculus Quest 2 involves the careful removal of the facial interface, which is the part of the headset that comes into contact with the user's face during VR experiences. This component is designed to be easily detachable, allowing for convenient cleaning and maintenance. Here's a detailed guide on how to remove the facial interface:
-
Prepare the Workspace: Before beginning the disassembly process, ensure that you are working in a clean and well-lit environment. This minimizes the risk of misplacing small components and provides ample space for maneuvering the headset during disassembly.
-
Gently Pry the Interface: Using a plastic opening tool, carefully insert the tool between the facial interface and the main body of the Oculus Quest 2. Apply gentle and even pressure to pry the interface away from the headset. It's important to exercise caution to avoid exerting excessive force, which could lead to damage.
-
Work Around the Edges: Once the tool is inserted, work your way around the edges of the facial interface, gradually releasing the clips that secure it to the headset. Take your time and ensure that each clip is disengaged before proceeding to the next section. This methodical approach minimizes the risk of damaging the interface or the headset.
-
Lift and Remove: As the clips are released, gently lift the facial interface away from the Oculus Quest 2. Be mindful of any attached cables or connectors, if applicable, and ensure that they are safely disconnected before completely removing the interface.
-
Inspect and Clean: With the facial interface removed, take a moment to inspect it for any signs of wear or damage. Additionally, this is an opportune time to clean the interface using a mild, non-abrasive cleanser and a microfiber cloth. Ensure that the interface is thoroughly dry before reassembly.
By following these steps with precision and care, you can successfully remove the facial interface of the Oculus Quest 2, gaining access to the internal components while maintaining the integrity of the headset. This meticulous approach sets the stage for the subsequent steps in the disassembly process, allowing for a seamless exploration of the device's inner workings.
Step 2: Removing the Head Strap
The next crucial step in disassembling the Oculus Quest 2 involves the removal of the head strap, which provides essential support and comfort during extended VR sessions. Removing the head strap is a fundamental part of gaining access to the internal components of the headset, paving the way for further exploration and potential maintenance or customization. Here's a detailed guide on how to remove the head strap with precision and care:
-
Prepare the Workspace: Before proceeding with the removal of the head strap, ensure that your workspace remains clean and well-organized. Having a clutter-free environment minimizes the risk of misplacing small components and provides ample space for maneuvering the headset during disassembly.
-
Identify Attachment Points: Examine the head strap to identify the attachment points where it connects to the main body of the Oculus Quest 2. Depending on the specific model and design, the attachment points may consist of clips, screws, or other securing mechanisms.
-
Unfasten Screws or Release Clips: Using the appropriate tools, such as a Phillips head screwdriver or plastic opening tool, unfasten any screws securing the head strap to the headset. If the attachment points involve clips, carefully release them by applying gentle pressure to disengage the securing mechanism.
-
Disconnect Cables (if applicable): In some instances, the head strap may be integrated with cables that connect to the internal circuitry of the Oculus Quest 2. If this is the case, carefully disconnect any cables or connectors to ensure a safe and hassle-free removal of the head strap.
-
Lift and Remove the Head Strap: With the attachment points disengaged and any cables disconnected, gently lift the head strap away from the headset. Exercise caution to prevent any sudden movements that could potentially damage the headset or the strap itself.
-
Inspect and Prepare for Reassembly: Upon removal, take a moment to inspect the head strap for any signs of wear, damage, or areas requiring cleaning. This is also an opportune time to clean the head strap if necessary, using a mild cleanser and a soft cloth. Ensure that the strap is completely dry before reassembly.
By following these steps attentively, you can effectively remove the head strap of the Oculus Quest 2, gaining access to the internal components while maintaining the integrity of the headset. This meticulous approach sets the stage for the subsequent steps in the disassembly process, allowing for a seamless exploration of the device's inner workings.
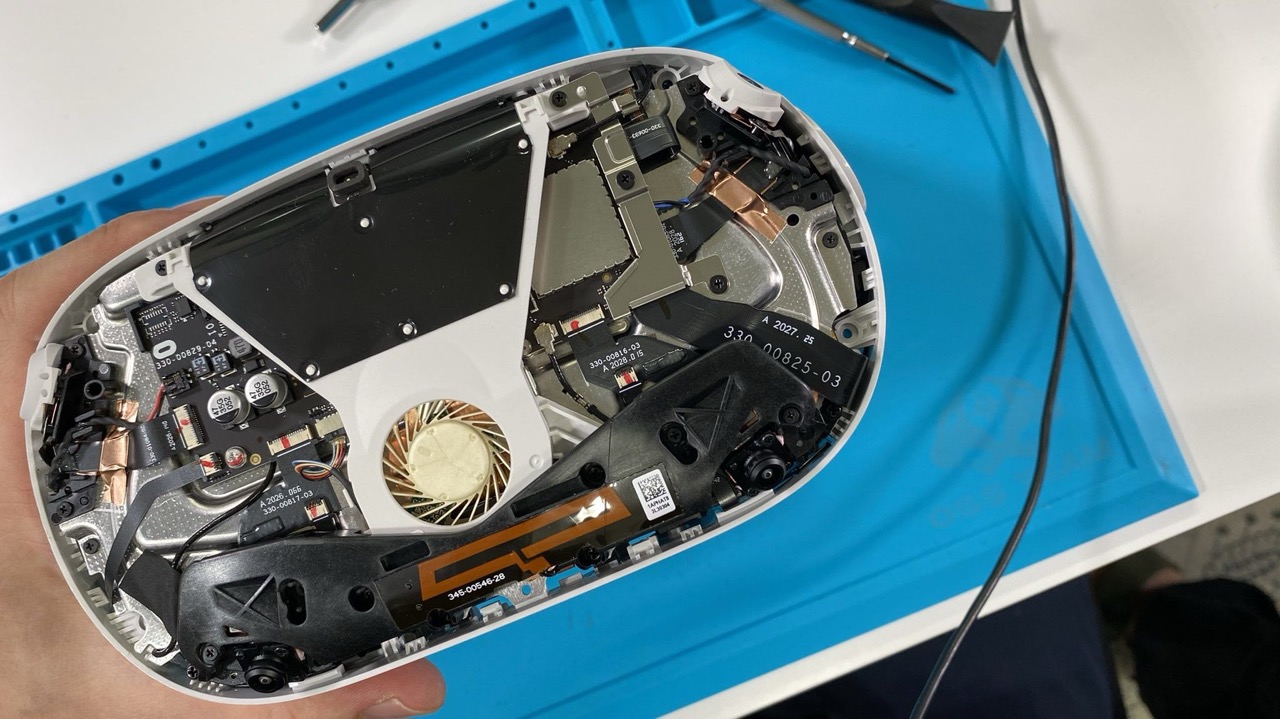
Step 3: Opening the Headset
Opening the Oculus Quest 2 headset is a pivotal step in the disassembly process, as it grants access to the internal components that power the immersive virtual reality experiences. Careful attention and precision are essential to ensure that the opening procedure is executed smoothly and without causing damage to the intricate components within the headset.
-
Prepare the Workspace: Before proceeding with the opening of the headset, it is crucial to reiterate the importance of maintaining a clean and organized workspace. Clear any clutter and ensure that the area is well-lit, providing optimal visibility for the upcoming tasks. This meticulous approach minimizes the risk of misplacing small components and facilitates a methodical disassembly process.
-
Identify Securing Mechanisms: Examine the perimeter of the headset to identify the securing mechanisms that hold the device's housing together. Depending on the specific model and design of the Oculus Quest 2, these mechanisms may consist of screws, clips, or a combination of both. Take note of the locations and types of securing mechanisms to prepare for their subsequent removal.
-
Unfasten Screws: Using a precision Phillips head screwdriver, carefully unfasten the screws that secure the housing of the Oculus Quest 2. It is imperative to keep track of the screws and their respective positions, as they may vary in size and threading. Organizing the screws in labeled containers or trays helps prevent confusion during the reassembly process.
-
Release Clips or Latches: In addition to screws, the housing of the headset may be secured by clips or latches that require careful disengagement. Utilize plastic opening tools to gently release the clips, taking care to apply even pressure and avoid excessive force that could lead to damage. A methodical approach to releasing the clips ensures that the housing can be separated without causing unnecessary strain on the components.
-
Separate the Housing: With the securing mechanisms disengaged, carefully separate the housing of the Oculus Quest 2, taking note of any resistance or areas that may require additional attention. It is essential to exercise patience and precision during this step to prevent unintended damage to the internal components or the housing itself.
By meticulously following these steps, you can successfully open the Oculus Quest 2 headset, gaining access to its internal marvels while upholding the integrity of the device. This pivotal stage sets the foundation for the subsequent steps in the disassembly process, allowing for a thorough exploration of the device's inner workings and the potential for maintenance, repair, or customization endeavors.
Step 4: Disconnecting the Battery
As we delve deeper into the disassembly process of the Oculus Quest 2, the next critical step involves disconnecting the battery to ensure the safety of both the device and the individual performing the disassembly. The battery, a vital power source for the headset, must be carefully disconnected to prevent any potential electrical hazards and facilitate unhindered access to the internal components.
Precautions and Preparation
Before proceeding with the disconnection of the battery, it is imperative to prioritize safety measures. The following precautions should be adhered to:
-
Anti-Static Wrist Strap: Ensure that the anti-static wrist strap is securely fastened to prevent electrostatic discharge, safeguarding the sensitive electronic components from potential damage caused by static electricity.
-
Power Off the Device: Prior to disconnecting the battery, power off the Oculus Quest 2 and ensure that it is not connected to any external power sources. This precautionary measure mitigates the risk of electrical shock during the disconnection process.
-
Identify the Battery: Locate the battery within the headset, taking note of its position and any securing mechanisms that may be in place. Depending on the model and design, the battery may be situated in a specific compartment or integrated within the internal structure of the device.
Disconnection Process
-
Access the Battery Compartment: If the battery is housed within a designated compartment, carefully open or remove the cover to gain access. Exercise caution to avoid damaging any surrounding components or cables during this step.
-
Identify Connectors: Upon accessing the battery, identify the connectors that link it to the internal circuitry of the Oculus Quest 2. These connectors may consist of cables or ribbon cables that facilitate the transfer of power and data between the battery and the device.
-
Disconnect the Connectors: Using a spudger or similar non-metallic tool, gently disconnect the connectors linking the battery to the internal circuitry. It is crucial to exercise precision and care to avoid damaging the connectors or the surrounding components. Ensure that the connectors are fully released before proceeding.
-
Secure the Disconnected Cables: Once the connectors are detached, carefully secure the disconnected cables to prevent accidental reconnection during the subsequent steps of the disassembly process. This precautionary measure minimizes the risk of damage and facilitates a seamless exploration of the device's internal components.
By meticulously following these steps, the battery of the Oculus Quest 2 can be safely disconnected, paving the way for further exploration and potential maintenance or customization endeavors. This methodical approach ensures the safety of both the device and the individual performing the disassembly, setting the stage for a comprehensive and insightful exploration of the device's inner workings.
Step 5: Removing the Mainboard
As we progress through the disassembly of the Oculus Quest 2, the removal of the mainboard emerges as a pivotal step in gaining access to the heart of the device's electronic architecture. The mainboard, also known as the motherboard, serves as the central hub for processing and coordinating the intricate functions of the headset. Careful attention and precision are paramount as we navigate the process of removing the mainboard to ensure the integrity of the device and its internal components.
Precautions and Preparation
Before initiating the removal of the mainboard, it is imperative to adhere to essential precautions and preparation measures to safeguard both the device and the individual performing the disassembly:
-
Anti-Static Measures: Confirm that the anti-static wrist strap is securely fastened to mitigate the risk of electrostatic discharge, preserving the delicate electronic components from potential damage caused by static electricity.
-
Power Off and Disconnection: Ensure that the Oculus Quest 2 is powered off and disconnected from any external power sources. This precautionary measure minimizes the risk of electrical hazards during the mainboard removal process.
-
Organized Workspace: Maintain a clean and organized workspace, free from clutter, to facilitate a methodical and meticulous approach to the removal of the mainboard. Adequate lighting and ample space enhance visibility and maneuverability during the disassembly process.
Removal Process
-
Locate the Mainboard: Identify the mainboard within the Oculus Quest 2, typically situated at a central position within the device's housing. Take note of any securing mechanisms, such as screws or clips, that hold the mainboard in place.
-
Unfasten Securing Mechanisms: Using a precision Phillips head screwdriver, carefully unfasten the screws securing the mainboard to the housing. It is essential to keep track of the screws and their respective positions to ensure accurate reassembly later.
-
Release Cable Connections: Identify the cable connections linking the mainboard to other components, such as the display assembly and internal circuitry. With precision tweezers or a spudger, gently release the cable connectors, ensuring that they are fully detached before proceeding.
-
Lift and Remove the Mainboard: Once the securing mechanisms and cable connections are released, carefully lift the mainboard away from the housing. Exercise caution to prevent any undue strain on the delicate components and cables, ensuring a smooth and damage-free removal process.
By meticulously following these steps, the mainboard of the Oculus Quest 2 can be successfully removed, unveiling the intricate electronic core of the device while upholding the integrity of its internal components. This meticulous approach sets the stage for a comprehensive exploration of the mainboard's architecture, potentially leading to maintenance, repair, or customization endeavors with a deep understanding of the device's electronic framework.
Step 6: Removing the Display Assembly
The removal of the display assembly marks a significant phase in the disassembly process of the Oculus Quest 2, unveiling the visual centerpiece of the virtual reality experience. The display assembly, encompassing the high-resolution screens and associated components, is a vital element that immerses users in captivating virtual environments. As we navigate the meticulous procedure of removing the display assembly, precision and care are paramount to ensure the integrity of the delicate components and the seamless reassembly of the device.
Precautions and Preparation
Before embarking on the removal of the display assembly, it is essential to adhere to crucial precautions and preparation measures to safeguard the intricate components and facilitate a methodical disassembly process:
-
Anti-Static Measures: Confirm the secure fastening of the anti-static wrist strap to mitigate the risk of electrostatic discharge, preserving the sensitive electronic components from potential damage caused by static electricity.
-
Power Off and Disconnection: Ensure that the Oculus Quest 2 is powered off and disconnected from any external power sources. This precautionary measure minimizes the risk of electrical hazards during the removal process.
-
Organized Workspace: Maintain a clean and organized workspace, free from clutter, to facilitate a methodical and meticulous approach to the removal of the display assembly. Adequate lighting and ample space enhance visibility and maneuverability during the disassembly process.
Removal Process
-
Identify the Display Assembly: Locate the display assembly within the Oculus Quest 2, typically positioned at the forefront of the device's housing. Take note of any securing mechanisms, such as screws or clips, that hold the display assembly in place.
-
Unfasten Securing Mechanisms: Using a precision Phillips head screwdriver, carefully unfasten the screws securing the display assembly to the housing. It is imperative to keep track of the screws and their respective positions to ensure accurate reassembly later.
-
Release Cable Connections: Identify the cable connections linking the display assembly to the mainboard and internal circuitry. With precision tweezers or a spudger, gently release the cable connectors, ensuring that they are fully detached before proceeding.
-
Lift and Remove the Display Assembly: Once the securing mechanisms and cable connections are released, carefully lift the display assembly away from the housing. Exercise caution to prevent any undue strain on the delicate components and cables, ensuring a smooth and damage-free removal process.
By meticulously following these steps, the display assembly of the Oculus Quest 2 can be successfully removed, revealing the captivating visual core of the device while upholding the integrity of its internal components. This meticulous approach sets the stage for a comprehensive exploration of the display assembly's architecture, potentially leading to maintenance, repair, or customization endeavors with a deep understanding of the device's visual framework.
Step 7: Reassembling the Oculus Quest 2
After successfully navigating through the intricate process of disassembling the Oculus Quest 2, the reassembly phase presents an opportunity to apply the acquired knowledge and meticulous attention to detail. The careful reassembly of the device is crucial to ensure its structural integrity and seamless functionality. As we embark on this pivotal phase, precision and methodical execution are paramount to guarantee a successful and fully operational reassembled Oculus Quest 2.
Organized Workspace
To commence the reassembly process, it is essential to return to a clean and organized workspace, free from any clutter or potential distractions. Adequate lighting and a clutter-free environment facilitate optimal visibility and maneuverability, enabling a methodical and seamless reassembly experience.
Component Alignment
Begin the reassembly by carefully aligning the internal components, such as the mainboard and display assembly, with their respective housing within the Oculus Quest 2. Ensuring precise alignment is crucial to prevent any potential damage to the components during the reassembly process.
Cable Connections
With the components properly aligned, proceed to reconnect the cable connections, adhering to the specific orientations and securing mechanisms. Exercise caution and precision when reattaching the delicate cable connectors to prevent any misalignment or damage to the internal circuitry.
Securing Mechanisms
As the internal components are repositioned and the cable connections are restored, carefully fasten the securing mechanisms, such as screws or clips, to secure the components within the housing. Utilize the appropriate tools and ensure that the securing mechanisms are tightened to the specified torque to maintain the structural integrity of the device.
Functional Testing
Upon completing the reassembly, conduct thorough functional testing to verify the proper operation of the Oculus Quest 2. Power on the device and assess its functionality, ensuring that all components are functioning as intended and that there are no irregularities or malfunctions.
By meticulously following these steps, the Oculus Quest 2 can be successfully reassembled, reaffirming its structural integrity and operational prowess. The reassembly process not only consolidates the acquired knowledge of the device's internal architecture but also instills a sense of accomplishment and confidence in navigating future maintenance or customization endeavors.