Introduction
Whether you’re a seasoned Mac user or new to the world of macOS, finding and managing your downloads is an essential skill. With the abundance of files we download every day, it’s easy for them to get lost in the shuffle. Thankfully, there are several methods you can use to locate your downloaded files on your Mac.
In this article, we will explore various ways to find and manage your downloads on a Mac. From checking the Downloads folder to using search functions in browsers and accessing download histories, we will cover all the bases. So, if you’re ready to take control of your downloaded files, let’s dive in!
Before we begin with the different methods, it’s important to note that the steps provided in this article are based on the latest versions of macOS and popular web browsers such as Safari, Google Chrome, and Mozilla Firefox. If you have an older version of macOS or a different browser, the steps might vary slightly.
Now, let’s explore the multiple approaches you can take to easily locate and manage your downloaded files on your Mac.
Checking the Downloads Folder
One of the most straightforward methods to find your downloaded files on a Mac is by checking the Downloads folder. When you download a file, it is often saved to this default folder unless you specify a different location.
To access the Downloads folder, follow these simple steps:
- Click on the magnifying glass icon in the top right corner of your screen to open Spotlight Search.
- Type “Downloads” in the search bar and press Enter.
- The Downloads folder will appear in the search results. Click on it to open the folder.
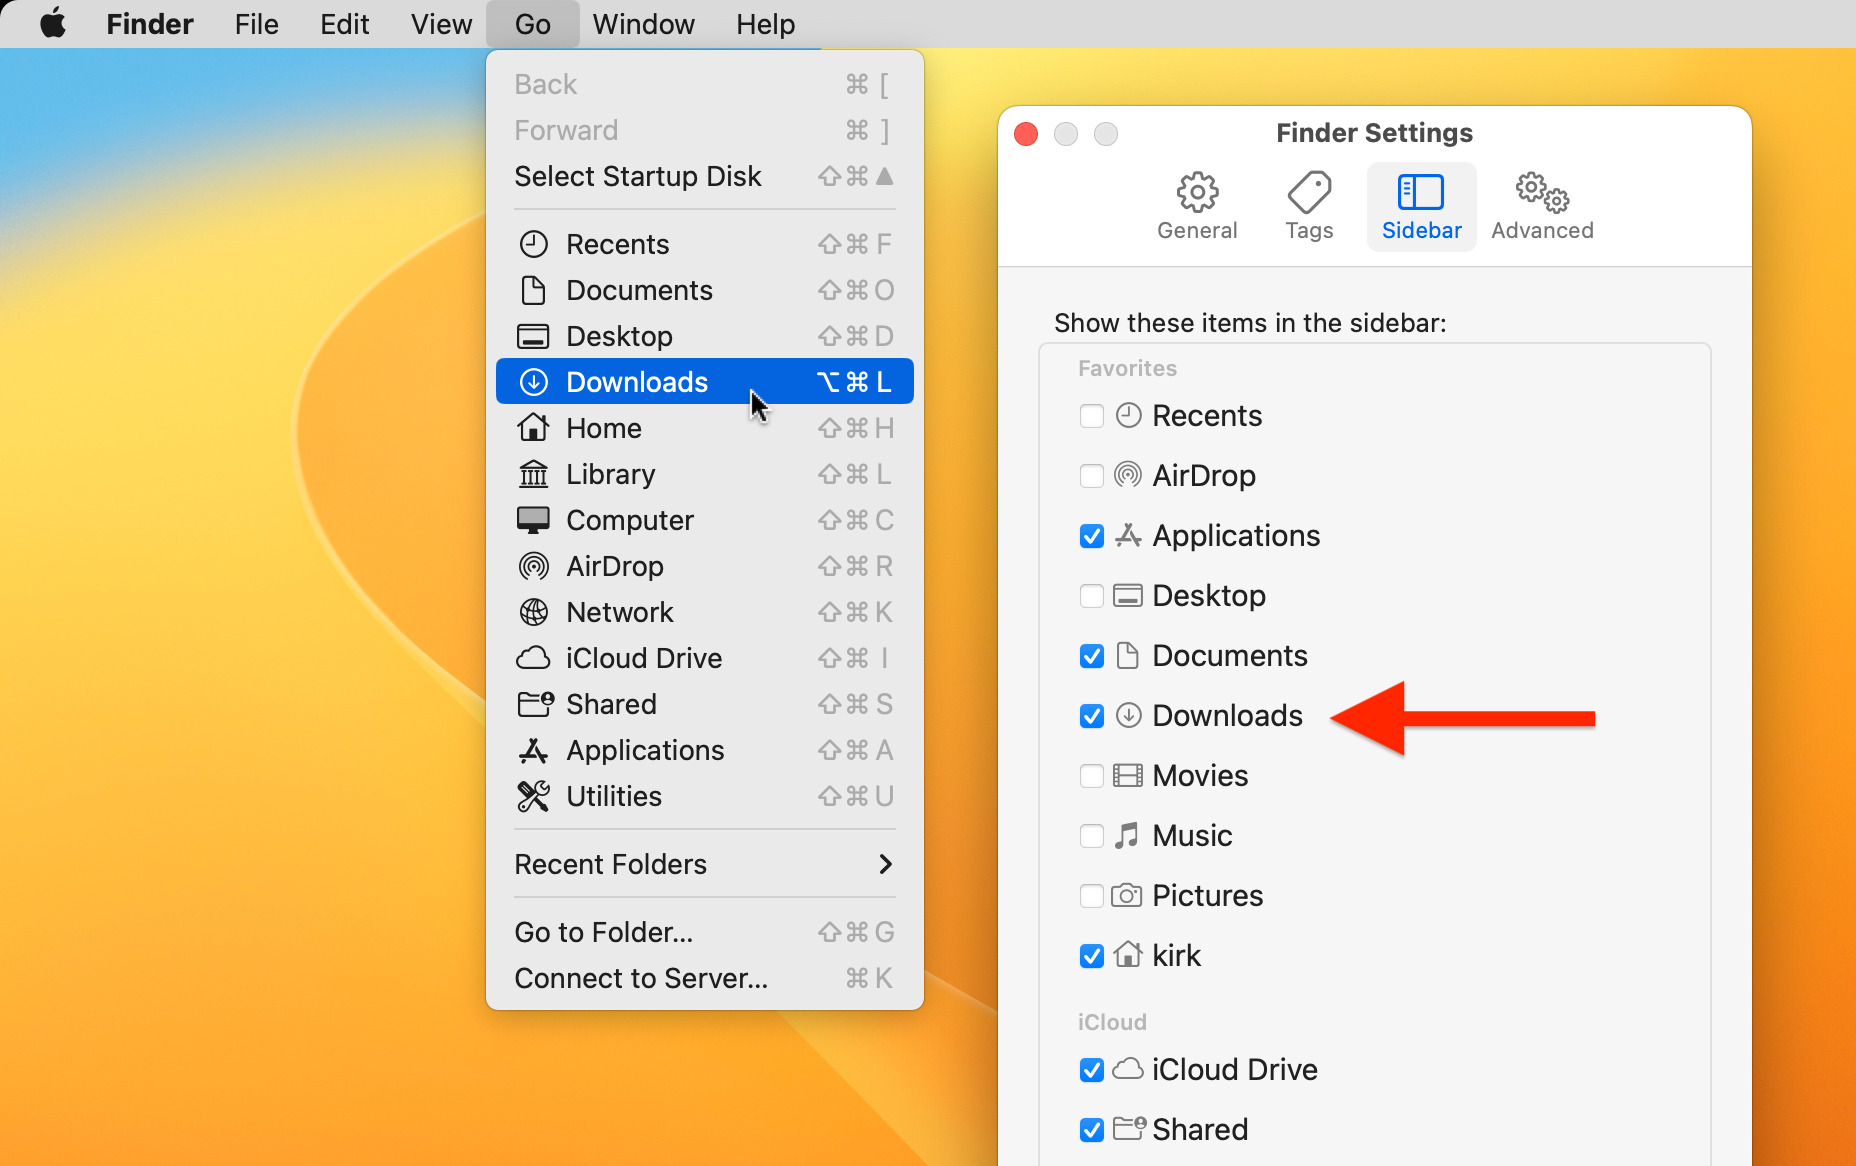
Alternatively, you can also access the Downloads folder through the Finder:
- Open a Finder window by clicking on the Finder icon in your Dock or by pressing Command + N.
- In the left sidebar, you will find a list of shortcuts. Click on “Downloads” to open the folder.
Once you have accessed the Downloads folder, you can browse through the files and organize them according to your preference. You can also use the search bar at the top right corner of the Finder window to locate specific files by name.
It’s important to periodically clear out your Downloads folder to free up storage space on your Mac. You can do this by selecting the files you no longer need and dragging them to the Trash or by right-clicking on the files and selecting “Move to Trash.”
Remember that files in the Downloads folder are stored locally on your Mac’s hard drive. If you delete a file from this folder, it will be permanently removed from your system unless you have a backup. Therefore, make sure to double-check the files you are deleting to avoid losing important data.
Using the Finder Search
If you are unable to locate a specific file in the Downloads folder, you can use the Finder search function to quickly find it. The Finder search allows you to search for files based on various criteria, including file name, file type, and date modified.
To use the Finder search to locate your downloaded files, follow these steps:
- Open a Finder window by clicking on the Finder icon in your Dock or by pressing Command + N.
- Click on the search bar at the top right corner of the Finder window. This will activate the search function.
- Type in the name or a keyword related to the file you are looking for. For example, if you downloaded a Word document, you can type “.docx” to filter for that file type.
- As you type, the search results will automatically update to display the matching files. You can further refine the search results by using the options provided below the search bar, such as “Kind” or “Date Modified”.
If you still can’t find the file you’re looking for, make sure to check that you haven’t accidentally selected a specific location within the Finder search parameters. You can do this by clicking on “This Mac” under the search bar, which will search your entire computer instead of just a specific folder or location.
The Finder search function is a powerful tool that can help you quickly locate and retrieve your downloaded files. It’s especially useful when you have a large number of downloads or when you need to find a specific file among multiple folders and locations on your Mac.
By mastering the Finder search, you can save time and effort in searching for your downloaded files, allowing you to focus on your tasks and projects without the frustration of manually browsing through folders.
Searching in Safari
If you frequently use Safari as your web browser on your Mac, you can take advantage of its built-in search feature to find your downloaded files. Safari provides a convenient way to search for specific downloads within the browser itself.
To search for downloaded files in Safari, follow these steps:
- Open Safari on your Mac.
- In the top menu, click on “History” and then select “Show Downloads” from the dropdown menu. Alternatively, you can use the keyboard shortcut Option + Command + L.
- A Downloads window will appear, displaying a list of your recent downloads.
- At the top right corner of the Downloads window, you will find a search bar. Here, you can enter keywords or the name of the file you are looking for.
- As you type, the Downloads window will filter the results and display only the files that match your search query.
- If you want to clear the search and view all the downloads again, you can click on the “x” button at the right side of the search bar or simply delete the text in the search bar and press Enter.
Using Safari’s built-in search feature is a quick and efficient way to locate specific downloads without needing to open the Downloads folder or use external search functions. It’s especially useful when you remember the file’s name or some keywords related to it.
Additionally, the Downloads window in Safari also provides useful information about each file, such as the file name, file size, and the date it was downloaded. This can help you easily identify the desired file among your download history.
By utilizing Safari’s search feature, you can save time and effort in locating your downloaded files, ensuring that you can access them whenever you need them.
Searching in Google Chrome
If you’re a Google Chrome user, you can leverage the browser’s search functionality to quickly locate your downloaded files. Google Chrome provides a seamless way to search for specific downloads within the browser itself.
To search for downloaded files in Google Chrome, follow these steps:
- Open Google Chrome on your Mac.
- In the top menu, click on the three-dot icon to open the menu, then select “Downloads” from the dropdown menu. Alternatively, you can use the keyboard shortcut Command + Shift + J.
- A new tab will open, displaying your download history in Chrome.
- At the top right corner of the Downloads tab, you will find a search bar. Here, you can enter keywords or the name of the file you are looking for.
- As you type, Google Chrome will filter the results and display only the files that match your search query.
- If you want to clear the search and view all the downloads again, you can click on the “x” button at the right side of the search bar or simply delete the text in the search bar and press Enter.
Using Google Chrome’s built-in search feature makes it convenient to find specific downloads without the need to navigate through multiple folders or use external search functions. It’s especially helpful when you know the file’s name or certain keywords related to it.
Furthermore, the Downloads tab in Google Chrome provides additional details about each file, such as the file name, file size, and the date it was downloaded. This information can assist you in quickly identifying the desired file from your download history.
By taking advantage of Google Chrome’s search feature, you can save time and streamline the process of locating your downloaded files, ensuring that you can access them whenever you need them.
Searching in Mozilla Firefox
If you prefer using Mozilla Firefox as your web browser on your Mac, you can utilize its search functionality to locate your downloaded files. Firefox provides a convenient way to search for specific downloads within the browser itself.
To search for downloaded files in Mozilla Firefox, follow these steps:
- Open Mozilla Firefox on your Mac.
- In the top menu, click on the three-line icon to open the menu, then select “Library” and click on “Downloads”. Alternatively, you can use the keyboard shortcut Command + Shift + Y.
- A new tab will open, displaying your download history in Firefox.
- At the top right corner of the Downloads tab, you will find a search bar. Here, you can enter keywords or the name of the file you are looking for.
- As you type, Mozilla Firefox will filter the results and display only the files that match your search query.
- If you want to clear the search and view all the downloads again, you can click on the “x” button at the right side of the search bar or simply delete the text in the search bar and press Enter.
By using Mozilla Firefox’s built-in search feature, you can easily find specific downloads without the need to navigate through folders or use external search tools. This feature is particularly useful when you remember the file’s name or have specific keywords related to it.
Additionally, the Downloads tab in Mozilla Firefox provides useful information about each file, including the file name, file size, and the date it was downloaded. This way, you can quickly identify the desired file from your download history.
By leveraging the search feature in Mozilla Firefox, you can save time and effort in locating your downloaded files, ensuring that you can access them whenever you need them.
Checking Download History in Safari
If you are using Safari as your web browser on your Mac, you can easily review your download history to locate files you have previously downloaded. Checking the download history in Safari allows you to quickly find and manage your downloaded files.
To check your download history in Safari, follow these steps:
- Open Safari on your Mac.
- In the top menu, click on “History.”
- A dropdown menu will appear. Towards the bottom of the menu, you will find the “Show All History” option. Click on it.
- A new window will open, displaying your browsing history.
- In the search bar at the top right corner of the history window, you can enter keywords or the name of the file you want to find.
- As you type, Safari will filter the results and display only the history entries that match your search query.
- Scroll through the list to find the specific download you are looking for.
When you locate the desired download in your history, you can click on it to open the file in Safari’s Downloads window. From there, you can access the file and perform actions such as opening or deleting it.
It’s important to note that the download history in Safari only stores the records of files you have downloaded. If you have deleted a file from your Downloads folder, it will no longer appear in the download history.
By checking your download history in Safari, you can easily keep track of the files you have downloaded and quickly retrieve them when needed.
Checking Download History in Google Chrome
If you are using Google Chrome as your web browser on your Mac, you can easily access your download history to view and manage your downloaded files. Checking the download history in Google Chrome allows you to conveniently locate and organize your downloads.
To check your download history in Google Chrome, follow these steps:
- Open Google Chrome on your Mac.
- In the top menu, click on the three-dot icon to open the menu.
- From the menu, hover your cursor over “Downloads” and click on it.
- A new tab will open, displaying your download history in Google Chrome.
- You can scroll through the list to find the specific download you are looking for.
- If you want to search for a specific download, you can use the search bar at the top right corner of the Downloads tab. Simply enter keywords or the name of the file you want to find, and the list will be filtered accordingly.
- Clicking on a downloaded file will open it in the default application associated with its file type, allowing you to access and work with the file.
The download history in Google Chrome provides a record of all the files you have downloaded using the browser. It includes details such as the file name, file size, and the date and time of the download. This information can be helpful in quickly identifying and managing your downloaded files.
It’s worth noting that Google Chrome retains your download history even after you have deleted the downloaded files from your computer. Therefore, you can still access the record of your downloads even if the actual files are no longer present in your system.
By checking your download history in Google Chrome, you can easily keep track of your downloaded files, find specific downloads, and perform necessary actions on them according to your needs.
Checking Download History in Mozilla Firefox
If you use Mozilla Firefox as your web browser on your Mac, you have the ability to access your download history within the browser. Reviewing your download history in Mozilla Firefox allows you to easily track and manage your downloaded files.
Here’s how you can check your download history in Mozilla Firefox:
- Launch Mozilla Firefox on your Mac.
- In the top menu, click on the three-line icon to open the menu.
- From the menu, select “Library” and then click on “Downloads.”
- A new tab will open, displaying your download history in Mozilla Firefox.
- You can scroll through the list to find the specific download you are looking for.
- If you want to search for a particular download, you can use the search bar at the top right corner of the Downloads tab. Enter keywords or the name of the file you are searching for, and the list will be filtered accordingly.
- Clicking on a downloaded file will open it or reveal it in Finder, depending on its file type and your system settings.
The download history in Mozilla Firefox provides details about each downloaded file, including the file name, file size, and the date and time it was downloaded. This information can assist you in quickly identifying and managing your downloaded files.
Note that the download history in Mozilla Firefox retains a record of your downloads even if you have deleted the downloaded files from your computer. Therefore, you can still access the history of your downloads, even if the actual files are no longer present in your system.
By navigating through your download history in Mozilla Firefox, you can easily keep track of your downloads, locate specific files, and take appropriate actions to manage and organize them according to your preferences.
Using Spotlight Search
If you are using a Mac, one powerful tool at your disposal is Spotlight Search. This built-in feature allows you to search your entire computer, including your downloads, with just a few keystrokes. Using Spotlight Search can save you time and effort by quickly locating specific downloaded files.
Here’s how you can use Spotlight Search to find your downloaded files:
- Press Command + Spacebar to activate Spotlight Search.
- A search bar will appear in the center of your screen.
- Type in the name of the file you want to find or related keywords.
- As you type, Spotlight Search will start displaying results in real-time below the search bar.
- Look for the “Documents” category in the search results and click on it to expand.
- Scroll through the search results to find the downloaded file you are looking for.
- Once you locate the file, you can click on it to open it or access its location in Finder.
Spotlight Search is incredibly versatile, allowing you to find files across your entire Mac, not just in specific folders. This makes it an efficient way to locate downloaded files, even if you don’t remember the specific location where they were saved.
Additionally, Spotlight Search also supports advanced search operators, such as file type filters (e.g., “kind:pdf”) or date filters (e.g., “created:yesterday”). These operators can help you narrow down your search results and find your downloaded files more quickly.
By leveraging the power of Spotlight Search, you can effortlessly locate your downloaded files, saving yourself the time and hassle of manually searching through different folders on your Mac.
Using Terminal
If you’re comfortable working with the command line interface, you can utilize Terminal to efficiently locate and manage your downloaded files on a Mac. Terminal provides a powerful way to interact with your system and perform various tasks, including finding specific files.
Here’s how you can use Terminal to search for downloaded files:
- Open Terminal on your Mac.
- Type the following command and press Enter:
cd ~/Downloads - This command will change the working directory to your Downloads folder.
- Next, you can use various commands to search for files, such as:
ls– Lists all the files and folders in the current directory.ls -l– Lists files and folders in a detailed format (including permissions, size, and modification date).ls -a– Lists all files and folders, including hidden ones.find . -name "filename"– Searches for a file with a specific name in the current directory and its subdirectories. Replace “filename” with the actual name of the file you’re looking for.
Using Terminal gives you precise control over your search commands and allows for advanced filtering and sorting options. It’s particularly useful when you need to perform complex searches or when you’re familiar with specific Unix commands.
In addition to searching for files, Terminal also allows you to perform various file management operations, such as moving, copying, deleting, and renaming files. This gives you full control over organizing and managing your downloaded files directly from the command line.
Remember to exercise caution when using Terminal, as commands can have significant system-level effects. Double-check your commands before executing them, especially when deleting or modifying files, to avoid unintended consequences.
By leveraging the power of Terminal, you can efficiently search for and manage your downloaded files on your Mac, taking advantage of the flexibility and control that the command line provides.
Conclusion
Locating and managing your downloaded files on a Mac is vital for staying organized and accessing important documents, media files, and more. In this article, we explored various methods to help you find your downloaded files effectively.
We started by checking the Downloads folder, the default location where downloaded files are often saved. By accessing this folder, you can easily browse through your downloads and organize them as needed. Additionally, we explored how to use the Finder search function to search for specific files based on criteria such as file name and file type.
We then delved into searching for downloaded files in popular web browsers such as Safari, Google Chrome, and Mozilla Firefox. Each browser provides built-in search features that allow you to search your download history and quickly locate specific files. This can be incredibly useful when you remember keywords related to the file or its name.
Moreover, we discussed how to leverage Spotlight Search, a powerful tool on macOS, to search your entire computer, including downloaded files. This method is ideal when you need to find files scattered across different folders and locations.
Lastly, we explored using Terminal, the command line interface on a Mac, to search for and manage downloaded files. Terminal offers advanced control, allowing for precise search commands and file manipulation operations.
By utilizing these various methods, you can save time and effort in locating your downloaded files on your Mac. Remember to regularly clear out unnecessary files from your Downloads folder to free up storage space and keep your system running smoothly.
Whether you prefer the simplicity of browsing your Downloads folder, the convenience of browser-specific search functions, the versatility of Spotlight Search, or the power of Terminal, there’s a method that suits your preferences and workflow. Experiment with these techniques to find the most efficient way to manage your downloaded files on your Mac.