Introduction
Welcome to this guide on how to download Zoom for Mac! In today’s digital age, video conferencing has become an essential tool for connecting with others virtually, whether it be for work, school, or personal communication. Zoom, a popular video conferencing platform, offers a seamless and user-friendly experience for Mac users that allows you to participate in meetings, join webinars, and collaborate with others from the comfort of your own home.
Downloading Zoom for Mac is a simple process that can be done by following a few easy steps. This guide will walk you through each step, ensuring that you have Zoom up and running on your Mac in no time. Before we dive into the process, it’s important to note that Zoom is compatible with various versions of Mac operating systems. So, regardless of whether you’re using the latest version or an older one, you’ll be able to download and use Zoom on your Mac.
Now, without further ado, let’s get started with the step-by-step process of downloading Zoom for Mac. Whether you’re a first-time user or simply need to reinstall the application, this guide will provide you with all the information you need to successfully download Zoom and begin your video conferencing journey.
Step 1: Go to the Zoom website
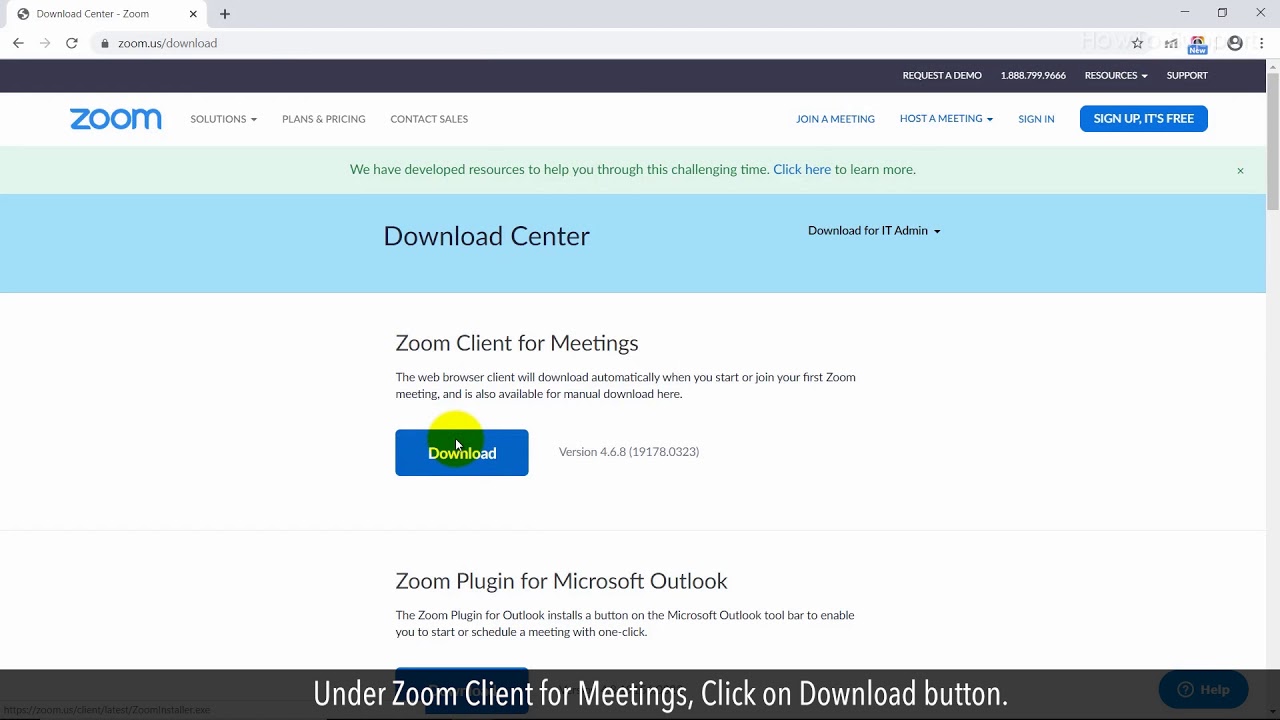
The first step to download Zoom for Mac is to visit the official Zoom website. Open your preferred web browser and type in “zoom.us” in the address bar. Hit Enter or Return to access the website.
Once you are on the Zoom website, you will be presented with various options and resources related to Zoom’s services. It’s important to note that Zoom offers different versions of their software based on your needs. For example, if you are a regular user who wants to join meetings and participate in webinars, you will need to download the Zoom Client for Meetings. However, if you are a host who wants to schedule and conduct meetings, you will need to download the Zoom Client for Meetings app.
To proceed with the download, navigate to the top navigation menu on the website and click on “Resources”. A drop-down menu will appear, and you should select “Download Zoom Client” from the options available.
Alternatively, you can directly access the download page by visiting the following link: https://zoom.us/download.
Now that you are on the download page, you will see different Zoom Clients listed. Look for the option that says “Zoom Client for Meetings” or “Zoom Client for Meetings app” (depending on your requirements) specifically tailored for Mac users. This will ensure that you download the right application for your device’s operating system.
Once you have identified the correct version, click on the “Download” button beside it. This will initiate the download process for Zoom on your Mac.
Now that you have successfully completed Step 1, you are ready to proceed to the next step of the download process. In the following step, you will learn how to choose the appropriate Zoom Client for Mac.
Step 2: Click on “Resources” and select “Download Zoom Client”
Once you have reached the Zoom website, the next step to download Zoom for Mac is to navigate to the “Resources” section. At the top navigation menu of the Zoom website, you will find a tab labeled “Resources”. Click on it to access a drop-down menu with various options.
In the drop-down menu, you need to select the “Download Zoom Client” option. This will take you to the Zoom download page, where you can find the necessary software for your Mac.
Alternatively, you can skip this step and directly access the Zoom download page by visiting the following link: https://zoom.us/download.
On the Zoom download page, you will find different Zoom Clients available for download. These options cater to different user needs and requirements. Look for the option specifically designed for Mac users, labeled “Zoom Client for Mac”. This ensures that you download the correct application compatible with your Mac operating system.
Once you have identified the appropriate Zoom Client for Mac, click on the “Download” button next to it. This will initiate the download process, and the installation file will be saved to your Mac’s designated downloads folder. The file size may vary based on the specific Zoom Client you have chosen.
Please note that the download speed may vary depending on your internet connection. If you have a slower internet connection, the download may take some time to complete. However, if you have a faster internet connection, the process may be relatively quick.
Now that you have completed Step 2, you have successfully downloaded the Zoom installation file onto your Mac. In the next step, we will guide you on how to proceed with the installation process.
Step 3: Choose the appropriate Zoom Client for Mac
After downloading the Zoom installation file, the next step is to choose the appropriate Zoom Client for Mac. This ensures that you install the correct version of Zoom that is compatible with your specific Mac operating system.
Locate the downloaded file on your Mac. By default, the file will be in your designated Downloads folder, unless you have specified a different location for downloaded files.
To locate the downloaded file, you can either use the Finder application or click on the Downloads shortcut in your browser. Once you have located the downloaded file, it will typically have a filename similar to “zoominstaller.pkg”.
Double-click on the downloaded file to begin the installation process. You may be prompted to provide your Mac’s administrative credentials, such as your username and password, to proceed with the installation. This ensures that only authorized users can install applications on your Mac.
Once you have entered the necessary credentials, the installation wizard will guide you through the installation process. Follow the on-screen instructions to complete the installation of Zoom on your Mac.
During the installation, you will also be presented with various customization options. You can choose the installation location for Zoom, specify whether you want it to launch automatically at startup, and select additional features that you want to install with Zoom.
For most users, the default installation settings should be sufficient. If you are unsure about the customization options, it is recommended to keep the default settings.
After you have made your selections, click on the “Install” button to begin the installation process. Depending on your Mac’s performance and the specific options you have chosen, the installation may take a few moments to complete.
Once the installation is finished, you will see a confirmation message indicating that Zoom has been successfully installed on your Mac. Congratulations! You are now ready to launch the Zoom application and start using it for video conferencing and virtual meetings.
Now that you have completed Step 3, you are just one step away from joining the world of Zoom on your Mac. In the next step, we will guide you on how to launch the Zoom application and sign in to your account.
Step 4: Save the downloaded file
After downloading the Zoom installation file, it’s important to save the file in a location on your Mac that is easily accessible. This will ensure that you can locate and open the file when it’s time to install Zoom.
By default, the Zoom installation file is saved in your Mac’s designated Downloads folder. However, if you prefer to save the file in a different location, you can choose a specific folder or directory on your Mac where you’d like to save it.
To save the downloaded file, follow these steps:
- Once the download is complete, locate the downloaded file on your Mac. You can do this by opening the Finder application, navigating to the Downloads icon in the sidebar, and clicking on it.
- In the Downloads folder, you should see the Zoom installation file. The file name may be something like “zoominstaller.pkg”.
- If you would like to save the file in a different location, click and drag the file to the desired folder or directory.
- If you’re satisfied with saving the file in the Downloads folder, you can leave it there for easy access during the installation process.
Remember, it’s important to save the file in a location where you can easily find it when you’re ready to install Zoom on your Mac.
Now that you’ve successfully saved the downloaded file, you’re ready to move on to the next step of the process. In the following step, we will guide you on how to locate the downloaded file and open it to start the installation of Zoom on your Mac.
Step 5: Locate the downloaded file and open it
Now that you’ve saved the downloaded Zoom installation file, the next step is to locate the file on your Mac and open it to initiate the installation process.
By default, the Zoom installation file is saved in the designated Downloads folder on your Mac. If you haven’t changed the default download location, follow these steps:
- Open a new Finder window by clicking on the Finder icon in the Dock or by pressing Command + N.
- In the left-hand sidebar, click on the “Downloads” folder. This will display the contents of your Downloads folder in the main window.
- Look for the Zoom installation file, which is typically named “zoominstaller.pkg”.
- Once you’ve located the downloaded file, double-click on it to open the installation wizard.
If you’ve chosen to save the downloaded file in a different location, navigate to that folder or directory by following the steps above, but selecting the appropriate location instead of the Downloads folder.
When you double-click on the Zoom installation file, you may be prompted to provide your Mac’s administrative credentials, such as your username and password. This is to ensure that only authorized users can install applications on your Mac.
After entering the necessary credentials, the installation wizard will launch and guide you through the process of installing Zoom on your Mac.
Now that you’ve successfully located the downloaded file and opened it, you’re one step closer to having Zoom installed on your Mac. In the next step, we will walk you through the installation process of Zoom on your Mac.
Step 6: Install Zoom on your Mac
Now that you have located and opened the Zoom installation file on your Mac, it’s time to proceed with the installation process. The installation wizard will guide you through the necessary steps to install Zoom on your Mac.
Follow these instructions to install Zoom on your Mac:
- Once the Zoom installation wizard opens, you will be presented with a welcome message. Read the message and click on the “Continue” button to proceed.
- The next screen will display the Zoom software license agreement. Take a moment to review the terms and conditions. If you agree, click on the “Agree” button to continue.
- On the following screen, you will have the option to choose the installation location for Zoom. By default, the application will be installed in the Applications folder on your Mac. If you want to change the installation location, click on the “Change Install Location” button and select a different folder.
- After selecting the installation location, click on the “Install” button to start the installation process. You may be prompted to enter your Mac’s administrative credentials (username and password) to authorize the installation.
- The installation process will begin, and a progress bar will indicate the status of the installation. Depending on your Mac’s performance and the size of the Zoom installation file, the process may take a few minutes to complete.
- Once the installation is finished, you will see a confirmation message indicating that Zoom has been successfully installed on your Mac. Click on the “Close” button to exit the installation wizard.
Congratulations! You have successfully installed Zoom on your Mac. The application is now ready to be launched and used for video conferencing, meetings, and other collaborative activities.
In the next step, we will guide you on how to launch the Zoom app on your Mac and sign in to your Zoom account.
Step 7: Launch the Zoom app and sign in
With Zoom successfully installed on your Mac, you’re now ready to launch the application and sign in to your Zoom account. Follow these steps to get started:
- Locate the Zoom app on your Mac. You can find it in the “Applications” folder or use the search function in the top-right corner of your screen by clicking on the magnifying glass icon and typing “Zoom”.
- Once you’ve located the Zoom app, double-click on it to launch the application.
- After launching the Zoom app, you will be presented with the Zoom login screen. Here, you have two options to sign in to your Zoom account: “Sign In with SSO” or “Sign In with Google”.
- If you have a Zoom account that is not associated with a Single Sign-On (SSO) or Google, click on the “Sign In” button.
- Enter your Zoom credentials, including your email address and password, into the provided fields.
- Click on the “Sign In” button to log in to your Zoom account. If the credentials are correct, you will be taken to the Zoom dashboard.
If you have a Zoom account linked to your Single Sign-On (SSO) or Google, you can click on the respective options (“Sign In with SSO” or “Sign In with Google”) and follow the on-screen instructions to sign in to your account.
Once you have successfully signed in to your Zoom account, you can start using the application to join meetings, schedule meetings, host webinars, and enjoy all the features that Zoom has to offer on your Mac. Explore the various options and settings in the Zoom dashboard to customize your experience according to your preferences.
Congratulations! You have now successfully launched the Zoom app on your Mac and signed in to your Zoom account. Enjoy the benefits of video conferencing, collaboration, and seamless communication with others.
Remember to keep your Zoom app up to date by regularly checking for updates and installing them when they become available. This will ensure that you have the latest features, bug fixes, and security enhancements for the best Zoom experience on your Mac.
Conclusion
Congratulations on successfully downloading and installing Zoom on your Mac! Now, you have the powerful tool at your fingertips that allows you to connect with others through video conferencing, attend virtual meetings, and collaborate with ease.
In this guide, we have taken you through the step-by-step process of downloading Zoom for Mac. We started by guiding you to the Zoom website, where you clicked on “Resources” and selected the appropriate Zoom Client for Mac. Then, you saved the downloaded file and located it on your Mac. Afterwards, you opened the file and proceeded with the installation process. Finally, you launched the Zoom app and signed in to your Zoom account.
Now that Zoom is installed on your Mac, you can enjoy the convenience and flexibility it offers. Whether you need to connect with colleagues for work-related meetings, attend online classes, or simply catch up with friends and family, Zoom provides a seamless and user-friendly experience.
As you continue to use Zoom on your Mac, we encourage you to explore its features and settings to make the most out of your video conferencing experience. Familiarize yourself with the various options available, such as screen sharing, virtual backgrounds, and recording capabilities.
Additionally, it’s important to keep your Zoom app up to date by regularly checking for updates and installing them when available. This ensures that you have access to the latest features, security patches, and performance improvements.
Thank you for following this guide. We hope it has been helpful in assisting you with the process of downloading and installing Zoom on your Mac. Now, go ahead and utilize the power of Zoom to connect, collaborate, and communicate effortlessly!


