Introduction
Music has the power to enhance any visual project, and with Canva’s versatile design platform, you can take your creations to the next level. Whether you’re working on a presentation, video, or graphic design, adding the right music can make a significant impact on the final product.
However, finding the perfect music for your Canva project can sometimes be a challenge. While Canva offers a wide range of audio tracks in their library, you may have specific music in mind that isn’t available in their collection. In such cases, downloading music from external platforms and importing it into Canva can be the ideal solution.
In this article, we will guide you through the process of downloading music from various platforms and importing it into your Canva projects. From choosing the right music platform and locating your desired tracks to adding and customizing the music within Canva, we’ll cover everything you need to know.
Whether you’re creating a captivating slideshow, an engaging social media video, or an interactive presentation, having the ability to personalize your projects with your preferred music can add that extra touch of professionalism and creativity.
So, let’s dive in and explore the steps you need to follow to download music and incorporate it seamlessly into your Canva designs.
Step 1: Choose your music platform
Before you can start downloading music to use in Canva, you need to choose a suitable music platform. There are several popular options available, each with its own unique features and music library.
One of the most popular choices for downloading music is a streaming platform such as Spotify, Apple Music, or YouTube Music. These platforms offer a vast selection of songs and playlists that cater to different genres and moods. However, keep in mind that not all platforms allow you to download music directly. Some may require a premium subscription or additional tools to download the songs.
If you prefer a more extensive collection of royalty-free music, you can explore platforms like Epidemic Sound, Artlist, or Soundstripe. These platforms specifically curate music for creators, offering a wide range of high-quality tracks that can be used for commercial purposes without any copyright issues. Many of these platforms require a subscription, but they often provide a free trial period that you can take advantage of.
Another option is to visit websites that provide free music downloads, such as Jamendo, Free Music Archive, or SoundCloud. These sites house a variety of independent artists who offer their music for free, allowing you to discover unique and less mainstream tracks. However, be sure to check the licensing terms for each track to ensure it can be used in your Canva projects without violating any copyright restrictions.
It’s essential to consider your project’s requirements and the style of music you’re looking for when choosing a platform. Take your time to explore different platforms and their music libraries to find the one that best aligns with your creative vision.
Once you’ve selected the platform that suits your needs, it’s time to move on to the next step: finding the music you want to download.
Step 2: Find the music you want to download
Now that you have chosen your preferred music platform, it’s time to search for the specific music you want to download and use in your Canva project. This step requires a bit of exploration and research to find the perfect track that complements your design.
If you’re using a streaming platform like Spotify or Apple Music, you can start by browsing through their extensive music catalog. Utilize search filters to narrow down your options by genre, mood, or artist. Additionally, these platforms often include curated playlists or recommendations based on your previous listening history, which can be a great way to discover new music that aligns with your project’s theme.
For those using royalty-free music platforms like Epidemic Sound or Artlist, you can search for music using keywords such as genre, mood, or tempo. These platforms usually offer advanced search options that enable you to refine your results and find the exact type of music you’re looking for. You can preview the tracks before downloading them to ensure they match your vision.
If you prefer to explore independent artists on websites like Jamendo or SoundCloud, the search process may involve digging through playlists, artist profiles, or user-generated collections. You can use tags, descriptions, or comments to find music that suits your style. Additionally, some artists offer dedicated websites or portfolios where you can directly download their music, allowing you to support their work while benefiting from their unique sound.
Regardless of the platform you choose, it’s crucial to keep in mind any licensing restrictions that may apply to the downloaded music. Ensure that the music you select can be used in your Canva projects without infringing on any copyright laws.
Once you have found the music you want to use, it’s time to move on to the next step: downloading the music to your device.
Step 3: Download the music to your device
After finding the perfect music for your Canva project, the next step is to download the selected tracks to your device. The process of downloading music can vary depending on the platform you’re using.
If you’re using a streaming platform like Spotify, Apple Music, or YouTube Music, you may need a premium subscription to download songs directly to your device. These platforms often provide the option to save songs offline, allowing you to access them even without an internet connection. Look for the download or save offline button next to the songs you want to use and follow the prompts to save them to your device.
For royalty-free music platforms like Epidemic Sound or Artlist, you typically have the option to download the tracks you select. Look for the download button next to each song or use the “Add to Library” feature, which enables you to compile a collection of tracks and then download them in bulk. Make sure to choose a file format (usually MP3 or WAV) that is compatible with Canva’s audio import feature.
If you’re downloading music from websites like Jamendo or SoundCloud, the process may vary depending on the artist’s preferences. Some artists may provide a download link directly on their page, while others may require you to contact them for permission to download their music. Pay close attention to any licensing restrictions or attribution requirements stated by the artists before downloading their music.
Once you have successfully downloaded the music files to your device, you can proceed to the next step: importing the music into Canva.
Remember to organize your downloaded music files in a designated folder on your device, making it easier to locate and import them into Canva when needed.
Step 4: Import the downloaded music to Canva
Now that you have your desired music downloaded to your device, it’s time to import it into Canva. Canva provides an easy and user-friendly interface for adding audio to your designs, whether it’s a video, presentation, or graphic.
To import your downloaded music into Canva, log in to your Canva account and open the project you’re working on. Look for the “Uploads” tab on the left sidebar of the Canva editor. Click on it to open the uploads manager.
In the uploads manager, you’ll find an option to either drag and drop your music files or click on the “Upload media” button to browse and select the files from your device. Navigate to the folder where you stored the downloaded music, select the relevant files, and let them upload to Canva.
Canva will automatically process and add the imported music files to your project’s media library. You can access them by clicking on the “Media” tab on the left sidebar. It’s a good practice to rename the files with descriptive titles to make it easier to locate them later.
Once the music is added to the media library, you can now start incorporating it into your project.
Keep in mind that there might be limitations on the number of audio tracks you can have in your Canva project, depending on your account type. Make sure to check the Canva pricing plans or consult the Canva support documentation to understand the audio limitations based on your subscription level.
Now that you have successfully imported your downloaded music into Canva, it’s time to move on to the next step: adding the music to your Canva project.
Step 5: Add the music to your Canva project
With your music now available in Canva’s media library, you can easily add it to your project and create a captivating audiovisual experience. The process of adding music to your Canva project may vary depending on the type of design you’re working on.
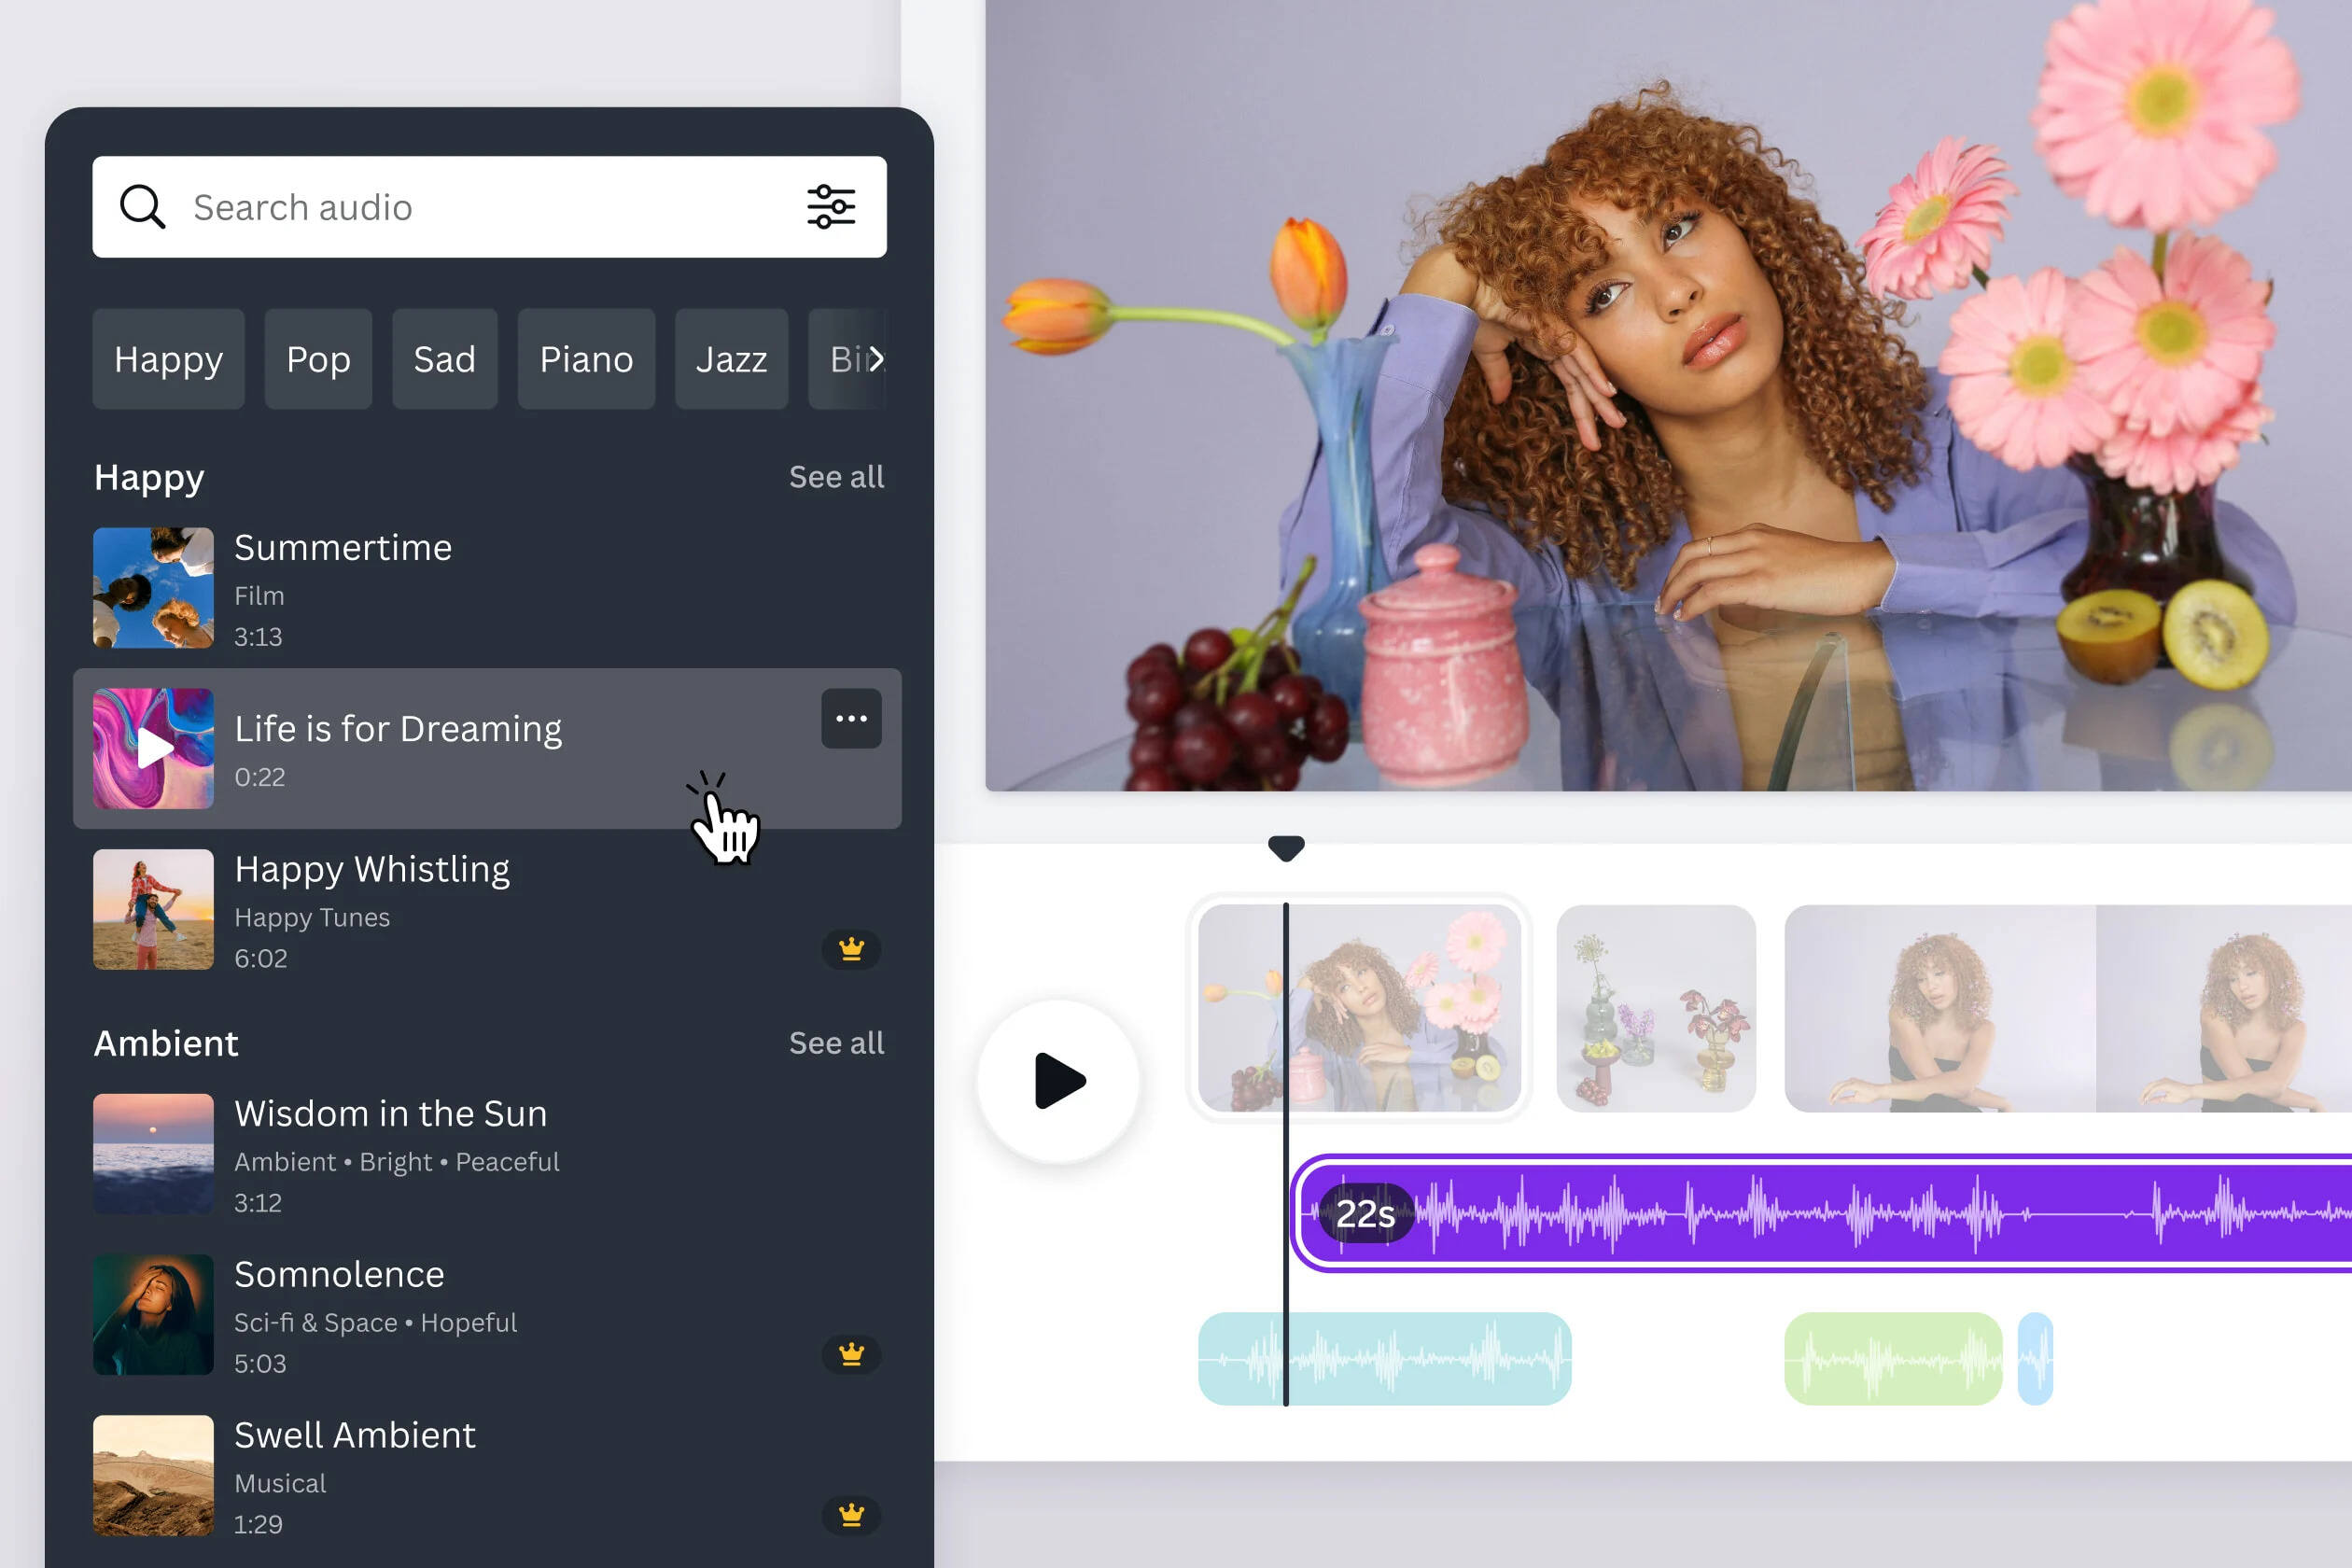
If you’re creating a video in Canva, start by selecting the video element where you want to incorporate the music. Look for the “Audio” tab in the editing options panel that appears when you select the video. Click on the “Add audio” button and choose the music track you want to use from your media library. Canva allows you to adjust the volume, fade in or out, and trim the duration of the music to align perfectly with your video content.
For presentations or slideshows, adding background music can enhance the overall impact. Insert the desired music track by clicking on the “+” button to add a new slide and select the “Audio” option. You can then choose the music from your media library and customize its settings to ensure a seamless transition between slides.
If you’re working on a graphic design or social media post, you can still incorporate music into your project to create an interactive experience. Look for the “Elements” tab on the left sidebar and search for the “Audio” category. Select the desired audio element and browse through your media library to choose the music you want to use. You can resize and reposition the audio element to fit your design, creating a dynamic and engaging visual.
Regardless of the type of project, make sure to play back your creation to ensure that the music aligns perfectly with the visuals and captures the desired mood or atmosphere. Adjust the volume levels and timings as needed to achieve the desired effect.
Remember to respect copyright laws and only use music that you have appropriate permissions or licenses for. It’s always a good practice to credit the artist or source of the music if required.
Now that you’ve added the music to your Canva project, you’re ready to move on to the final step: customizing the music settings to further enhance your design.
Step 6: Customize the music settings
To make your Canva project truly unique, you can customize the music settings to further enhance the audio experience. Canva provides various options to adjust and refine the music to align perfectly with your creative vision.
Start by selecting the music element in your project. Look for the audio control options that appear, which allow you to make specific adjustments.
One key feature you can utilize is adjusting the volume of the music. Canva allows you to control the audio volume independently so that it complements your project’s visuals without overpowering them. You can increase or decrease the volume to create the desired balance between the music and any accompanying narration or dialogue.
In addition to volume control, Canva also offers the option to fade in or fade out the music. This enables you to smoothly introduce or conclude the audio track, preventing any abrupt transitions. Adjusting the fade settings can help create a seamless and captivating audio experience.
If your Canva project is a video, you can further refine the music by trimming its duration to match the desired timeline. Canva allows you to select specific sections of the music track, ensuring that it corresponds precisely with the visual content, eliminating any unnecessary or extended portions of the track.
Furthermore, consider aligning the beats or key moments of the music with significant visuals or movements in the design. This synchronization can enhance the impact of your project and create a cohesive audiovisual experience.
Take advantage of the preview option within Canva to listen to the music alongside your project in real-time. This allows you to fine-tune the settings and make any necessary adjustments to achieve the desired effect.
By customizing the music settings in Canva, you can elevate your project to the next level and create a memorable audiovisual experience for your audience.
Once you are satisfied with the customization of the music settings, review your entire project to ensure harmony between the visuals, audio, and any other elements. Make any final adjustments if needed.
Now that you have personalized your music settings in Canva, you’re ready to export or share your completed project with the world.
Conclusion
Adding the perfect music to your Canva projects can truly elevate the overall impact and create an unforgettable experience for your audience. By following the six steps outlined in this guide, you can easily download music from various platforms, import it into Canva, and seamlessly integrate it into your designs.
In step one, you learned the importance of choosing the right music platform that aligns with your project’s requirements and preferences. In step two, you discovered how to find the ideal music tracks by exploring streaming platforms, royalty-free music libraries, and independent artist websites.
Step three guided you through the process of downloading the music files to your device, ensuring they are readily accessible for your Canva projects. In step four, you learned how to import the downloaded music into Canva by using the uploads manager feature.
With the music successfully imported, step five focused on adding the music to your Canva project, highlighting specific techniques for videos, presentations, and graphic designs. Finally, in step six, you explored the customization options that Canva offers to fine-tune the audio settings, such as adjusting volume, fading in and out, and trimming the duration of the music.
Remember to respect copyright laws and use only music that you have the appropriate permissions or licenses for. If required, provide credit to the artist or source of the music.
By following these steps, you can unleash your creativity, enhance the impact of your Canva projects, and create captivating audiovisual experiences for any purpose, whether it’s a presentation, video, or graphic design.
So, start exploring different music platforms, find the perfect tracks, and let your imagination run wild as you incorporate music into your Canva designs. Create remarkable projects that will leave a lasting impression on your audience.
Now, it’s time to apply your newfound knowledge and take your Canva designs to a whole new level with the power of music.


