Introduction
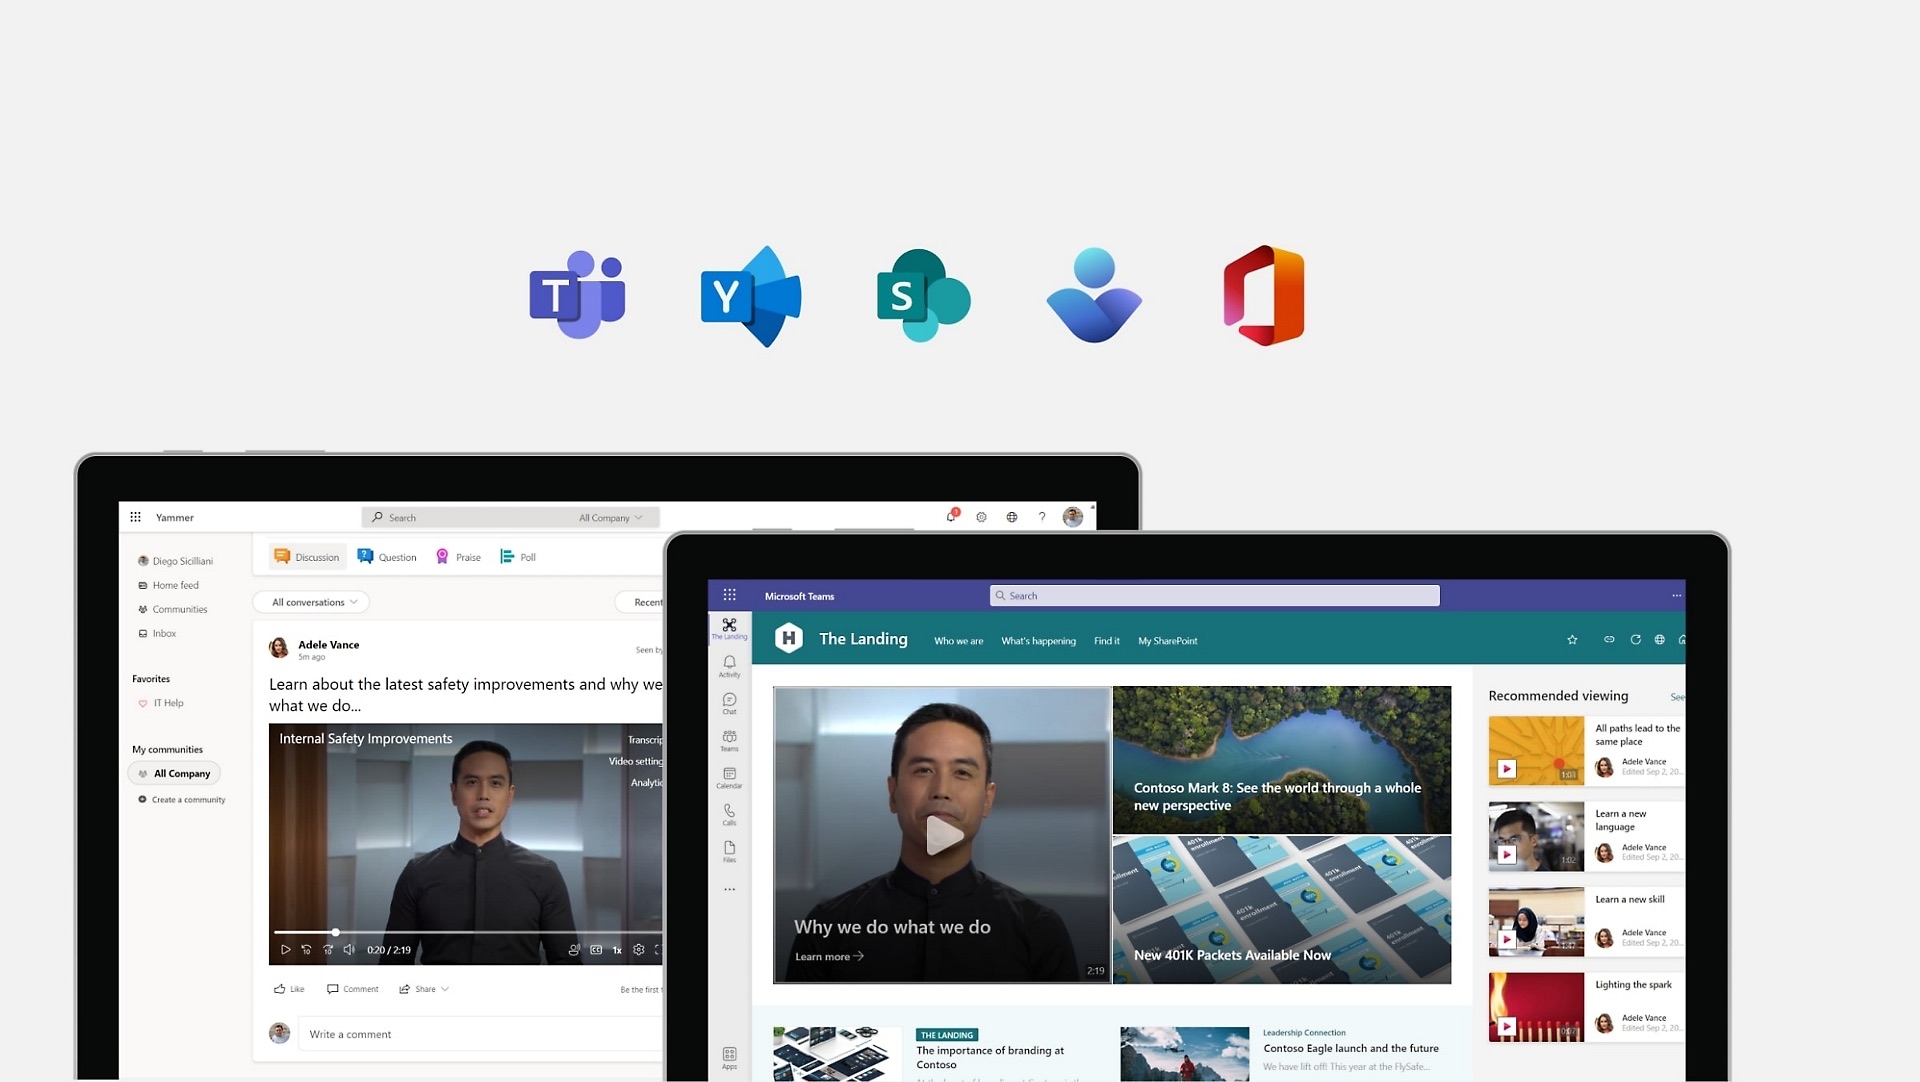
Welcome to the digital age, where communication and collaboration have taken a giant leap forward. Microsoft Teams, a powerful collaboration platform, has become increasingly popular in the workplace and education sectors. It enables teams to connect and work together seamlessly, regardless of their physical locations. If you’re looking to leverage the benefits of Microsoft Teams on your laptop, you’ve come to the right place. In this article, we will guide you through the simple steps to download Microsoft Teams on your laptop and get started with this incredible tool.
Microsoft Teams offers a plethora of features, including chat, video calls, file sharing, and integration with other Microsoft Office applications. Whether you’re a student attending virtual classes, an employee working remotely, or a project team looking to collaborate effectively, Microsoft Teams has you covered. Before we dive into the download process, let’s ensure you have the necessary prerequisites to get started.
Prerequisites for Downloading Microsoft Teams on Laptop:
- A laptop or desktop computer
- Operating system: Windows (Windows 10, Windows 8.1, Windows 7), Mac (OS X 10.13 or later)
- Internet connection
- Web browser: Microsoft Edge, Google Chrome, Mozilla Firefox, Safari
- Valid Microsoft account or Office 365 account
Now that you have the prerequisites ready, let’s dive into the step-by-step guide on how to download Microsoft Teams on your laptop.
Prerequisites for Downloading Microsoft Teams on Laptop
Before you embark on the journey of downloading Microsoft Teams on your laptop, there are a few prerequisites you need to fulfill. Here’s a quick checklist:
- A laptop or desktop computer: Make sure you have access to a reliable laptop or desktop computer. Microsoft Teams can be installed on both Windows and Mac operating systems.
- Operating system: Check that your laptop is running a compatible operating system. For Windows users, Microsoft Teams supports Windows 10, Windows 8.1, and Windows 7. Mac users should have OS X 10.13 or later.
- Internet connection: A stable internet connection is crucial for the smooth functioning of Microsoft Teams. Ensure that you have a reliable internet connection before proceeding with the download.
- Web browser: Microsoft Teams can be accessed through various web browsers. Supported browsers include Microsoft Edge, Google Chrome, Mozilla Firefox, and Safari. Make sure you have at least one of these browsers installed on your laptop.
- Valid Microsoft account or Office 365 account: To sign in and use Microsoft Teams, you’ll need a valid Microsoft account or an Office 365 account. If you don’t have one, you can easily create a Microsoft account for free or check if your organization has provided you with an Office 365 account.
Once you have verified that you meet all the prerequisites, you are now ready to proceed with the download and installation of Microsoft Teams on your laptop. In the following steps, we will guide you through the process, ensuring a seamless experience from start to finish.
Step 1: Visit the Microsoft Teams Website
The first step to downloading Microsoft Teams on your laptop is to visit the official Microsoft Teams website. Open your preferred web browser (Microsoft Edge, Google Chrome, Mozilla Firefox, or Safari) and type in the URL: www.microsoft.com/microsoft-teams/.
As soon as the website loads, you will be greeted with the main page of Microsoft Teams. Here, you can find detailed information about the platform, its features, and how it can benefit you in your personal and professional life.
Take a moment to familiarize yourself with the website and explore the different sections. You can navigate through the various tabs to learn more about Microsoft Teams’ capabilities, customer success stories, and resources for getting started.
If you’re ready to move forward with the download, proceed to the next step.
Key Points to Remember:
- Open your web browser and go to the official Microsoft Teams website: www.microsoft.com/microsoft-teams/
- Explore the website to understand the features and benefits of Microsoft Teams.
- Take your time to familiarize yourself with the different sections of the website.
Once you have visited the Microsoft Teams website, you are ready to move on to the next step, which is crucial in downloading the application to your laptop.
Step 2: Click on “Download for Desktop”
After visiting the Microsoft Teams website, it’s time to initiate the download process. Look for the “Download for Desktop” button on the website’s main page and give it a click.
By clicking on this button, you will be directed to the Microsoft Teams download page. Here, you will find the options to download the application based on your laptop’s operating system.
Microsoft Teams is available for both Windows and Mac operating systems, so make sure you select the correct download option for your device. The website will automatically detect your operating system and present you with the appropriate download link.
Under the download button, you may find additional information, such as the file size and system requirements. It’s always a good idea to review this information to ensure compatibility and that you have enough storage on your laptop.
Once you have reviewed the necessary details and confirmed your operating system, click on the download button to initiate the download process. Depending on your internet connection speed, the download may take a few seconds to complete.
Key Points to Remember:
- On the Microsoft Teams website, locate and click on the “Download for Desktop” button.
- Ensure you choose the correct download option based on your laptop’s operating system.
- Review the file size and system requirements before proceeding with the download.
- Click on the download button to begin the download process.
With the download process now underway, you’re one step closer to experiencing the powerful collaboration features of Microsoft Teams. In the next step, we will guide you through the installation process on your laptop.
Step 3: Choose the Download Option Based on Your Laptop’s Operating System
Once you have clicked on the “Download for Desktop” button on the Microsoft Teams website, you will be directed to the download page. On this page, you will find different download options based on your laptop’s operating system.
If you are using a Windows laptop, you will typically see a button or link labeled “Download Teams for Windows.” Click on this option to begin the download process for the Windows version of Microsoft Teams.
If you are using a Mac laptop, you will see a button or link labeled “Download Teams for Mac.” Click on this option to download the Mac version of Microsoft Teams.
It is essential to choose the correct download option that corresponds to your laptop’s operating system. This will ensure that you are installing the compatible version of Microsoft Teams for optimal performance and functionality.
It’s worth mentioning that Microsoft Teams also offers a web-based version, which allows you to access Teams directly from your web browser without the need to download or install any software. This option is available for users who prefer not to install applications on their laptops or are using devices without administrative rights.
Key Points to Remember:
- On the Microsoft Teams download page, select the appropriate download option for your laptop’s operating system.
- If you’re using a Windows laptop, click on “Download Teams for Windows.”
- If you’re using a Mac laptop, click on “Download Teams for Mac.”
- Ensure that you choose the correct download option to ensure compatibility.
Now that you have chosen the correct download option based on your laptop’s operating system, it’s time to move on to the next step – running the setup file for Microsoft Teams.
Step 4: Run the Setup File
After downloading the Microsoft Teams setup file, you need to run it to begin the installation process. Locate the setup file in the designated download location on your laptop and double-click on it to run it.
Depending on your laptop’s operating system, the installation process may vary slightly. Here are the general steps to follow:
For Windows:
- Locate the downloaded setup file, which is typically saved in the “Downloads” folder.
- Double-click on the setup file, and a “User Account Control” dialog box may appear. Click “Yes” to allow the app to make changes to your device.
- Follow the on-screen prompts and select your preferred installation options. You can choose to install Microsoft Teams for all users on the laptop or only for your user account.
- Click “Install” to begin the installation. The setup program will extract and copy the necessary files to your laptop.
- Once the installation is complete, you may be prompted to restart your laptop. If so, save any unsaved work and click “Restart Now” to restart your laptop.
For Mac:
- Locate the downloaded setup file, which is usually found in the “Downloads” folder or the designated location you chose.
- Double-click on the setup file, and it will open a new window with the Microsoft Teams application icon.
- Drag the Microsoft Teams application icon to the “Applications” folder to begin the installation process.
- The installation will start, and you may be prompted to enter your administrator password to authorize the installation.
- Once the installation is complete, you can locate the Microsoft Teams application in the “Applications” folder or launch it directly from the Dock.
Key Points to Remember:
- Locate the downloaded setup file on your laptop.
- Double-click on the setup file to run it.
- Follow the on-screen prompts and select your preferred installation options.
- For Windows, click “Install” and restart your laptop if prompted.
- For Mac, drag the Microsoft Teams application icon to the “Applications” folder and authorize the installation with your administrator password.
Congratulations! You have successfully run the setup file for Microsoft Teams on your laptop. In the next step, we will guide you through the process of signing in to Microsoft Teams and getting started with this powerful collaboration platform.
Step 5: Sign in to Microsoft Teams
After successfully installing Microsoft Teams on your laptop, it’s time to sign in to your account and start using the platform. Here’s how you can sign in to Microsoft Teams:
- Locate the Microsoft Teams application on your laptop and open it.
- You will be presented with the sign-in screen. Enter your Microsoft account or Office 365 account email address and click “Next.”
- On the next screen, enter your password and click “Sign In.”
- If you have enabled two-factor authentication for your Microsoft account, you may be prompted to verify your identity using a verification code or prompt on your mobile device.
- Once you have successfully signed in, you will be taken to the Microsoft Teams main interface, where you can start exploring the various features and options.
If you don’t have a Microsoft account or Office 365 account, you can create a new account by clicking on the “Create one!” link on the sign-in screen. Follow the prompts to create your account, and then sign in using the newly created credentials.
Key Points to Remember:
- Open the Microsoft Teams application on your laptop.
- Enter your Microsoft account or Office 365 account email address on the sign-in screen.
- Enter your password and click “Sign In.”
- Complete two-factor authentication if prompted.
- Once signed in, you will be taken to the Microsoft Teams main interface.
Now that you have successfully signed in to Microsoft Teams, you’re ready to customize your settings and explore the collaborative features offered by this powerful platform. In the next step, we will guide you through the process of customizing Microsoft Teams to suit your preferences.
Step 6: Customize Your Microsoft Teams Settings
After signing in to Microsoft Teams, it’s a good idea to customize the settings to tailor the platform to your preferences. Here are some important settings you can consider adjusting:
- Profile Picture: Personalize your profile by adding a profile picture. Click on your initials or profile picture in the top-right corner, then select “Change Picture” to upload an image from your computer or choose one from the available options.
- Theme: Change the visual theme of Microsoft Teams by clicking on your initials or profile picture, then selecting “Settings” from the drop-down menu. Under the “General” tab, you can choose a different theme, such as Dark or High Contrast, to suit your preferences.
- Notifications: Manage your notification settings to control the alerts you receive. Click on your initials or profile picture, then select “Settings” and go to the “Notifications” tab. From here, you can customize which activities trigger notifications and choose how you want to receive them (email, banner, or none).
- Privacy: Review and adjust your privacy settings to control what information is visible to others. Click on your initials or profile picture, select “Settings,” and go to the “Privacy” tab. Here, you can manage your presence status, control who can contact you, and customize other privacy options.
- Keyboard shortcuts: If you prefer to use keyboard shortcuts, you can familiarize yourself with the available shortcuts by clicking on your initials or profile picture, selecting “Settings,” and going to the “Keyboard shortcuts” tab. Here, you’ll find a list of shortcuts for various actions within Microsoft Teams.
- Teams and channels: Explore the Teams and channels available to you within Microsoft Teams. You can join existing Teams, create your own Teams, or participate in different channels within Teams to collaborate with colleagues, classmates, or project members.
Key Points to Remember:
- Personalize your profile picture and choose a theme that suits your preferences.
- Manage your notification settings to control alerts.
- Customize your privacy settings to control what information is visible to others.
- Familiarize yourself with keyboard shortcuts for faster navigation.
- Explore Teams and channels to collaborate with others.
By customizing your Microsoft Teams settings, you can create a personalized and optimized experience that enhances your productivity and collaboration. Now it’s time to start using Microsoft Teams to communicate, collaborate, and achieve your goals.
Step 7: Start Using Microsoft Teams on Laptop
Now that you have customized your Microsoft Teams settings, it’s time to dive into the vibrant world of collaboration and communication. Here are some key aspects to get you started:
- Chat and Collaboration: Use the chat feature to have one-on-one conversations with colleagues, classmates, or project team members. You can also create and participate in group chats. Collaborate on documents, share files, and co-author in real-time to enhance productivity.
- Meetings and Video Calls: Schedule and join meetings with ease using the built-in meetings feature in Microsoft Teams. Conduct audio or video calls with individuals, teams, or even host webinars. Share your screen or specific applications to collaborate effectively.
- Teams and Channels: Utilize the power of Teams and channels to organize projects, departments, or virtual classrooms. Create dedicated channels within Teams to focus discussions and collaborations on specific topics or workflows.
- Apps and Integrations: Explore the rich ecosystem of apps and integrations available in Microsoft Teams. Connect your favorite tools, such as Trello, OneNote, or SharePoint, to streamline workflows and enhance productivity.
- Status and Presence: Take advantage of the status and presence settings in Microsoft Teams to let others know if you’re available, busy, or away. This helps team members know when it’s appropriate to reach out or collaborate with you.
- Training and Resources: Microsoft Teams offers a range of training resources, tutorials, and guides to help you make the most of the platform’s features. Explore the Microsoft Teams website, help center, and community forums for additional support and learning opportunities.
Key Points to Remember:
- Utilize the chat and collaboration features for effective communication.
- Schedule and join meetings, conduct video calls, and share screens.
- Create Teams and channels to organize projects and discussions.
- Explore and integrate apps to enhance productivity.
- Set your status and presence to indicate availability.
- Take advantage of training resources and support.
With these features and capabilities at your fingertips, you are now ready to fully immerse yourself in the Microsoft Teams experience. Make the most of this powerful collaboration platform to stay connected, collaborate efficiently, and achieve your goals, whether you’re working remotely, attending virtual classes, or collaborating on projects.
Conclusion
Congratulations! You have successfully downloaded and set up Microsoft Teams on your laptop. By following the step-by-step guide outlined in this article, you have gained access to a robust collaboration platform that will enhance your communication and productivity.
Microsoft Teams offers a wide range of features, including chats, video calls, file sharing, and integration with other Microsoft Office applications. Whether you are a student attending virtual classes, an employee working remotely, or part of a project team, Microsoft Teams provides a seamless environment for collaboration.
Remember to take advantage of the customization options available in Microsoft Teams to personalize your experience. Set up your profile picture, adjust your notification settings, and explore the various themes and privacy options. By tailoring the platform to your preferences, you can optimize your workflow and boost your productivity.
As you start using Microsoft Teams on your laptop, take the time to familiarize yourself with the different features and functionalities. Utilize the chat and collaboration tools to communicate effectively with your team members. Schedule and join meetings to connect face-to-face, even when you’re miles apart. Explore the Teams and channels to organize projects and discussions efficiently.
Additionally, make use of the wide range of apps and integrations available in Microsoft Teams to streamline your workflows and enhance collaboration. Connect your favorite tools and services to bring all the necessary elements into one centralized platform.
Lastly, remember to access the training resources and support available to you. Microsoft Teams provides various tutorials, guides, and a vibrant user community to help you make the most of the platform’s capabilities. Stay curious, keep learning, and deepen your understanding of Microsoft Teams to become a proficient user.
Now that you are equipped with the knowledge and tools to harness the power of Microsoft Teams on your laptop, it’s time to embark on a journey of enhanced collaboration and productivity. Seize the opportunities offered by this powerful platform and make every project, class, and communication more efficient and effective.
Happy collaborating with Microsoft Teams!