Introduction
Welcome to the world of Homebrew for Mac! If you’re a Mac user looking for a simple and efficient way to install and manage software packages, Homebrew is the answer. Whether you’re a developer, power user, or someone who simply loves exploring new tools, Homebrew provides an easy method to expand the functionality of your Mac.
So, what exactly is Homebrew? In simple terms, Homebrew is a package manager for Mac that allows you to install, update, and maintain various software packages effortlessly. It works from the command line interface and provides access to a vast array of applications, libraries, and utilities that can enhance your productivity, entertainment, and overall Mac experience.
The beauty of Homebrew lies in its simplicity and flexibility. It automates the installation process, handles dependencies, and ensures that the software you install is up to date. With just a few commands, you can have access to a multitude of open-source and community-contributed packages tailored to your needs.
In this article, we will guide you through the process of downloading and setting up Homebrew on your Mac. We will cover everything from installing the necessary tools to verifying your Homebrew installation. So, without further ado, let’s dive in and start harnessing the power of Homebrew!
What is Homebrew?
Homebrew is a package manager for macOS that simplifies the process of installing, updating, and managing software packages. It is built on the principles of simplicity, convenience, and flexibility, making it a popular choice among Mac users.
Think of Homebrew as a command-line tool that provides access to a vast repository of software packages. These packages range from development tools and libraries to productivity utilities and multimedia applications. With Homebrew, you can easily install and update these packages with just a few simple commands.
One of the key advantages of Homebrew is its focus on open-source software. Most of the packages available through Homebrew are open-source, meaning they are free to use, modify, and distribute. This makes Homebrew an excellent resource for developers, as it provides a convenient way to access and manage the tools they need for their projects.
Another significant aspect of Homebrew is its emphasis on simplicity and user-friendliness. Homebrew strives to provide a straightforward and intuitive command-line interface, making it accessible to both beginners and experienced users. Its clear documentation and active community support further enhance the user experience.
Additionally, Homebrew takes care of managing dependencies automatically. When you install a package through Homebrew, it will also handle any required libraries or frameworks that the package relies on. This eliminates the need for manual dependency management and ensures that the installed software works seamlessly on your Mac.
Furthermore, Homebrew is designed to coexist harmoniously with the existing macOS ecosystem. It installs packages in dedicated directories separate from the macOS system files, preventing conflicts and potential issues. This ensures that your Mac remains stable and secure while benefiting from the additional software provided by Homebrew.
Overall, Homebrew is a powerful and versatile package manager that brings a whole new level of convenience and flexibility to your Mac. From software developers and system administrators to casual users, Homebrew is a valuable tool for expanding the capabilities of your Mac and simplifying the software installation process.
Benefits of Installing Homebrew on Mac
Installing Homebrew on your Mac comes with a multitude of benefits that can greatly enhance your software management and development experience. Let’s take a look at some of the key advantages of using Homebrew:
- Easy Installation and Management: Homebrew simplifies the process of installing and managing software packages on your Mac. With just a few simple commands, you can install, update, and uninstall packages effortlessly.
- Extensive Package Repository: Homebrew provides access to a vast repository of software packages. Whether you need development tools, multimedia applications, or productivity utilities, Homebrew has you covered with a wide range of packages tailored to your needs.
- Automatic Dependency Management: Homebrew takes care of managing dependencies for you. When you install a package, Homebrew automatically handles any required libraries or frameworks, ensuring that your software works seamlessly without any manual intervention.
- Open-Source Software: Homebrew focuses on open-source software, which means that most of the packages available through Homebrew are free to use, modify, and distribute. This makes it a valuable resource for developers and enthusiasts who want access to a vast range of open-source tools and libraries.
- Customizability and Flexibility: Homebrew allows you to customize your software installation and configuration. You can choose to install specific versions of packages, enable optional features, or customize package build options to suit your preferences.
- Active Community Support: Homebrew has a vibrant and active community of users and contributors. If you encounter any issues or have questions about Homebrew or specific packages, you can seek help from the community through forums, chat rooms, or GitHub repositories.
- Up-to-Date Software: Homebrew ensures that your software packages are always up to date. With a simple command, you can easily update all installed packages or individual packages to the latest versions, keeping your Mac environment secure and benefiting from the latest features and bug fixes.
- Separation of System Files: Homebrew installs packages in dedicated directories separate from the macOS system files, reducing the risk of conflicts and potential issues. This ensures that your Mac remains stable and secure even when you install and update multiple software packages.
By installing Homebrew on your Mac, you unlock a world of convenience, flexibility, and community-driven software development. It empowers you to easily manage and customize your software environment, access a wide range of packages, and stay up to date with the latest software updates and enhancements. Whether you’re a developer, power user, or someone who enjoys exploring new software, Homebrew is a valuable addition to your Mac toolkit.
Step-by-Step Guide to Download Homebrew on Mac
If you’re ready to unleash the power of Homebrew on your Mac, follow the step-by-step guide below to download and install Homebrew:
- Install Xcode Command Line Tools: Before installing Homebrew, you’ll need to have the Xcode Command Line Tools installed on your Mac. Open the Terminal application and enter the command
xcode-select --install. Follow the on-screen instructions to install the Command Line Tools. - Verify Xcode Command Line Tools: After installing the Command Line Tools, verify that they are successfully installed by entering the command
gcc --versionin Terminal. You should see the version information of the Command Line Tools. - Install Homebrew: To install Homebrew, open Terminal and paste the following command:
- Follow on-screen Instructions: Once the installation command is entered, you will be prompted to proceed. Read the information on the screen, enter your password when prompted, and then press Enter to start the installation.
- Wait for Installation: The installation process may take a few minutes, so be patient and let the process complete. Homebrew will be installed in the
/usr/local/Homebrewdirectory. - Verify Homebrew Installation: After the installation completes, you can verify the installation by entering the command
brewin Terminal. If Homebrew is installed correctly, you will see a list of available commands and options. - Update Homebrew: It is a good practice to update Homebrew regularly to obtain the latest package information and updates. To update Homebrew, simply enter the command
brew updatein Terminal.
/bin/bash -c "$(curl -fsSL https://raw.githubusercontent.com/Homebrew/install/HEAD/install.sh)"
Congratulations! You have successfully downloaded and installed Homebrew on your Mac. You’re now ready to explore the vast collection of packages available through Homebrew and enjoy the benefits of streamlined software installation and management.
Installing Xcode Command Line Tools
Before you can install Homebrew on your Mac, you’ll need to have the Xcode Command Line Tools installed. These tools provide essential components and libraries that Homebrew relies on. Here’s how you can install the Xcode Command Line Tools:
- Open Terminal: Launch the Terminal application on your Mac. You can find it in the Utilities folder within the Applications folder or by using Spotlight Search.
- Initiate Installation: In the Terminal window, enter the command
xcode-select --install. - Confirmation Prompt: A prompt will appear asking if you want to install the Command Line Tools. Click “Install” to proceed.
- Agree to Terms: A license agreement will be displayed. Read through it and click “Agree” to continue with the installation.
- Installation Progress: The Command Line Tools will begin downloading and installing. The process may take a few minutes, so be patient and let it complete.
- Verification: Once the installation is finished, you can verify that the Command Line Tools are successfully installed by entering the command
gcc --versionin Terminal. You should see the version information for the Command Line Tools.
That’s it! You have now successfully installed the Xcode Command Line Tools on your Mac. These tools provide the necessary libraries and components for Homebrew to function effectively. With the Command Line Tools in place, you can proceed to install Homebrew and leverage its powerful package management capabilities.
Installing Homebrew
Once you have the Xcode Command Line Tools installed on your Mac, you’re ready to proceed with the installation of Homebrew. Follow the steps below to install Homebrew:
- Open Terminal: Launch the Terminal application on your Mac. You can find it in the Utilities folder within the Applications folder or by using Spotlight Search.
- Installation Command: In the Terminal window, paste the following command:
- Start Installation: Press Enter to execute the installation command. This command will download the Homebrew installation script from the official Homebrew GitHub repository and begin the installation process.
- Password Prompt: During the installation, you may be prompted to enter your password. This is required for certain system-level actions that Homebrew needs to perform. Enter your password (you won’t see any characters as you type) and press Enter to continue.
- Wait for Installation: The installation process will take a few moments. You will see status updates indicating the progress of the installation.
- Installation Complete: Once the installation is complete, you will see a message indicating that Homebrew was successfully installed.
/bin/bash -c "$(curl -fsSL https://raw.githubusercontent.com/Homebrew/install/HEAD/install.sh)"That’s it! Homebrew is now installed on your Mac. You can start using Homebrew to install and manage software packages from a vast collection of available options.
Note that during the installation process, Homebrew sets up all the necessary directories and files on your system, including a dedicated directory /usr/local/Homebrew that will be used for package management.
Now that you have Homebrew installed, you can move on to the next step and verify the installation to ensure everything is working correctly.
Verifying Homebrew Installation
After successfully installing Homebrew on your Mac, it’s important to verify that the installation was completed correctly. This step ensures that Homebrew is functioning as expected and ready for you to start using it. Follow the steps below to verify your Homebrew installation:
- Open Terminal: Launch the Terminal application on your Mac. You can find it in the Utilities folder within the Applications folder or by using Spotlight Search.
- Verify Homebrew: In the Terminal window, enter the command
brewand press Enter. - Confirmation: If Homebrew is installed correctly, you will see a list of available commands and options provided by Homebrew.
If you see the list of Homebrew commands and options, congratulations! Your Homebrew installation is successful and ready to be used. You can now start exploring and installing software packages using Homebrew.
If, for some reason, you receive an error message or the command is not recognized, there may be an issue with your Homebrew installation. In such cases, you can try reinstalling Homebrew by following the previous steps, or you can seek assistance from the Homebrew community forums or online resources to troubleshoot the problem.
Verifying your Homebrew installation ensures that you can confidently proceed with using this powerful package manager to install and manage software on your Mac. With Homebrew successfully installed and verified, you’re now equipped to take advantage of the extensive range of software packages available through Homebrew and enjoy the benefits it offers.
Updating Homebrew and Packages
One of the key advantages of using Homebrew is that it allows you to easily keep your software packages up to date. Regular updates ensure that you have the latest features, bug fixes, and security patches. In this section, we will guide you through the process of updating Homebrew and the packages installed via Homebrew.
- Open Terminal: Launch the Terminal application on your Mac.
- Update Homebrew: To update Homebrew itself, simply enter the command
brew update. This will fetch the latest version of Homebrew and update its software package database. - Update Packages: To update all installed packages, enter the command
brew upgrade. Homebrew will check for updates for all installed packages and upgrade them to the latest versions. - Updating a Specific Package: If you only want to update a specific package, use the command
brew upgrade package-name, replacing “package-name” with the name of the package you want to update. - List Outdated Packages: To see a list of packages that have updates available, use the command
brew outdated.
By regularly updating Homebrew and your installed packages, you ensure that your software environment is up to date, secure, and optimized. This helps in maintaining compatibility with the latest macOS updates and ensures that you’re benefiting from the latest features and improvements offered by the software packages installed via Homebrew.
It’s a good practice to periodically update Homebrew and your packages to stay current with the latest developments in the software ecosystem. By making this a habit, you can ensure a smooth and seamless experience with your Mac and the software you depend on.
Uninstalling Homebrew
If you no longer need Homebrew or want to uninstall it from your Mac for any reason, you can easily do so by following the steps below:
- Open Terminal: Launch the Terminal application on your Mac.
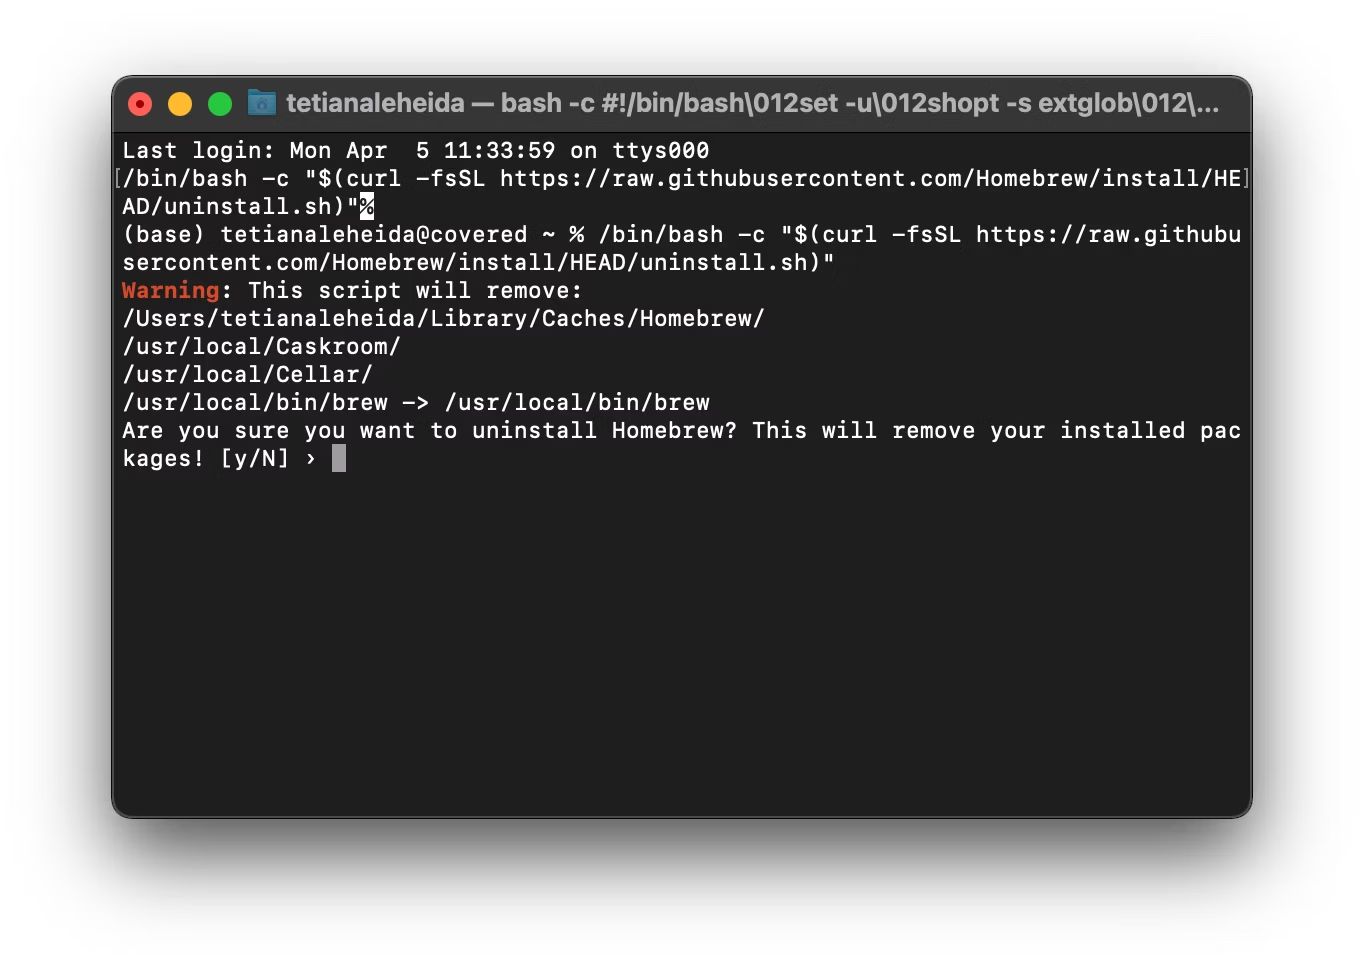
- Uninstall Homebrew: In the Terminal window, enter the following command to uninstall Homebrew:
- Enter Your Password: You may be prompted to enter your password. This is required for the uninstallation process to make necessary changes to your system files. Enter your password and press Enter to proceed.
- Confirmation: Once you have entered your password, the uninstallation process will begin. During this process, you will see messages indicating the progress of the uninstallation.
- Finish Uninstallation: After the process completes, you will see a message indicating the successful uninstallation of Homebrew from your Mac.
/bin/bash -c "$(curl -fsSL https://raw.githubusercontent.com/Homebrew/install/HEAD/uninstall.sh)"After uninstalling Homebrew, it’s a good practice to clean up any remaining files and directories associated with Homebrew. You can do this by entering the following command in Terminal:
rm -rf /usr/local/HomebrewThis command ensures that any leftover files and folders related to Homebrew are removed from your system.
Keep in mind that uninstalling Homebrew will also remove any packages that were installed via Homebrew. Make sure to back up any important data or configurations related to those packages beforehand.
By following these steps, you can easily uninstall Homebrew from your Mac and remove any traces of it from your system.
Conclusion
Congratulations on completing the journey of installing, verifying, and using Homebrew on your Mac! By now, you should have a clear understanding of what Homebrew is, its benefits, and how to install, update, and uninstall it.
Homebrew provides Mac users with a powerful and convenient way to manage software packages, giving you access to a wide range of tools, libraries, and utilities. With Homebrew, you can enhance your productivity, explore new software, and stay up to date with the latest features and bug fixes.
Remember, Homebrew is more than just a package manager; it’s an active community of contributors, developers, and enthusiasts who collaborate and share their knowledge and expertise. If you encounter any issues or have questions about Homebrew or specific packages, reaching out to the Homebrew community can provide valuable assistance and guidance.
Whether you’re a developer, power user, or someone who loves exploring new software, Homebrew opens up a world of possibilities for your Mac. With a few simple commands, you can install, update, and manage a vast collection of software packages tailored to your needs.
So, go forth and explore the vast ecosystem of packages available through Homebrew. Discover new tools, streamline your workflows, and enjoy the flexibility and convenience that Homebrew brings to your Mac experience.