How to Download Blizzard Games
Blizzard Entertainment is a renowned game development company known for its popular titles such as World of Warcraft, Diablo, and Overwatch. If you’re eager to experience their immersive and exciting games, follow these steps to download Blizzard games and embark on epic adventures:
- Create a Blizzard Account: To download and play Blizzard games, you’ll need to create a Blizzard account. Visit the official Blizzard website and click on “Create an Account” to get started. Fill in the required information and follow the prompts to set up your account.
- Visit the Blizzard Website: Once you have a Blizzard account, visit the Blizzard website at www.blizzard.com. This is where you’ll find a wide range of Blizzard games available for download.
- Select the Game You Want to Download: Browse through the game library and select the Blizzard game you wish to download. Each game will have its own dedicated page with detailed information about the game and system requirements.
- Purchase or Install the Game: Depending on the game, you may have the option to purchase it or install it for free. If it’s a free game, simply click on the “Install” button. If it’s a paid game, you’ll need to follow the prompts to purchase and download it.
- Download the Blizzard Game Launcher: Blizzard games are downloaded and managed through the Blizzard Game Launcher. To download the Launcher, click on the “Download” button or link provided on the game’s page.
- Install the Blizzard Game Launcher: Once the Launcher is downloaded, locate the installer file and run it. Follow the on-screen instructions to install the Blizzard Game Launcher on your computer.
- Log in to the Blizzard Game Launcher: After the Launcher is installed, launch it and log in using your Blizzard account credentials. This will give you access to your game library and allow you to download and play the Blizzard games you own.
- Access Your Game Library: Once you’re logged in to the Blizzard Game Launcher, navigate to your game library. This is where you’ll find all the Blizzard games you’ve purchased or installed.
- Start Downloading Your Game: Locate the game you want to download, click on it, and select the “Download” option. The Blizzard Game Launcher will begin downloading the game files to your computer. The download time will vary depending on the game’s size and your internet connection speed.
- Monitor the Download Progress: While the game is downloading, you can monitor the progress in the Blizzard Game Launcher. It will display the download speed, progress percentage, and estimated time remaining.
- Launch and Play Your Blizzard Game: Once the download is complete, the game will be ready to play. Click on the “Play” button in the Blizzard Game Launcher to launch the game and start your gaming experience.
By following these step-by-step instructions, you’ll be able to easily download and enjoy Blizzard games on your computer. Get ready to embark on thrilling adventures, battle fierce enemies, and immerse yourself in the fantastic worlds created by Blizzard Entertainment!
Introduction
Blizzard Entertainment is renowned for developing some of the most popular and beloved games in the gaming industry. From the epic fantasy realms of World of Warcraft to the dark and atmospheric world of Diablo, and the intense team-based action of Overwatch, Blizzard has captivated millions of players worldwide. If you’re eager to dive into these immersive gaming experiences, you’ll need to know how to download Blizzard games.
In this guide, we’ll walk you through the step-by-step process of downloading Blizzard games and getting started on your gaming journey. Whether you’re a seasoned gamer or new to the world of Blizzard, this guide will ensure that you have all the information you need to start playing your favorite Blizzard titles.
We’ll cover everything from creating a Blizzard account to downloading the Blizzard Game Launcher and accessing your game library. By following these simple instructions, you’ll be well on your way to exploring the vast and exhilarating worlds that Blizzard games have to offer.
Before we dive into the steps, it’s important to note that Blizzard games are available for download on PC and Mac platforms. Make sure you have a compatible computer and a stable internet connection to ensure a smooth downloading and gaming experience.
Now, let’s get started on the journey to download Blizzard games and begin your exciting adventure!
Step 1: Create a Blizzard Account
To download and play Blizzard games, you’ll first need to create a Blizzard account. This account will serve as your gateway to the world of Blizzard, where you can access and manage your games, interact with the community, and receive important updates.
To create a Blizzard account, follow these simple steps:
- Visit the official Blizzard website at www.blizzard.com.
- Look for the “Create an Account” option, usually located in the top-right corner of the website.
- Click on “Create an Account” to begin the registration process.
- You’ll be prompted to provide some basic details, including your email address, date of birth, and country of residence.
- Create a unique username and password for your account. Make sure to choose a strong password that includes a combination of letters, numbers, and special characters for optimal security.
- Agree to the terms of service and privacy policy.
- Complete any additional security verification steps, such as setting up a two-factor authentication method to enhance your account’s security.
- Once you’ve filled in all the required information, click on the “Create Account” button to finalize the registration process.
- You will receive a verification email at the email address you provided during the registration process. Click on the verification link in the email to verify and activate your Blizzard account.
After completing these steps, congratulations! You now have a Blizzard account that you can use to download and play Blizzard games.
It’s important to note that you should keep your account information secure and avoid sharing your login credentials with others. Blizzard takes account security seriously, but it’s always good practice to be proactive in protecting your account.
Now that you’ve created your Blizzard account, you’re one step closer to experiencing the thrilling adventures that Blizzard games have to offer. In the next step, we’ll guide you on how to visit the Blizzard website to access the games you want to download.
Step 2: Visit the Blizzard Website
Once you’ve created your Blizzard account, the next step is to visit the official Blizzard website. This is where you’ll find a vast collection of Blizzard games available for download, along with news, updates, and community forums.
To visit the Blizzard website and explore the incredible world of Blizzard games, follow these simple steps:
- Open a web browser on your computer.
- In the address bar, type in www.blizzard.com and press Enter.
- The Blizzard website homepage will load, showcasing the latest games, news, and featured content.
- Take your time to browse through the website and explore the various sections.
- You’ll find tabs or dropdown menus that direct you to different game categories, such as World of Warcraft, Diablo, Overwatch, and more.
- Click on a game category that interests you or use the search function to find a specific game.
- Once you’re on the game’s page, you’ll find detailed information about the game, including its description, system requirements, screenshots, and videos.
- Take the time to read through the information to ensure the game is compatible with your computer and appeals to your gaming preferences.
- Feel free to explore other games or sections of the Blizzard website before making your decision.
Visiting the Blizzard website is an essential step in downloading Blizzard games. It allows you to discover new games, stay updated on the latest news, and immerse yourself in the Blizzard gaming community.
Take your time to browse through the website and find the game that piques your interest. Once you’ve made your decision, it’s time to move on to the next step: selecting and purchasing the game you want to download.
Step 3: Select the Game You Want to Download
With the Blizzard website at your fingertips, it’s time to select the game you want to download and embark on your gaming adventure. Blizzard offers a diverse range of games, each with its own unique gameplay, story, and setting.
To select the game you want to download from the Blizzard website, follow these steps:
- While on the official Blizzard website, navigate to the game category that interests you. For example, if you’re a fan of massive multiplayer online role-playing games (MMORPGs), you can click on the “World of Warcraft” category.
- Once you’re in the game category, browse through the list of available games in that category.
- Take your time to read the descriptions, view screenshots or gameplay videos, and explore the features and gameplay mechanics of each game.
- Consider factors such as the game’s genre, art style, and player reviews to help you make an informed decision.
- If you already have a specific game in mind, you can use the search bar on the Blizzard website to quickly locate it.
- Click on the game’s title or image to access its dedicated page.
- On the game’s page, you’ll find detailed information about the game, including its system requirements, supported platforms, and price.
- Review this information to ensure that your computer meets the minimum system requirements and that the game is compatible with your preferred platform.
- Take note of any special editions, expansions, or additional content that may be available for the game, as this can enhance your overall gaming experience.
- Once you’re confident about your choice, you can proceed to purchase or install the game, depending on its availability and pricing.
By carefully selecting the game you want to download, you can ensure that you’ll be investing your time and energy into a game that resonates with your gaming preferences. So take your time, explore different games, and choose the one that excites you the most.
Now that you’ve made your selection, it’s time to move to the next step: purchasing or installing the game. This will vary depending on whether the game is free to play or requires a purchase. We’ll guide you through the process in the next step.
Step 4: Purchase or Install the Game
After selecting the game you want to download from the Blizzard website, the next step is to either purchase or install the game, depending on its availability and pricing. Blizzard offers a variety of gaming experiences, including both free-to-play and paid games.
Follow these steps to purchase or install the game you’ve chosen:
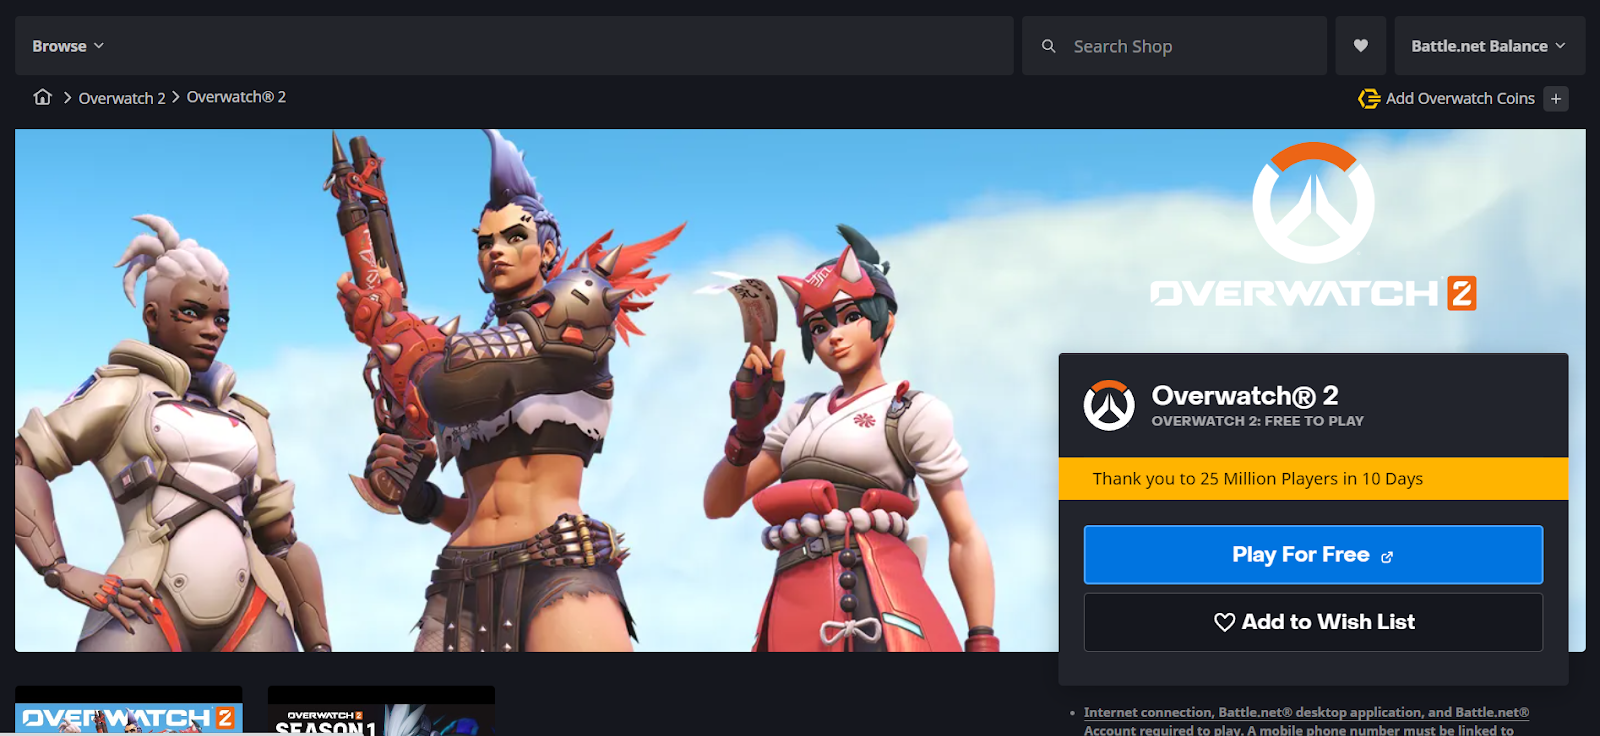
- If the game is free-to-play:
- On the game’s dedicated page, look for the “Install” or “Play for Free” button.
- Click on the button to begin the installation process.
- Follow the on-screen prompts to download and install the game on your computer.
- Once the installation is complete, the game will be ready to play.
- If the game is a paid game:
- On the game’s dedicated page, locate the pricing and purchase options.
- Click on the appropriate button to start the purchase process.
- You’ll be directed to a secure payment page where you can enter your payment details, such as your credit card information or use a preferred payment method, such as PayPal.
- Follow the prompts to complete the purchase. Ensure that you review the pricing, any additional content that may be included, and any special offers or discounts available.
- Once the purchase is completed, you’ll receive a confirmation email with instructions on how to proceed with the download and installation of the game.
- Click on the provided link or follow the instructions in the email to begin the download and installation process.
- Follow the on-screen prompts to download and install the game on your computer.
- Once the installation is complete, the game will be ready to play.
By following these steps, you’ll either purchase or install the game of your choice, enabling you to delve into the captivating world of Blizzard gaming.
It’s important to note that some Blizzard games may offer additional content, such as expansions or special editions. Be sure to check the game’s page for any available extras that can enhance your gaming experience.
Now that you’ve acquired the game, it’s time to move on to the next step: downloading the Blizzard Game Launcher, which will serve as your hub for managing and launching your Blizzard games.
Step 5: Download the Blizzard Game Launcher
Before you can start downloading and playing your Blizzard games, you’ll need to download the Blizzard Game Launcher. The Blizzard Game Launcher is a desktop application that serves as a hub for managing and launching your Blizzard games.
Follow the steps below to download the Blizzard Game Launcher:
- On the Blizzard website, navigate to the game’s page or the main Blizzard homepage.
- Look for the “Download” or “Get Started” button related to the Blizzard Game Launcher.
- Click on the button to initiate the download process.
- A file called BlizzardSetup.exe or a similar name will begin downloading to your computer.
- Once the download is complete, locate the downloaded file on your computer (usually in the “Downloads” folder).
- Double-click on the downloaded file to run the Blizzard Game Launcher installer.
- Follow the on-screen prompts to install the Blizzard Game Launcher on your computer.
- Choose the desired installation location and agree to any terms or conditions presented during the installation process.
- Wait for the installation to complete. The Blizzard Game Launcher will be ready to use once the installation is finished.
Downloading the Blizzard Game Launcher is an important step as it provides easy access to all your Blizzard games. You’ll be able to install, update, and launch your games from a single application, enhancing your gaming experience.
Once the Blizzard Game Launcher is installed, you’ll need to log in with your Blizzard account credentials to access your game library and start downloading the games you’ve purchased or installed.
Next, we’ll move on to the next step: logging in to the Blizzard Game Launcher to access your game library.
Step 6: Install the Blizzard Game Launcher
After you have downloaded the Blizzard Game Launcher installer, the next step is to install it on your computer. The Blizzard Game Launcher is a desktop application that allows you to manage and launch your Blizzard games with ease.
Follow the steps below to install the Blizzard Game Launcher:
- Locate the downloaded Blizzard Game Launcher installer file on your computer. It is usually located in your “Downloads” folder or the location specified during the download.
- Double-click on the installer file to start the installation process.
- A setup wizard will appear on your screen. Follow the on-screen prompts to proceed with the installation.
- Review the license agreement and accept the terms and conditions to continue.
- Choose the installation location for the Blizzard Game Launcher on your computer. You can either use the default location or specify a different folder where you would like to install it.
- Customize the installation options, such as creating desktop shortcuts or Start menu entries, if desired.
- Click on the “Install” or “Next” button to begin the installation process.
- Wait for the installation to complete. This may take a few moments.
- Once the installation is finished, click on the “Finish” button to close the setup wizard.
- You can now find the Blizzard Game Launcher either on your desktop or in your Start menu.
With the Blizzard Game Launcher successfully installed on your computer, you’re one step closer to enjoying your favorite Blizzard games.
Now, it’s time to move on to the next step: logging in to the Blizzard Game Launcher using your Blizzard account credentials.
Step 7: Log in to the Blizzard Game Launcher
After installing the Blizzard Game Launcher, the next step is to log in using your Blizzard account credentials. By logging in to the Blizzard Game Launcher, you’ll gain access to your game library, where you can download, install, and manage your Blizzard games.
Follow these steps to log in to the Blizzard Game Launcher:
- Locate the Blizzard Game Launcher shortcut on your desktop or in your Start menu and double-click to open it.
- The Blizzard Game Launcher will launch and display the login screen.
- Enter your Blizzard account email address or username in the designated field.
- Enter your account password in the corresponding field. Be sure to double-check your spelling and ensure that the Caps Lock key is not enabled.
- If you have set up two-factor authentication (2FA) for your Blizzard account, you’ll need to follow the prompts to provide the authentication code.
- Click on the “Log In” or “Sign In” button to proceed.
- If the provided credentials are correct, you’ll be successfully logged in to the Blizzard Game Launcher.
Logging in to the Blizzard Game Launcher is essential as it grants you access to your game library, allows you to download and install your purchased or installed Blizzard games, and provides access to additional features such as updates, news, and community features.
Make sure to keep your Blizzard account credentials secure and avoid sharing them with others. If you suspect any unauthorized access to your account, it’s recommended to change your password and enable additional security measures like two-factor authentication.
Now that you’re logged in to the Blizzard Game Launcher, you’re ready for the next step: accessing your game library to begin downloading the Blizzard games you own.
Step 8: Access Your Game Library
After logging in to the Blizzard Game Launcher, you’ll have access to your game library, where you can find and manage all the Blizzard games you own. The game library serves as a central hub for organizing and launching your downloaded games.
To access your game library in the Blizzard Game Launcher, follow these steps:
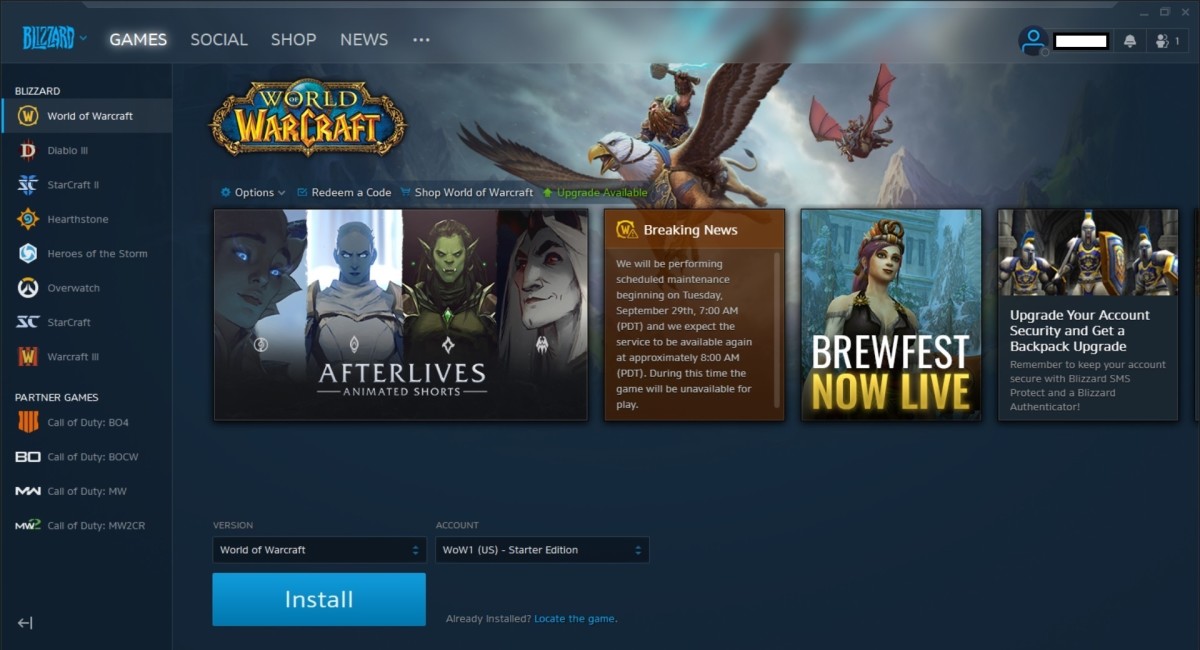
- Once you’re logged in to the Blizzard Game Launcher, you’ll be on the main interface.
- Look for the “Games” or “Library” tab near the top of the Launcher. Click on it.
- This will open your game library, displaying all the Blizzard games that are available for you to play.
- Scroll through the list to find the specific game you’d like to download or launch.
- Each game in your library will have a dedicated page with additional details, such as game updates, news, and community features.
- Take the time to explore the different options and features available for each game.
- To download a game that hasn’t been downloaded yet, click on the “Install” button located next to the game.
- To launch a game that has already been downloaded, click on the “Play” button.
- If you have multiple Blizzard accounts or want to switch between regions, you can do so by clicking on the account dropdown menu.
- From the game library, you can also access additional options such as game settings, game updates, or uninstalling a game if desired.
By accessing your game library in the Blizzard Game Launcher, you have full control over your Blizzard games. You can easily download new games, manage updates, and seamlessly launch your favorite games to begin your gaming experience.
Now that you know how to access your game library, it’s time to move on to the next step: downloading your desired Blizzard game. We’ll guide you through the process in the following step.
Step 9: Start Downloading Your Game
Now that you have accessed your game library, it’s time to start downloading the Blizzard game you want to play. The Blizzard Game Launcher makes it easy to manage and download your games, ensuring a smooth and efficient downloading process.
To begin downloading your desired Blizzard game, follow these steps:
- In the Blizzard Game Launcher, navigate to your game library by clicking on the “Games” or “Library” tab.
- Scroll through the list of games until you find the specific game you want to download.
- If the game is not downloaded yet, you’ll see an “Install” button next to it. Click on the “Install” button to start the download process.
- A progress bar will appear, indicating the download progress.
- Depending on the size of the game and your internet connection speed, the download time may vary.
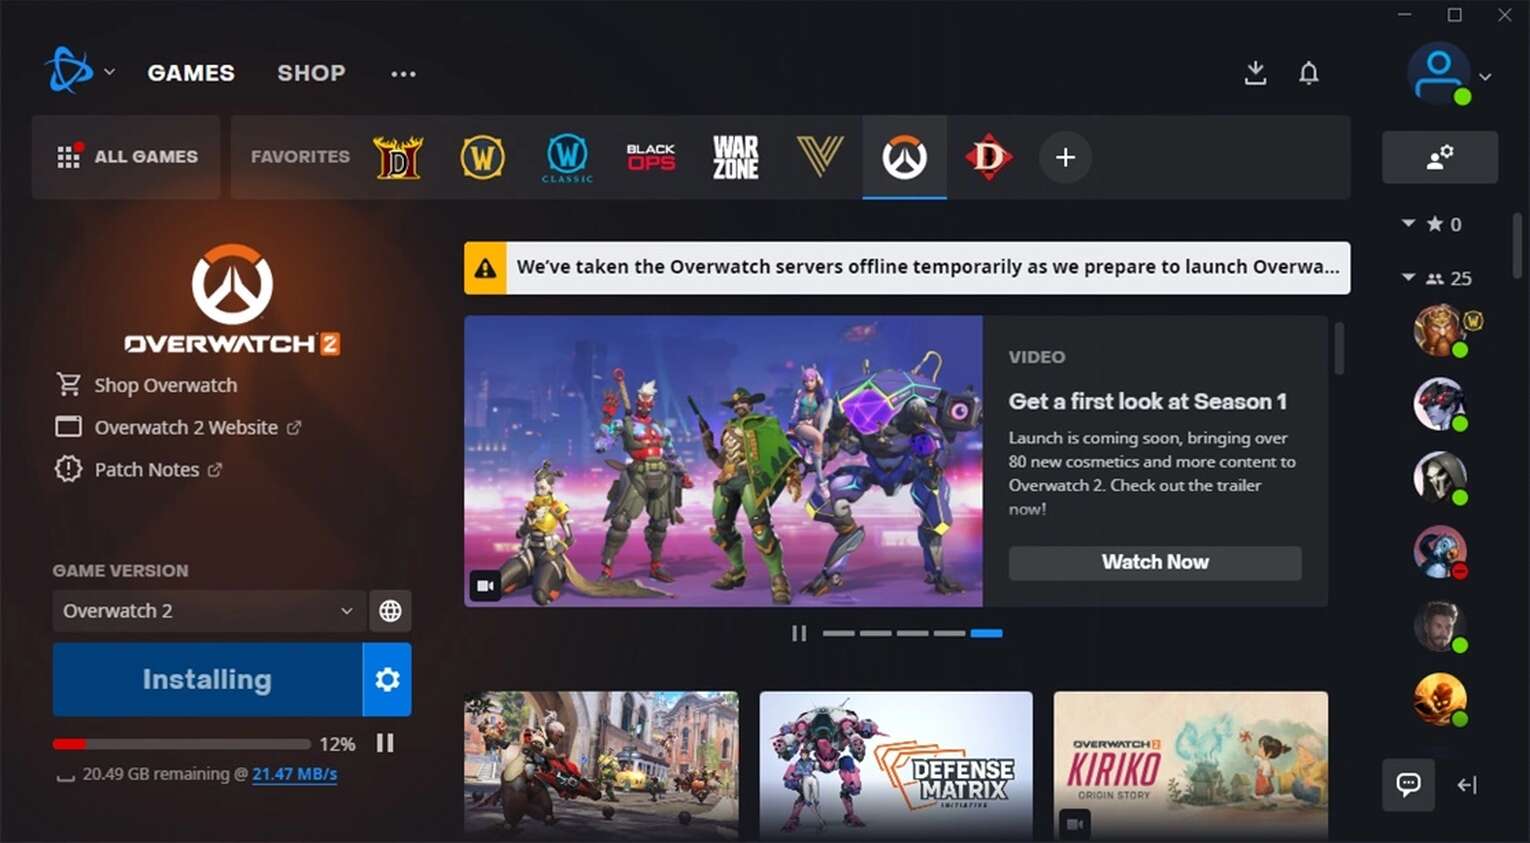
- During the download, you can monitor the progress in the Blizzard Game Launcher. It will display the download speed, percentage completed, and estimated time remaining.
- While the game is downloading, you have the option to pause, resume, or cancel the download if needed. Simply click on the corresponding button next to the progress bar.
- It’s recommended to ensure a stable internet connection throughout the download process to avoid any interruptions or delays.
- Once the download is complete, the game is ready to be installed and played.
By following these steps, you’ll successfully initiate the download of your desired Blizzard game. Allow the download to complete, and soon you’ll be ready to dive into the immersive world of your chosen game.
Now that the game is downloading, it’s a good time to grab a refreshing drink and prepare yourself for the captivating gameplay that awaits you. Next, we’ll cover the importance of monitoring the download progress in the following step.
Step 10: Monitor the Download Progress
As your desired Blizzard game is downloading, it’s important to monitor the download progress to ensure a smooth and timely installation. The Blizzard Game Launcher provides you with real-time information about the download, allowing you to keep track of its status.
Follow these steps to monitor the download progress of your Blizzard game:
- Open the Blizzard Game Launcher if it’s not already open.
- In the Launcher, navigate to your game library by clicking on the “Games” or “Library” tab.
- Locate the Blizzard game you are currently downloading. You’ll see a progress bar and a numerical representation of the download percentage.
- The Blizzard Game Launcher will also display the download speed, estimated time remaining, and the total size of the game.
- Keep an eye on the progress bar as it fills up, indicating the download percentage completed.
- Take note of the estimated time remaining and use it as a reference to plan your gaming session.
- If needed, you can pause or resume the download by clicking on the respective button next to the progress bar.
- It’s recommended to have a stable internet connection throughout the download process to avoid any interruptions or delays.
- While the game is downloading, you can explore other features of the Blizzard Game Launcher, such as the shop, news updates, or community forums.
- Once the download is complete, you’ll be notified, and the game will be ready for installation and play.
By monitoring the download progress, you can have a better understanding of when your preferred Blizzard game will be fully downloaded and ready to play. This ensures that you are well-prepared and can make the most of your gaming experience.
Now that you’re aware of the importance of monitoring the download progress, it’s time to get ready to launch and play your Blizzard game. We’ll cover the final step in the next section.
Step 11: Launch and Play Your Blizzard Game
After patiently waiting for the download to complete, it’s finally time to launch and play your Blizzard game. The Blizzard Game Launcher simplifies the process of accessing your games, ensuring a seamless and enjoyable gaming experience.
Follow these steps to launch and play your Blizzard game:
- Open the Blizzard Game Launcher if it’s not already open.
- In the Launcher, navigate to your game library by clicking on the “Games” or “Library” tab.
- Locate the Blizzard game you’ve downloaded and that is ready to be played.
- Click on the “Play” button or a similar button next to the game’s title.
- The Blizzard Game Launcher will initiate the game’s launching process.
- Depending on the game, you may be prompted to install any necessary updates or patches. Allow the updates to be installed to ensure the game is up to date.
- Once the game is ready to launch, a new window or screen will appear, displaying the game’s logo, loading screen, or main menu.
- Follow any on-screen instructions or prompts to start a new game, load a saved game, or access additional game settings.
- Enjoy playing your Blizzard game and immerse yourself in the captivating world and gameplay that awaits you.
Congratulations! You have successfully launched and started playing your Blizzard game. Take your time to explore the game, dive into its storyline, and enjoy the exciting gameplay that Blizzard games are known for.
Remember to refer to the game’s documentation or in-game tutorial for any specific instructions or controls to enhance your gaming experience.
Now that you’ve successfully launched and begun playing your Blizzard game, go ahead and embark on your gaming adventure. Have fun, and may your gaming sessions be filled with excitement and memorable moments!
Conclusion
Downloading and playing Blizzard games is an exciting journey that allows you to immerse yourself in rich and captivating gaming experiences. By following the step-by-step process outlined in this guide, you’ve learned how to successfully download and launch your desired Blizzard game.
Throughout the process, we covered essential steps, including creating a Blizzard account, visiting the Blizzard website, selecting and purchasing/installing the game, downloading the Blizzard Game Launcher, logging in, accessing your game library, and monitoring the download progress. Finally, we guided you on how to launch and play your Blizzard game.
It’s important to note that while the focus of this guide was on the technical aspects of downloading Blizzard games, each game offers a unique and immersive world filled with stories, challenges, and adventures. Explore the vast realms of World of Warcraft, battle the forces of evil in Diablo, or engage in exhilarating team-based combat in Overwatch – the choice is yours!
Remember to check the system requirements to ensure your computer meets the necessary specifications for optimal gameplay. Additionally, regularly updating your games and maintaining a stable internet connection will enhance your gaming experience.
Continue to explore new games, join the vibrant Blizzard community, and stay updated with the latest news and updates provided by Blizzard Entertainment. Engage with fellow gamers, share your experiences, and discover new friends and allies along the way.
With your new knowledge on how to download and play Blizzard games, it’s time to embark on thrilling adventures, conquer formidable foes, and experience the magic and excitement that Blizzard games have to offer. So, let the epic journey begin, and may your gaming experiences be nothing short of extraordinary!