Introduction
Downloading files from the terminal can be a quick and efficient way to retrieve data without the need for a graphical user interface. Whether you’re a developer, system administrator, or simply someone who prefers working with the command line, knowing how to download files using the terminal can be a valuable skill.
In this guide, we’ll explore various methods and commands that you can use to download files from the terminal. We’ll cover downloading files from the web, as well as retrieving files from remote servers. Whether you’re looking to fetch a single file or transfer multiple files, we’ve got you covered!
By leveraging command-line tools such as wget, curl, scp, and rsync, you’ll be able to download files with ease and flexibility.
So, let’s dive in and explore how you can harness the power of the terminal to download files effortlessly!
Step 1: Open Terminal
The first step in downloading files from the terminal is to open the terminal application on your operating system. The terminal provides a command-line interface through which you can interact with your computer using text-based commands.
On most operating systems, you can open the terminal by searching for the “Terminal” application in your system’s applications menu. Alternatively, you can use keyboard shortcuts like Ctrl+Alt+T (Linux) or Command+Space and type “Terminal” (macOS) to quickly launch it.
Once you have the terminal open, you’ll be presented with a blank command prompt where you can start entering commands. The exact appearance of the terminal may vary depending on your operating system and terminal emulator, but the concept remains the same.
Now that you have the terminal open and ready to use, you’re one step closer to downloading files like a pro!
Let’s move on to the next step and learn how to navigate to the directory where you want to save the downloaded files.
Step 2: Navigate to the Directory Where You Want to Save the File
Before you can start downloading files, it’s important to navigate to the directory where you want to save them. The terminal operates within a specific directory, also known as the working directory, and any files you download will be stored in that location.
To navigate to a specific directory in the terminal, you can use the cd command followed by the directory’s path. For example, if you want to navigate to a folder called “Downloads” located in your home directory, you can use the following command:
cd ~/Downloads
This command instructs the terminal to change into the specified directory. The tilde (~) is a shorthand notation for your home directory.
If you’re not sure about the exact path of the directory you’re looking for, you can use the ls command to list the contents of the current directory. This will give you a visual representation of the available directories and files.
Once you’ve accurately located the directory where you want to save your downloaded files, you’re ready to proceed to the next step.
In the next step, we’ll explore how to use the wget command to download a file directly from the web using the terminal.
Step 3: Use the wget Command to Download a File from the Web
One of the most commonly used commands for downloading files from the web using the terminal is wget. This command allows you to retrieve files from URLs or web addresses without the need for a graphical web browser.
To download a file using wget, you simply need to provide the URL of the file as an argument. For example, to download a file named “example-file.txt” from a web server, you can use the following command:
wget http://www.example.com/example-file.txt
When you execute the command, wget will initiate the download process, and the file will be saved in the current working directory by default. You can also specify a different directory path to save the downloaded file by providing the desired location as an argument:
wget -P ~/Downloads http://www.example.com/example-file.txt
In this example, the downloaded file will be saved in the “Downloads” directory in the user’s home directory.
By default, wget will overwrite any existing files with the same name. If you want to avoid this, you can use the -nc option to prevent overwriting:
wget -nc http://www.example.com/example-file.txt
This will only download the file if it does not already exist in the specified location.
Now you know how to use the wget command to download files from the web. In the next step, we’ll explore an alternative command, curl, which provides additional functionality for downloading files.
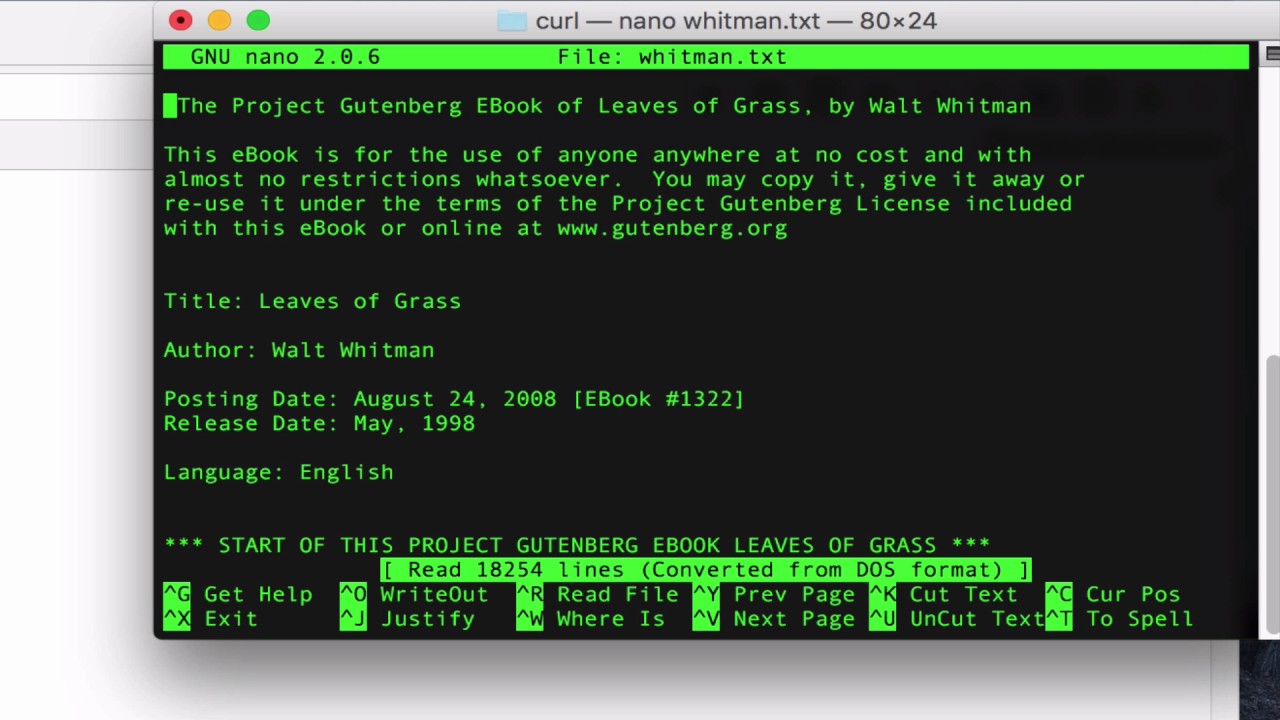
Step 4: Use the curl Command to Download a File from the Web
Another powerful command-line tool for downloading files from the web is curl. Similar to wget, curl allows you to fetch files from URLs directly in the terminal.
Using curl to download a file is quite straightforward. Simply provide the URL of the file as an argument, and curl will handle the rest. For example, let’s say you want to download a file named “example-file.txt” from a web server:
curl -O http://www.example.com/example-file.txt
When you run this command, curl will retrieve the file and save it in the current working directory with the same name as on the server.
If you want to save the downloaded file with a specific name, you can use the -o option followed by the desired file name:
curl -o local-file-name.txt http://www.example.com/example-file.txt
This command will save the downloaded file as “local-file-name.txt.”
One of the advantages of curl is its ability to resume downloads. If the download is interrupted for some reason, you can use the -C - option to resume the download from where it left off:
curl -C - -O http://www.example.com/example-file.txt
This can be helpful when dealing with large files and unstable connections.
With the curl command, you have a powerful tool at your disposal for downloading files from the web in the terminal. In the next step, we’ll explore how to use the scp command to download files from a remote server.
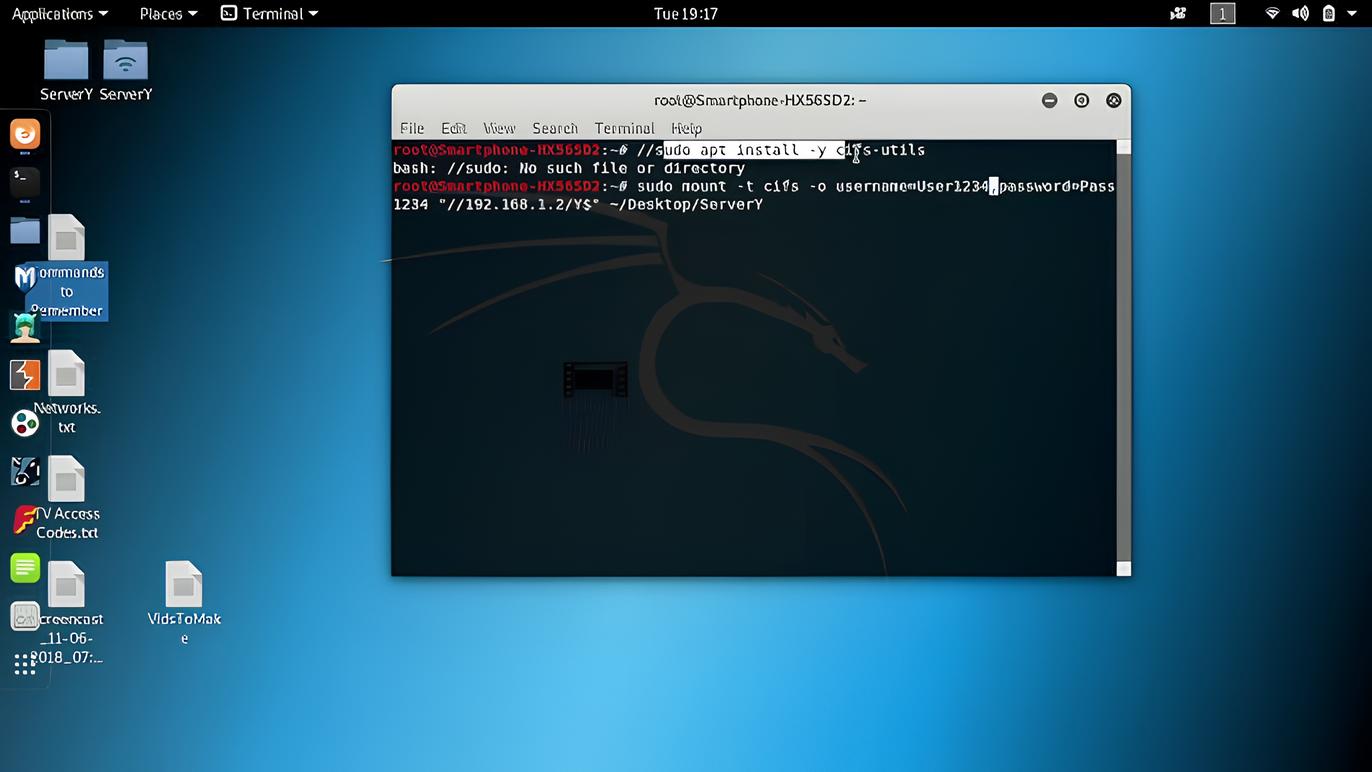
Step 5: Use the scp Command to Download a File from a Remote Server
If you need to download files from a remote server, the scp command can be a handy tool. scp, short for Secure Copy, allows you to securely transfer files between your local machine and a remote server via SSH (Secure Shell).
To download a file from a remote server using scp, you’ll need the remote server’s address and the login credentials. The general syntax of the command is:
scp username@remote_host:remote_file local_destination
For example, let’s say you want to download a file named “example-file.txt” from a remote server with the IP address 192.168.1.100:
scp username@192.168.1.100:/path/to/example-file.txt /local/destination
Replace “username” with your actual username on the remote server, and “/path/to/example-file.txt” with the actual file path on the remote server. Similarly, “/local/destination” should be replaced with the directory path where you want to save the downloaded file on your local machine.
When you run the scp command, it will prompt you for the password associated with the provided username on the remote server. After entering the correct password, scp will securely copy the file to your local machine.
Note that the scp command supports various additional options, such as preserving file attributes with -p and recursively downloading directories with -r. Consult the command’s documentation or use the man scp command for more information on these options.
Now you know how to use the scp command to download files from a remote server. In the next step, we’ll explore the rsync command, which provides advanced features for downloading files from remote servers.
Step 6: Use the rsync Command to Download Files from a Remote Server
If you need to synchronize and download files from a remote server, the rsync command can be a powerful tool. It allows you to efficiently transfer files between your local machine and a remote server while preserving file attributes and performing incremental updates.
To download files from a remote server using rsync, you’ll need the remote server’s address, the login credentials, and the path to the files you want to download. The general syntax of the command is:
rsync [options] username@remote_host:/path/to/remote_files local_destination
For example, let’s say you want to download files from a remote server with the IP address 192.168.1.100, and the files are located in the “/path/to/remote_files” directory:
rsync -avz username@192.168.1.100:/path/to/remote_files /local/destination
In this example, -avz are options commonly used with rsync. The -a option preserves file attributes and permissions, the -v option enables verbose output for a more detailed progress log, and the -z option compresses the data during transfer for faster download speeds.
Running the rsync command will prompt you for the password associated with the provided username on the remote server. After entering the correct password, rsync will initiate the download process, and the specified files will be synchronized and downloaded to your local machine.
One of the advantages of rsync is its ability to perform incremental transfers. This means that after the initial download, subsequent executions of the rsync command will only transfer the changes or updates to the files, resulting in faster synchronization.
Now you’re equipped with the knowledge of using the rsync command to efficiently download files from a remote server. With this, you have completed all the necessary steps to download files from the terminal!
Conclusion
Downloading files from the terminal is a valuable skill that can enhance your productivity, especially if you work in a command-line environment or need to automate file retrieval tasks. Throughout this guide, we’ve explored various methods to download files using commands such as wget, curl, scp, and rsync.
We started by opening the terminal and navigating to the desired directory where the downloaded files should be saved. Then, we learned how to use the wget command to download files directly from the web with ease. Next, we explored the capabilities of the curl command, which offers more flexibility and features for file downloads.
To download files from remote servers, we discussed the scp command, which allows secure file transfers over SSH. Finally, we learned about the powerful rsync command, which not only enables file downloads but also provides advanced synchronization capabilities.
By mastering these commands, you can efficiently download files from the terminal, automate downloads, and streamline your workflow. Whether you’re a developer, system administrator, or someone who prefers working with the command line, these techniques will greatly enhance your efficiency.
Remember to always verify the permissions and legality of the files you download to ensure a safe and responsible usage of the command-line tools.
So go ahead, explore the world of file downloading from the terminal, and enjoy the power and flexibility that it brings to your daily tasks!