Introduction
Welcome to the world of embroidery! Whether you’re a seasoned embroiderer or just starting out, having a Brother embroidery machine opens up a world of creative possibilities. Embroidery designs can elevate any project, from garments and accessories to home decor items and gifts.
In this article, we will walk you through the process of downloading and utilizing embroidery designs specifically for Brother machines. We’ll cover different embroidery design formats, explore popular Brother embroidery design websites, explain how to create your own designs, and guide you in transferring those designs to your Brother machine for stitching.
Embroidery designs can be found in various formats, such as .pes, .dst, .exp, and more. These formats determine the compatibility between the design file and your Brother machine. It’s essential to select the correct format to ensure a successful embroidery process.
If you prefer to download ready-made embroidery designs, there are numerous websites dedicated to Brother-compatible designs. These platforms offer a wide range of designs, from intricate floral patterns to fun and quirky designs for children. We will discuss some of the popular websites where you can find these designs.
If you have a creative flair and want to customize your own designs, we will provide guidance on how to create embroidery designs using specialized software. You’ll learn about the different elements involved, such as selecting stitch types, digitizing images, and adding text.
Once you have your designs ready, you’ll need to transfer them to your Brother machine. We’ll walk you through the process of connecting your machine to your computer and transferring the design files. You’ll also learn how to organize and store designs within your machine for easy access.
Stitching embroidery designs is an exciting and rewarding process. We’ll explain how to set up your Brother machine for optimal stitching, including selecting the appropriate thread colors, stabilizing the fabric, and adjusting the settings for different design elements. You’ll be amazed at how your designs come to life as the machine does its magic.
Finally, we’ll address common troubleshooting issues you may encounter during the embroidery process. Whether it’s issues with design transfer, thread tension, or thread breakage, we’ll provide helpful tips to overcome these challenges.
Embroidery is a timeless craft that allows you to showcase your creativity and style. With the guidance and tips provided in this article, you’ll be well-equipped to explore the world of embroidery designs and create stunning works of art with your Brother machine.
Embroidery Design Formats
When it comes to embroidery design formats, it’s important to understand that different formats are compatible with different machines. Brother machines typically support various file formats, including .pes, .dst, .exp, .jef, .vp3, and more. Each format has its own specific characteristics and features, and selecting the right format ensures that your designs can be read and stitched correctly by your Brother machine.
The .pes format, short for Brother Embroidery Format, is the most commonly used format for Brother machines. It supports various design elements such as colors, stitch types, and intricate details. Many embroidery design websites offer designs in the .pes format, making it easy to find and download compatible designs for your machine.
The .dst format, or Tajima Embroidery Format, is another popular format widely used in the industry. It is compatible with many embroidery machines, including Brother machines. Designs in the .dst format often contain multiple color layers and can achieve a high level of detail and complexity.
The .exp format, also known as Melco Embroidery Format, is primarily associated with Melco embroidery machines. However, many Brother machines can read and stitch designs in this format as well. The .exp format supports color, stitch density, stitch types, and various design elements.
Other formats like .jef and .vp3 are specific to certain embroidery machine brands but are also compatible with Brother machines. These formats offer versatility in terms of design compatibility and can be converted into other formats if needed.
When choosing embroidery designs, it’s essential to ensure that they are available in a format compatible with your Brother machine. Most design files can be downloaded in multiple formats, giving you the flexibility to choose. Check the specifications of your Brother machine and the available design formats on the websites or software you use to download designs.
By understanding the different embroidery design formats and their compatibility with your Brother machine, you can confidently explore a vast collection of designs and unleash your creativity in unique and personalized embroidery projects.
Brother Embroidery Design Websites
When it comes to finding embroidery designs for your Brother machine, there are several dedicated websites that offer a wide range of designs to choose from. These websites provide a convenient platform for embroiderers to browse and download designs that are compatible with their Brother machines. Here are a few popular Brother embroidery design websites that you can explore:
- EmbroideryDesigns.com: This website offers a vast collection of embroidery designs, including a dedicated section for Brother-compatible designs. You can filter designs based on categories, themes, and even specific Brother machine models, making it easy to find designs that suit your preferences.
- Urban Threads: Urban Threads specializes in unique and contemporary embroidery designs. They offer a mix of free and paid designs, with a specific category for Brother machines. Their designs often have a modern and edgy aesthetic, perfect for adding a trendy touch to your projects.
- Emblibrary: Emblibrary features thousands of embroidery designs, including a section dedicated to Brother-compatible designs. They offer a variety of categories, allowing you to find designs for different types of projects. The website also provides helpful tips and tutorials to enhance your embroidery skills.
- Embroideres.com: This website offers a diverse collection of embroidery designs, including a dedicated section for Brother machines. They have designs that cater to various themes, styles, and skill levels. You can browse through their extensive library and discover new designs to inspire your creativity.
- Designs by JuJu: Designs by JuJu is known for their adorable and whimsical embroidery designs. They offer a section specifically for Brother machines, featuring designs suitable for children, holidays, and more. Their designs are often vibrant and playful, making them perfect for adding a touch of fun to your projects.
These websites provide a user-friendly experience, allowing you to browse through designs, preview them, and download them in the appropriate format for your Brother machine. Some websites also offer subscription options or loyalty programs, giving you access to a wider range of designs at discounted prices.
Before downloading any designs, always check the compatibility of the design format with your Brother machine. Additionally, ensure that the website is reputable and offers secure downloads to protect your computer and embroidery machine from potential risks.
Exploring these Brother embroidery design websites will open up a world of possibilities for your embroidery projects. From classic designs to modern and trendy ones, you’ll find the perfect designs to match your style and bring your creativity to life.
Creating Embroidery Designs
If you want to add a personal touch to your embroidery projects, creating your own embroidery designs is a rewarding option. With the help of specialized software and a bit of creativity, you can design custom patterns and motifs that reflect your unique style. Here’s a step-by-step guide on creating embroidery designs:
- Select a Design Software: To create embroidery designs, you’ll need embroidery design software. There are various options available, both free and paid, that offer different levels of functionality. Some popular software choices for designing embroidery include Embird, Wilcom Hatch, and PE-Design.
- Digitize Your Design: Once you have your design software in place, you can begin the digitizing process. Digitizing involves converting an image or artwork into a format that can be stitched by an embroidery machine. You’ll need to import your desired image and use the software’s tools to outline shapes, add fill stitches, and define thread colors.
- Choose Stitch Types: Embroidery designs consist of various stitch types, such as satin stitches, fill stitches, and appliqué stitches. Select the appropriate stitch types for different areas of your design to achieve the desired texture and visual effect. Experiment with different stitch lengths and densities to enhance the details of your design.
- Add Text (if desired): If you want to include text in your design, most embroidery software allows you to add and customize text. You can choose font styles, adjust letter spacing and size, and even shape the text to fit a particular area of your design. Incorporating meaningful words or names can personalize your embroidery projects.
- Preview and Refine: Before finalizing your design, take advantage of the software’s preview feature to get a visual representation of how your design will look when stitched. Make any necessary adjustments to ensure that the design elements are well-defined and the colors are balanced. Pay attention to areas where stitches may be too dense or too sparse, and refine accordingly.
- Save in Compatible Formats: Once you’re satisfied with your design, save it in a format compatible with your Brother machine (.pes, .dst, etc.). Some design software also offers the option to directly export the design to your machine’s USB drive or transfer it using a compatible file transfer method.
Keep in mind that creating embroidery designs requires practice and patience. Start with simple designs and gradually explore more complex techniques as you gain experience. There are also online tutorials and forums where you can find additional guidance and tips from experienced embroiderers.
By creating your own embroidery designs, you can infuse your projects with a unique touch and bring your artistic vision to life. Whether it’s personalizing gifts or embroidering your favorite designs, the possibilities are endless when you have the creative freedom to design your own embroidery patterns.
Transferring Embroidery Designs to Brother Machine
Once you have your desired embroidery designs ready, the next step is transferring them to your Brother machine. This process allows you to seamlessly transfer the design files from your computer to your embroidery machine for stitching. Here’s a step-by-step guide on how to transfer embroidery designs to your Brother machine:
- Connect Your Machine: Start by connecting your Brother machine to your computer using a USB cable or a designated transfer cable. Ensure that both the machine and the computer are powered on.
- Access Design Transfer Mode: On your Brother machine, navigate to the menu or settings options and look for the mode that allows design transfer. This mode may be called “USB” or “Transfer” mode. Select it to enable the design transfer feature.
- Prepare Your Design Files: Using file management software on your computer, locate the embroidery design files you want to transfer. Ensure that the designs are saved in a compatible format for your Brother machine (e.g., .pes, .dst, etc.). It’s a good idea to organize your designs into folders for easy access.
- Copy Design Files to Machine: Select the desired embroidery design files on your computer and copy them. Then, navigate to the designated folder on your Brother machine where you want to store the designs. Paste the copied design files into this folder on your machine.
- Eject or Safely Remove the Device: Once the design files are successfully transferred to your Brother machine, it’s important to safely eject or remove the device from your computer. Follow the proper procedure to disconnect the USB or transfer cable to avoid any potential data loss or damage.
- Access and Select Designs on Your Machine: On your Brother machine, navigate to the appropriate menu or screen to access the designs. The exact steps may vary depending on the model of your machine. Browse through the folders or categories to locate the transferred designs. Select the desired design to start stitching.
Transferring embroidery designs from your computer to your Brother machine allows you to access a wide range of designs and explore your creativity. Keep in mind that the specific steps and menu options may vary slightly depending on the model of your Brother machine. Refer to the user manual or the official Brother website for detailed instructions pertaining to your machine.
With the ability to transfer designs seamlessly, you can now dive into a world of limitless creativity and bring your embroidery projects to life using your Brother machine.
Stitching Embroidery Designs
Once you have transferred your desired embroidery design to your Brother machine, it’s time to bring your design to life through stitching. Proper setup and adjustments are key to achieve the best results. Here’s a step-by-step guide on how to stitch embroidery designs using your Brother machine:
- Prepare Your Machine: Ensure that your Brother machine is clean and properly maintained before starting. Check that the needle is in good condition and properly inserted. Also, make sure you have the correct embroidery foot attachment for your machine.
- Select Thread Colors: Refer to the design or your own color palette preferences to choose the appropriate thread colors. Load the corresponding thread colors onto the machine, following the manufacturer’s recommendations for thread placement.
- Prepare the Fabric: Hoop the fabric firmly, ensuring it is taut but not excessively stretched. Consider using stabilizers to provide support for the fabric and prevent distortion during stitching. Adhere the stabilizer to the fabric, following the guidelines provided with the stabilizer you are using.
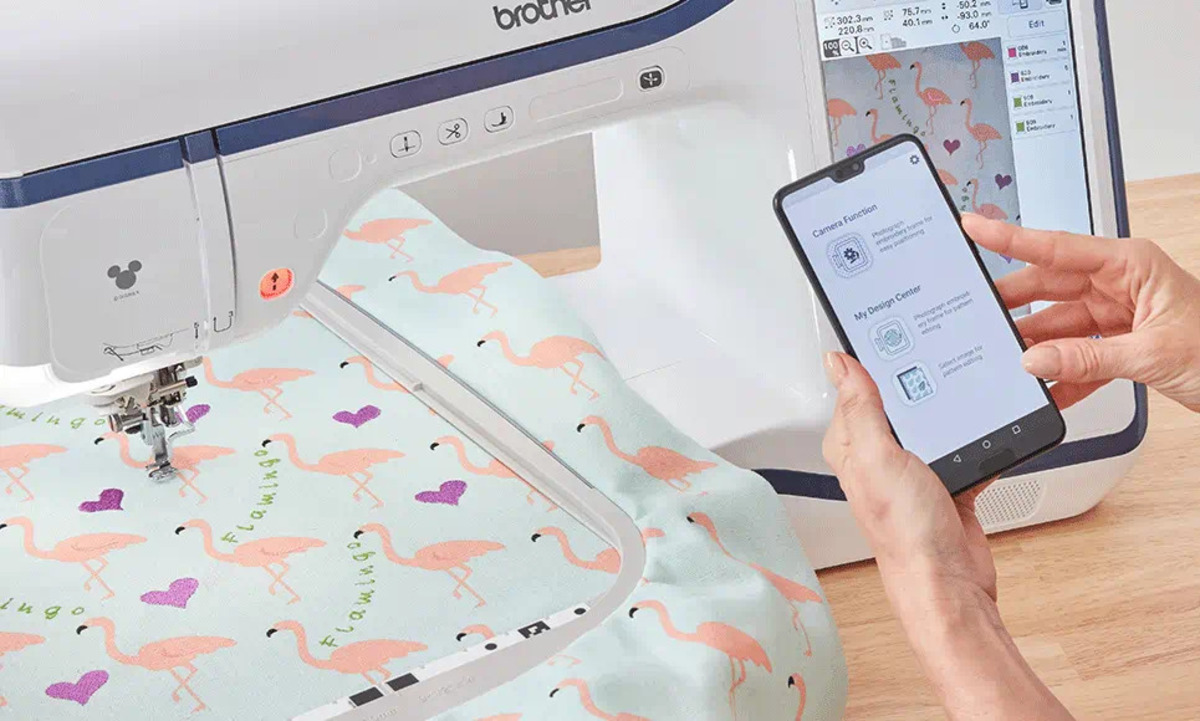
- Select the Embroidery Design: On your Brother machine, navigate to the embroidery design section or screen. Browse through the available designs and select the one you transferred. You may have options to resize, rotate, or mirror the design based on your preferences and the intended placement on the fabric.
- Set Embroidery Settings: Adjust the embroidery settings on your Brother machine to ensure the best stitch quality. This may include adjusting the thread tension, stitch speed, stitch density, and other settings specific to your machine model. Refer to your machine’s user manual for detailed instructions on adjusting these settings.
- Start Stitching: Once your fabric is hooped and the design is selected with the desired settings, it’s time to start stitching. Begin the embroidery process by pressing the start or embroidery button on your Brother machine. Observe the stitching progress, ensuring that the threads are being properly tensioned and the design is being stitched accurately.
- Monitor and Supervise: While the machine is stitching, it’s important to monitor the process. Keep an eye out for any thread breakages, tension issues, or fabric distortions. If any issues arise, address them promptly to avoid any negative impact on the final embroidery result.
- Finishing the Design: Once the design is fully stitched, your Brother machine will notify you or automatically stop. Carefully remove the fabric from the hoop, taking care not to damage the stitches. Trim any excess stabilizer from the back of the design. Clean any loose threads and give your finished embroidery design a final inspection.
By following proper setup procedures, selecting the right thread colors, preparing the fabric, and adjusting the necessary settings, you can achieve beautiful and precise stitching results on your Brother machine. Remember to practice good machine maintenance and refer to the user manual for any specific guidelines or troubleshooting tips.
With each embroidery design you stitch, you’ll witness the transformation of your fabric into a stunning piece of embroidery art, all made possible through the capabilities of your Brother machine.
Troubleshooting Common Issues
While working with embroidery designs and your Brother machine, you may encounter some common issues that can affect the stitching process or the quality of your embroidery. Here are some troubleshooting tips to help you overcome these common issues:
- Thread Breakage: If you experience frequent thread breakage, check if the thread is properly threaded through the machine, the tension is set correctly, and the needle is not bent or dull. Also, ensure that the thread spool is positioned correctly and is not getting caught on any edges.
- Poor Stitch Quality: If the stitches are not looking clean or tight, check the tension settings. Adjust the tension as needed, through trial and error, to achieve the desired stitch quality. Additionally, consider using a quality stabilizer and ensuring that the fabric is properly hooped to prevent any puckering or distortion.
- Design Alignment Issues: If the design is not aligning correctly on the fabric, check that the fabric and stabilizer are properly hooped and that the hoop is securely tightened. Make sure the design is centered correctly in the hoop and double-check the design placement on the machine screen before stitching.
- Needle Breakage: If the needle keeps breaking, it may be due to various reasons, including using the wrong needle type or size for the fabric, using a dull needle, or having an issue with the needle mechanism in the machine. Ensure that you’re using the appropriate needle and replace it if it appears dull or damaged.
- Bobbin Thread Issues: If you notice bobbin thread showing on the top of your embroidery, adjust the bobbin tension to balance it with the top thread. Additionally, make sure the bobbin thread is correctly inserted into the bobbin case and that the case is properly placed in the machine.
- Machine Error Messages: If your Brother machine displays an error message, consult the user manual to understand the specific error and troubleshooting steps associated with it. Each error message can indicate different issues, such as a mechanical problem, incorrect settings, or a design compatibility issue.
- Thread Tangles and Knots: If you experience thread tangles or knots during stitching, double-check that the thread is properly threaded through all the thread guides and the tension discs. Also, ensure that the thread is unwinding smoothly from the spool and that it is not tangled or caught on any parts of the machine.
Remember, troubleshooting embroidery issues may require a bit of patience and experimentation. It’s always helpful to keep a record of the issues you encounter and the solutions that work for you. This way, you can refer back to them if similar issues occur in the future.
If you’re unable to resolve an issue or if it persists despite troubleshooting efforts, it may be helpful to consult the user manual, reach out to the Brother customer support team, or seek assistance from an experienced embroiderer who is familiar with Brother machines.
By identifying and troubleshooting common issues, you can overcome obstacles and ensure smooth and successful embroidery sessions with your Brother machine.
Conclusion
Embroidery is a captivating craft that allows you to unleash your creativity and add a personal touch to various projects. With a Brother embroidery machine, you have the power to bring beautiful embroidery designs to life. Throughout this article, we have explored the world of embroidery designs for Brother machines, from understanding different design formats to transferring and stitching designs.
By familiarizing yourself with embroidery design formats such as .pes, .dst, and .exp, you can ensure compatibility between your designs and your Brother machine. We also discussed some popular Brother embroidery design websites where you can find a vast collection of designs to suit your style and preferences.
If you want to take your embroidery skills to the next level, we provided guidance on creating your own embroidery designs using specialized software. This allows you to customize and personalize your projects with unique patterns and motifs.
Transferring embroidery designs to your Brother machine is made possible through a simple connection via USB or transfer cable. With proper setup, selecting the right thread colors, and adjusting settings, you can confidently stitch your designs on various fabric types.
Lastly, we explored common troubleshooting issues that may arise during the embroidery process, such as thread breakage, poor stitch quality, and design alignment. By understanding and troubleshooting these issues, you can overcome obstacles and achieve the best results with your Brother embroidery machine.
Embroidery is an art form that takes practice and patience, but with the right tools and techniques, you can create stunning and unique embroidery projects that will impress and delight. Let your imagination soar and embrace the endless possibilities that embroidery designs and your Brother machine offer.
So, grab your Brother machine, immerse yourself in the world of embroidery designs, and begin your journey to create remarkable works of embroidered art.