Introduction
Welcome to the world of gaming with your DualShock 4 controller! Whether you’re a PC gamer or simply prefer the comfort and familiarity of your PlayStation controller, DS4Windows is a must-have tool that allows you to seamlessly connect and use your DualShock 4 on your computer. With DS4Windows, you can enjoy your favorite games with a controller you already know and love.
In this guide, we will walk you through the step-by-step process of downloading DS4Windows onto your computer. It’s a straightforward process that will have you up and running in no time.
Before we begin, it’s important to note that DS4Windows is compatible with Windows operating systems, including Windows 7, 8, and 10. Make sure you have a stable internet connection and sufficient disk space available on your computer.
Now, let’s dive into the detailed steps to download DS4Windows and start using your DualShock 4 controller for an enhanced gaming experience!
Step 1: Go to the DS4Windows Website
The first step in downloading DS4Windows is to visit the official DS4Windows website. Open your preferred web browser and type in the URL: https://ds4windows.com/.
Once you’ve reached the website, you’ll be greeted with the homepage that provides you with all the information you need about DS4Windows, including its features and compatibility. Take a moment to familiarize yourself with the website before moving on to the next step.
The DS4Windows website also offers additional resources and support options, such as FAQs, user guides, and a community forum. These can be helpful if you encounter any issues during the installation process or need assistance with using DS4Windows.
It’s important to note that the DS4Windows website is constantly updated to provide you with the latest versions of the software. This ensures that you have access to all the new features and improvements that have been made.
Now that you’re on the DS4Windows website, you’re ready to move on to the next step and locate the download section. Keep following this guide to ensure a smooth installation process.
Step 2: Locate the Download Section
After accessing the DS4Windows website, it’s time to find the download section. Scroll down the homepage, and you’ll come across the section that provides the download links for DS4Windows.
The download section usually consists of a prominent button or a labeled hyperlink that directs you to the download page. Look for labels such as “Download Now” or “Get DS4Windows” — these will guide you to the appropriate location.
In some cases, the download section may be located on a separate page of the website. If that’s the case, look for navigation options at the top or bottom of the homepage, such as “Download” or “Get Started.” Click on the relevant link to be directed to the download page.
Take a moment to ensure that you’re downloading DS4Windows from the official website. This guarantees that you’re getting a legitimate and safe copy of the software. Be cautious of any third-party websites offering downloads, as these may potentially contain malware or outdated versions.
If you’re unsure whether you’re on the correct page, you can always double-check the website URL. The official DS4Windows website URL should be: https://ds4windows.com/. This will help ensure that you’re on the authentic website.
Now that you’ve located the download section, it’s time to proceed to the next step, where we’ll select the latest version of DS4Windows.
Step 3: Select the Latest Version
Once you have found the download section on the DS4Windows website, it’s time to select the latest version of the software. The latest version ensures that you have access to the most up-to-date features, bug fixes, and improvements.
In the download section, you will typically find a list of available versions or a single download link that leads to the latest version. Look for labels such as “Latest Version” or the highest version number displayed.
If there are multiple versions listed, it’s recommended to choose the latest one. The latest version is often marked with flags like “Recommended” or “New” to help you identify it easily.
Keep in mind that DS4Windows is regularly updated by its developers to provide an optimal user experience. New versions may introduce additional functionalities and performance enhancements, so it’s preferable to install the latest version.
It’s worth noting that the latest version may have specific system requirements. Make sure your computer meets the minimum requirements stated on the website to ensure compatibility.
Now that you have identified the latest version of DS4Windows, it’s time to proceed to the next step where we will choose the download option that suits your needs.
Step 4: Choose the Download Option
After selecting the latest version of DS4Windows, it’s time to choose the download option that best suits your needs. The DS4Windows website typically provides different download options to accommodate various user preferences and operating systems.
Common download options may include:
- Installer Package: This option is recommended for most users. The installer package usually comes in the form of an executable file (.exe) that simplifies the installation process. It includes all the necessary files and dependencies to ensure a smooth setup.
- Portable ZIP: If you prefer a portable installation, you can choose the ZIP package. This option allows you to extract the necessary files without running an installer. It’s ideal if you want to run DS4Windows from a USB drive or a specific folder on your computer.
- Source Code: The source code is aimed at more advanced users or developers who want to explore, modify, or contribute to the DS4Windows project directly. It contains the original programming files and resources.
Consider your requirements and choose the download option that aligns with your preferences. If you’re unsure, it’s generally recommended to select the installer package for a hassle-free installation experience.
Click on the download option of your choice, and the file will begin downloading to your computer. The download time may vary depending on your internet speed and the size of the selected package.
Now that you have chosen the appropriate download option for DS4Windows, it’s time to proceed to the next step: saving the installer.
Step 5: Save the Installer
After selecting the download option for DS4Windows, the next step is to save the installer file to your computer. Depending on your web browser settings, the file may be automatically saved to your default downloads folder or prompt you to choose a specific location.
When the download is complete, locate the downloaded file. The filename may vary depending on the version and download option you selected. It is typically a recognizable name that includes “DS4Windows” and the version number.
Choose a suitable location on your computer to save the installer file. It’s recommended to save it in a location where you can easily locate it, such as your desktop or a dedicated downloads folder.
By saving the installer file, you ensure that you have a backup copy if you need to reinstall DS4Windows in the future or if any issues arise during the installation process.
Once you have selected the destination folder, click on the “Save” or “OK” button to save the file. The time it takes to save the installer will depend on the speed of your computer and the location you choose.
Now that you have successfully saved the DS4Windows installer, it’s time to proceed to the next step: running the installer and initiating the installation process.
Step 6: Run the Installer
Now that you have saved the DS4Windows installer file on your computer, it’s time to run the installer and start the installation process. Locate the saved installer file in the destination folder you selected in the previous step.
Double-click on the installer file to run it. Depending on your computer’s settings, you may need to confirm your action or provide administrative privileges to proceed.
Once you initiate the installer, a setup wizard will appear on your screen. This wizard will guide you through the necessary steps to install DS4Windows on your computer.
Read through the information presented in the setup wizard and follow any instructions provided. These may include accepting the software’s terms and conditions, choosing a language preference, or specifying an installation location.
Ensure that you carefully review any optional settings or additional software bundled with the installer. It’s common for software installers to include additional tools or applications, so uncheck any boxes for those programs if you do not wish to install them.
Click on the appropriate buttons or options in the setup wizard to proceed through each step. It’s important to be patient and allow the installation process to complete without interruption.
Once the installation process has finished, you will be notified of the successful installation of DS4Windows on your computer.
Now that you have run the installer and installed DS4Windows, it’s time to move on to the next step: following the installation wizard.
Step 7: Follow the Installation Wizard
After running the DS4Windows installer, you will be guided through an installation wizard. The installation wizard will take you through the final steps to set up DS4Windows on your computer.
Follow the prompts and instructions provided by the installation wizard to ensure a successful installation. The wizard will offer you various options and configurations to personalize your DS4Windows experience.
During the installation process, you may be prompted to select additional components or features to install. These could include drivers, additional software, or supporting libraries. Ensure that you carefully review these options and choose the ones that you require.
Be attentive to any customization options the installation wizard may provide. These options can allow you to configure settings such as language preferences, desktop shortcuts, or startup options. Select and adjust these settings according to your preferences.
Make sure to read any license agreements, terms of use, or privacy policies presented during the installation process. It’s important to understand and agree to these terms before proceeding.
Once you have followed all the steps and made the appropriate selections in the installation wizard, click “Finish” or “Complete” to finalize the installation process.
Congratulations! You have successfully followed the installation wizard and completed the installation of DS4Windows on your computer.
Now that DS4Windows is installed, you can proceed to the next step: launching DS4Windows and configuring your DualShock 4 controller.
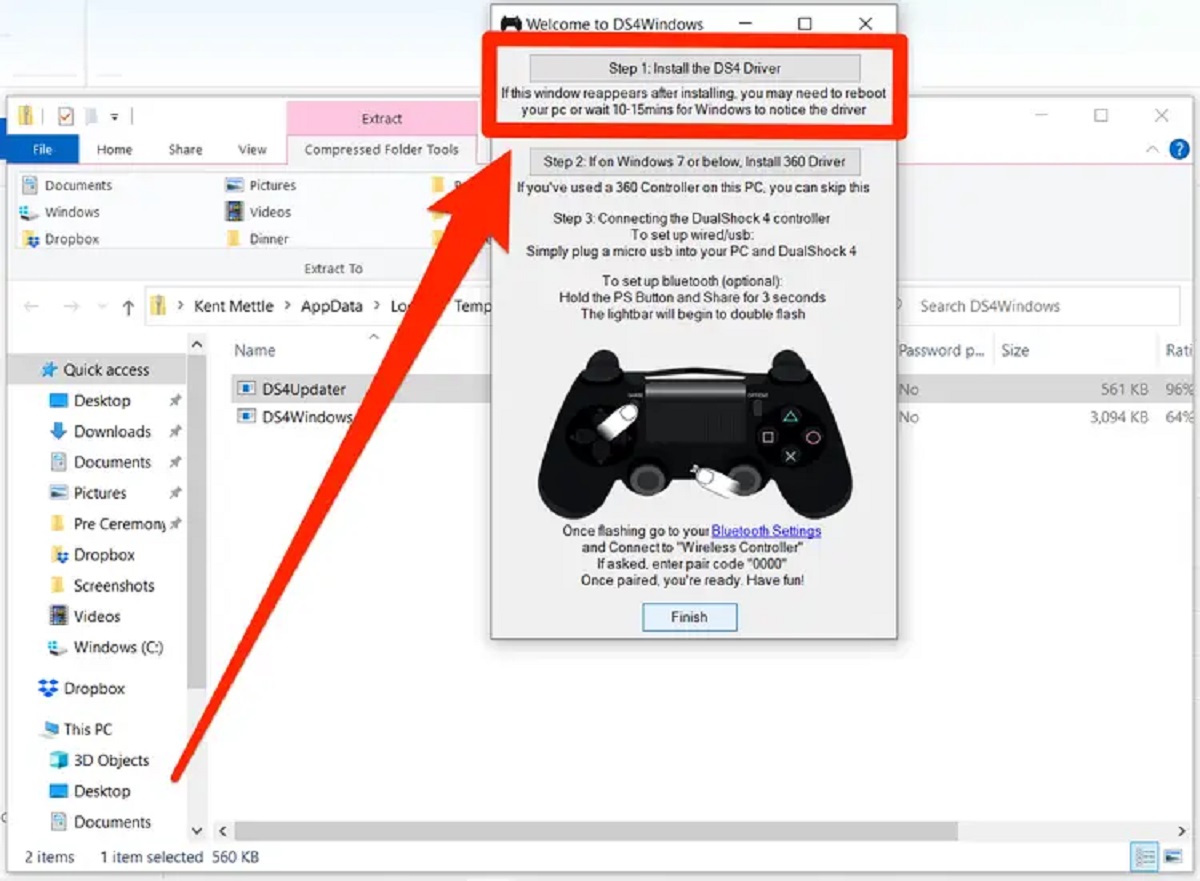
Step 8: Launch DS4Windows
With DS4Windows successfully installed on your computer, it’s time to launch the program and start using your DualShock 4 controller.
Locate the DS4Windows icon either on your desktop or in your Start menu. It typically appears as a controller icon or the DS4Windows logo.
Double-click on the DS4Windows icon to launch the program. Depending on your computer’s settings, you may need to confirm any security prompts or provide administrative privileges.
After launching DS4Windows, it will automatically detect your DualShock 4 controller if it’s connected to your computer via a USB cable or Bluetooth. The program will display the connected controller on its interface.
If DS4Windows does not recognize your controller, make sure it is properly connected and try clicking on the “Connect DS4 exclusively” button in the program’s interface. This option helps ensure that the controller is exclusively paired with DS4Windows.
Once your controller is successfully recognized by DS4Windows, you can start configuring its settings and mapping the buttons to your liking.
Now that you have launched DS4Windows, you’re one step closer to enjoying your favorite games with your DualShock 4 controller. Proceed to the next step to connect your DualShock 4 controller to DS4Windows.
Step 9: Connect Your DualShock 4 Controller
Now that you have launched DS4Windows, it’s time to connect your DualShock 4 controller to your computer. The connection can be established either through a USB cable or wirelessly via Bluetooth.
If you prefer a wired connection:
- Take the USB cable that came with your DualShock 4 controller and connect one end to the controller itself.
- Connect the other end of the USB cable to an available USB port on your computer.
- Once connected, DS4Windows should recognize the controller and display its current status on the program’s interface.
If you want to establish a wireless connection via Bluetooth:
- Ensure that your computer has a Bluetooth adapter or is Bluetooth-enabled.
- On your DualShock 4 controller, press and hold the PS button and the Share button simultaneously until the light bar on the controller starts flashing.
- Go to your computer’s Bluetooth settings and search for available devices.
- Select the DualShock 4 controller from the list of available devices and click on “Pair” or “Connect.”
- Once successfully paired, DS4Windows will recognize the controller and indicate its status on the program’s interface.
Regardless of the connection method you choose, DS4Windows should now be successfully connected to your DualShock 4 controller, allowing you to use it for gaming on your computer.
Now that your DualShock 4 controller is connected, proceed to the final step: customizing DS4Windows settings to enhance your gaming experience.
Step 10: Customize DS4Windows Settings
Once your DualShock 4 controller is connected to DS4Windows, you have the option to customize various settings to tailor your gaming experience. These settings allow you to configure button assignments, sensitivity, profiles, and more.
Here are some common customization options available in DS4Windows:
- Button Mapping: DS4Windows allows you to remap the buttons on your DualShock 4 controller. This enables you to assign different functions or keyboard inputs to specific buttons according to your preferences.
- Touchpad Configuration: You can configure the behavior of the touchpad on your DualShock 4 controller. This includes settings for mouse emulation, gestures, and sensitivity.
- Controller Profiles: DS4Windows supports the creation of multiple profiles. You can create and save different profiles for various games or applications, allowing you to switch between them easily.
- Controller Sensitivity: Adjusting the sensitivity of your controller can enhance your control and precision. DS4Windows provides options to customize the sensitivity of your sticks and triggers.
- Advanced Settings: For advanced users, DS4Windows offers additional settings to fine-tune your controller experience. These settings include dead zone adjustments, gyro controls, and more.
To access and customize these settings, open the DS4Windows program and navigate to the appropriate sections. The interface of DS4Windows provides a user-friendly way to modify these settings to your liking.
Experiment with the different customization options available and find the configurations that suit your gaming style and preferences. Don’t hesitate to fine-tune the settings until you achieve the optimal setup for your gaming needs.
With DS4Windows settings customized to your liking, you can now fully enjoy gaming on your computer using your DualShock 4 controller.
Congratulations! You have successfully completed all the steps to download DS4Windows, connect your DualShock 4 controller, and customize the settings. Get ready to dive into your favorite games and have an incredible gaming experience with your trusted controller!
Conclusion
Congratulations on successfully downloading DS4Windows and connecting your DualShock 4 controller to your computer! With DS4Windows, you can enjoy the comfort and familiarity of your DualShock 4 controller while playing your favorite games on your PC.
We started by visiting the official DS4Windows website and locating the download section. From there, we selected the latest version of DS4Windows and chose the appropriate download option. After saving the installer file, we ran the installer and followed the installation wizard’s prompts.
Once DS4Windows was installed, we launched the program and connected our DualShock 4 controller either through a USB cable or wirelessly via Bluetooth. We then explored the customization options available in DS4Windows to personalize our gaming experience, including button mapping, touchpad configuration, and controller sensitivity.
By following these steps, you have successfully set up DS4Windows and can now enjoy gaming on your computer with your DualShock 4 controller. Whether you’re playing action-packed games or relaxing with a casual title, the familiar feel of your controller will enhance your immersion and enjoyment.
Remember, DS4Windows is regularly updated to provide you with the latest features and improvements. It’s a valuable tool that ensures compatibility between your DualShock 4 controller and your PC gaming experience. Be sure to check for updates on the official DS4Windows website to stay up-to-date.
Thank you for choosing DS4Windows and happy gaming!