Introduction
The Microsoft Store is a central hub for downloading and installing apps, games, and other digital content on Windows 11. By default, the Microsoft Store saves all downloaded files to the system drive, which can sometimes lead to insufficient storage space issues. However, did you know that you can actually change the default download location in the Microsoft Store? This allows you to save your downloads to a different drive or folder of your choice, freeing up precious space on your system drive.
In this article, we will explore different methods to change the Microsoft Store download location on Windows 11. Whether you prefer using the Settings app, modifying the Registry Editor, or utilizing the Microsoft Store app itself, we’ve got you covered. Additionally, we will also discuss how to change the download location for secondary drives, providing you with maximum flexibility in managing your downloaded content.
With the ability to customize the download location, you can ensure that downloads are saved in a location that suits your needs, such as an external hard drive or a separate partition on your primary drive. This not only helps in organizing your files but also prevents your system drive from getting cluttered and potentially slowing down your computer.
So, if you’re ready to take control of your download location in the Microsoft Store on Windows 11, let’s dive into the different methods that you can use to make this change. Whether you’re a tech-savvy user or a beginner, these methods are designed to be accessible and easy to follow. Let’s get started!
Method 1: Changing the default download location on the Settings app
The easiest way to change the default download location for the Microsoft Store on Windows 11 is through the Settings app. Follow these simple steps:
- Open the Settings app by clicking on the Start button and selecting the Settings icon.
- In the Settings window, click on System.
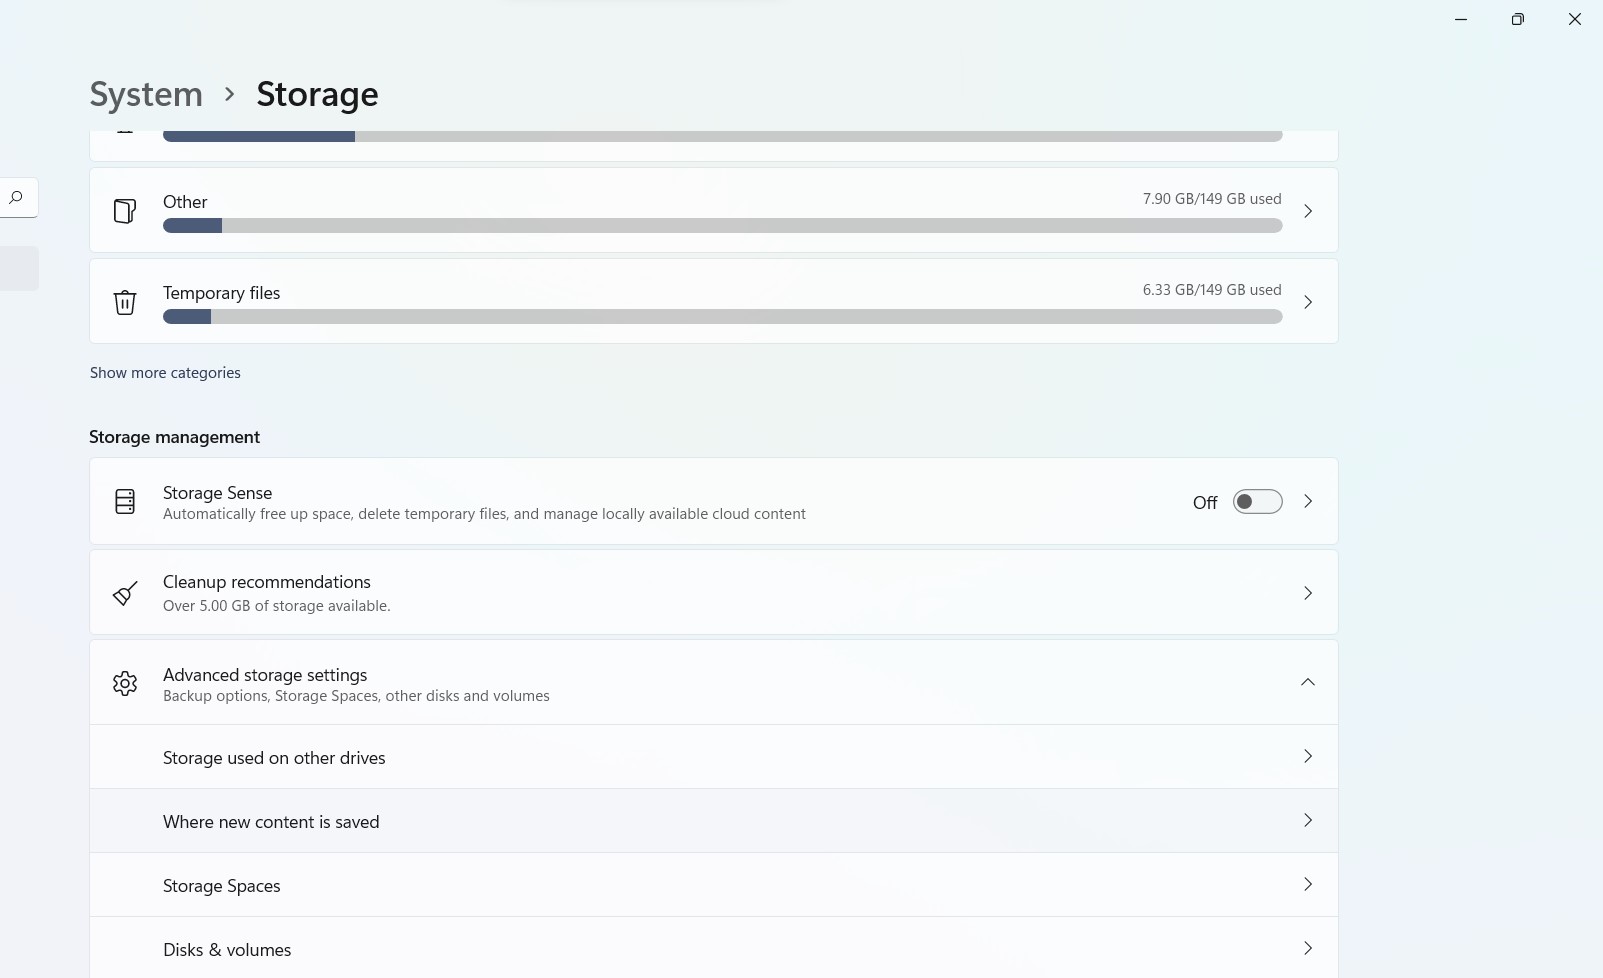
- On the left side of the System settings, click on Storage.
- In the Storage settings, scroll down to find the Default save locations section and click on the Change button next to the New apps will save to: option.
- A dialog box will appear, allowing you to select a new location. Choose the drive or folder where you want your Microsoft Store downloads to be saved and click Select Folder.
- After selecting the new location, Windows will automatically move all the existing downloads to the new location. Any new downloads from the Microsoft Store will now be saved to the new location.
By changing the default save location for the Microsoft Store on the Settings app, you can easily designate a specific drive or folder for your downloads. This method is convenient for users who prefer a straightforward and user-friendly approach to customizing their download location.
It is important to note that this method only changes the default download location for the Microsoft Store. Other applications, such as web browsers or third-party software, may still save downloads to the default location on the system drive. To change the download location for these applications, you will need to adjust their settings individually.
Now that you know how to change the default download location through the Settings app, let’s explore another method: modifying the Registry Editor.
Method 2: Modifying the Registry Editor to change the download location
If you’re comfortable making changes to the Windows Registry, you can use this method to change the default download location for the Microsoft Store on Windows 11. Here’s how:
- Open the Registry Editor by pressing Win + R on your keyboard, typing regedit in the Run dialog box, and hitting Enter.
- In the Registry Editor window, navigate to the following location:
HKEY_LOCAL_MACHINE\SOFTWARE\Microsoft\Windows\CurrentVersion\AppModel\WinStore. - Right-click on the
PackageRootentry in the right pane and select Modify. - In the Edit String dialog box, replace the existing value with the path to the new download location. For example, if you want to save downloads to the folder
D:\Microsoft Store Downloads, enterD:\Microsoft Store Downloadsas the new value. - Click OK to save the changes.
- Close the Registry Editor.
After modifying the Registry Editor, the Microsoft Store will save all downloads to the new location specified. It is important to be cautious when making changes to the Registry, as incorrect modifications can cause system errors or instability. Make sure to follow the steps carefully and back up your Registry before proceeding.
This method offers more flexibility and control over the default download location, but it requires a basic understanding of the Windows Registry. If you’re not comfortable with modifying the Registry, it’s recommended to use the previous method or consult with a knowledgeable individual to avoid any potential issues.
Now that you’ve learned how to change the download location through the Registry Editor, let’s move on to the next method: using the Microsoft Store app.
Method 3: Using the Microsoft Store app to change the download location
If you prefer a more streamlined approach, you can utilize the Microsoft Store app itself to change the download location. Follow these steps:
- Open the Microsoft Store app by clicking on the Start button and searching for “Microsoft Store.”
- In the Microsoft Store app, click on the … (ellipsis) icon in the top-right corner of the window to open the menu.
- From the menu, click on Settings.
- In the Settings window, scroll down to find the Downloads section.
- Under the Downloads section, click on the Change button next to the Default location option.
- A file explorer window will appear, allowing you to choose a new location. Browse to the drive or folder where you want your Microsoft Store downloads to be saved and click Select Folder.
- After selecting the new download location, any new downloads from the Microsoft Store will be saved to the chosen location.
Using the Microsoft Store app to change the download location offers a simple and intuitive method for customizing where your downloads are saved. This method is especially useful if you frequently download apps or games from the Microsoft Store and prefer to have them stored in a specific location.
Keep in mind that changing the download location through the Microsoft Store app only affects downloads from the Microsoft Store itself. Other applications or software may still save downloads to their respective default locations. To modify the download location for other apps or software, you will need to adjust their settings individually.
Now that you know how to change the download location using the Microsoft Store app, let’s explore another method: changing the download location for secondary drives.
Method 4: Changing the download location for secondary drives
If you have additional drives or partitions on your Windows 11 computer, you can change the download location specifically for those secondary drives. This is especially useful if you have a secondary drive with more available space and want to offload your Microsoft Store downloads to that drive. Follow these steps:
- Open the Settings app by clicking on the Start button and selecting the Settings icon.
- In the Settings window, click on System.
- On the left side of the System settings, click on Storage.
- Scroll down to the More storage settings section and click on the secondary drive that you want to change the download location for.
- In the storage settings for the selected drive, click on the Change where new content is saved option.
- A new window will open with different content categories. Look for the New apps will save to your drive section and click on the dropdown menu next to it.
- From the dropdown menu, select the secondary drive where you want to save your Microsoft Store downloads.
- Close the Settings app.
By changing the content storage location for the secondary drive, the Microsoft Store will save any new downloads to that specific drive. This can help you make better use of the available space on your various drives and keep your downloads organized.
It’s important to note that this method only changes the download location for one specific secondary drive. To change the download location for other secondary drives, you will need to repeat these steps for each drive individually.
Now that you know how to change the download location for secondary drives, you have more flexibility in managing your storage space and organizing your Microsoft Store downloads.
In the following section, we will provide a brief summary of the methods covered in this article and offer some final thoughts on managing your download location in the Microsoft Store.
Conclusion
Changing the default download location in the Microsoft Store on Windows 11 can help you optimize your storage space and keep your system running smoothly. In this article, we explored four methods to customize the download location based on your preferences and needs.
First, we covered the easiest method using the Settings app. By navigating to the Storage settings, you can change the default save location for the Microsoft Store downloads effortlessly.
Next, we discussed how to modify the Registry Editor to change the download location. This method offers more control but requires caution and basic knowledge of the Windows Registry.
We also explored using the Microsoft Store app itself to change the download location. With just a few clicks, you can choose a new location for your Microsoft Store downloads.
Lastly, we explained how to change the download location specifically for secondary drives. This method allows you to allocate downloads to specific drives or partitions.
It’s important to note that each method has its own advantages and considerations. Choose the one that suits your comfort level and requirements best. Remember to backup your data and exercise caution when making changes to system settings, especially in the Registry Editor.
By customizing the download location in the Microsoft Store, you can keep your system drive clutter-free and ensure that your downloads are saved in a location that works best for you.
We hope this article has provided you with valuable insights and practical methods to change the default download location in the Microsoft Store on Windows 11. Enjoy organizing your downloads and optimizing your storage space!


