Introduction
Changing the default download location on your Mac can be a useful customization, allowing you to organize your downloaded files more efficiently. By default, the Mac operating system sets the download location to the “Downloads” folder in your user directory. However, you might prefer to save your files to a different location, such as an external hard drive or a specific folder.
In this guide, we will walk you through the steps to change the default download location on your Mac. Whether you want to save your files to a different folder, an external storage device, or a cloud service, these steps will help you make the necessary adjustments to streamline your workflow and keep your files organized.
Before we get started, it’s worth noting that changing the default download location will affect all downloads made on your Mac. Therefore, it’s essential to choose a location that suits your needs and is easily accessible for your future downloads.
Now that you understand the importance and benefits of changing the default download location, let’s dive into the step-by-step process. By following these instructions, you’ll be able to customize your Mac’s download location and improve your overall file management experience.
Step 1: Opening Finder Preferences
To begin changing the default download location on your Mac, you’ll first need to access the Finder Preferences. The Finder is the default file manager on macOS, and the Preferences menu allows you to customize various settings.
Follow these simple steps to open Finder Preferences:
- Click on the “Finder” icon in your Mac’s dock to open a Finder window.
- From the menu at the top of the screen, click on the “Finder” tab.
- In the dropdown menu that appears, select “Preferences.” Alternatively, you can also press the “Command” and “,” keys simultaneously to open Finder Preferences.
Once you click on “Preferences,” a new window will appear on your screen, presenting various customization options for your Finder.
It’s important to note that the steps mentioned above may slightly vary depending on the version of macOS you are using. However, regardless of the macOS version, you should be able to access Finder Preferences using one of these methods.
Now that you have successfully opened Finder Preferences, you’re ready to proceed to the next step and make the necessary changes to your default download location. Stay with us as we guide you through the process in the upcoming steps!
Step 2: Selecting the “CDs, DVDs, and iOS Devices” tab
After opening Finder Preferences, it’s time to navigate to the specific tab where you can change the default download location for CDs, DVDs, and iOS devices. This step is essential if you frequently connect and sync your devices with your Mac.
Follow these instructions to select the “CDs, DVDs, and iOS Devices” tab:
- In the Finder Preferences window, locate the row of tabs at the top.
- Click on the “CDs, DVDs, and iOS Devices” tab.
By selecting this tab, you’ll now have access to the settings related to the default download location for CDs, DVDs, and iOS devices.
This tab is particularly useful if you often download or import content from CDs, DVDs, or iOS devices. By customizing the default download location, you can ensure that these files are saved to a specific folder or external storage device of your choice.
It’s worth mentioning that if you don’t frequently connect CDs, DVDs, or iOS devices to your Mac, you can skip this step and proceed to the next one where we will be configuring the default download location for regular files.
Now that you’ve successfully selected the “CDs, DVDs, and iOS Devices” tab in Finder Preferences, let’s move on to the next step and learn how to change the default download location for these types of files.
Step 3: Changing the default download location for CDs, DVDs, and iOS devices
Now that you’re in the “CDs, DVDs, and iOS Devices” tab of Finder Preferences, you can customize the default download location for these types of files. This step is especially useful if you frequently transfer or import content from CDs, DVDs, or iOS devices to your Mac.
- In the “CDs, DVDs, and iOS Devices” tab, locate the “When a CD, DVD, or iOS device is inserted” dropdown menu.
- Click on the dropdown menu and select “Ask what to do.”
- Next, locate the “Open folders” dropdown menu underneath it.
- Click on the dropdown menu and select “Other…”
- A new window will appear, allowing you to browse and select the desired folder or location where you want to save your CD, DVD, and iOS device downloads.
- Once you’ve selected the folder or location, click on the “Open” button.
By following these steps, you have successfully changed the default download location for CDs, DVDs, and iOS devices. This means that whenever you insert a CD, DVD, or iOS device, your Mac will prompt you to choose the desired folder or location to save the content.
Customizing this setting gives you greater control over where your CD, DVD, and iOS device downloads are stored, allowing you to ensure they are saved to a specific folder, external storage device, or even a cloud service of your choice.
Now that you’ve adjusted the default download location for CDs, DVDs, and iOS devices, let’s move on to the next step and configure the default download location for regular files.
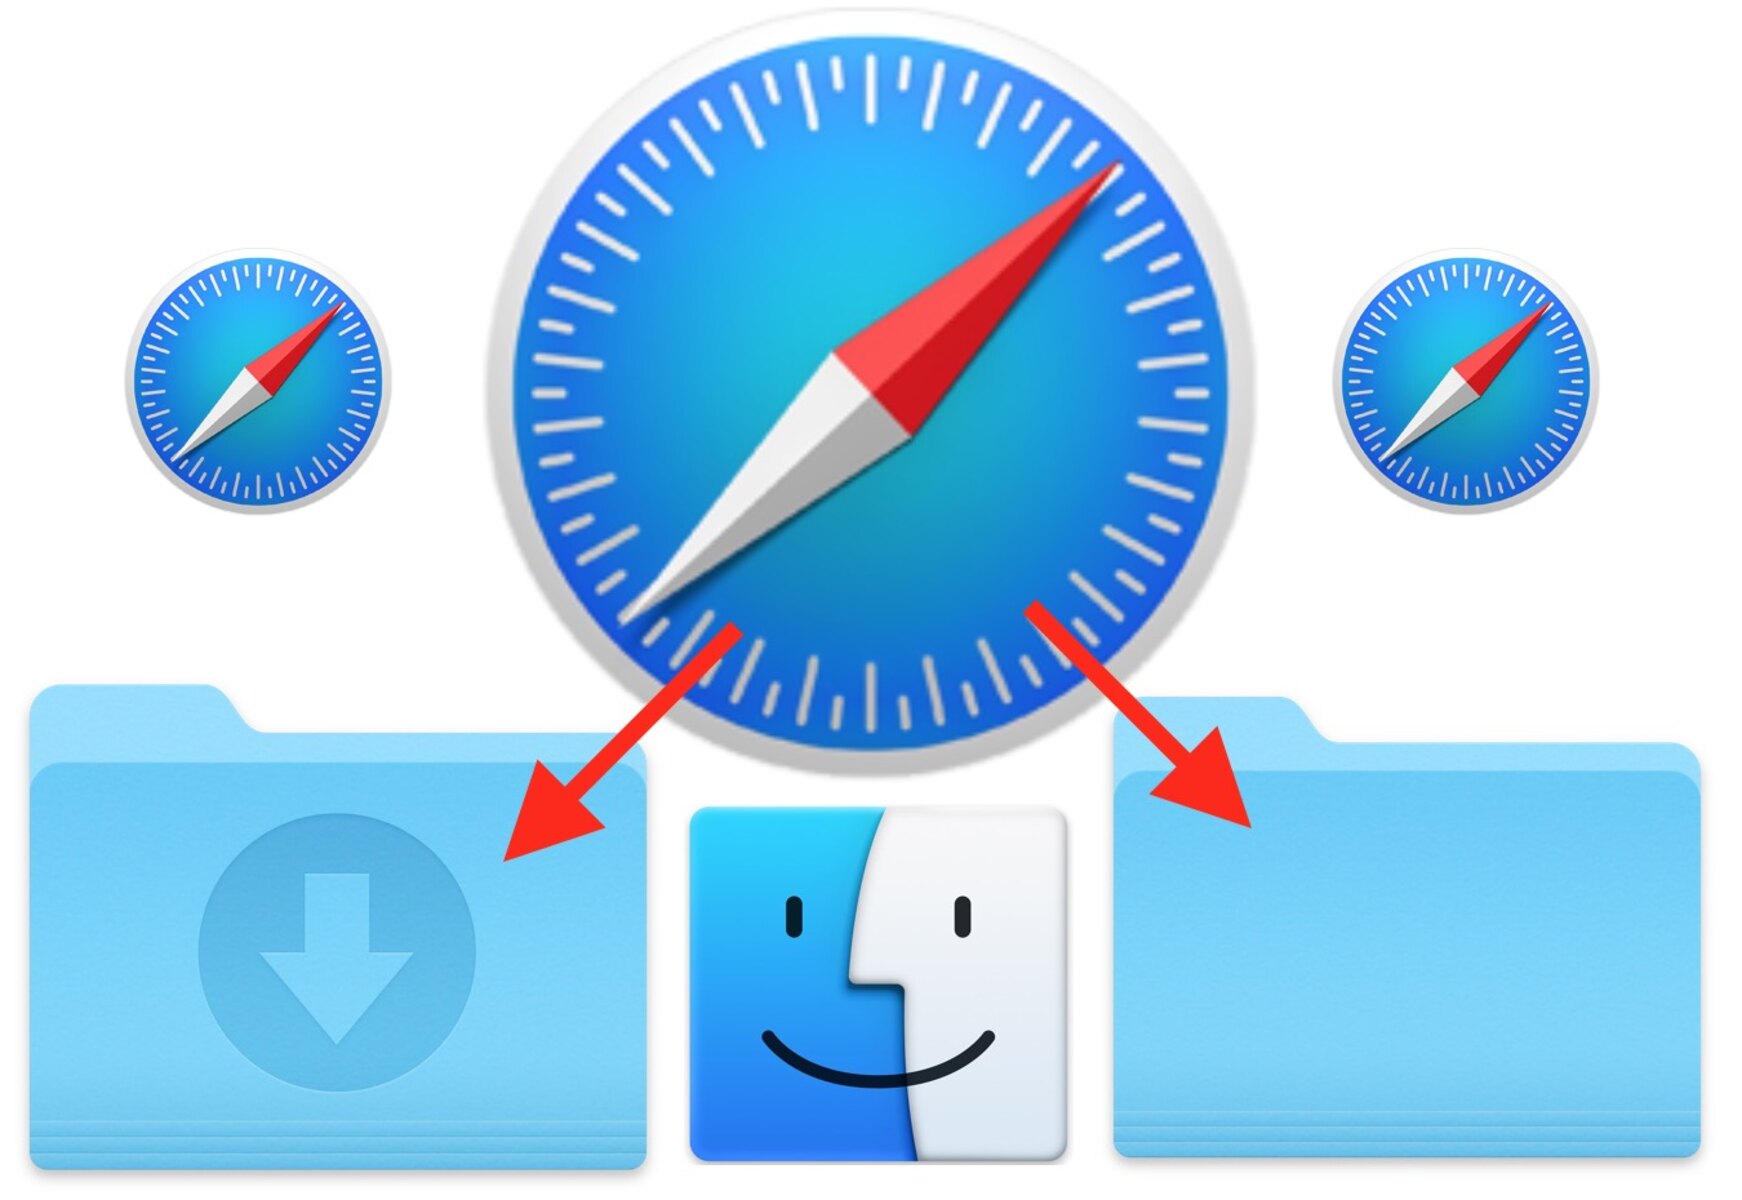
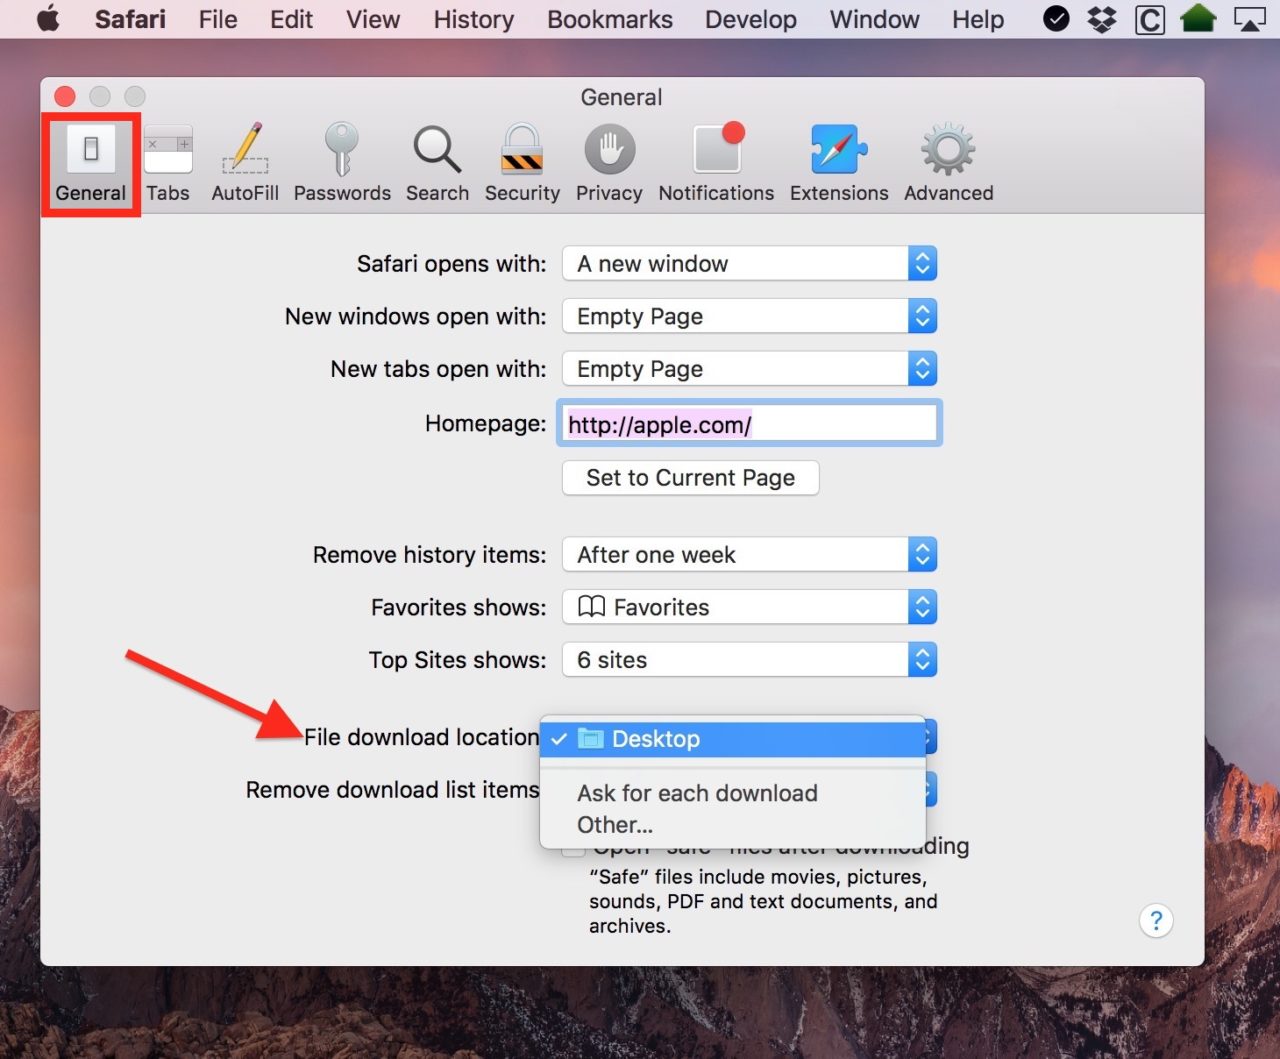
Step 4: Selecting the “Downloads” tab
In this step, we will be selecting the “Downloads” tab in Finder Preferences to change the default download location for regular files. This is the tab that specifically controls where files, such as documents, images, and media, are saved when downloaded from the internet.
Follow the instructions below to access the “Downloads” tab:
- In the Finder Preferences window, navigate to the row of tabs at the top.
- Click on the “Downloads” tab.
By selecting the “Downloads” tab, you’ll now be able to configure the default download location for regular files on your Mac.
This tab is particularly important as it allows you to choose a specific folder or location where all your downloaded files will be saved by default. This customization can be particularly useful if you prefer to keep your downloads organized in a separate folder or if you want to save them to an external storage device.
Now that you’ve successfully selected the “Downloads” tab in Finder Preferences, let’s move on to the next step and learn how to change the default download location for regular files.
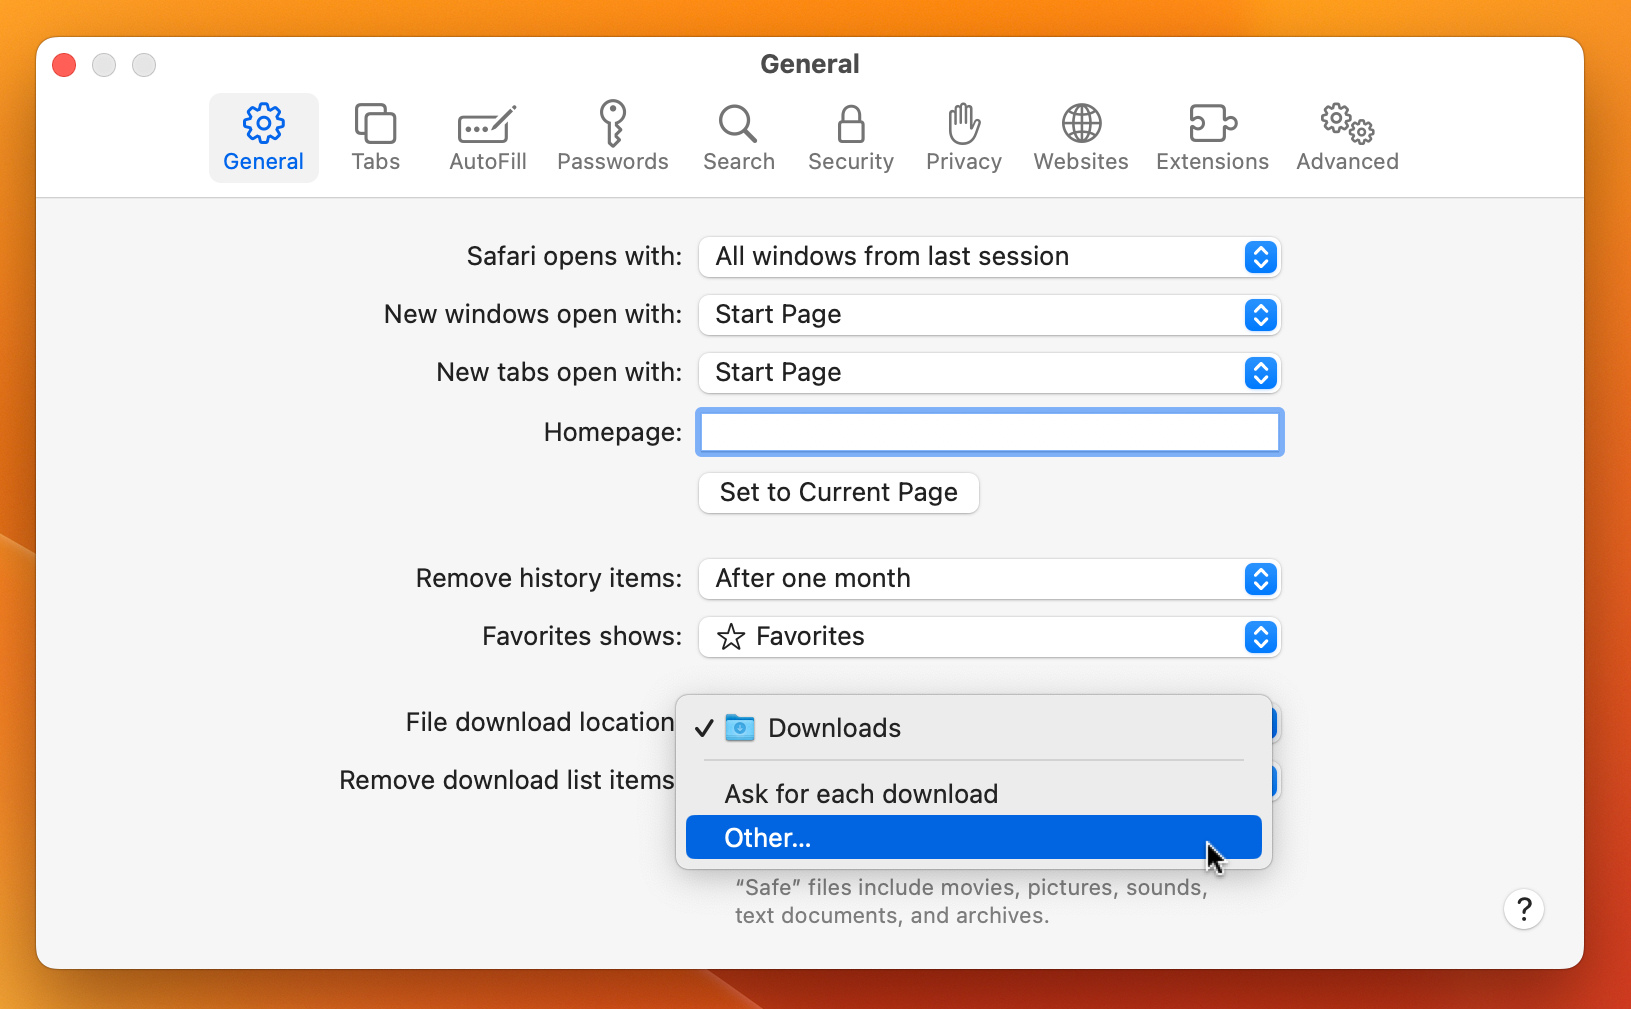
Step 5: Changing the default download location for regular files
Now that you’re in the “Downloads” tab of Finder Preferences, you can customize the default download location for regular files. This step allows you to choose a specific folder or location on your Mac where all your downloaded files will be saved.
- In the “Downloads” tab, locate the “Save downloaded files to” dropdown menu.
- Click on the dropdown menu and select “Other…”.
- A window will appear, allowing you to browse and choose the desired folder or location where you want to save your downloaded files.
- Once you’ve selected the folder or location, click on the “Open” button.
By following these steps, you have successfully changed the default download location for regular files. From now on, any files you download from the internet will automatically be saved to the folder or location you have selected.
Customizing this setting provides you with greater control over the organization of your downloaded files, allowing you to keep them in a separate folder, on an external storage device, or in a cloud service of your choice.
It’s worth mentioning that if you ever wish to change the default download location again in the future, you can simply follow these steps and select a different folder or location.
Now that you’ve configured the default download location for regular files, let’s move on to the next step and verify if the changes have been applied successfully.
Step 6: Checking if the changes have been applied
After making the necessary changes to the default download location on your Mac, it’s essential to ensure that the modifications have been applied successfully. This step will allow you to verify whether your downloads are now being saved to the newly selected folder or location.
Here’s how you can check if the changes have been applied:
- Open your preferred web browser or any other application from which you typically download files.
- Find a downloadable file, such as a PDF document or an image, and click on the download link.
- In the file download dialog box that appears, check the location displayed in the “Save As” or “Save File” prompt.
- Make sure the location matches the folder or location you recently selected in Finder Preferences.
If the location displayed in the file download dialog box matches the folder or location you set as your default download location, then the changes have been successfully applied. Any future files you download will be saved to this new location.
If the location does not match the folder or location you selected, double-check the steps from the previous sections and ensure that you followed them correctly. Repeat the process if necessary to ensure that the changes are implemented as intended.
By verifying that the changes have been applied, you can rest assured that your downloaded files are being saved to the desired folder or location. This allows for better organization and easier access to your downloaded content.
Now that you have completed all the steps, you have successfully changed the default download location on your Mac! Enjoy the benefits of a customized and organized file management system.
Conclusion
Changing the default download location on your Mac is a simple yet effective way to customize your file management system and improve your workflow. By following the step-by-step process outlined in this guide, you can ensure that your downloaded files are saved to a specific folder, external storage device, or even a cloud service of your choice.
By adjusting the default download location, you can keep your files organized and easily accessible, allowing for a more efficient and streamlined experience. Whether you frequently download files from the internet or transfer content from CDs, DVDs, or iOS devices, customizing the default download location ensures that your files are saved exactly where you want them.
We started by opening Finder Preferences and navigating to the relevant tabs, such as “CDs, DVDs, and iOS Devices” and “Downloads.” From there, we made the necessary changes to specify the desired folders or locations for different types of downloads.
It’s important to note that these changes affect all downloads made on your Mac, not just future ones. Ensure that you choose a location that suits your needs and is easily accessible for your downloaded files.
Lastly, we confirmed whether the changes were successfully applied by checking the download location in the file download dialog box. This step allows you to verify that your files are indeed being saved to the intended folder or location.
With the default download location now configured to your preference, you can enjoy a more organized and efficient file management system on your Mac. Take full advantage of this customization feature to streamline your workflow and easily locate your downloaded files.
Remember, if you ever need to change the default download location again in the future, you can revisit Finder Preferences and follow the steps outlined in this guide.
Congratulations on successfully changing your default download location on your Mac! Enjoy the benefits of a tailored file management experience.