Introduction
Are you a passionate mechanical keyboard user who finds joy in the tactile feedback and satisfying click-clack sound of each keystroke? If so, you may have encountered the annoyance of a squeaky key disrupting your typing experience. Fear not, as this guide will equip you with the knowledge and skills to remedy this pesky issue and restore harmony to your beloved keyboard.
A squeaky key on a mechanical keyboard can be a source of frustration, interrupting your focus and disrupting the tranquil rhythm of typing. However, understanding the cause of this disturbance is the first step toward reclaiming the smooth and seamless typing experience you cherish. With the right tools and a bit of patience, you can effectively address the squeaky key and revitalize your keyboard to its optimal functionality.
In the following sections, we will delve into the root cause of the squeaky key, explore the essential tools needed for the repair process, and provide a detailed, step-by-step guide to fixing the issue. By following these instructions, you can bid farewell to the irksome squeak and restore your keyboard to its former glory. Let's embark on this journey to silence the squeak and rediscover the joy of uninterrupted typing on your mechanical keyboard.
Understanding the Cause of the Squeaky Key
Before diving into the process of fixing a squeaky key on a mechanical keyboard, it’s crucial to comprehend the underlying reasons behind this common issue. The squeak typically arises from friction between the keycap and the switch stem or stabilizer, often exacerbated by a lack of proper lubrication. Over time, the repeated motion of the keycap can lead to the development of an irritating squeak, disrupting the otherwise smooth and satisfying typing experience.
Another potential cause of the squeak is the accumulation of dust, debris, or residue within the key switch housing. These foreign particles can interfere with the key’s movement, resulting in an audible squeak when the key is pressed or released. Additionally, inadequate stabilizer support or misaligned components within the keyboard can contribute to the emergence of squeaky keys.
Understanding these potential causes empowers you to effectively diagnose and address the issue, ensuring that the remedial steps taken are targeted and precise. By identifying the specific source of the squeak, whether it be friction, debris, or misalignment, you can tailor your approach to effectively eliminate the disturbance and restore the smooth, silent operation of the affected key.
Armed with this knowledge, you are prepared to embark on the journey of remedying the squeaky key, equipped with a clear understanding of the factors contributing to this inconvenience. Now, let’s explore the essential tools required for addressing the squeaky key and proceed with the step-by-step guide to resolving this common nuisance.
Tools Needed for Fixing a Squeaky Key
Equipping yourself with the appropriate tools is essential for effectively addressing a squeaky key on your mechanical keyboard. Before commencing the repair process, gather the following items to ensure a smooth and efficient resolution to the issue:
- Keycap Puller: This tool is indispensable for safely removing the keycap from the switch without causing damage to the delicate components.
- Lubricant: A high-quality lubricant specifically designed for mechanical keyboards is essential for reducing friction and eliminating the squeak. Look for a lubricant that is safe for use on plastic and metal components.
- Compressed Air Canister: To dislodge any dust, debris, or foreign particles that may be contributing to the squeak, a canister of compressed air is invaluable for thorough cleaning of the key switch housing.
- Tweezers or Small Brush: These tools are useful for delicately removing any stubborn debris or residue that may be obstructing the key’s movement.
- Stabilizer Grease (if applicable): If the squeak is originating from stabilizer components, a specialized stabilizer grease can be beneficial for ensuring smooth and silent operation.
- Cloth or Microfiber Towel: Keeping a clean cloth or microfiber towel on hand is essential for wiping down components and ensuring a pristine working environment during the repair process.
By assembling these essential tools, you are well-prepared to embark on the journey of remedying the squeaky key with precision and confidence. With these tools at your disposal, you can proceed to the next section, where we will delve into the step-by-step guide for fixing the squeaky key and restoring the tranquility of your mechanical keyboard.
Step-by-Step Guide to Fixing a Squeaky Key
Now that you have gathered the necessary tools, it’s time to embark on the process of remedying the squeaky key on your mechanical keyboard. Follow these step-by-step instructions to effectively address the issue and restore the smooth, silent operation of the affected key:
- Prepare Your Workspace: Find a well-lit and clean area to work on your keyboard. Ensure that you have ample space to maneuver and organize your tools effectively.
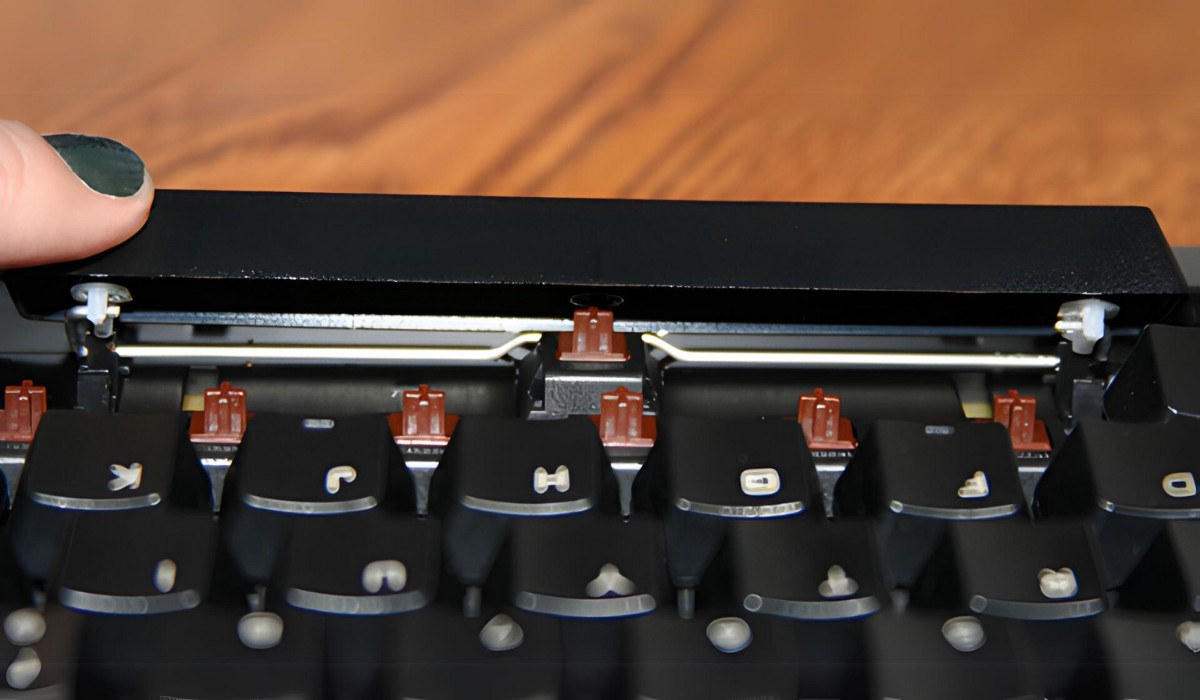
- Remove the Keycap: Use the keycap puller to gently and carefully remove the keycap from the switch without exerting excessive force. Place the keycap aside in a secure location.
- Clean the Key Switch Housing: Utilize the compressed air canister to remove any dust, debris, or foreign particles from the key switch housing. Ensure thorough cleaning to eliminate potential sources of friction and squeaking.
- Apply Lubricant: Using the appropriate lubricant, apply a small amount to the switch stem and any contact points within the switch housing. Be mindful not to over-apply the lubricant, as excess lubrication can lead to other issues.
- Check and Clean Stabilizer Components (if applicable): If the squeak is originating from stabilizer components, inspect and clean the stabilizer mechanism. Apply stabilizer grease if necessary to ensure smooth and silent operation.
- Reattach the Keycap: Carefully place the keycap back onto the switch stem, ensuring that it is aligned properly. Apply gentle pressure to secure the keycap in place.
- Test the Key: Press the repaired key multiple times to ensure that the squeak has been eliminated and that the key functions smoothly and quietly.
By following these systematic steps, you can effectively address the squeaky key on your mechanical keyboard and restore it to its optimal functionality. With the key now repaired, it’s time to proceed to the next section, where we will discuss testing the fixed key to ensure a successful resolution to the issue.
Testing the Fixed Key
After completing the repair process, it is crucial to thoroughly test the fixed key to ensure that the squeak has been effectively addressed and that the key functions as intended. Follow these steps to conduct a comprehensive test of the repaired key:
- Typing Test: Begin by typing on the repaired key repeatedly to assess its performance. Pay close attention to any lingering squeaks or irregularities in the key’s movement.
- Key Stability: Evaluate the stability of the keycap after the repair. Ensure that it is securely attached and does not wobble or exhibit any unusual movement.
- Sound Check: Listen for any audible squeaks or abnormal noises when pressing and releasing the key. A properly repaired key should operate silently and smoothly.
- Keystroke Consistency: Verify that the key provides consistent tactile feedback and actuates reliably with each press. Any inconsistencies may indicate the need for further adjustments.
- Extended Testing: Engage in an extended typing session to thoroughly assess the performance of the repaired key under sustained use. This will provide a comprehensive evaluation of the effectiveness of the repair.
By conducting these tests, you can ensure that the repaired key operates seamlessly and silently, free from the previous squeaking issue. If the key passes these tests with flying colors, you can rest assured that your efforts have been successful in remedying the squeaky key on your mechanical keyboard.
With the key now functioning optimally, you can resume your typing endeavors with renewed satisfaction, knowing that the irksome squeak has been silenced. Your mechanical keyboard has been revitalized, and you can once again revel in the tactile bliss of uninterrupted typing.
Conclusion
Congratulations! By delving into the intricacies of addressing a squeaky key on a mechanical keyboard, you have not only silenced the irksome disturbance but also gained valuable insight into the inner workings of your cherished typing companion. Armed with a deeper understanding of the causes of keyboard squeaks and equipped with the essential tools and know-how, you have successfully navigated the process of remedying this common nuisance.
Through the systematic steps outlined in this guide, you have meticulously diagnosed the source of the squeak, meticulously cleaned and lubricated the key switch, and meticulously tested the repaired key to ensure its optimal functionality. Your dedication to this endeavor has not only restored tranquility to your typing experience but has also empowered you with the skills to address similar issues in the future.
As you resume your typing endeavors, take pride in the knowledge that you possess the expertise to maintain and enhance the performance of your mechanical keyboard. The satisfaction of a smoothly operating, silent key is a testament to your diligence and commitment to preserving the integrity of your beloved keyboard.
With this newfound proficiency, you are well-equipped to navigate the intricacies of mechanical keyboard maintenance and repair, ensuring that your keyboard continues to deliver a gratifying typing experience for years to come. Embrace the tactile bliss of each keystroke, knowing that you have conquered the challenge of the squeaky key and emerged victorious.
As you bid farewell to the vexing squeak and embrace the tranquility of uninterrupted typing, remember that your journey doesn’t end here. Your mechanical keyboard stands as a testament to your dedication and expertise, ready to accompany you on countless more typing adventures with the assurance of smooth, silent operation.