Introduction
Are you bothered by the incessant squeaking of your mechanical keyboard? It's a common nuisance that can disrupt your focus and annoy those around you. Fortunately, there are several effective methods to silence the squeaks and restore your keyboard to its former, whisper-quiet glory.
A squeaky mechanical keyboard can be caused by a variety of factors, such as dust and debris accumulation, lack of lubrication, or worn-out switches. In this guide, we'll explore the steps to identify the source of the squeak and provide solutions to remedy the issue.
Whether you're a seasoned gamer, a dedicated typist, or someone who simply appreciates the tactile feedback of a mechanical keyboard, keeping it in optimal condition is essential for a satisfying and productive computing experience. By addressing the squeak, you can enhance your typing or gaming sessions while preserving the longevity of your beloved keyboard.
In the following sections, we'll delve into the process of identifying the source of the squeak, cleaning the keyboard, lubricating the switches, and even replacing the switches if necessary. By following these steps, you can bid farewell to the irksome squeak and revel in the smooth, uninterrupted keystrokes of your mechanical keyboard. Let's embark on this journey to restore tranquility to your typing domain.
Identifying the Source of the Squeak
Before delving into the remedial measures, it’s crucial to pinpoint the root cause of the squeak emanating from your mechanical keyboard. Identifying the source of the noise will enable you to apply the most effective solution. Here are the key steps to determine the origin of the squeak:
- Key Press Examination: Begin by pressing each key on the keyboard and listening for the squeak. Take note of the specific keys that produce the noise, as this can provide valuable insights into the location of the issue.
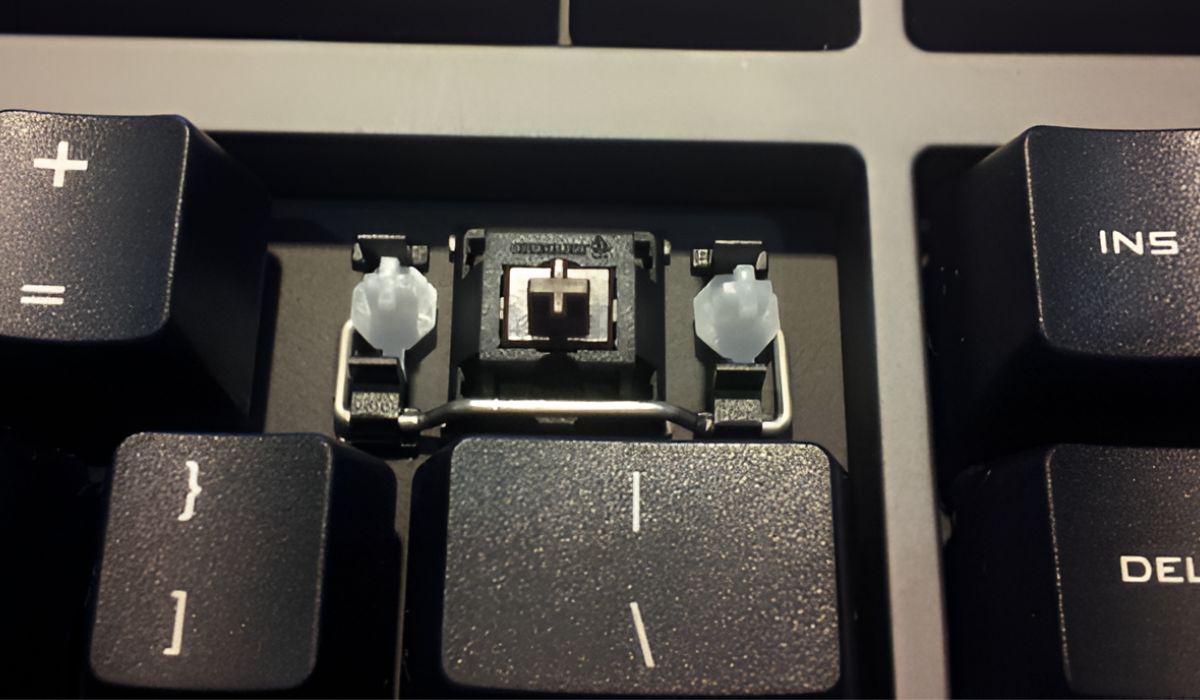
- Physical Inspection: Carefully examine the switches beneath the problematic keys. Look for any visible signs of wear, dust, or debris that may be contributing to the squeaking sound. Additionally, check for any loose components or irregularities that could be causing friction.
- Listening Closely: In a quiet environment, listen attentively as you press the keys. Try to discern whether the squeak is originating from the keycaps, the switches, or the stabilizers. This keen observation can help in narrowing down the potential sources of the noise.
Furthermore, it’s important to consider the history of the keyboard. If it has been subjected to spills, excessive dust accumulation, or prolonged use without maintenance, these factors can significantly contribute to the development of squeaks.
Once you have identified the specific keys or components responsible for the squeak, you can proceed to address the issue with targeted solutions. Whether it involves cleaning the affected areas, lubricating the switches, or replacing the worn-out components, a precise diagnosis is the first step toward restoring the tranquility of your mechanical keyboard.
Cleaning the Keyboard
Over time, mechanical keyboards can accumulate dust, debris, and other particles that may contribute to the development of squeaks. Cleaning the keyboard is a fundamental step in addressing this issue and maintaining its optimal functionality. Here’s a comprehensive guide to effectively clean your mechanical keyboard:
- Unplugging the Keyboard: Before cleaning, ensure that the keyboard is unplugged from the computer to prevent accidental input or electrical damage.
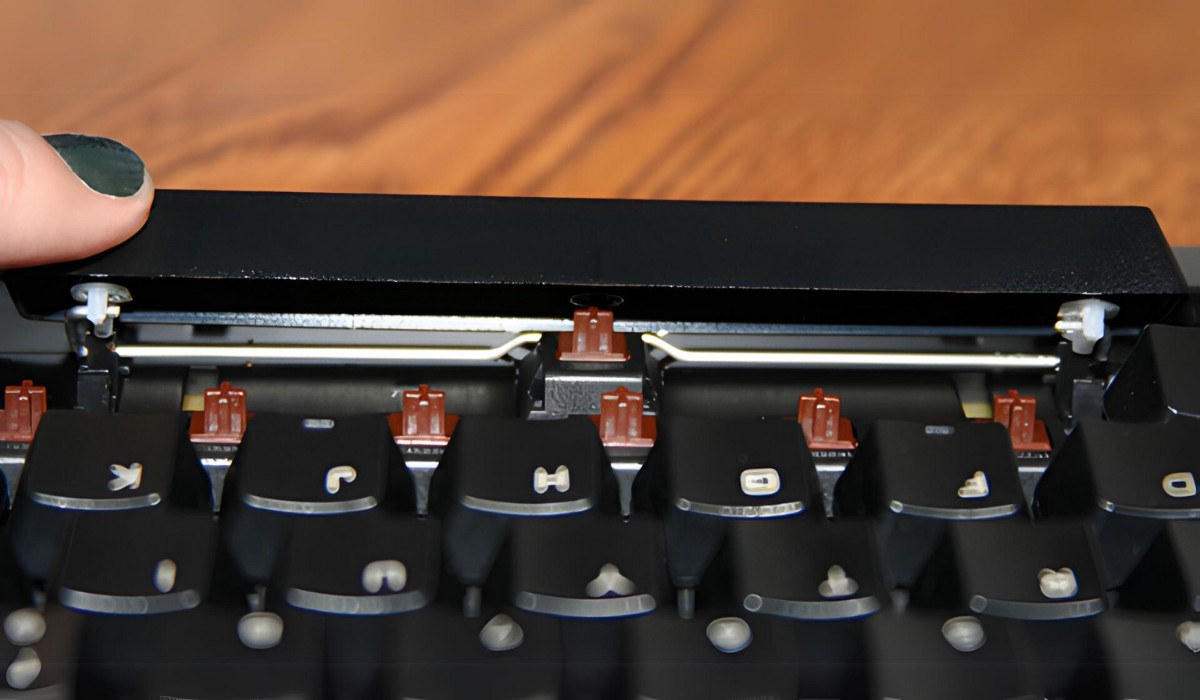
- Removing Keycaps: Carefully remove the keycaps using a keycap puller or a similar tool. This allows access to the switches and ensures a thorough cleaning of the underlying components.
- Dusting and Brushing: Utilize compressed air or a soft brush to dislodge and remove dust and debris from the exposed switches and keyboard housing. Pay close attention to the areas around the squeaky keys and ensure that all visible particles are removed.
- Using Cleaning Solutions: For more stubborn stains or residues, lightly dampen a microfiber cloth with a gentle cleaning solution and carefully wipe the keycaps and keyboard surface. It’s essential to avoid excessive moisture and harsh chemicals that could damage the keyboard.
- Drying and Reassembling: Allow the components to air dry thoroughly before reassembling the keyboard. Ensure that the keycaps are securely placed back onto the switches, and the keyboard is completely dry before reconnecting it to the computer.
By diligently cleaning your mechanical keyboard, you can effectively eliminate the potential sources of squeaks caused by dirt and debris. This maintenance routine not only enhances the keyboard’s performance but also contributes to a more hygienic and pleasant typing experience.
Regular cleaning, ideally performed every few months or as needed, can significantly reduce the likelihood of squeaks and prolong the longevity of your mechanical keyboard. With a clean and well-maintained keyboard, you can relish the satisfying tactile feedback of each keystroke without the unwelcome accompaniment of squeaks.
Lubricating the Switches
When addressing squeaky mechanical keyboards, proper lubrication of the switches can serve as a highly effective solution. Over time, the switches may experience increased friction due to wear or the accumulation of debris, leading to the development of squeaks. By applying lubricant to the switches, you can mitigate the friction and restore the smooth, silent operation of the keyboard. Here’s a detailed guide to effectively lubricate the switches of your mechanical keyboard:
- Switch Accessibility: Begin by ensuring access to the switches, either by removing the keycaps or gaining direct access to the switch housings, depending on the keyboard’s design.
- Appropriate Lubricant: Select a high-quality, non-conductive lubricant specifically formulated for mechanical keyboard switches. Popular options include silicone-based lubricants, which provide excellent lubrication without causing damage to the switches.
- Application Technique: Apply a small amount of lubricant to the moving parts of the switches, such as the stems and contact points. It’s essential to use a minimal but adequate quantity to avoid excess buildup that could impede the switches’ functionality.
- Distribution and Testing: After applying the lubricant, actuate the switches multiple times to ensure even distribution of the lubricant and to allow it to penetrate the critical areas. This process helps in minimizing friction and eliminating the squeaks caused by dry or rough switch movements.
By effectively lubricating the switches of your mechanical keyboard, you can significantly reduce the occurrence of squeaks and enhance the overall typing or gaming experience. It’s important to exercise caution and precision when applying the lubricant to prevent any spillage or contamination of other keyboard components.
Regular maintenance and lubrication of the switches, performed at appropriate intervals, can contribute to the prolonged smooth operation of the keyboard and minimize the likelihood of squeaks. With a well-lubricated keyboard, you can relish the satisfying tactile feedback without the unwelcome accompaniment of distracting noises.
Replacing the Switches
When all other attempts to address the squeaking issue have proven ineffective, replacing the switches of your mechanical keyboard may be the most viable solution. Over time, switches can undergo wear and tear, leading to diminished performance and the development of persistent squeaks. By replacing the switches, you can restore the keyboard to its optimal functionality and silence the unwelcome noises. Here’s a comprehensive guide to effectively replace the switches in your mechanical keyboard:
- Switch Compatibility: Determine the specific type of switches used in your keyboard, as mechanical keyboards often offer a variety of switch options with distinct characteristics. Ensure that the replacement switches are compatible with your keyboard’s design and layout.
- Keyboard Disassembly: Carefully disassemble the keyboard to gain access to the switch housings. This process may vary depending on the keyboard model, but it typically involves removing the keycaps and accessing the internal components.
- Desoldering and Removal: If the switches are soldered to the keyboard’s circuit board, use a desoldering tool to carefully remove the old switches without causing damage to the PCB or surrounding components.
- Switch Installation: Install the replacement switches by securely seating them in the switch housings and ensuring proper alignment. Pay attention to the orientation and positioning of the switches to maintain consistency across the keyboard.
- Soldering and Testing: If desoldering was necessary, carefully solder the new switches to the circuit board, ensuring strong and reliable connections. Once the switches are installed, thoroughly test each key to verify their functionality and confirm the elimination of squeaks.
Replacing the switches of your mechanical keyboard demands precision and attention to detail to ensure a successful and seamless transition. It’s essential to exercise caution during the disassembly and reassembly processes to prevent damage to the keyboard’s internal components.
By replacing the switches, you can effectively eliminate persistent squeaks and revitalize the keyboard’s performance, providing a renewed typing or gaming experience free from the distractions of unwanted noises. This comprehensive solution ensures the long-term enjoyment and functionality of your mechanical keyboard.
Conclusion
Addressing the squeak in your mechanical keyboard is essential for maintaining a pleasant and distraction-free typing or gaming experience. By identifying the source of the squeak, cleaning the keyboard, lubricating the switches, and, if necessary, replacing the switches, you can effectively restore the tranquility and optimal functionality of your beloved keyboard.
Regular maintenance and attentive care are paramount in preserving the performance and longevity of your mechanical keyboard. By incorporating these remedial measures into your keyboard maintenance routine, you can mitigate the likelihood of squeaks and ensure that your keyboard consistently delivers a satisfying and silent typing experience.
Furthermore, understanding the intricacies of your mechanical keyboard and being proactive in addressing potential issues can contribute to a seamless and enjoyable computing environment. Whether you’re a professional typist, avid gamer, or simply someone who appreciates the tactile satisfaction of a mechanical keyboard, maintaining its pristine condition is a worthwhile endeavor.
Embracing the process of troubleshooting and remedying the squeak in your mechanical keyboard not only enhances its performance but also fosters a deeper connection with this indispensable tool. As you embark on this journey to silence the squeaks, you’re not only restoring the keyboard’s functionality but also reaffirming your commitment to an optimal and personalized computing experience.
With these solutions at your disposal, you can bid farewell to the irksome squeaks and revel in the smooth, uninterrupted keystrokes of your mechanical keyboard, ensuring that it remains a reliable and cherished companion in your daily endeavors.