Introduction
Welcome to the comprehensive guide on how to clean under the keys of your Razer mechanical keyboard. Mechanical keyboards are renowned for their tactile feedback and durability, making them a popular choice among gamers, programmers, and typing enthusiasts. However, over time, dust, crumbs, and debris can accumulate underneath the keys, affecting the keyboard's performance and aesthetics. Cleaning under the keys is essential for maintaining the keyboard's functionality and prolonging its lifespan.
In this guide, you will learn the step-by-step process of safely removing the keycaps, effectively cleaning the area underneath, and reassembling the keyboard to restore it to its optimal condition. By following these instructions, you can ensure that your Razer mechanical keyboard remains in pristine shape, providing a satisfying typing or gaming experience.
Whether you're a novice or experienced user, this guide will equip you with the knowledge and skills to maintain your Razer mechanical keyboard, preserving its performance and appearance. With the right tools and techniques, you can effectively remove debris and maintain the integrity of your keyboard, ultimately enhancing its longevity and your overall satisfaction.
Let's dive into the essential steps and tips for cleaning under the keys of your Razer mechanical keyboard. Whether you're a gaming enthusiast, a professional typist, or simply someone who values a clean and well-maintained keyboard, this guide is tailored to help you achieve optimal results.
Tools Needed
Before embarking on the process of cleaning under the keys of your Razer mechanical keyboard, it’s essential to gather the necessary tools to ensure a thorough and efficient cleaning experience. The following tools are recommended for this task:
- Keycap Puller: This tool is specifically designed to safely remove keycaps from mechanical keyboards without causing damage to the switches or keycaps themselves. It provides a convenient and non-intrusive way to lift off the keycaps, allowing access to the area underneath.
- Compressed Air Duster: A can of compressed air is instrumental in dislodging and removing dust, crumbs, and debris from the nooks and crannies beneath the keycaps. Its high-pressure stream effectively cleans hard-to-reach areas without the risk of causing damage to the keyboard’s components.
- Cotton Swabs: These are useful for detailed cleaning, particularly in areas where compressed air may not reach. They can be used to gently wipe away stubborn residue and ensure a thorough cleaning process.
- Microfiber Cloth: A soft, lint-free microfiber cloth is ideal for wiping down the keycaps and the surface of the keyboard. It helps in removing any remaining dust or smudges, leaving the keyboard looking clean and polished.
- Isopropyl Alcohol: When diluted with water, isopropyl alcohol can be used to clean the keycaps and the surface of the keyboard, effectively removing oils, stains, and grime without causing damage.
By assembling these tools, you’ll be well-prepared to carry out a thorough cleaning of your Razer mechanical keyboard, ensuring that both the visible and hidden areas are free from debris and buildup. With these tools at your disposal, you can proceed with confidence, knowing that you have everything needed to maintain your keyboard in top condition.
Removing Keycaps
Before delving into the cleaning process, it’s crucial to carefully remove the keycaps from your Razer mechanical keyboard. This step is essential for gaining access to the area beneath the keycaps, where dust and debris may have accumulated. Here’s a step-by-step guide to safely removing the keycaps:
- Prepare Your Workspace: Find a clean and well-lit area to work on your keyboard. It’s advisable to perform this task on a flat surface to prevent any keycaps from rolling away or getting misplaced.
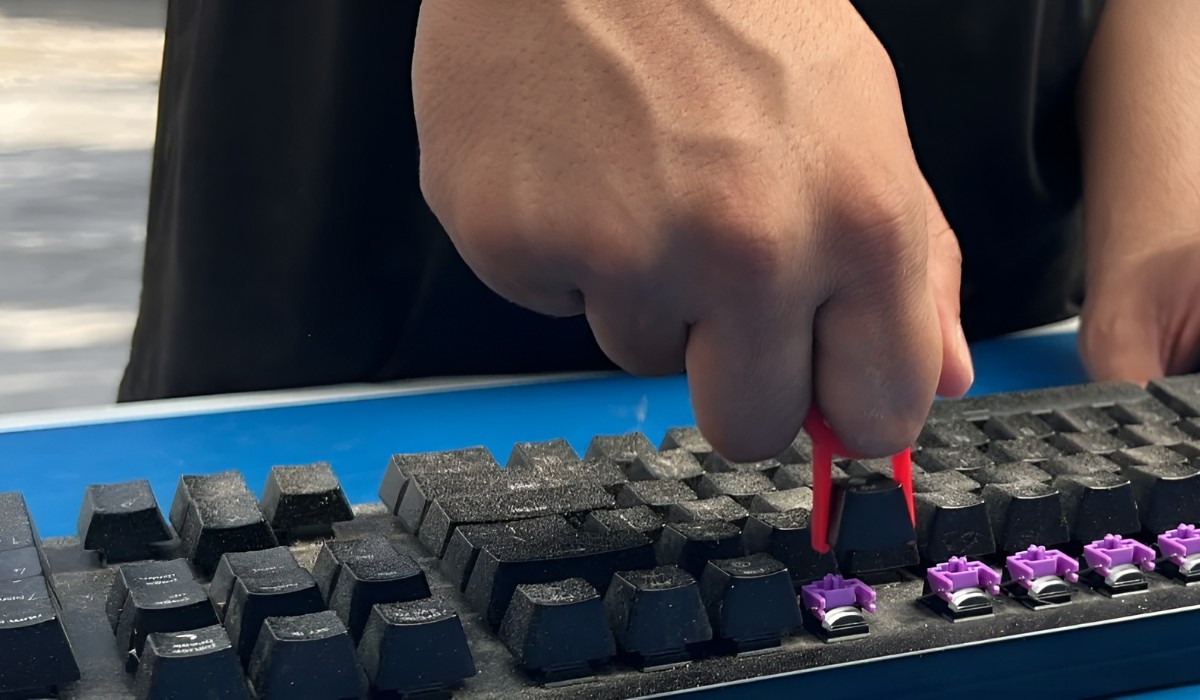
- Use the Keycap Puller: Gently position the keycap puller around the base of a keycap. Apply even pressure and pull upward to lift the keycap from the switch. Repeat this process for each keycap, taking care to store them in a safe place to avoid misplacement.
- Handle with Care: When using the keycap puller, ensure that you exert gentle and even pressure to avoid damaging the keycaps or the switches. It’s important to approach this task with patience and precision to prevent any mishaps.
- Inspect the Switches: Once the keycaps are removed, take a moment to inspect the switches and the exposed area. This is an opportune time to check for any visible dust or debris and to prepare for the subsequent cleaning steps.
By following these steps, you can safely remove the keycaps from your Razer mechanical keyboard, setting the stage for a thorough cleaning of the area underneath. This process allows for a comprehensive cleaning, ensuring that both the keycaps and the switches are free from any accumulated debris or grime. With the keycaps removed, you’re now ready to proceed to the next crucial phase of cleaning under the keys.
Cleaning Under Keycaps
With the keycaps successfully removed, it’s time to focus on cleaning the area underneath to restore your Razer mechanical keyboard to its optimal condition. This step is vital for eliminating any accumulated dust, crumbs, or debris that may have found their way beneath the keycaps. Here’s a systematic approach to effectively clean under the keycaps:
- Use Compressed Air: Holding the keyboard at a slight angle, use the compressed air duster to blow away any loose debris from underneath the keycaps. The high-pressure air stream will dislodge and remove dust and particles, ensuring a clean surface.
- Inspect for Stubborn Debris: After using the compressed air, inspect the area beneath the keycaps for any stubborn debris that may require further attention. If necessary, use a cotton swab to gently dislodge and remove any remaining particles.
- Clean the Keycaps: While the keycaps are removed, take the opportunity to clean them individually. Prepare a solution of water and isopropyl alcohol, dampen a microfiber cloth, and gently wipe each keycap to remove oils, stains, and grime. Ensure that the keycaps are thoroughly dry before reinstallation.
- Inspect the Switches: With the area under the keycaps cleaned, take a moment to inspect the switches for any signs of debris or dust. Use the compressed air and cotton swabs as needed to ensure that the switches are free from any contaminants.
By diligently following these steps, you can effectively clean under the keycaps of your Razer mechanical keyboard, ensuring that both the visible and hidden areas are free from any accumulated debris. This meticulous cleaning process contributes to the overall functionality and longevity of your keyboard, allowing you to enjoy a pristine typing or gaming experience.
Reassembling the Keyboard
After completing the cleaning process, it’s time to reassemble your Razer mechanical keyboard to restore it to its fully functional and visually appealing state. Proper reassembly ensures that the keycaps are securely in place and that the keyboard is ready for use. Here’s a step-by-step guide to reassembling your keyboard:
- Organize the Keycaps: Before reinstallation, organize the keycaps in a logical manner to facilitate the reassembly process. This step helps prevent confusion and ensures that each keycap is returned to its correct position.
- Align the Keycaps: Position each keycap over its corresponding switch, ensuring that it is aligned correctly. Apply gentle pressure to each keycap, pressing down evenly until it snaps into place. Take care to avoid using excessive force to prevent damage to the switches.
- Verify Keycap Placement: Once all the keycaps are reinstalled, visually inspect the keyboard to verify that each keycap is securely seated and level with the surrounding keys. Make any necessary adjustments to ensure uniformity and proper alignment.
- Test the Keyboard: After reassembling the keyboard, test each key to ensure that it registers keystrokes accurately and consistently. This step allows you to confirm that the keycaps are properly reinstalled and that the switches are functioning as intended.
By following these steps, you can confidently reassemble your Razer mechanical keyboard, knowing that the keycaps are securely in place and the keyboard is ready for use. A properly reassembled keyboard not only ensures optimal functionality but also presents a clean and polished appearance, reflecting the care and attention invested in its maintenance.