Introduction
So, you've been grinding away at your favorite games, racking up victories and conquering virtual worlds on your trusty gaming keyboard. But let's face it – all that intense gaming action can take a toll on your beloved peripheral. Crumbs, dust, and the occasional spill can turn your gaming keyboard into a sticky, grimy mess. But fear not, because with a little know-how and some simple household items, you can bring your keyboard back to its former glory.
In this guide, we'll walk you through the process of cleaning your gaming keyboard using a surprising ingredient: soda. Yes, you read that right – soda! This unconventional method can be incredibly effective at removing grime and gunk from your keyboard, leaving it looking and feeling fresh. We'll cover everything from gathering the necessary supplies to safely cleaning and drying your keyboard, ensuring that you can enjoy a pristine gaming experience once again.
So, grab a can of soda and get ready to give your gaming keyboard the TLC it deserves. With our step-by-step instructions, you'll learn how to tackle those sticky keys and greasy surfaces, all while avoiding the need for expensive cleaning solutions. Let's dive in and revitalize your gaming setup!
Gather Your Supplies
Before embarking on your keyboard-cleaning journey, it’s essential to gather the necessary supplies. Here’s what you’ll need:
- Soda: Opt for a clear, non-colored soda, such as club soda or lemon-lime soda. The carbonation and mild acidity of the soda can help break down grime and residue on your keyboard.
- Cotton Swabs: These handy tools are perfect for reaching into the nooks and crannies between the keys, allowing you to effectively remove dirt and debris.
- Microfiber Cloth: A soft, lint-free microfiber cloth is ideal for gently wiping down the keyboard’s surface without leaving behind any fibers or lint.
- Isopropyl Alcohol (Optional): If your keyboard is particularly grimy, a small amount of isopropyl alcohol can aid in cutting through tough grease and grime.
- Compressed Air: This can be used to dislodge any stubborn particles or dust from beneath the keys.
- Small Bowl: To hold the soda for dipping and cleaning.
- Flathead Screwdriver (Optional): If your keyboard keys are removable, a flathead screwdriver can assist in safely popping them off for thorough cleaning.
By ensuring you have these supplies on hand, you’ll be well-prepared to tackle the task of cleaning your gaming keyboard with soda. With a few simple items and a bit of patience, you’ll be on your way to a squeaky-clean keyboard that’s ready for your next gaming session.
Prepare the Keyboard
Before diving into the cleaning process, it’s important to prepare your gaming keyboard to ensure a thorough and safe cleaning experience. Here’s how to get started:
1. Power Off and Unplug: Start by powering off your computer and unplugging the keyboard from your PC or laptop. This precautionary step ensures your safety and prevents any electrical mishaps while cleaning.
2. Remove Any External Attachments: If your keyboard has any detachable components, such as wrist rests or additional keypads, remove them to simplify the cleaning process and access hard-to-reach areas.
3. Turn the Keyboard Upside Down: Holding the keyboard upside down, gently shake it to dislodge any loose debris or particles that may have accumulated between the keys. This simple step can help minimize the amount of dirt you’ll need to clean manually.
4. Check for Removable Keys: Some gaming keyboards feature keys that can be removed for cleaning. If your keyboard allows for this, carefully pop off the keys using a flathead screwdriver or a keycap puller, taking note of their original positions for reassembly.
By following these preparatory steps, you’ll set the stage for a successful cleaning process, ensuring that your gaming keyboard is ready to undergo a thorough and effective soda-based cleaning treatment. With the keyboard prepped and ready, you’ll be one step closer to restoring its pristine condition and optimizing your gaming experience.
Clean the Keys
Now that your keyboard is prepped and ready, it’s time to focus on cleaning the individual keys. Follow these steps to effectively remove dirt and grime from the keycaps and the spaces between them:
1. Dip and Swirl: Pour a small amount of soda into a bowl. Dip a cotton swab into the soda, allowing it to absorb a moderate amount without dripping. Gently swirl the swab around the surface of the keycaps, ensuring that each key receives thorough coverage.
2. Wipe and Scrub: Using the dampened cotton swab, carefully wipe each keycap, paying special attention to areas with visible grime or residue. For stubborn spots, apply gentle pressure and scrub in a circular motion to dislodge the dirt.
3. Dry and Reassemble: After cleaning each key, use a dry cotton swab or a microfiber cloth to remove any excess moisture. If you removed the keys, ensure they are completely dry before reattaching them to the keyboard, aligning them properly based on their original positions.
4. Address Sticky Keys: If you encounter sticky or unresponsive keys, consider using a cotton swab dampened with isopropyl alcohol to target the affected areas, followed by thorough drying to restore functionality.
5. Utilize Compressed Air: For a comprehensive cleaning, use compressed air to blow away any remaining debris or liquid from between the keys, ensuring a pristine finish.
By meticulously cleaning each keycap and addressing any sticky or unresponsive keys, you’ll breathe new life into your gaming keyboard. With the keys sparkling clean and free of grime, your keyboard will not only look pristine but also deliver a satisfying tactile experience during intense gaming sessions.
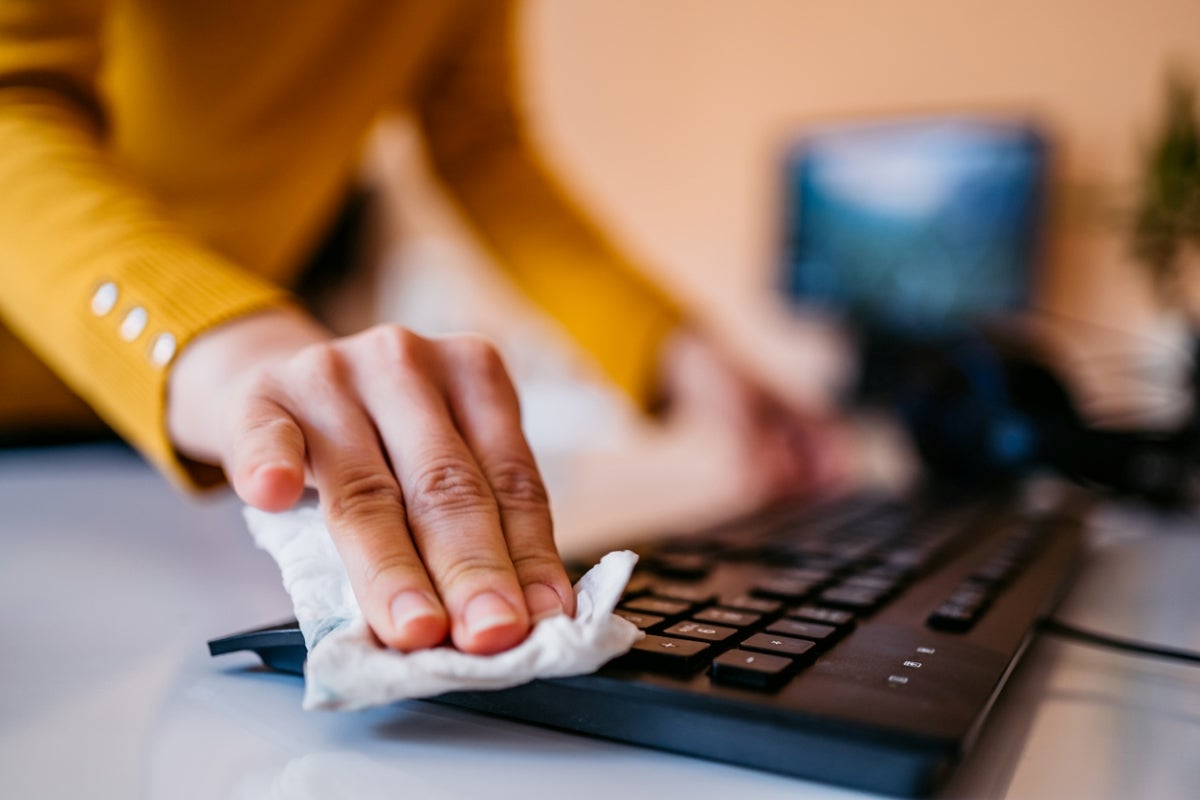
Clean the Surface
With the keys taken care of, it’s time to focus on cleaning the surface of your gaming keyboard. Follow these steps to effectively remove grime and residue from the keyboard’s exterior:
1. Dampen the Cloth: Moisten a microfiber cloth with a small amount of soda, ensuring that it is not excessively wet. The mild acidity and carbonation of the soda can help break down and lift dirt and oils from the surface of the keyboard.
2. Gently Wipe the Surface: Using the damp cloth, gently wipe the entire surface of the keyboard, paying close attention to areas around the keys and along the edges. Employ light, circular motions to effectively lift and remove grime without applying excessive pressure.
3. Address Stubborn Areas: For particularly stubborn or sticky spots, apply slightly more pressure while wiping, taking care not to press too hard on delicate components such as key switches or LED indicators.
4. Focus on the Edges and Crevices: Utilize the edge of the cloth or a cotton swab to reach into the narrow crevices and edges of the keyboard, ensuring that no residue is left behind. Thoroughly clean these hard-to-reach areas to achieve a comprehensive cleaning result.
5. Dry the Surface: Once the surface has been effectively cleaned, use a dry microfiber cloth to gently remove any remaining moisture, ensuring that the keyboard is completely dry before use.
6. Reassemble and Test: If you removed any detachable components, such as wrist rests, reattach them to the keyboard. Plug the keyboard back into your computer and test its functionality to ensure that it’s in optimal working condition.
By meticulously cleaning the surface of your gaming keyboard, you’ll not only restore its visual appeal but also ensure a hygienic and comfortable gaming experience. With the exterior looking fresh and free of grime, your keyboard will be primed for countless hours of gaming enjoyment.
Let it Dry
After completing the cleaning process, it’s crucial to allow your gaming keyboard to thoroughly dry before returning it to active use. Follow these essential steps to ensure that your keyboard dries effectively:
1. Air Dry: Place the keyboard in a well-ventilated area, allowing air to circulate around and beneath it. This will facilitate the evaporation of any residual moisture from the cleaning process.
2. Patience is Key: It’s important to exercise patience during the drying process, especially if you used a liquid cleaning agent such as soda. While it may be tempting to hasten the drying with heat sources, it’s best to avoid using hairdryers or heaters, as excessive heat can damage the keyboard’s components.
3. Monitor the Drying Progress: Periodically check the keyboard to assess its dryness. Look for any remaining moisture or signs of dampness, particularly in the spaces between the keys and along the keyboard’s surface.
4. Consider Inverted Drying: If feasible, consider placing the keyboard upside down to allow any trapped moisture to escape. This can be particularly effective for keyboards with removable keycaps, as it encourages thorough drying of the underlying components.
5. Verify Dryness: Before reconnecting the keyboard to your computer, ensure that it is completely dry to the touch. This includes verifying that no moisture remains beneath the keys or along the edges of the keyboard.
By allowing your gaming keyboard to dry completely, you’ll safeguard its internal components and prevent potential issues related to moisture. With a patient approach to drying, you’ll soon be ready to reunite with your freshly cleaned and revitalized gaming keyboard, setting the stage for uninterrupted gaming enjoyment.
Conclusion
Congratulations! You’ve successfully navigated the process of cleaning your gaming keyboard with soda, revitalizing it and ensuring a pristine gaming experience. By following the steps outlined in this guide, you’ve not only removed grime and residue but also demonstrated a commitment to maintaining your gaming gear in top condition.
Remember, the key to a clean and functional gaming keyboard lies in regular maintenance and care. By incorporating this soda-based cleaning method into your maintenance routine, you can keep your keyboard looking and feeling fresh, allowing for uninterrupted gaming sessions without the distraction of sticky keys or grimy surfaces.
Additionally, the use of soda as a cleaning agent showcases the resourcefulness and creativity of the gaming community. Sometimes, unconventional solutions yield remarkable results, and the soda cleaning method exemplifies this principle, offering an effective and accessible approach to keyboard maintenance.
As you return to your gaming setup, take a moment to appreciate the renewed allure and tactile satisfaction of your freshly cleaned keyboard. With its keys gleaming and the surface free of grime, you’re poised to dive back into your favorite games with enhanced comfort and precision.
So, grab your soda, gather your supplies, and embark on this cleaning adventure whenever your gaming keyboard needs a little TLC. By doing so, you’ll ensure that your trusty keyboard remains a reliable companion throughout your gaming endeavors.
Here’s to many more victorious gaming sessions with a sparkling clean keyboard at your fingertips!