Introduction
Welcome to the world of digital banking! In today’s fast-paced society, the convenience of online financial transactions has become an integral part of our lives. E-wallets, in particular, have revolutionized the way we handle our money. And when it comes to e-wallets, the FNB App is a popular choice among users.
Whether you’re new to the FNB App or you’ve been utilizing its features for a while, knowing how to reverse a transaction on the app can be incredibly useful. Perhaps you accidentally sent money to the wrong person or made a payment to the wrong merchant. Whatever the case may be, the ability to reverse e-wallet transactions can save you time and effort.
In this guide, we’ll walk you through the step-by-step process of reversing a transaction on the FNB App’s e-wallet feature. By following these instructions, you’ll regain control over your finances and ensure that your transactions are accurate.
Before we jump into the details, it’s important to note that the specific steps may vary slightly depending on the version of the FNB App you’re using. However, the general process should be similar across different versions and updates of the app.
Now, without further ado, let’s dive into the nitty-gritty of reversing e-wallet transactions on the FNB App!
Step 1: Accessing the FNB App
The first step in reversing a transaction on the FNB App is to ensure that you have access to the app. If you haven’t already done so, download and install the FNB App on your mobile device from the respective app store.
Once the app is successfully installed, launch it by tapping on the app icon. If you already have the app installed, simply locate and open the app.
Upon launching the app, you may be required to sign in with your FNB banking credentials. Enter your login details, such as your username and password, and tap on the “Sign In” button.
For added convenience, you can enable biometric authentication, such as fingerprint or face recognition, if your device supports these features. This will allow you to quickly access the app without the need to enter your login credentials each time.
Once you are successfully logged in, you will be directed to the home screen of the FNB App, where you can access the various features and services offered by the app.
Note: If you encounter any issues while accessing the FNB App or logging in, make sure you have a stable internet connection and the latest version of the app installed on your device. If the problem persists, it is advisable to contact FNB customer support for assistance.
Now that you have accessed the FNB App, you’re ready to proceed to the next step and locate the e-wallet feature.
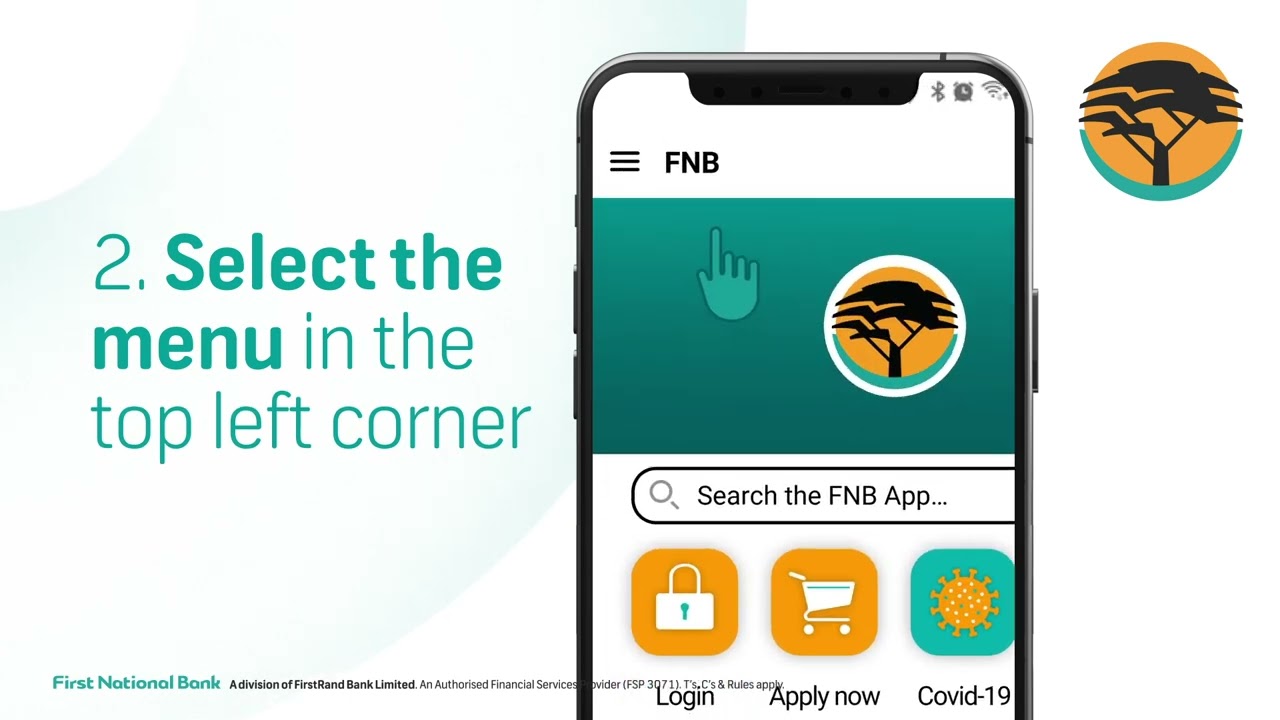
Step 2: Locating the E-wallet Feature
After accessing the FNB App, the next step is to locate the e-wallet feature within the app’s interface. The e-wallet feature allows you to manage your digital funds and perform various transactions.
To find the e-wallet feature, look for a designated icon or menu option on the app’s home screen. The exact placement and appearance of this icon may vary slightly depending on the version of the app you are using.
Once you have located the e-wallet feature, tap on it to access the e-wallet section of the FNB App. This will take you to a dedicated page where you can access a range of e-wallet services and functionality.
In some cases, you may need to navigate through a series of menus or screens to reach the e-wallet section. Follow the on-screen prompts and instructions to help you find the e-wallet feature quickly.
If you are having trouble locating the e-wallet feature, consider referring to the FNB App’s user guide or FAQ section for detailed instructions. You can also reach out to FNB customer support for assistance in finding and accessing the e-wallet feature.
Once you have successfully located the e-wallet feature within the FNB App, you are now ready to proceed to the next step and learn how to reverse a transaction using this functionality.
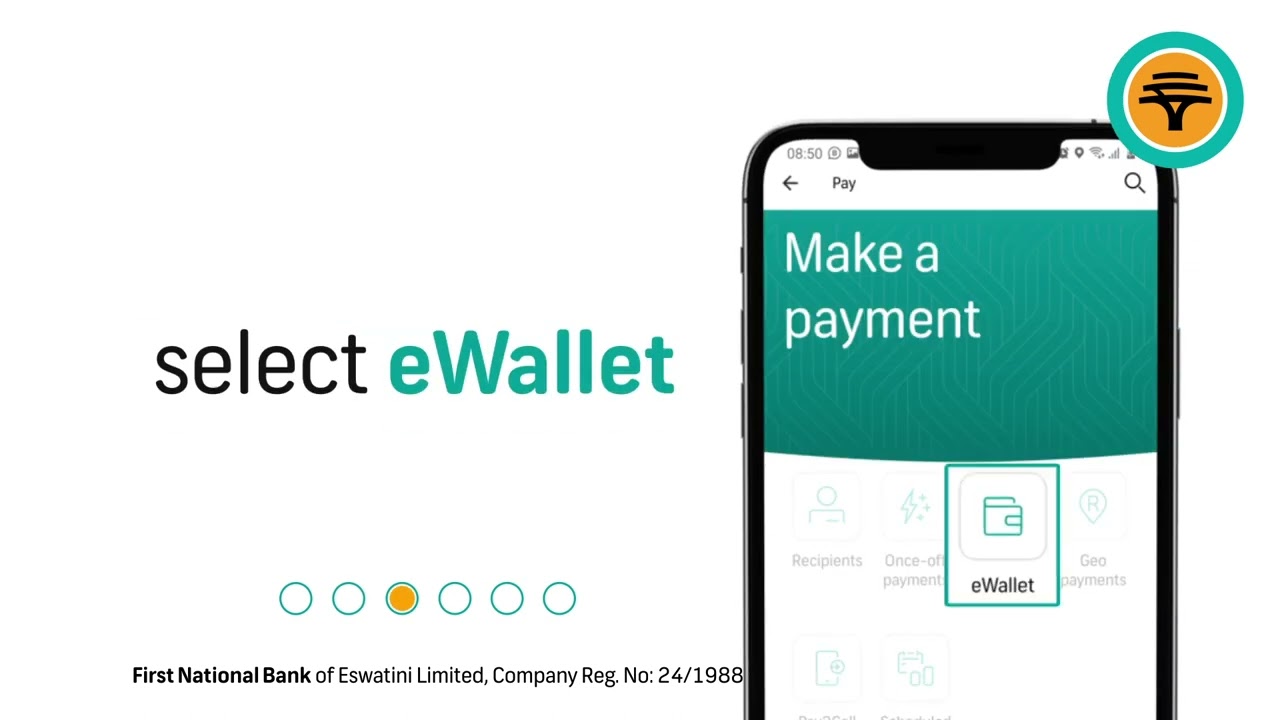
Step 3: Selecting the E-wallet Option
Now that you have accessed the e-wallet feature within the FNB App, the next step is to select the option for reversing a transaction. This will allow you to navigate to the appropriate section where you can initiate the reversal process.
On the e-wallet page, you will likely find a list of different options and services related to e-wallet transactions. Look for an option specifically labeled or related to transaction management, reversal, or history.
Tap on the relevant option to proceed to the transaction management section. It may be labeled as “Transaction History”, “Manage Transactions”, or something similar, depending on the app’s layout and design.
Once you have accessed the transaction management section, you will be presented with a list of your recent e-wallet transactions. This list may include details such as the date, time, recipient, and amount of each transaction.
Locate the specific transaction that you wish to reverse. You can typically do this by scrolling through the list or using search filters and sorting options provided by the app. Some apps may also have a dedicated search bar for easier navigation.
Once you have identified the transaction you want to reverse, tap on it to select it. This action will typically bring up a detailed view of the transaction, including more specific information about the transaction, such as the transaction ID or reference number.
Now that you have selected the specific transaction, you are ready to move on to the next step and initiate the reversal process within the FNB App.
Step 4: Reversing a Transaction
With the chosen transaction in view, you can now proceed to reverse the transaction using the available options and tools within the FNB App. The steps to reverse the transaction may vary slightly depending on the specific app version and interface design.
Look for a button or link labeled “Reverse” or “Refund” within the transaction details. Tap on this button to initiate the reversal process for the selected transaction.
Before confirming the reversal, it is essential to review the transaction details carefully to ensure that you are reversing the correct transaction. Pay attention to the amount, recipient, and other relevant information.
Once you are confident that you have selected the correct transaction, proceed with the reversal by confirming your intention to reverse the transaction. This confirmation step may involve providing additional security measures such as entering a PIN, biometric authentication, or answering security questions.
After confirming the reversal, the FNB App will begin processing the request to reverse the transaction. This process may take a few moments, depending on the network speed and the specific details of the transaction.
During this process, do not navigate away from the app or close the transaction management section. It’s important to remain patient until you receive confirmation that the reversal has been successfully processed.
Once the reversal process is complete, you will receive a notification or confirmation message within the app, indicating that the transaction has been successfully reversed.
Now that you have successfully initiated the reversal process, it’s time to move on to the next step and verify the reversed transaction within the FNB App.
Step 5: Confirming the Reversal
After initiating the reversal process for the transaction, the next step is to confirm that the reversal has been successfully processed within the FNB App. Confirming the reversal will provide you with the assurance that the transaction has been reversed and any associated funds have been returned.
Once the reversal has been processed, navigate back to the transaction management section within the e-wallet feature of the FNB App.
Locate the reversed transaction within the transaction history. It may be labeled differently or display a different status than before, indicating that the reversal has taken place.
Tap on the reversed transaction to view the updated details. Confirm that the status of the transaction now reflects the reversal and any associated funds have been returned to your e-wallet balance.
Take a moment to review the updated transaction details, ensuring that the date, time, recipient, and amount reflect the reversal accurately.
If the details appear correct and the status reflects the reversal, this confirms that the transaction has been successfully reversed within the FNB App.
It’s important to note that the availability of funds and the exact timing of the returned funds may vary depending on various factors, such as the recipient’s e-wallet provider or banking institution.
Once you have confirmed the reversal within the FNB App, you can proceed to the final step and conclude the process of reversing an e-wallet transaction.
Step 6: Verifying the Reversed Transaction
After confirming the reversal of the transaction within the FNB App, it is essential to verify that the reversed transaction reflects accurately in all relevant platforms.
To verify the reversed transaction, you can check your e-wallet balance within the FNB App. Ensure that the amount that was initially deducted for the transaction has been fully restored.
In addition to the FNB App, you may also want to check any other connected accounts or platforms where the reversed transaction may have had an impact. For example, if the transaction involved a merchant or a third-party service, verify with them as well that the reversal has been processed successfully.
If the reversed transaction affected your bank balance or any other financial accounts, log in to those platforms and confirm that the funds have been restored to their proper places.
During this verification process, it is crucial to keep track of the necessary documentation, such as transaction IDs or reference numbers, for future reference or in the event of any discrepancies or issues that may arise.
Should you find any discrepancies or concerns during the verification process, it is recommended to contact FNB’s customer support as soon as possible. They will be able to assist you in resolving any issues or clarifying any questions.
Once you have verified that the reversed transaction reflects accurately in all relevant platforms, you can consider the process of reversing the e-wallet transaction complete.
By following these steps and ensuring that the reversed transaction has been properly processed and verified, you can have peace of mind knowing that your e-wallet funds have been restored to their intended destination.
Conclusion
Reversing a transaction on the FNB App’s e-wallet feature can be a straightforward process once you familiarize yourself with the steps involved. By following the step-by-step instructions outlined in this guide, you can confidently navigate the app and reverse any unintended or incorrect transactions.
Remember, the key steps involved in reversing a transaction on the FNB App are: accessing the app, locating the e-wallet feature, selecting the e-wallet option, reversing the transaction, confirming the reversal, and verifying the reversed transaction. These steps ensure that you have complete control over your digital funds and can rectify any mistakes quickly and efficiently.
It’s important to note that while the steps provided here are a general guide, the specific process may vary slightly depending on the version of the FNB App you are using. If you encounter any difficulties or have questions throughout the process, don’t hesitate to seek assistance from FNB customer support.
Now that you have a clear understanding of how to reverse e-wallet transactions on the FNB App, you can navigate the digital world of finance with confidence and peace of mind. Remember to always double-check your transactions and take the necessary steps to rectify any errors promptly.
With these newfound skills, you can make the most of the convenient e-wallet features offered by the FNB App, ensuring accurate and efficient digital transactions.
So, fire up your FNB App, take control of your e-wallet transactions, and enjoy the peace of mind that comes with knowing you have the power to reverse any unintended financial mishaps.