Introduction
Are you interested in getting started with Ripple, one of the leading cryptocurrencies in the industry? If so, the first thing you’ll need is a Ripple wallet. A Ripple wallet is a secure digital storage for your Ripple coins, allowing you to send, receive, and store your XRP tokens.
But what exactly is Ripple? In simple terms, Ripple is both a digital payment protocol and a cryptocurrency. It was created to provide a fast and efficient way to send and receive money globally. Unlike traditional banking systems, Ripple allows for quick and low-cost transactions, making it an attractive option for individuals and businesses alike.
So why do you need a Ripple wallet? Well, when you purchase or receive Ripple coins, you’ll want a safe and secure place to store them. A Ripple wallet not only provides a secure location for your XRP tokens, but it also gives you full control over your funds. With a Ripple wallet, you can easily manage your transactions, track your balance, and even participate in the broader Ripple network.
Now that you understand the importance of having a Ripple wallet, let’s dive into the different types of wallets available.
What Is Ripple?
Ripple is not just a cryptocurrency; it’s a digital payment protocol designed to revolutionize the way money moves around the world. Developed by Ripple Labs, the technology behind Ripple aims to provide a fast and secure method of transferring funds globally, effectively eliminating the inefficiencies of traditional banking systems.
Unlike other cryptocurrencies like Bitcoin or Ethereum, which operate on decentralized systems, Ripple operates on a centralized network. This means that it doesn’t rely on the energy-intensive process of mining to validate transactions. Instead, transactions on the Ripple network are verified by a select group of trusted validators, ensuring quick and efficient processing.
The native cryptocurrency of the Ripple network is called XRP. It serves multiple purposes within the network, acting as both a bridge currency and a medium for transaction fees. XRP is designed to provide liquidity and facilitate the seamless transfer of various currencies, making it an ideal tool for banks and financial institutions.
One of the main features that sets Ripple apart from other cryptocurrencies is its focus on real-world use cases. It aims to solve the problems associated with cross-border transactions, such as slow processing times, high fees, and currency conversion hassles. By utilizing the Ripple network, financial institutions can settle transactions faster and at a lower cost, ultimately benefiting both businesses and consumers.
Furthermore, Ripple’s technology enables the creation of various financial products and services. Its open-source nature allows developers to build on top of the platform, fostering innovation and the creation of new applications.
In summary, Ripple is a digital payment protocol centered around providing fast and secure cross-border transactions. With its unique features and focus on real-world utility, Ripple has gained popularity and garnered the attention of both financial institutions and individual investors.
Why Do You Need a Ripple Wallet?
If you’re planning to engage in the world of cryptocurrencies, having a Ripple wallet is essential if you want to start investing in Ripple’s native cryptocurrency, XRP. Here are a few reasons why you need a Ripple wallet:
- Secure Storage: A Ripple wallet provides a secure digital storage solution for your XRP tokens. By storing your XRP in a wallet, you have control over your funds and reduce the risk of losing them due to exchange hacks or other security breaches.
- Easy Transactions: With a Ripple wallet, you can send and receive XRP tokens easily. Whether you want to make payments, transfer funds to friends or family, or engage in cryptocurrency trading, a wallet makes it convenient to carry out these transactions.
- Participate in the Ripple Network: Having a Ripple wallet allows you to be an active participant in the Ripple network. You can take advantage of features like becoming a liquidity provider, participating in consensus, and benefiting from the network’s innovations.
- Track Your Balance: A Ripple wallet enables you to monitor the balance and transaction history of your XRP tokens. This gives you a clear overview of your assets and facilitates better financial management.
- Personal Control: By using a Ripple wallet, you have full control over your XRP tokens. Unlike keeping your coins on an exchange, where you rely on the exchange’s security measures, a wallet puts you in charge of your funds, reducing the risk of potential loss or theft.
In summary, a Ripple wallet is necessary for securely storing and managing your XRP tokens. It provides a gateway to engage in transactions, participate in the Ripple network, and have complete control over your digital assets. If you’re looking to enter the world of Ripple and XRP, obtaining a Ripple wallet is the first step towards exploring the possibilities and reaping the benefits of this innovative digital payment protocol.
Different Types of Ripple Wallets
When it comes to Ripple wallets, there are several options available to suit different preferences and security needs. Here are the most common types of Ripple wallets:
- Online Wallets: Also known as web wallets, online wallets can be accessed through a web browser. They offer convenience as you can access your wallet from any device with an internet connection. However, online wallets are considered less secure compared to other types as they are vulnerable to hacking and phishing attacks.
- Hardware Wallets: Hardware wallets are physical devices that store your XRP tokens offline, providing maximum security for your funds. These wallets use secure elements and encryption to protect your private keys. Hardware wallets are immune to online threats and are a popular choice for long-term storage.
- Desktop Wallets: Desktop wallets are software applications installed on your computer. They offer a higher level of security compared to online wallets since they are not connected to the internet all the time. However, desktop wallets may be susceptible to malware or computer vulnerabilities, so it’s important to ensure proper security measures are in place.
- Mobile Wallets: Mobile wallets are designed to be used on smartphones and tablets, offering convenience and accessibility. They provide a good balance between security and ease of use. Mobile wallets can be convenient for everyday transactions and are often offered as apps for iOS and Android devices.
- Paper Wallets: A paper wallet is a physical copy of your XRP public and private keys printed on paper. It’s considered one of the most secure ways to store your XRP tokens since it’s immune to hacking or malware attacks. However, paper wallets require careful handling and protection from physical damage and theft.
Each type of Ripple wallet has its own advantages and considerations. It’s important to choose a wallet that aligns with your individual needs and preferences. Factors such as security, convenience, and accessibility should be taken into account when selecting the right Ripple wallet for you.
Online Wallets
Online wallets, also known as web wallets, are Ripple wallets that can be accessed through a web browser. They offer users the convenience of managing their XRP tokens from any device with an internet connection. Online wallets are typically provided by third-party service providers, allowing users to create an account and access their wallet through a secure login process.
One of the main advantages of online wallets is their accessibility. As long as you have an internet connection, you can log in to your wallet and manage your XRP tokens from anywhere in the world. This makes online wallets particularly convenient for individuals who frequently travel or require access to their funds on the go.
Another advantage of online wallets is the ease of use. They often have user-friendly interfaces that make it simple to send, receive, and store XRP tokens. This makes online wallets a popular choice for newcomers to the cryptocurrency world who may not be familiar with the technical aspects of managing their own wallet.
However, it’s important to note that online wallets come with some risks. Since they are connected to the internet, online wallets are susceptible to hacking and phishing attacks. It’s crucial to choose a reputable online wallet provider that implements strict security measures, such as two-factor authentication and encryption, to protect your funds.
If you decide to use an online wallet, it’s important to follow best practices to enhance the security of your XRP tokens. This includes using a strong and unique password, enabling two-factor authentication, and being cautious of phishing attempts or suspicious links.
In summary, online wallets provide a convenient way to manage your XRP tokens from any device with an internet connection. They are user-friendly and accessible, making them suitable for beginners. However, it’s essential to choose a trusted online wallet provider and implement security measures to protect your funds from potential online threats.
Hardware Wallets
Hardware wallets are physical devices designed to store your XRP tokens offline, providing the highest level of security for your funds. These wallets are specifically built to protect your private keys and ensure that your digital assets remain safe from online threats.
One of the main advantages of hardware wallets is their inherent security features. These wallets store your private keys offline, meaning they are not exposed to the internet or vulnerable to hacking attempts. The private keys are stored within a secure element of the hardware wallet, which is designed to resist physical and software attacks.
When you want to initiate a transaction, you need to connect your hardware wallet to a computer or mobile device. The device then prompts you to confirm the transaction by physically pressing buttons or verifying it on the device’s screen. This adds an extra layer of security, as the transaction cannot be signed without your physical interaction with the device.
Furthermore, hardware wallets are immune to malware or keylogger attacks that may compromise the security of other wallet types. Even if your computer or mobile device is infected with malicious software, the private keys stored on your hardware wallet remain secure.
Another benefit of hardware wallets is their durability and long-term reliability. They are built to withstand physical damage, and most reputable hardware wallet manufacturers provide backup and recovery options, allowing you to easily restore your wallet and access your funds in the event of loss or theft.
However, it’s important to note that hardware wallets come at a cost. They are typically a more expensive option compared to other wallet types. Additionally, the initial setup and learning curve associated with hardware wallets may be intimidating for novice users.
Despite these considerations, hardware wallets are widely regarded as one of the most secure options for storing and managing your XRP tokens. If security is a top priority for you and you plan to hold a significant amount of XRP for a longer period, a hardware wallet is highly recommended.
In summary, hardware wallets provide the highest level of security for your XRP tokens by storing your private keys offline and utilizing physical confirmation for transactions. They offer reliable and durable solutions for long-term storage, protecting your XRP assets from online threats and vulnerabilities associated with other wallet types.
Desktop Wallets
Desktop wallets are software applications installed on your computer that allow you to store and manage your XRP tokens. These wallets provide a higher level of security compared to online wallets since they are not connected to the internet all the time.
One of the main advantages of desktop wallets is that they give you complete control over your private keys. Unlike online wallets where the wallet provider has control over your keys, desktop wallets store your private keys locally on your computer. This means you have full ownership and responsibility for your funds.
Desktop wallets also offer additional security features such as encryption and password protection. You can encrypt your wallet file or set a strong password to prevent unauthorized access to your XRP tokens. This adds an extra layer of security, particularly if your computer is shared or prone to physical theft.
Another benefit of desktop wallets is their compatibility with various operating systems. Whether you are using Windows, MacOS, or Linux, you can find a desktop wallet that works on your preferred operating system. This flexibility allows more users to access and utilize desktop wallets for managing their XRP tokens.
However, it’s important to consider potential risks associated with desktop wallets. Since they are installed on your computer, they can be vulnerable to malware or hacking attempts. It’s crucial to ensure that your computer has up-to-date antivirus software and that you download the wallet application from trusted sources.
Regularly updating your desktop wallet and keeping backups of your wallet file is also recommended. This ensures that you can recover your wallet in case of computer failures or accidental deletion of files.
Desktop wallets are a good choice for users seeking a balance between security and convenience. However, it’s important to note that they may require a certain degree of technical knowledge and regular maintenance to ensure optimal security.
In summary, desktop wallets provide users with control over their private keys and offer enhanced security features, such as encryption and password protection. They are compatible with various operating systems and provide a balance between security and convenience. By taking proper security measures, desktop wallets can offer a reliable and secure way to store and manage your XRP tokens.
Mobile Wallets
Mobile wallets are smartphone applications that allow you to store and manage your XRP tokens directly on your mobile device. These wallets offer convenience and accessibility, making it easy for you to send, receive, and track your XRP transactions on the go.
One of the main advantages of mobile wallets is their accessibility. Since most people carry their smartphones with them at all times, mobile wallets provide instant access to your XRP tokens. You can make transactions or check your balance anytime and anywhere, as long as you have an internet connection.
Mobile wallets also offer a user-friendly interface and intuitive design, making them suitable for both beginners and experienced users. They often provide features such as QR code scanning for easy transactions, address book integration for streamlined payments, and push notifications for real-time updates on your transactions.
In terms of security, mobile wallets implement various measures to protect your XRP tokens. Many mobile wallets allow you to set a PIN or passcode to prevent unauthorized access in case your phone gets lost or stolen. Some wallets even offer biometric authentication, such as fingerprint or face recognition, for added security.
It’s important to note that mobile wallets are still vulnerable to certain risks. Since smartphones are connected to the internet, they can be susceptible to malware or hacking attempts. To enhance security, it’s advisable to download mobile wallet applications from trusted sources, keep your smartphone operating system up to date, and avoid downloading suspicious apps or clicking on suspicious links.
Mobile wallets are a popular choice for individuals who frequently make transactions or want to manage their XRP tokens on the go. They can be especially useful for everyday transactions, such as paying for goods and services at physical stores that accept cryptocurrencies.
In summary, mobile wallets provide convenience and accessibility, allowing you to manage your XRP tokens from your smartphone. They offer user-friendly interfaces and implement security measures such as PIN codes or biometric authentication. By taking necessary precautions, mobile wallets can provide a convenient and secure way to store and transact with your XRP tokens.
Paper Wallets
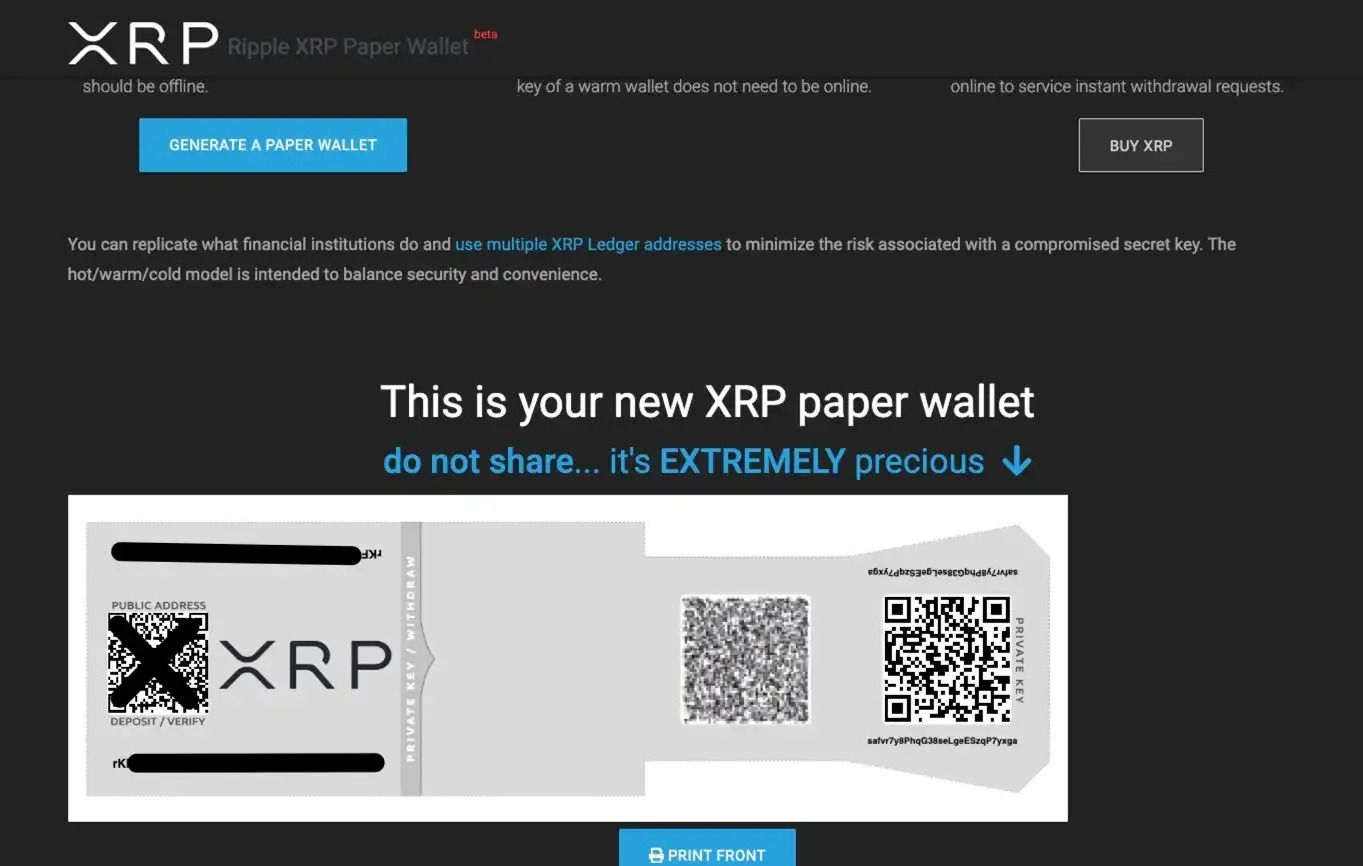
Paper wallets are a form of cold storage for your XRP tokens, and they provide one of the most secure ways to store your cryptocurrency offline. They involve generating a physical copy of your XRP public and private keys and keeping them on a piece of paper.
The main benefit of paper wallets is their high level of security. Since they are completely offline, they are not susceptible to hacking or online threats. Paper wallets provide what is known as “air-gapped” storage, meaning they are isolated from the internet and not accessible through digital means.
To create a paper wallet, you can use specific tools or websites that generate a pair of public and private keys for your XRP tokens. The private key is often represented by a QR code, which you can scan later to access your funds. It’s crucial to generate the keys in a secure and trusted environment to avoid any compromise of your private key.
Once you have generated the keys, you need to print them or write them down on a piece of paper. It’s recommended to use a printer that is not connected to the internet and to store the paper wallet in a safe and secure location, such as a locked safe or safety deposit box.
Using a paper wallet is simple but requires some precautions. You need to ensure the paper wallet is kept free from physical damage, such as water or fire hazards. Additionally, if you want to access your XRP tokens or make transactions, you will need to import the paper wallet into a wallet application or use a hardware wallet that supports importing paper wallets.
It’s highly recommended to create multiple copies of your paper wallet and store them in separate secure locations. This provides redundancy in case one copy is lost or damaged. It’s also important to keep your paper wallet private and not share it with anyone to prevent unauthorized access to your funds.
While paper wallets offer a high level of security, they may not be the most convenient option for frequent or everyday transactions. Importing and managing a paper wallet can be more complex compared to other wallet types, and it may require additional technical knowledge or understanding of the process.
In summary, paper wallets are an offline method of storing your XRP tokens, providing a high level of security against online threats. They involve generating a physical copy of your public and private keys and storing them securely. Paper wallets are a popular choice for long-term storage but may not be as convenient for frequent transactions.
Choosing the Right Ripple Wallet
When it comes to choosing a Ripple wallet, it’s important to consider various factors to ensure the security and usability of your XRP tokens. Here are some key points to consider when selecting the right Ripple wallet for your needs:
- Security: Security should be a top consideration when choosing a wallet. Look for wallets that implement strong security measures, such as encryption, two-factor authentication, and secure hardware elements. Consider the reputation of the wallet provider and whether they have experienced any security breaches in the past.
- Accessibility: Consider how and where you want to access your Ripple wallet. If you require on-the-go access, mobile or online wallets may be more suitable. If you prefer a more offline and secure option, hardware or software wallets might be preferable. Assess your lifestyle and choose a wallet that aligns with your accessibility needs.
- User Experience: User-friendly interfaces and intuitive designs can make managing your XRP tokens much easier. Consider wallets that have a clear and straightforward interface, making it easy to navigate, send and receive transactions, and track your balance. Look for wallet applications that provide a seamless user experience.
- Backup and Recovery: Accidents can happen, and it’s essential to have a backup and recovery plan for your wallet. Ensure the selected wallet offers backup options, such as recovery seeds or encrypted backups. This allows you to restore your wallet and access your XRP tokens in case of device failure or loss.
- Community Support and Reputation: Research the wallet’s reputation and community reviews. Look for wallets that have a strong and trusted presence within the Ripple community. Consider forums and online communities to gather information and experiences from other users of the wallet.
Ultimately, the right Ripple wallet depends on your individual needs and preferences. It’s important to consider the level of security, accessibility, user experience, backup options, and the wallet’s reputation in the community. It may be helpful to test and experiment with different wallet options to find the one that best fits your requirements.
Remember to exercise caution when choosing a wallet and securely store your private keys or recovery phrases. Regularly update the wallet software and stay informed about any security updates or vulnerabilities that may arise.
In summary, choosing the right Ripple wallet involves considering factors such as security, accessibility, user experience, backup options, and reputation. Assess your needs and preferences to select a wallet that aligns with your requirements, providing a secure and user-friendly solution for managing your XRP tokens.
How to Set Up a Ripple Wallet
If you’re ready to set up a Ripple wallet and start storing and managing your XRP tokens, follow these steps:
Step 1: Research and Choose a Wallet
Begin by researching different Ripple wallet options and considering the factors mentioned earlier, such as security, accessibility, user experience, and community support. Assess your needs and preferences to select a wallet that aligns with your requirements.
Step 2: Download or Access Wallet Application
Once you’ve chosen a wallet, download the application or access it through the wallet provider’s website. Ensure that you’re downloading from the official source to avoid any counterfeit or malicious applications.
Step 3: Create a New Wallet
Follow the instructions provided by the wallet application to create a new wallet. This typically involves creating a strong password and setting up any additional security measures, such as two-factor authentication. Take the time to carefully read and understand the wallet’s terms and conditions.
Step 4: Secure Your Wallet
After creating your wallet, take precautions to enhance its security. Enable any available security features such as PIN codes, biometric authentication, or encryption. Set up any additional layers of security offered by the wallet application.
Step 5: Backup Your Wallet
Creating a backup of your wallet is essential in case of device failure or loss. Most wallet applications provide you with a recovery phrase or a unique seed. Write down this recovery phrase and keep it in a safe and secure location. Don’t store it digitally or share it with anyone to protect the integrity of your wallet.
Step 6: Fund Your Wallet
Before you can start using your Ripple wallet, you’ll need to fund it with XRP tokens. You can purchase XRP from a cryptocurrency exchange and transfer it to your wallet address. Be cautious when entering the wallet address to avoid any errors or loss of funds.
Step 7: Start Using Your Ripple Wallet
Once your wallet is funded, you can start using it to send, receive, and manage your XRP tokens. Explore the wallet’s features and functionalities, such as transaction history, balance tracking, and additional security settings.
Remember to stay informed about any updates or changes to the wallet application, as well as general security practices within the cryptocurrency industry. Regularly back up your wallet and update the application to ensure the security and functionality of your Ripple wallet.
In summary, setting up a Ripple wallet involves researching and choosing a wallet, downloading or accessing the application, creating a new wallet, securing it, backing it up, funding it, and finally, enjoying the functionality and convenience of managing your XRP tokens.
Step 1: Research and Choose a Wallet
When setting up a Ripple wallet, the first step is to research and choose the right wallet for your needs. With several wallet options available, it’s important to consider factors such as security, accessibility, user experience, community support, and reputation.
Begin by researching different Ripple wallet providers and reading reviews and feedback from users. Take note of the security features offered by each wallet, such as encryption, two-factor authentication, and secure hardware elements. Opt for wallets that prioritize the protection of your XRP tokens and private keys.
Consider the accessibility of the wallet. Are you looking for a wallet that you can access on multiple devices, or would you prefer a wallet that is specifically designed for a particular platform, such as desktop or mobile? Assess your lifestyle and requirements to choose a wallet that fits your needs.
User experience is another crucial factor to consider. Look for wallets with user-friendly interfaces and intuitive designs that make it easy to navigate and manage your XRP tokens. A well-designed wallet ensures a smooth and hassle-free experience when sending, receiving, and tracking transactions.
Community support and reputation should also be taken into account. Inquire about the reputation of the wallet provider within the Ripple community and look for wallets that have a strong and trusted presence. It can be helpful to participate in forums or online communities to gather information and experiences from other users of the wallet.
Take your time to compare wallet features, read user experiences, and weigh the pros and cons of each option. Assess your personal preferences and priorities to make an informed decision that aligns with your needs and goals.
It’s important to note that while researching and choosing a wallet is an essential step, it’s equally important to stay informed about security best practices in the cryptocurrency industry. Keep up with updates and news regarding wallet vulnerabilities, and educate yourself on how to stay secure in the ever-evolving landscape of digital assets.
By thoroughly researching and choosing the right Ripple wallet, you can ensure the security and usability of your XRP tokens and set yourself up for a smooth and hassle-free experience as you embark on your journey into the world of Ripple and cryptocurrency.
Step 2: Download or Access Wallet Application
Once you have researched and chosen the Ripple wallet that suits your needs, the next step is to download or access the wallet application. Depending on the type of wallet you have chosen, the process may vary.
If you have opted for an online wallet, you can typically access it through the wallet provider’s website. Visit the official website and look for the option to create a new account or log in if you already have an existing account. Ensure that you are using the official website to avoid any phishing or counterfeit websites.
For hardware wallets, you will need to purchase the physical device from the manufacturer or an authorized retailer. Follow the manufacturer’s instructions to set up the hardware wallet. This may involve connecting the device to your computer or mobile device and installing the necessary software.
Desktop and mobile wallets are usually available for download from official app stores or the wallet provider’s website. Visit the respective app stores for your operating system (iOS or Android) and search for the specific wallet application. Ensure that you download the official version of the wallet application to avoid any fake or malicious applications.
It’s crucial to be cautious and verify the authenticity of the wallet application you are downloading. Check for reviews and verify that the developer is reputable. Scammers sometimes create malicious applications that resemble popular wallet apps, aiming to steal your XRP tokens.
When downloading the wallet application, make sure to keep your devices and software up to date. This helps ensure that you have the latest security updates and features available, protecting your wallet from potential vulnerabilities.
If you encounter any issues or have questions during the download or setup process, consult the wallet provider’s website or their customer support channels for assistance. They can provide guidance and help you navigate through the installation and setup process.
Remember, it’s important to exercise caution and double-check the authenticity of the wallet application during the download and installation phase. Taking the time to download the genuine wallet application from a trusted source goes a long way in securing your XRP tokens and safeguarding your funds.
Once you have successfully downloaded or accessed the wallet application, you’re ready to move on to the next step of creating your new wallet and securing your XRP tokens.
Step 3: Create a New Wallet
After successfully downloading or accessing your chosen Ripple wallet application, the next step is to create a new wallet. The process may vary depending on the wallet provider and the type of wallet you have selected. Here’s a general outline of how to create a new Ripple wallet:
1. Open the Wallet Application: Launch the wallet application on your device, whether it’s on your computer, smartphone, or hardware wallet.
2. Select “Create New Wallet”: Look for the option to create a new wallet within the wallet application interface. It may be labeled as “Create New Account” or something similar.
3. Follow the Setup Instructions: Follow the on-screen instructions provided by the wallet application. This usually involves setting up a strong and unique password for your wallet. Some wallets may require you to create additional security measures, such as PIN codes or passphrase phrases.
4. Record Your Recovery Phrase: Most wallets will provide you with a recovery phrase or seed. This is a set of words that serves as a backup in case you forget your password or need to restore your wallet. Write down the recovery phrase and store it in a safe and secure location. Do not store it digitally or share it with anyone.
5. Confirm and Verify Your Wallet: After completing the setup instructions, the wallet application may prompt you to verify your wallet. This step typically involves confirming your email address or phone number to ensure the security and legitimacy of your wallet.
6. Review and Accept the Wallet Terms and Conditions: Carefully review the terms and conditions presented by the wallet application. Read and understand the details before accepting them to proceed with the wallet creation process.
7. Complete the Wallet Creation Process: Once you have followed all the necessary steps and provided the required information, the wallet creation process should be complete. You should now have a new Ripple wallet associated with your account.
It’s important to note that the wallet creation process may require additional steps or verification, depending on the specific wallet application you are using. Follow the instructions provided by the wallet application and take your time to ensure that you understand each step before proceeding.
By carefully creating your new wallet and securely storing your recovery phrase, you are taking crucial steps to protect your XRP tokens and ensure the security of your funds. With your wallet successfully set up, you’re ready to move on to the next steps of securing your wallet, backing up your wallet, and funding it with XRP tokens.
Step 4: Secure Your Wallet
Once you have created your Ripple wallet, it’s important to take steps to enhance its security. Securing your wallet helps protect your XRP tokens and ensures that only you have access to your funds. Here are some key measures to secure your Ripple wallet:
1. Enable Two-Factor Authentication: Many wallet applications offer the option to enable two-factor authentication (2FA). This adds an extra layer of security by requiring a second verification step, such as a unique code sent to your mobile device or email. Enable this feature to prevent unauthorized access to your wallet.
2. Set a Strong Password: Create a strong and unique password for your wallet. Use a combination of uppercase and lowercase letters, numbers, and special characters to make it more secure. Avoid using personal information or easy-to-guess passwords.
3. Use Biometric Authentication (if available): If your wallet application supports biometric authentication, such as fingerprint or face recognition, consider enabling this feature. Biometric authentication adds an extra layer of convenience and security by ensuring that only you can access your wallet.
4. Keep Your Wallet Software Up to Date: Developers regularly release updates to improve the security and functionality of wallet applications. Keep your wallet software up to date to benefit from the latest security patches and enhancements.
5. Be Cautious of Phishing and Scams: Be vigilant of phishing attempts and scams. Always double-check the website or email addresses you interact with and verify that they are legitimate. Avoid clicking on suspicious links or providing your wallet information to untrusted sources.
6. Secure Your Device: Ensure that the devices you use to access your wallet are secure. Use strong passwords or PIN codes, enable auto-lock or screensaver lock when idle, and keep your devices physically secure to prevent unauthorized access.
7. Use Multi-Signature (Multi-Sig) Wallets: Some wallet applications offer multi-signature functionality, which requires multiple signatures to initiate a transaction. Consider using a multi-sig wallet if you want to add an extra layer of security and control over your funds.
8. Be Mindful of Public Wi-Fi: When accessing your wallet on public Wi-Fi networks, exercise caution. Public Wi-Fi networks can be vulnerable to eavesdropping and hacking attempts. Ideally, use a secure and private internet connection or employ a virtual private network (VPN) for added security.
9. Regularly Back Up Your Wallet: Create regular backups of your wallet and store them in multiple safe and secure locations. This ensures that you can recover your wallet and access your XRP tokens in case of device loss, damage, or failure.
By implementing these security measures, you can significantly enhance the security of your Ripple wallet. Remember that the responsibility for securing your wallet rests with you, so it’s essential to stay informed about new security threats and best practices in the cryptocurrency space.
Continue to the next step of backing up your wallet to ensure that you have a copy of your wallet information in case of unforeseen circumstances.
Step 5: Backup Your Wallet
Backing up your Ripple wallet is an essential step in safeguarding your XRP tokens and ensuring that you can recover your wallet in the event of loss, damage, or device failure. By creating a backup of your wallet, you can regain access to your funds and restore your wallet on a new device. Here’s how to backup your Ripple wallet:
1. Locate the Backup Option: Open your Ripple wallet application and look for the backup or export option. This feature is typically found in the settings or security section of the wallet application.
2. Follow the Backup Instructions: Once you have located the backup option, the wallet application will provide instructions on how to proceed. This may involve creating a backup file or writing down your recovery phrase.
3. Create a Recovery Phrase: Many Ripple wallets use a recovery phrase or seed, which is a set of words that represent your wallet’s private key. Write down the recovery phrase carefully and accurately. It is crucial to keep this phrase secure and private.
4. Store Your Backup Securely: Keep your backup in a safe and secure location. Consider using physical storage options, such as a fireproof safe or a safety deposit box. It’s important to protect the backup from physical damage, loss, theft, or unauthorized access.
5. Make Multiple Copies: It is advisable to create multiple copies of your wallet backup. This redundancy ensures that you have backups in multiple secure locations. However, it’s crucial to ensure that only you have access to these copies.
6. Test the Backup: After creating your backup, test its reliability. Some wallet applications provide a recovery process to ensure that your backup is accurate and can restore your wallet successfully.
7. Regularly Update Your Backup: As you make changes to your wallet, such as adding new addresses or updating security settings, remember to update your backup accordingly. Regularly review and update your backup to reflect your current wallet configuration.
8. Be Mindful of Digital Backups: If you choose to use digital backups, exercise caution. Encrypt your backup files and choose secure storage options, such as encrypted external drives or secure cloud storage. Be aware of the potential risks associated with digital backups and take appropriate measures to protect your data.
By following these steps, you can ensure that your wallet backup is secure and accessible, giving you peace of mind knowing that you can recover your wallet and access your XRP tokens even in unexpected situations. Keep your backup up to date and review it periodically to maintain the integrity of your financial data.
With your wallet securely backed up, you can proceed to the next steps of funding your wallet and starting to use your Ripple wallet for sending, receiving, and managing your XRP tokens.
Step 6: Fund Your Wallet
Once you have set up your Ripple wallet and secured it, the next step is to fund your wallet with XRP tokens. Without XRP in your wallet, you won’t be able to engage in transactions or take advantage of the features offered by the Ripple network. Here’s how to fund your Ripple wallet:
1. Choose a Reliable Exchange: Select a reputable cryptocurrency exchange where you can purchase XRP tokens. Look for exchanges that support XRP trading and have a good reputation in terms of security and reliability.
2. Sign Up and Verify Your Account: Create an account on the chosen cryptocurrency exchange and follow the necessary verification process. This may involve providing identification documents and meeting the exchange’s compliance requirements.
3. Deposit Funds: Once your account is verified, deposit funds into your exchange account. This is typically done through bank transfers or by depositing other cryptocurrencies into your exchange wallet to exchange for XRP.
4. Purchase XRP: Using the funds in your exchange account, place an order to purchase XRP. Follow the instructions provided by the exchange to complete the purchase. You can specify the amount of XRP you want to buy and the price at which you are willing to purchase.
5. Withdraw XRP to Your Wallet: Once you have completed the purchase, withdraw the purchased XRP from the exchange to your Ripple wallet. Navigate to the withdrawal section of the exchange and provide your wallet address. Double-check the address to avoid any mistakes and confirm the withdrawal.
6. Confirm the Transaction: Depending on the exchange and network congestion, it may take some time for the XRP to be credited to your Ripple wallet. Monitor the transaction status on the exchange and confirm that the XRP tokens have been successfully transferred to your wallet.
7. Verify the XRP in Your Wallet: Open your Ripple wallet and verify that the XRP tokens are successfully reflected in your wallet’s balance. Ensure that the transaction details, including the amount and wallet address, match your expectations.
It’s important to note that exchanges may have withdrawal fees, so consider reviewing the fee structure before initiating the transaction. Additionally, always keep your wallet address secure and double-check for accuracy to avoid any loss of funds.
With your Ripple wallet funded, you can now use your XRP tokens to engage in transactions, participate in the Ripple network, and explore the various features offered by the Ripple ecosystem.
Ensure that you monitor and manage your wallet balance, and consider keeping some XRP in reserve to cover transaction fees and account for potential fluctuations in market prices.
Congratulations! Your Ripple wallet is now funded and ready for you to start utilizing the power of XRP.
Step 7: Start Using Your Ripple Wallet
With your Ripple wallet funded and ready to go, you can now begin using it to send, receive, and manage your XRP tokens. Here’s how you can start using your Ripple wallet:
1. Familiarize Yourself with the Wallet Interface: Take some time to explore your Ripple wallet’s interface. Get familiar with the different sections, such as the balances, transaction history, and settings. Understand the features and functionalities available to you.
2. Sending XRP: To send XRP from your wallet, you’ll need the recipient’s XRP address. Paste or enter the recipient’s address into the designated field in your wallet’s send section. Specify the amount of XRP you want to send, review the transaction details, and confirm the transaction.
3. Receiving XRP: To receive XRP into your wallet, share your wallet’s public address with the sender. The sender can then initiate the transfer by specifying your wallet’s address. Make sure to check your wallet to verify that the XRP has been successfully received.
4. Tracking Your Transactions: Your Ripple wallet provides a transaction history, allowing you to track all your past transactions. Review this history to monitor the flow of XRP in and out of your wallet and to keep track of your transaction activity.
5. Managing Your Balance: Keep an eye on your wallet’s balance and ensure you have enough XRP to cover any transaction fees you may incur. It’s recommended to maintain a minimum balance in your wallet to support future transactions and potential fluctuations in market prices.
6. Utilizing Additional Features: Depending on the wallet you have chosen, there may be additional features available within the wallet. For example, some wallets offer integration with exchanges, allowing you to buy or sell XRP directly from the wallet. Explore these features and see if they align with your needs.
7. Stay Informed: Stay updated with the latest news and developments in the Ripple ecosystem. Follow trusted sources to keep track of Ripple-related updates, new features, and emerging trends. Staying informed can help you make better decisions and fully utilize the potential of your Ripple wallet.
Remember to practice good security hygiene throughout your usage of the wallet. Regularly update your wallet software, be cautious of phishing attempts, and safely store your wallet recovery phrase or key.
Your Ripple wallet empowers you to take part in the Ripple network and explore the world of digital currencies. As you continue to use your wallet confidently, you’ll discover new possibilities and opportunities within the Ripple ecosystem.
Congratulations on successfully setting up and using your Ripple wallet. Enjoy the benefits of quick, efficient, and secure transactions with your XRP tokens!
Conclusion
Setting up a Ripple wallet is an essential step in securely storing and managing your XRP tokens. Whether you choose an online wallet, hardware wallet, desktop wallet, mobile wallet, or paper wallet, each option comes with its own advantages and considerations.
During the process of setting up your Ripple wallet, it’s important to research and choose a wallet that aligns with your security needs, accessibility preferences, and user experience requirements. Consider factors such as reputation, community support, and the wallet’s track record in keeping funds secure.
Securing your Ripple wallet is crucial to protect your XRP tokens. Enable two-factor authentication, use strong passwords, and be mindful of potential phishing attempts or scams. Regularly update your wallet software and keep your backup copies in secure locations.
Once your wallet is set up, funding it with XRP tokens allows you to engage in transactions and take advantage of the features offered by the Ripple network. Utilize your wallet’s sending and receiving functions, keep track of your transaction history, and manage your XRP balance effectively.
As you become more comfortable with your Ripple wallet, explore additional features and stay informed about developments in the Ripple ecosystem. Through your wallet, you have the opportunity to participate in the growth of Ripple and benefit from innovative financial products and services.
Remember, the financial landscape regarding cryptocurrencies is constantly evolving, and it’s important to stay up to date with the latest news, security practices, and technological advancements. Regularly review your wallet’s security measures and take additional precautions to safeguard your funds.
By carefully setting up and using your Ripple wallet, you can confidently navigate the world of digital assets and leverage the benefits of Ripple’s fast and efficient payment protocol. Securely store your XRP tokens, track your transactions, and enjoy the convenience of managing your financial assets with ease.
Now that you are equipped with the knowledge to set up and use your Ripple wallet, it’s time to take the next step and embark on your Ripple journey. Start exploring the world of XRP and make the most of your Ripple wallet’s capabilities.