What is a Ripple Paper Wallet?
A Ripple paper wallet is a secure way to store your Ripple (XRP) cryptocurrency offline. It is a physical document that contains a Ripple address and its corresponding secret key, printed on paper. Unlike online wallets or exchanges, a paper wallet is not connected to the internet, making it immune to hacking attempts or online vulnerabilities.
The concept of a paper wallet is similar to storing cash in a physical wallet. Just like you can keep your money safe in a wallet that you hold, a Ripple paper wallet allows you to have complete control over your digital assets by having physical possession of the wallet. This makes it an appealing choice for those who prioritize security and want to keep their Ripple holdings safe from potential cyber threats.
The paper wallet includes a Ripple address, which is a unique identifier similar to a bank account number, and a secret key, which is a password required to access and manage the funds associated with that address. The secret key is usually encrypted or hidden on the paper to prevent unauthorized access. It is important to keep the paper wallet in a secure place, such as a locked drawer or a safe, to avoid the risk of loss, theft, or damage.
A Ripple paper wallet offers several advantages, including:
- Security: Since a paper wallet is offline, it is not susceptible to online attacks or vulnerabilities. This significantly reduces the risk of unauthorized access and theft of your Ripple funds.
- Private Key Control: With a paper wallet, you have sole control over your private key, ensuring that no third-party has access to your funds.
- Offline Storage: Storing your Ripple offline provides an extra layer of protection against potential malware or hacking attempts.
- Backup Option: A paper wallet can serve as a secure backup for your Ripple holdings. In case your digital wallet or device gets lost or becomes unusable, you can still access your funds using the paper wallet.
- Easy to Generate: Creating a Ripple paper wallet is a straightforward process that can be done using various online services or offline tools.
In the next sections, we will guide you through the process of creating and using a Ripple paper wallet to ensure the safe storage of your XRP.
Why Use a Paper Wallet for Ripple?
Using a paper wallet for Ripple offers several advantages over other storage methods. Let’s explore why you might consider using a paper wallet for your Ripple (XRP) cryptocurrency:
- Enhanced Security: One of the primary reasons to use a paper wallet is the enhanced security it provides. Since the wallet’s private key is stored offline, it is immune to online hacking attempts and malware attacks. This significantly reduces the risk of your funds being stolen or compromised.
- Complete Control: With a paper wallet, you have complete control over your Ripple funds. You are not dependent on any third-party service or platform to access or manage your assets. This puts you in charge of your cryptocurrency and ensures that no one else has access to your private key.
- No Dependance on Technology: Unlike digital wallets that rely on devices and internet connectivity, a paper wallet does not depend on any technology. This makes it a reliable storage option, even in circumstances where there is no access to electronic devices or an internet connection.
- Protection from Online Risks: Online wallets and exchanges are vulnerable to hacking, phishing, and other cyber threats. By using a paper wallet, you can protect your Ripple funds from these risks, as it is not connected to the internet and cannot be accessed remotely.
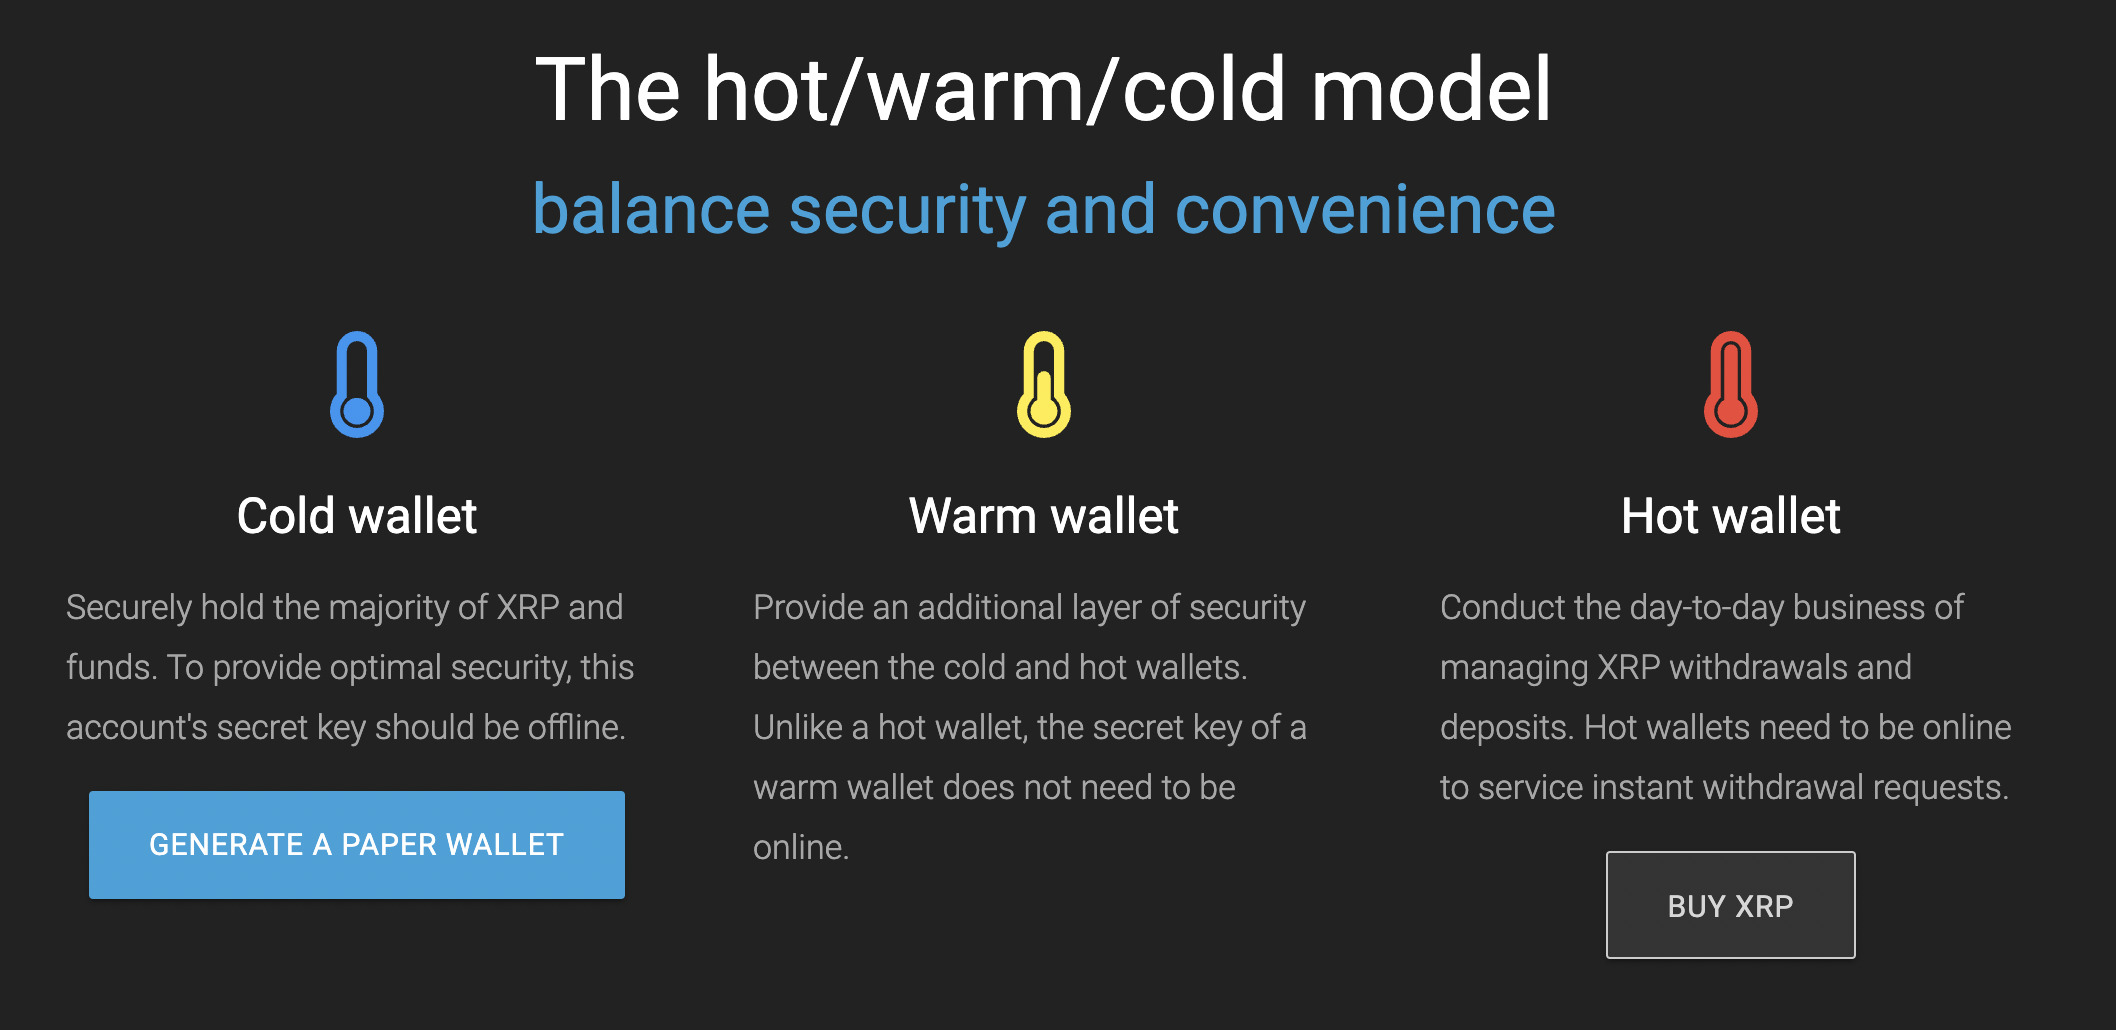
- Cold Storage Solution: Paper wallets are often referred to as “cold storage” because they keep your cryptocurrency offline. By storing your Ripple in a paper wallet, you minimize the risk of your funds being exposed to potential online vulnerabilities.
- No Registration or KYC: Many exchanges and online wallets require registration and Know Your Customer (KYC) procedures before allowing you to store or transact with Ripple. By using a paper wallet, you can bypass these processes, ensuring privacy and anonymity for your transactions.
While a paper wallet provides significant security advantages, it’s important to consider some potential drawbacks as well. One such drawback is the physical vulnerability of the paper itself. If the paper gets damaged, lost, or stolen, you may lose access to your funds. Therefore, it’s crucial to take necessary precautions and store your paper wallet in a secure location.
Now that you understand the benefits of using a paper wallet for Ripple, it’s time to learn how to create and utilize one effectively. In the following sections, we’ll guide you through the step-by-step process of creating a Ripple paper wallet and ensuring the safe storage of your XRP.
Preparing to Create a Ripple Paper Wallet
Before you create a Ripple paper wallet, there are a few key preparations you should make to ensure the process goes smoothly. Follow these steps to get ready:
- Ensure Security: It’s essential to create your paper wallet on a secure and trusted device. Make sure that your computer or smartphone is free from any malware or viruses that could compromise the security of your wallet.
- Choose a Reliable Website or Tool: Select a reputable website or tool to generate your paper wallet. Be cautious of phishing sites or untrusted sources that may compromise your funds. It’s recommended to use well-known and widely used platforms for creating Ripple paper wallets.
- Set Up a Secure Environment: Find a private and secure location where you can perform the wallet creation process. Avoid using public Wi-Fi networks or shared computers that may expose your private key to potential threats.
- Consider Security Measures: If you are concerned about physical theft or damage to your paper wallet, you may want to consider additional security measures. This can include using tamper-evident bags, laminating the paper wallet, or storing it in a waterproof and fireproof container.
- Allocate the Desired Amount of XRP: Decide how much Ripple (XRP) you want to store in your paper wallet. It’s important to transfer only the amount you are comfortable with, as accessing the funds in a paper wallet can be a more time-consuming process compared to an online or software wallet.
- Double-Check Addresses: When transferring XRP to your paper wallet, ensure that you carefully verify the Ripple address to avoid any mistakes. Sending funds to the wrong address could result in permanent loss of your cryptocurrency.
By taking these preparatory steps, you can ensure a smooth and secure process when creating your Ripple paper wallet. Once you have completed these preparations, you are ready to proceed to the next step: generating a Ripple address and secret key.
Creating a Ripple Paper Wallet Step 1: Generate a Ripple Address and Secret Key
The first step in creating a Ripple paper wallet is to generate a unique Ripple address and its corresponding secret key. This process can be done using various online tools or offline methods. Follow these steps:
- Choose a Trustworthy Website: Select a reliable website or tool that offers Ripple paper wallet generation. Make sure the website is secure and has positive user reviews to ensure the safety of your funds.
- Access the Ripple Paper Wallet Generator: Visit the chosen website and locate the option to create a new paper wallet. This feature could be found under headings such as “Generate Wallet,” “Create New Wallet,” or similar.
- Generate a Ripple Address and Secret Key: Click on the generate button to create a new Ripple address and its corresponding secret key. The website will use cryptographic algorithms to create a unique pair of keys for you.
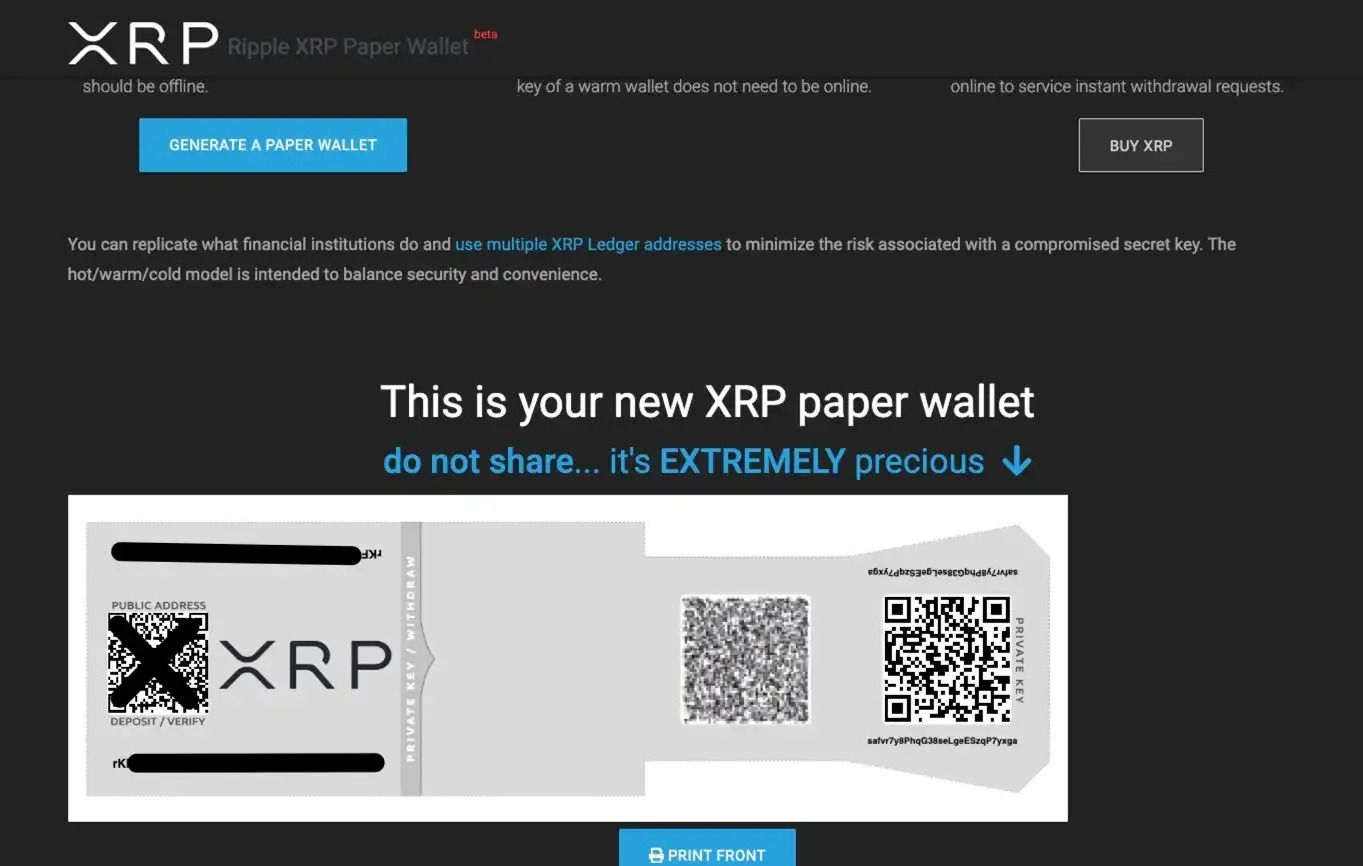
- Record the Ripple Address and Secret Key: Once the address and secret key are generated, write them down on a piece of paper or print them out. Be sure to record them accurately and avoid any typos or mistakes.
- Ensure Privacy: Make sure no one else has access to your generated keys, as anyone with the secret key would be able to access your funds. It is recommended to perform this step in a private and secure environment.
It’s important to note that the Ripple address serves as a public identifier, similar to a bank account number, while the secret key is a password-like code that grants access to the funds associated with that address. Treat your secret key with the utmost confidentiality and never share it with anyone.
Generating a Ripple address and secret key is a crucial step in creating your paper wallet. Once you have completed this step, you can proceed to the next phase: printing the paper wallet template.
Creating a Ripple Paper Wallet Step 2: Print the Paper Wallet Template
After generating a Ripple address and secret key, the next step in creating a Ripple paper wallet is to print the paper wallet template. This template will display your Ripple address and provide a space to securely store your secret key. Follow these steps:
- Choose a Printable Paper Wallet Template: Look for a printable paper wallet template that suits your preferences and needs. Several websites offer pre-designed templates that are specifically tailored for Ripple paper wallets.
- Access the Paper Wallet Template: Visit the chosen website and locate the option to download or access the paper wallet template. Make sure the website is trustworthy and secure to prevent any potential compromise of your secret key.
- Print the Paper Wallet Template: Once you have downloaded or accessed the paper wallet template, click on the print option to print it out. Ensure that your printer is in good working condition and that you have enough paper to complete the printing process.
- Print Multiple Copies (Optional): It’s recommended to print multiple copies of your paper wallet template as a backup. In case one copy gets lost or damaged, you can use the spare copy to access your Ripple funds. Store these copies in separate secure locations.
- Consider Security Measures: To enhance the security of your paper wallet, you may want to consider additional measures like using a printer that is not connected to the internet or disabling its wireless capabilities temporarily during the printing process. This reduces the chance of your secret key being intercepted by malicious actors.
- Write Down Additional Information: Alongside printing the paper wallet template, it’s advisable to write down any extra information relevant to your Ripple wallet. This could include the date of creation, the purpose of the wallet, or any personalized notes that may assist you in managing your Ripple holdings.
By printing the paper wallet template, you create a physical representation of your Ripple wallet. This step helps to ensure the security of your funds by keeping your private key offline and protected from potential online threats.
Once you have successfully printed your paper wallet template, you can proceed to the next phase: transferring XRP to your paper wallet.
Creating a Ripple Paper Wallet Step 3: Transfer XRP to the Paper Wallet
Now that you have generated a Ripple address, obtained the secret key, and printed the paper wallet template, it’s time to transfer your Ripple (XRP) cryptocurrency to the paper wallet. Follow these steps to securely move your XRP funds:
- Choose a Ripple Wallet or Exchange: Select a reputable Ripple wallet or exchange platform that allows you to send and receive XRP. Make sure the platform supports the option to send funds to an external wallet.
- Access Your Ripple Wallet or Exchange Account: Log in to your Ripple wallet or exchange account using your credentials. Navigate to the send or withdrawal section of the platform.
- Enter Your Paper Wallet Address: In the recipient or withdrawal address field, enter the Ripple address that you generated earlier. Double-check the address to ensure accuracy, as any mistakes could result in the funds being irretrievable.
- Specify the Amount to Transfer: Enter the amount of XRP that you want to transfer from your wallet or exchange account to the paper wallet. Ensure that you have sufficient funds and consider any applicable transaction fees.
- Confirm the Transaction: Review all the details of the transaction, including the recipient address and the amount being transferred. Once you are certain that everything is accurate, confirm the transaction to initiate the transfer process.
- Wait for Confirmation: Depending on the Ripple network congestion and the platform you are using, it may take some time for the transaction to be confirmed. Monitor your wallet or exchange account for updates on the transaction status.
- Verify Transaction Success: Once the transfer is confirmed, check the recipient address in your paper wallet to ensure that the XRP has been successfully deposited. You can use a Ripple block explorer to track the status of the transaction.
It’s important to note that transferring XRP from an exchange may require additional steps, such as authorizing the withdrawal via email or two-factor authentication. Be sure to follow the specific procedures provided by your exchange platform to successfully complete the transfer.
By transferring your Ripple to the paper wallet, you are ensuring that your XRP is stored securely in an offline environment, safeguarded from potential online threats or hacking attempts.
Now that you have successfully transferred XRP to your paper wallet, it’s crucial to learn how to store and utilize the paper wallet effectively. We will cover those aspects in the next section.
Storing and Using Your Ripple Paper Wallet
Once you have created a Ripple paper wallet and transferred your XRP funds to it, it’s essential to properly store and effectively utilize the paper wallet. Follow these guidelines to ensure the security and ease of use of your Ripple paper wallet:
- Secure Storage: Store your paper wallet in a secure location that is protected from physical risks such as theft, damage, or fire. Consider using a safe, lockbox, or other secure storage options where you have complete control over access.
- Backup and Redundancy: Make multiple copies of your paper wallet and store them in separate secure locations. This provides redundancy in case one copy gets lost or damaged. Remember to keep these copies in safe and confidential places.
- Avoid Digital Scanning: To maintain the security of your paper wallet, avoid scanning or digitizing it. Digitized versions can be susceptible to online hacking and unauthorized access. Keep your paper wallet strictly physical to minimize risks.
- Do Not Share Your Secret Key: Never share your secret key with anyone. Your secret key is like the password to your funds, and sharing it can lead to unauthorized access and potential loss of your XRP holdings. Keep your secret key private and secure.
- Be Mindful of Physical Threats: Protect your paper wallet from physical threats such as water, fire, and chemicals. Consider laminating the paper wallet or storing it in a waterproof and fireproof container for added protection.
- Offline Transactions: To make transactions or access your XRP funds, you will need to import the paper wallet into a digital wallet or use an offline tool. Follow secure procedures and use trusted software to import your paper wallet for transactions.
- Regularly Check Your Balance: It’s important to periodically check the balance of your Ripple paper wallet to ensure that the funds are intact. Use a Ripple block explorer or a trusted wallet software to verify the balance associated with your address.
- Keep Software and Devices Updated: When using digital wallets or tools to import your paper wallet, ensure that your software and devices are up to date with the latest security patches to protect against vulnerabilities.
By following these practices, you can maintain the security and usability of your Ripple paper wallet, ensuring that your XRP funds remain safe and accessible for future use.
Remember, being in complete control of your paper wallet also means taking full responsibility for its security. Be diligent in protecting and managing your paper wallet to safeguard your cryptocurrency investment.
Conclusion
Creating a Ripple paper wallet is a secure way to store your XRP cryptocurrency offline. It offers enhanced security, complete control over your funds, and protection from online risks. By following the step-by-step process outlined in this guide, you can create your own Ripple paper wallet and keep your XRP holdings safe.
Start by generating a unique Ripple address and its corresponding secret key using a trustworthy website or tool. Ensure that you record these details accurately and keep them private. Next, print the paper wallet template that displays your Ripple address and provides a space to securely store your secret key. Take precautions to print multiple copies and consider additional security measures to protect your paper wallet.
Afterward, transfer your XRP funds to the paper wallet by using a reliable Ripple wallet or exchange platform. Enter your paper wallet address and specify the amount to transfer. Confirm the transaction and monitor its progress until it is successfully completed. Verify the transaction’s success by checking the balance in your paper wallet using a Ripple block explorer.
Once your XRP is safely stored in the paper wallet, it’s crucial to store and use it effectively. Keep your paper wallet in a secure location, make backup copies, and avoid digitizing it. Be mindful of physical threats and avoid sharing your secret key with anyone.
In summary, creating and utilizing a Ripple paper wallet provides you with the peace of mind of offline storage and complete control over your digital assets. By following the recommended steps and best practices, you can ensure the security and accessibility of your XRP funds.
Remember, the world of cryptocurrency can be complex, and it’s important to stay informed and updated on the latest security practices. Always exercise caution and perform thorough research before engaging in any cryptocurrency-related activities.