Introduction
Welcome to our guide on how to buy Ripple in USD! If you’re interested in cryptocurrencies, you’ve probably heard of Ripple. As one of the top digital assets, Ripple (XRP) has gained significant popularity and attention in the crypto market.
Ripple is not only a cryptocurrency but also a payment protocol designed to facilitate fast, low-cost international transactions. Ripple’s native currency, XRP, plays a crucial role in powering transactions within the Ripple network. While Bitcoin is focused on being a decentralized digital currency, Ripple aims to revolutionize the traditional banking system by offering efficient cross-border transactions.
Before we dive into the process of buying Ripple in USD, it’s important to understand the basics of cryptocurrency exchanges. Exchanges are online platforms where you can buy, sell, and trade cryptocurrencies. They act as intermediaries, allowing users to convert their fiat currencies, such as USD, into digital assets like Ripple.
In this guide, we will walk you through the process of buying Ripple with USD. Whether you’re a beginner or have some experience in cryptocurrency trading, we will cover all the necessary steps to help you navigate the process smoothly.
Keep in mind that the steps outlined in this guide may vary slightly depending on the exchange you choose. It’s always important to do your own research and follow the guidelines and instructions provided by the specific exchange you decide to use.
Now, let’s get started and learn how to buy Ripple in USD!
What is Ripple?
Ripple is a digital payment protocol and cryptocurrency that was created in 2012 with the aim of revolutionizing cross-border transactions. Unlike other cryptocurrencies such as Bitcoin and Ethereum, Ripple is not just a decentralized digital currency, but also a technology that enables fast, secure, and low-cost money transfers.
The Ripple payment protocol is built upon a distributed ledger technology called the XRP Ledger. This ledger serves as a reliable and transparent source of transaction history, enabling participants to verify and settle transactions quickly and efficiently. The native cryptocurrency of the Ripple network is known as XRP.
One of the key features of Ripple is its focus on facilitating global payments. Traditional cross-border transactions can be slow and expensive, involving multiple intermediaries and high fees. Ripple aims to address these issues by providing a seamless platform for financial institutions and individuals to send and receive money all around the world.
Ripple’s network consists of financial institutions, banks, and payment providers that leverage the protocol to facilitate international remittances. The Ripple network enables these entities to transfer various currencies, including fiat currencies like USD, EUR, and JPY, as well as cryptocurrencies like Bitcoin, Ethereum, and XRP.
One of the unique aspects of Ripple is its consensus algorithm, which allows for fast and efficient validation of transactions. Unlike the proof-of-work (PoW) algorithm used by Bitcoin, Ripple uses a consensus protocol called the Ripple Protocol Consensus Algorithm (RPCA). This consensus mechanism enables quick confirmation of transactions, making Ripple one of the fastest and most scalable blockchain technologies.
Overall, Ripple aims to bridge the gap between the traditional financial system and the world of cryptocurrencies. By providing a reliable and efficient platform for cross-border payments, Ripple has gained significant traction in the financial industry and has established partnerships with major banks and payment providers worldwide.
Now that you have a better understanding of what Ripple is, let’s explore how you can convert USD to Ripple and become a part of this innovative payment ecosystem.
Understanding USD to Ripple Conversion
Before you can buy Ripple with USD, it’s essential to understand how the conversion process works. Converting USD to Ripple involves a few key steps that we’ll outline in this section.
First, it’s important to note that the conversion process takes place on a cryptocurrency exchange platform. These platforms act as intermediaries that facilitate the buying and selling of cryptocurrencies. There are several exchanges to choose from, each with its own set of features, fees, and user experience.
When converting USD to Ripple, the exchange rate plays a crucial role. The exchange rate represents the value of XRP in relation to USD. This rate can fluctuate based on market conditions, supply and demand, and other factors. It’s important to keep an eye on the exchange rate to ensure you’re getting the best value for your USD when buying Ripple.
Once you’ve chosen an exchange platform, you’ll need to create an account. This typically involves providing your personal information and completing a verification process to comply with regulatory requirements. Some exchanges may have different verification levels, each with its own deposit and withdrawal limits. Make sure to follow the instructions provided by the exchange and complete the verification process.
After your account is verified, the next step is to deposit funds into your exchange account. Most exchanges support various payment methods, including bank transfers, credit/debit cards, and sometimes even digital wallets like PayPal. Select the most convenient method for you and follow the instructions provided by the exchange to deposit USD into your account.
Once you have funds in your account, you’ll need to find the XRP/USD trading pair. This trading pair represents the exchange rate between XRP and USD and allows you to buy Ripple with your USD. Navigate to the trading section of the exchange and search for the XRP/USD pair. Depending on the exchange, you may have additional options such as XRP/BTC or XRP/ETH, which represent Ripple’s value in other cryptocurrencies.
Now that you’ve found the XRP/USD trading pair, you’re ready to place a buy order. This is where you specify the quantity of Ripple you want to purchase and at what price. You can either place a market order, which buys Ripple at the current market price, or a limit order, which allows you to set a specific price at which you want to buy. It’s important to note that the market can be volatile, so it’s essential to consider your risk tolerance and do your own research before placing a buy order.
After placing your buy order, you’ll have the opportunity to review and confirm your purchase. Double-check all the details and ensure that you’re comfortable with the amount and price before proceeding. Once you confirm the transaction, the exchange will execute your order and you will become the proud owner of Ripple.
Finally, it’s crucial to store your Ripple in a secure wallet. While exchange wallets can be convenient, they are also susceptible to hacks and other security breaches. Consider using a hardware wallet or a reputable software wallet to store your Ripple safely.
Now that you have a clear understanding of the conversion process, let’s dive into the step-by-step guide on how to buy Ripple in USD.
Step 1: Open an Account on an Exchange
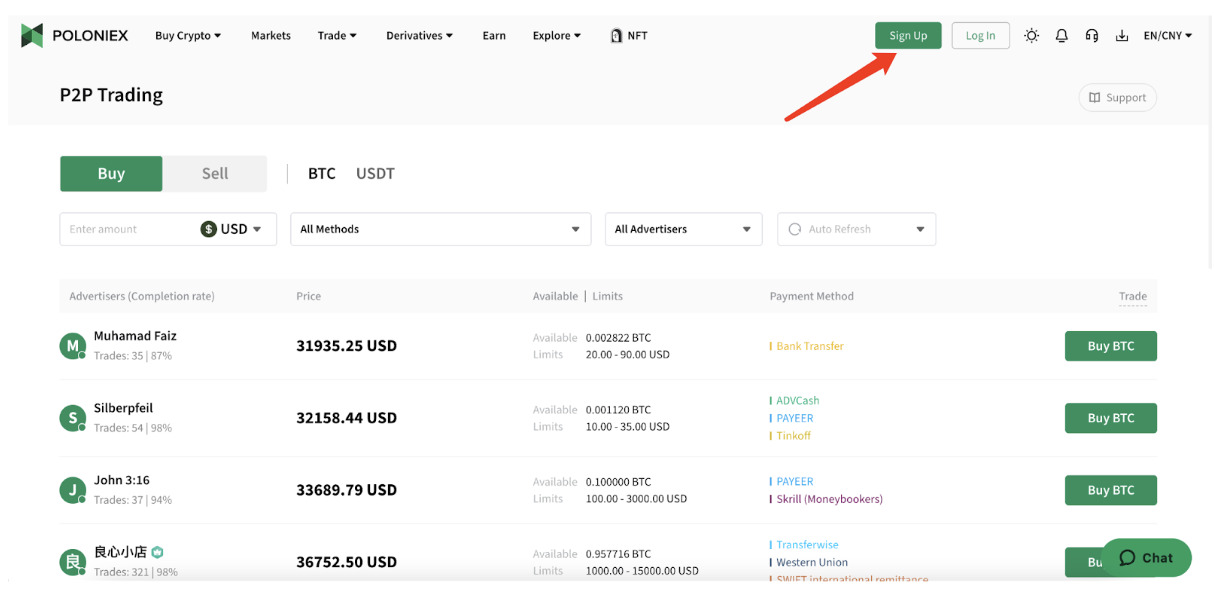
The first step in buying Ripple with USD is to open an account on a cryptocurrency exchange. There are several reputable exchanges to choose from, each with its own features, fees, and user experience. Here’s a step-by-step guide on how to open an account:
- Research and choose a reliable cryptocurrency exchange that supports USD to Ripple trading. Some popular exchanges that offer this trading pair include Coinbase, Binance, Kraken, and Bitstamp. Visit the exchange’s website to get started.
- Click on the “Sign Up” or “Create Account” button to start the registration process. You’ll typically be asked to provide an email address and create a secure password. Make sure to choose a strong password that includes a combination of uppercase and lowercase letters, numbers, and special characters.
- After entering your email and creating a password, you may be required to complete a verification process. This process usually involves providing your personal information, such as your full name, date of birth, and sometimes your address. The exchange needs this information to comply with regulatory requirements.
- Once you’ve submitted your personal information, you may be asked to verify your email address. Check your inbox for a verification email from the exchange and click on the link provided to verify your email.
- After verifying your email, you may need to enable two-factor authentication (2FA) for added security. This typically involves setting up an authenticator app, such as Google Authenticator or Authy, and linking it to your exchange account. 2FA adds an extra layer of protection by requiring a unique code generated by the app to access your account.
- Once you’ve completed the registration process, you should now have access to your exchange account. Take some time to navigate through the user interface and familiarize yourself with the features and functionalities of the exchange.
Opening an account on a cryptocurrency exchange is a straightforward process, but it’s important to choose a reputable exchange and follow the instructions carefully. Keep in mind that some exchanges may require additional verification steps, such as providing identification documents, for higher account limits and enhanced security.
Now that you have successfully created an account on the exchange, you’re ready to move on to the next step: completing the verification process.
Step 2: Complete the Verification Process
After opening an account on a cryptocurrency exchange, the next step in buying Ripple with USD is to complete the verification process. This process is crucial for ensuring the security and compliance of the exchange. Here’s a step-by-step guide on how to complete the verification process:
- Login to your exchange account using your email address and password. If you have enabled two-factor authentication (2FA), you will also need to provide the unique code generated by your authenticator app.
- Navigate to the account settings or profile section of the exchange. Look for an option that allows you to complete the verification process. This may be labeled as “Verification,” “Account Verification,” or something similar.
- Depending on the exchange, you may be required to provide various forms of identification and personal information. This can include uploading scanned copies or photos of your government-issued ID (such as a passport or driver’s license), proof of address, and in some cases, a selfie or photo of yourself holding your ID. Make sure to follow the specific instructions provided by the exchange carefully.
- When submitting your identification documents, ensure that they are clear, legible, and meet the exchange’s requirements. Some exchanges may require specific formats (such as JPEG or PDF) or specific file sizes.
- After submitting the required documents, the exchange will typically review your information within a few hours or days. It’s important to note that the verification process may take longer during periods of high demand or if additional documentation is requested.
- Once your account is successfully verified, you will receive a notification or email confirming the completion of the verification process. This allows you to access additional features and funding options on the exchange.
Completing the verification process is essential for most exchanges as it helps prevent fraud, money laundering, and other illicit activities. It also ensures regulatory compliance by the exchange and helps protect the security of your funds.
Keep in mind that each exchange may have different verification levels or tiers, each with its own deposit and withdrawal limits. Higher verification levels may require additional documentation and could provide increased account limits or access to advanced trading features.
Now that you have successfully completed the verification process, you’re ready to proceed to the next step: depositing funds into your exchange account.
Step 3: Deposit Funds into Your Account
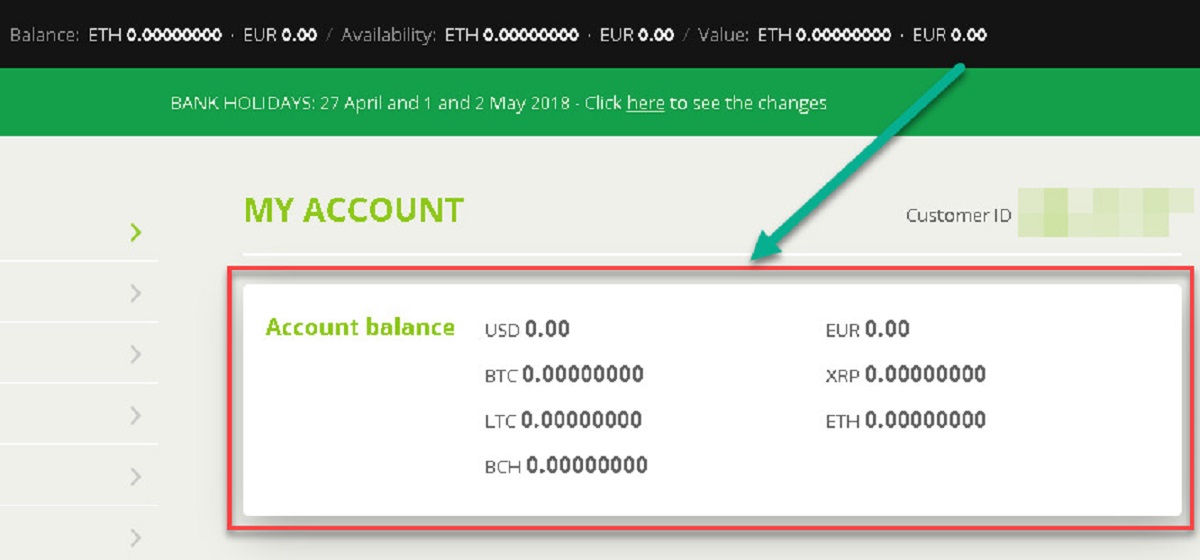
After completing the verification process on a cryptocurrency exchange, the next step in buying Ripple with USD is to deposit funds into your exchange account. This will allow you to have a balance of USD ready to be used for purchasing Ripple. Here’s a step-by-step guide on how to deposit funds:
- Login to your exchange account using your registered email address and password. If you have enabled two-factor authentication (2FA), provide the unique code generated by your authenticator app when prompted.
- Navigate to the deposit section of the exchange. This section is usually found in the account settings or funds management area. Look for an option that allows you to deposit USD or fiat currency.
- Select the deposit method that suits you best. Cryptocurrency exchanges typically offer several payment options, including bank transfers and credit/debit card payments. Choose the method that is convenient for you. Keep in mind that different payment methods may have different processing times and fees associated with them.
- Follow the instructions provided by the exchange to complete the deposit. This may involve entering your bank account details or card information, depending on the chosen deposit method. Make sure to double-check the information you provide to avoid any errors.
- After submitting the required information, initiate the deposit process. Depending on the payment method and the exchange, it may take some time for the funds to be credited to your account. Bank transfers, for example, can take a few business days to complete.
- Monitor your account balance on the exchange to ensure that the funds have been successfully deposited. The exchange should provide a confirmation or notification once the funds are available in your account.
It’s important to note that some exchanges may charge fees for depositing funds, especially for certain payment methods. These fees can vary, so be sure to check the fee schedule provided by the exchange.
Keep in mind that different exchanges have different deposit minimums and maximums, as well as varying processing times for different payment methods. Be sure to familiarize yourself with the specific policies and requirements of the exchange you are using.
Now that you have successfully deposited funds into your exchange account, you’re ready to move on to the next step: finding the XRP/USD trading pair to buy Ripple.
Step 4: Find the XRP/USD Trading Pair
Once you have deposited funds into your cryptocurrency exchange account, the next step in buying Ripple with USD is to find the XRP/USD trading pair. This trading pair represents the exchange rate between Ripple (XRP) and USD, allowing you to buy Ripple using your USD balance. Here’s how to find the XRP/USD trading pair:
- Login to your exchange account using your registered email address and password. If prompted, provide the unique code generated by your two-factor authentication (2FA) app.
- Locate the trading section or markets section of the exchange. This could be labeled as “Markets,” “Exchange,” or something similar, depending on the exchange’s user interface.
- Within the trading section, look for the available trading pairs. Cryptocurrency exchanges typically support a wide range of trading pairs, including those with fiat currencies like USD and cryptocurrencies like Bitcoin and Ethereum.
- Search for the XRP/USD trading pair. Some exchanges may provide a search bar to quickly find your desired trading pair. Alternatively, you can manually explore the list of available trading pairs until you locate XRP/USD.
- Once you find the XRP/USD trading pair, click on it to access the trading interface. Here, you will be able to see the current market price of Ripple in USD, as well as other relevant information such as the trading volume and price charts.
It’s important to note that different exchanges may offer different trading pairs and trading interfaces. Some exchanges may also provide additional trading pairs, such as XRP/BTC or XRP/ETH, which represent the value of Ripple in other cryptocurrencies.
Additionally, the trading interface may provide multiple options for executing trades, such as market orders and limit orders. Familiarize yourself with the available options and choose the one that suits your trading strategy and preferences.
Now that you have found the XRP/USD trading pair, you’re ready to proceed to the next step: placing a buy order for Ripple.
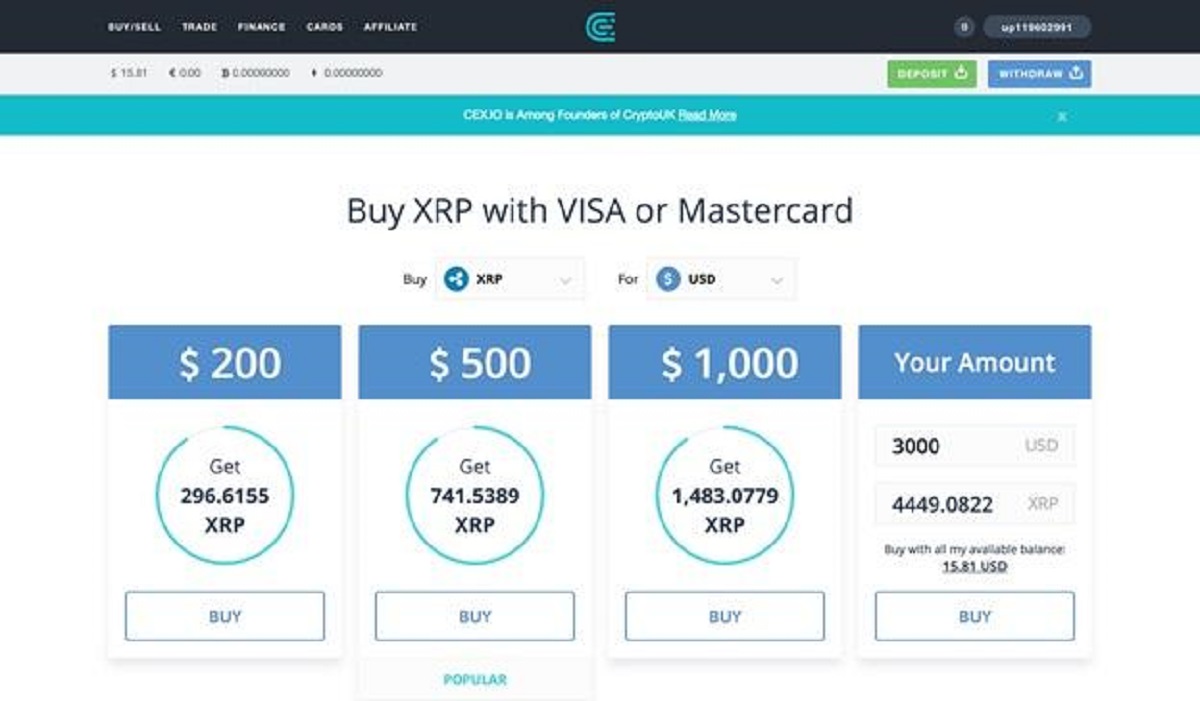
Step 5: Place a Buy Order
After finding the XRP/USD trading pair on your chosen cryptocurrency exchange, the next step in buying Ripple with USD is to place a buy order. Placing a buy order allows you to specify the quantity of Ripple you wish to purchase and at what price. Here’s how to place a buy order:
- Login to your exchange account using your registered email address and password. If prompted, provide the unique code generated by your two-factor authentication (2FA) app.
- Navigate to the trading interface or the trading section of the exchange where you found the XRP/USD trading pair.
- Under the XRP/USD trading pair, you will see the available options for placing a buy order. Depending on the exchange, you may have the choice of a market order or a limit order.
- If you choose a market order, you are requesting to buy Ripple at the current market price. The exchange will execute the order as soon as a seller is willing to sell their Ripple at the prevailing market price. Enter the quantity of Ripple you want to buy, and the total cost will be calculated automatically based on the current market price.
- If you choose a limit order, you can set a specific price at which you want to buy Ripple. This allows you to wait for the market to reach your desired price before executing the order. Enter the quantity of Ripple you want to buy and set the price at which you want to buy it.
- Review your order details, including the quantity of Ripple and the total cost. Double-check that all the information is correct before proceeding to the next step.
- Click on the “Buy” or “Place Order” button to submit your buy order. The exchange will process your order and attempt to execute it according to your specified parameters.
It’s important to note that placing a buy order does not guarantee immediate execution, especially for limit orders. The order will remain open until it is matched with a corresponding sell order that meets the specified price and quantity.
Be aware that market conditions can change quickly, and the price of Ripple can fluctuate significantly. Take this into consideration when choosing the type of buy order and setting the price for your purchase.
Once your buy order is executed, you will become the owner of the purchased Ripple. The amount of Ripple you bought will be reflected in your exchange account’s balance.
Now that you have successfully placed a buy order for Ripple, it’s time to review and confirm your purchase in the next step.
Step 6: Review and Confirm Your Purchase
After placing a buy order for Ripple with USD on a cryptocurrency exchange, the next step is to review and confirm your purchase. This step is crucial for ensuring that all the details of your transaction are accurate before finalizing the purchase. Here’s how to review and confirm your Ripple purchase:
- Login to your exchange account using your registered email address and password. If prompted, provide the unique code generated by your two-factor authentication (2FA) app.
- Navigate to the section of the exchange where you can view your active orders or order history. This section could be labeled as “Open Orders,” “Order History,” or something similar.
- Locate your buy order for Ripple in the list of active orders or order history. Click on the order to view its details, including the amount of Ripple purchased, the total cost in USD, and any applicable fees.
- Thoroughly review the order details to ensure that they match your intended purchase. Check the quantity of Ripple, the cost in USD, and any other relevant information provided by the exchange.
- Verify the total cost of the purchase, including any fees associated with the transaction. Understand and take note of the fees charged by the exchange, as they may vary depending on the exchange and the type of transaction executed.
- Confirm that you have sufficient funds available in your exchange account to cover the cost of the Ripple purchase, including any fees. Make sure you have enough USD balance in your account.
- Double-check all the information and ensure that it aligns with your intended purchase. Verify that the quantity of Ripple, the cost, and any fees specified in the order are accurate.
- If everything appears correct, click on the “Confirm” or “Submit” button to finalize your purchase. This confirms your buy order and completes the transaction.
It’s important to take the time to review and confirm your purchase to avoid any mistakes or discrepancies. Making sure that your transaction details are accurate and align with your intentions can help prevent any issues in the future.
Once you have reviewed and confirmed your purchase, the exchange will execute your order. This may involve matching your buy order with a corresponding sell order on the exchange. The Ripple you purchased will be credited to your exchange account’s balance.
Now that you have completed the review and confirmation process, the final step is to securely store your Ripple.
Step 7: Securely Store Your Ripple
After purchasing Ripple with USD on a cryptocurrency exchange, it’s essential to securely store your Ripple to ensure the safety of your investment. Storing your Ripple properly helps protect it from theft, loss, or other security risks. Here’s how to securely store your Ripple:
- Consider using a hardware wallet: One of the most secure ways to store your Ripple is by using a hardware wallet. A hardware wallet is a physical device that stores your private keys offline, providing an extra layer of security. Popular hardware wallet options for Ripple include Ledger and Trezor. Follow the instructions provided by the hardware wallet manufacturer to set up and initialize your device.
- Create a Ripple wallet address: If you prefer a software wallet, you can use a reliable Ripple wallet to generate a wallet address. Some popular Ripple wallet options include the official Ripple wallet (XUMM), Exodus, and Edge. Create a new wallet and follow the instructions to generate a unique wallet address.
- Backup your wallet: Regardless of the type of wallet you choose, it’s crucial to create a backup of your wallet’s recovery phrase or private keys. This backup allows you to restore access to your Ripple in case your wallet is lost, stolen, or becomes inaccessible. Store this backup in a secure location, such as a password-protected USB drive or a hardware wallet’s recovery card.
- Encrypt your software wallet: If you opt for a software wallet, make sure to encrypt it with a strong password. Encrypting your wallet adds an extra layer of protection, making it more difficult for unauthorized access to your Ripple.
- Be cautious of phishing attempts: Always be vigilant of phishing attempts that can compromise your wallet’s security. Be cautious of suspicious emails, messages, and websites that attempt to trick you into revealing your wallet’s private keys or recovery phrase. Only access your wallet through trusted sources and verify the authenticity of any communication related to your wallet.
- Regularly update your wallet software: Keep your wallet software up-to-date by installing the latest updates and security patches. Wallet providers often release updates to address vulnerabilities and enhance security measures. Stay informed about any updates from your chosen wallet provider and promptly apply them.
By securely storing your Ripple, you reduce the risk of losing your investment to theft or unauthorized access. Taking the necessary precautions to protect your Ripple wallet and maintaining good security practices will provide you with peace of mind as you navigate the world of cryptocurrency.
Congratulations! You have successfully completed the process of buying Ripple with USD and ensuring its secure storage. Now you can monitor the performance of your Ripple investment and take advantage of the opportunities that the market offers.
Conclusion
Congratulations! You have reached the end of our guide on how to buy Ripple in USD. By following the step-by-step process outlined in this guide, you now have the knowledge and tools to purchase Ripple and join the world of cryptocurrency investing.
Ripple is a unique cryptocurrency that aims to revolutionize cross-border transactions. Its payment protocol and native digital asset, XRP, offer fast and cost-effective solutions in the global financial landscape.
Throughout this guide, we explored the importance of choosing a reliable cryptocurrency exchange, completing the verification process, depositing funds into your account, finding the XRP/USD trading pair, placing a buy order, reviewing and confirming your purchase, and securely storing your Ripple.
Remember to conduct thorough research and analysis before making investment decisions. Keep an eye on market trends, news, and developments related to Ripple and the broader cryptocurrency industry.
Additionally, always prioritize the security of your Ripple investment. Utilize hardware wallets, software wallets with strong encryption, and take precautions against phishing attempts and unauthorized access.
It’s important to note that cryptocurrency markets can be volatile, and prices can fluctuate rapidly. Always exercise caution and make informed decisions based on your risk tolerance and financial goals.
We hope this guide has provided you with valuable insights and actionable steps to buy Ripple with USD. As technology continues to evolve, cryptocurrencies like Ripple have the potential to disrupt traditional financial systems and offer innovative solutions for global transactions.
Remember, learning and staying informed about the world of cryptocurrencies is an ongoing process. Stay curious, continue expanding your knowledge, and explore new opportunities in this exciting and rapidly evolving space.
Best of luck on your journey into the world of Ripple and cryptocurrency investing!